What's new

Mk IV A Phoenix Terpenator

Gray Wolf

A Posse ad Esse. From Possibility to realization.
Mentor
ICMag Donor
Veteran
okie dokie have a new issue for me and an old issue for others. I found oil residues on the lines going to the cpstr21 cleaned with alcohol and q tips but im sure there is oil in my pump now. I just do not understand how this happened since yesterday we ran the water bath at 90 and still didnt pick up oil for the first clean out run. Today we ran 80 degree bath and got a little bit sucked up and i tried feathering the dump. The mkiv we have only has 5-6 inch down tubes on a 10x12 with a 2 inch shatter platter below so its basically 10x14. I remember reading the cps tr21 forum and seeing everyone extending down tubes, but what is the best way? and importantly is there any info on taking apart the tr21 and cleaning it to prevent an entire rebuild? Or should I just turn off the pump when i dump?

and beyond all of this why would terpp extractors send us a unit with only a 5-6 inch down tube? on a 10x12? makes sense for mkiii but this is an mkiv

My suggestion would be to weld on extensions or extend it using slip on Teflon or Polypropylene tubing or hose.
 
You can also change how your lid connects to the rest of your system and use Swagelok Bored Through fittings. This is an easy way to create dip and down tubes.
 

justintime420

Active member
How do I go about setting up separate column recovery? Don't want to run the chance of the column warming up during the process and darkening the end product. Just to try it I closed the dump valve after most the droplets fell (may have lost a little yield) also closed the liquid line going to the top of the column. I then warmed the column and recovered what I assume is just vapor when re opening the liquid top line. Is this the same?
 

Gray Wolf

A Posse ad Esse. From Possibility to realization.
Mentor
ICMag Donor
Veteran
How do I go about setting up separate column recovery? Don't want to run the chance of the column warming up during the process and darkening the end product. Just to try it I closed the dump valve after most the droplets fell (may have lost a little yield) also closed the liquid line going to the top of the column. I then warmed the column and recovered what I assume is just vapor when re opening the liquid top line. Is this the same?

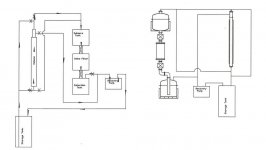
Here is the way the Mk VIII does it.
 

Attachments

  • Mk VIII 001.jpg
    Mk VIII 001.jpg
    29.5 KB · Views: 34
Last edited:

Chonkski

Member
Here is the way the Mk III does it.

Haven't tried this out yet, but I've been really looking forward to setting up this way. Just gotta get the parts..

Sad thing is, I've been saying that since jan. Anyone have experience with the Dewaxing setup?
 

A6 Grower

Member
Veteran
Once i started to regularly get potency results in the low 90s i gave up dewaxing any more as when i winterize my extracts im getting a 1/3rd of the waxes i was getting back in november when i started winterized lots of stuff. Now if someone requests it i just winterize thier stuff and everything else is ran with -10F solvent and usually comes out in the 87%to 93% total cannabinoids. im fine with that and its pretty consistent as long as the material is good. Shit still makes shit lol.
 

Gray Wolf

A Posse ad Esse. From Possibility to realization.
Mentor
ICMag Donor
Veteran
Chilling the butane prior to injection is still the most efficient way that we've found to reduce waxes. Chilling the whole tank limits how cold you can go, both from the standpoint of embrittling the carbon steel tanks below -40/50C, and from the stand point of how thick the butane becomes and how hard it is to push/pull.

We recently installed a counterflow heat exchanger on Joe's Mk IV, using N2 vapor from a liquid Dewar, with spits of liquid, which performed impressively, so we will continue to move in that direction, but focus on using a process cooler or refrigeration plant, vis a vis liquid N2 or dry ice.

The problem of course, is that as soon as you stop passing butane through the heat exchanger, the butane that is still in the heat exchanger drops even further in temperature, so presents a thick plug impeding the next flood.

WolfWurx is solving that problem by clearing the heat exchanger of coolant at the end of the flood, using a blast of compressed air.

Ostensibly, you could also clear the heat exchanger of liquid butane, using high pressure vapor from a heated tank.
 

A6 Grower

Member
Veteran
Ostensibly, you could also clear the heat exchanger of liquid butane, using high pressure vapor from a heated tank.

Thats awesome to hear the counter flow works so good! One thing i notice with my coils is if i blast hot vapor threw them the 50' is long enough and cold enough to condensed the vapor and liquid/vapor comes out the end. Maybe it would be better to clear the counter flow exchanger with nitrogen vapor?? Also i noticed when i used the appions to push air threw the coils and clear them i was probably getting condensation in the coils and VERY quickly put a lot of water in my tank.

This is just with 0f glycol too, i would imagine this issues would have been worse if i was using nitrogen to cool.
 

Gray Wolf

A Posse ad Esse. From Possibility to realization.
Mentor
ICMag Donor
Veteran
Thats awesome to hear the counter flow works so good! One thing i notice with my coils is if i blast hot vapor threw them the 50' is long enough and cold enough to condensed the vapor and liquid/vapor comes out the end. Maybe it would be better to clear the counter flow exchanger with nitrogen vapor?? Also i noticed when i used the appions to push air threw the coils and clear them i was probably getting condensation in the coils and VERY quickly put a lot of water in my tank.

This is just with 0f glycol too, i would imagine this issues would have been worse if i was using nitrogen to cool.

Nitrogen will work and as you note, would have less entrained humidity. I stuck with air because I am clearing the 50% Methanol coolant side of the counter flow, as opposed to the butane side, so it doesn't affect butane tank water content.
 

SkyHighLer

Got me a stone bad Mana
ICMag Donor
Veteran
Nitrogen will work and as you note, would have less entrained humidity. I stuck with air because I am clearing the 50% Methanol coolant side of the counter flow, as opposed to the butane side, so it doesn't affect butane tank water content.

I missed where you mentioned previously using 50% methanol with the nitrogen... I assume you're still 'dialing in the details,' but, couldn't blame WW and yourself from having some, at least temporarily, proprietary process details. :biggrin:
 

HG23

Member
GW, are you guys measuring the actual butane stream temps coming out of the cooler, or going off exterior column temps? What were the temp readings you were getting? With my SS coil chiller I'm getting the column exterior to -35 to -40C, which seems to be working well. I was going to focus on upgrading my prechiller as I agree it's the most efficient way to reduce wax pickup, but if I'm already in the right neighborhood I'll focus my upgrade dollars in a different area.
 

Gray Wolf

A Posse ad Esse. From Possibility to realization.
Mentor
ICMag Donor
Veteran
Mk IVB Operating Instructions

Mk IVB Operating Instructions

As requested, here are the Mk IVB Operating Instructions

Mk IVB Terpenator Operating Instructions

1.0 Starting up a dormant system:

1.1 Visually and tactically inspect system for:

1.1.1 Loose clamps, or clamps that are not uniformly tensioned.
1.1.1.1 Viton gasket clamp bolts are torqued to 44 inch pounds.
1.1.1.2 PTFE gasket clamp bolts are torqued to 50 inch pounds.

1.1.2 Any clamped joint misalignment suggesting potential sealing issues.

1.1.3 Loose hoses or compression fittings.

1.1.4 Loose filter drier cartridges.

1.1.5 Any staining at connections, suggesting low level leaks on previous runs.

1.2 Evacuate the system.

1.2.1 Using the attached Mk IV-B PID drawing, all valves are opened except back fill valve 9, the refrigerant tank valves 18 and 19, as well as valve 14, the vacuum pump isolation valve, and valve 25, the nitrogen valve.

1.2.2 Start high vacuum pump 8, and when running smoothly, open valve 14.

1.2.3 Evacuate the atmosphere from the system to a level of 30" (29.92") Hg on the analog gauge.

1.2.4 When 30" Hg is achieved, close the vacuum pump isolation valve 14.

1.2.5 Shut off vacuum pump.

1.2.6 Allow to soak for 5 minutes and monitor pressure using compound pressure gauge 9, to detect any rise in pressure, indicating a leak.

1.2.7 If vacuum decay is detected, remediate source of leak until vacuum levels hold steady for 5 minutes.


1.3 Inject refrigerant:

1.3.1 Start room ventilation:

1.3.2 Close butane injection valves 6 and 13.

1.3.3 Open tank valves 18 and 19.

1.3.4 Open valve 6 for 10 seconds and then close.


1.4 Inspect for leaks:

1.4.1 Using a portable Hydrocarbon Detector, inspect for leaks at all Triclamp connections.

1.4.2 Check all hose connections, especially valves 4, 6, 18, 19, and 24.

1.4.3 Inspect for leaks at valves 4, 6, 11, 13, 14, 15, 17, 18, and 19, both at the NPT fitting, and at the valve stem.

1.4.4 Check for leaks in the column head assembly threaded joints at 3, 4, 5, and 6.

1.4.5 Remediate any leaks and retest until leak free.

1.5 Recover refrigerant:

1.5.1 Start pneumatic recovery pump 2, by opening valve 1.

1.5.2 Recover to -22" Hg.

1.5.3 Close valve 11.

1.5.4 Turn off recovery pump 2, by closing valve 1 and 11.

1.5.3 Inject nitrogen until zero pressure gauge is reached using valve .

1.5.4 Start vacuum pump.

1.5.5 Open valve 14 once vacuum pump has smoothed out.

1.5.6 Evacuate to -29.9" Hg.


2.0 Operating the Mk IVB Terpenator


2.1 Load the prepared material into the column:

2.1.1 Remove the column from the Mk IVB using a 5/8" wrench to remove the 2 clamp bolts.

2.1.2 Inspect the column and seals for cleanliness and clean as required using denatured alcohol.

2.1.3 Clamp a blank end cap on one of the column, using a hinged speed clamp, and pack wadded commercial coffee filters in the bottom firmly, using a 2" or larger dowel.

2.1.4 Pack the material firmly and evenly every six inches or so, until the column is loaded within an inch of the end.

2.1.5 Finish the column by packing two more wadded coffee filters in the last inch, and set aside for mounting on the machine.

2.2 Mounting the columns.

2.2.1 Place a screened gasket on top the Mk IV injection manifold, and set the open column end on the gasket, centering it using the raised ridge on the sanitary seals.

2.2.2 Install the two bolt high pressure clamp, and tighten uniformly.

2.2.3 Remove the clamp and end cap from the other end of the column, and after setting a screened gasket in place, place the column head on top and center it on the sanitary seal ridge.

2.2.4 Install the two bolt high pressure clamp and tighten uniformly.

2.2.5 Check the tightness of all clamps and hose connections.


2.3 Preparing system:

2.3.1 Turn on ancillaries:

2.3.1.1 Turn on chamber ventilation.
2.3.1.2 If using water heat, turn on pot circulation pump 21, using switch 25, and verify flow by observing discharge in hot pot 22.
2.3.1.3 Observe water temperature on PID controller for process specified.
2.3.1.3.1 85F for carboxylic acid
2.3.1.3.2 200F for maximum speed extracting essential oils to subsequently be decarboxylated for topical or oral use.

2.3.1.4 If using silicone mat heaters, turn on power to the lower pot heater, but not the column heaters, at controller 20.
2.3.1.5 Add ice and water to ice bath 23.
2.3.1.5.1 May also add dry ice, depending on process.

2.4 Evacuating the system.

2.4.1 Using the attached Mk IV-B PID drawing, all valves are opened except the backfill valve 9, the refrigerant tank valve 18, as well as valve 14, the vacuum pump isolation valve, and valve 25, the nitrogen backfill valve.

2.4.2 Start high vacuum pump 8, and when running smoothly, open valve 14.

2.4.3 Evacuate the atmosphere from the system to a level of 30" (29.92") Hg on the analog gauge, to exclude oxygen from the system.

2.4.4 When 30" Hg is achieved, close the vacuum pump isolation valve 14.

2.4.5 Shut off vacuum pump.

2.4.6 Allow to soak for 5 minutes and monitor pressure using compound pressure gauge 9, to detect any rise in pressure, indicating a leak.

2.4.7 If vacuum decay is detected, remediate source of leak until vacuum levels hold steady for 5 minutes.

2.4.8 Once vacuum stability is achieved for 5 minutes, close dump valve 17, and column recovery valve 15.

2.4.8.1 Close butane flood valves 6 and 13.

2.4.8.2 Open solvent tank storage tank valves 18 and 19.

2.5 Safety checking the system.

2.5.1 Listen for leaks in the line from the Haskel pump 2 and the tank connection valve 19, as well as the line from the refrigerant tank to the Terpenator injection valves.

2.5.2 Using a Hydrocarbon Leak Detector, check for leaks in the liquid butane line from points 18, to points 6 and 13.

2.5.2.1 Check for hose leaks by sight and sound.

2.5.2.2 Check at locations 6,13, 18, and 24 specifically.

2.6 Flood the system.

2.6.1 Start recovery pump 2, by opening valve 1.

2.6.2 To flood, open valve 13 and time how long it takes until the liquid flows through sight glass 5.

5.2.1 Record that time.

2.6.3 Continue to flood for the additional specified period of time , or until the color of the oil passing through sight glass 5 clears.

2.6.4 Close vent valve 4.

2.6.5 Close flood valve 13.

2.6.6 Slowly open valve 17, so as to not splash when the column dumps.

2.6.7 Open rinse valve 6 for the specified period of time.

2.6.8 Close rinse valve 6.

2.7 Recover to -10" Hg

2.7.1 Allow recovery pump to lower system pressure to -10" Hg, and then close valve 17.

2.8 Repeat for as many cycles as required to fully extract the material being processed.

2.9 Finish process:

2.9.1 When last cycle reaches -10" Hg, close dump valve 17 and open column recovery valve 15, to recover the column separately from the lower pot.

2.9.2 Turn on column heat.

2.9.2.1 If hot water heat, turn on Circulation pump 32 using switch 33.
2.9.2.2 If heat mats, turn on controller at control 20.

2.9.3 Continue to pump until -22" Hg is reached.

2.9.4 Turn off valve 11.

2.9.5 Turn off valve 1

2.9.6 Turn on valve 25 and inject nitrogen until zero pressure is reached.

2.9.6.1 Nitrogen regulator pressure not to exceed 50 psi.
2.9.6.2 Turn off valve 25 at zero gauge.

2.9.7 Turn on switch 7 to start vacuum pump.

2.9.8 When pump smooths out, open vacuum pump isolation valve 14.

2.9.9 Evacuate to -29.9" Hg.

2.9.10 Hold at high vacuum for length of time specified on process.

2.9.10.1 Repeat 2.9.6 through 2.9.9" Hg if excessive pressure rise is noted during soak.

3.0 Harvesting the extracted essential oils and oleoresins:


3.1 Open vent 9 to equalize pressure.

3.2 Remove 2 bolt high pressure clamp 30 from the 10" lid on lower recovery tank 29.

3.3 Remove lid assembly and clean underside using 190 proof ethanol. Set aside alcohol mixture.

3.4 Set lid assembly on clean lower tank bottom and replace clamp 30.

3.5 Return Mk IVB to service.

3.6 Two methods of harvesting the extracted oleoresins.

3.6.1 Place lower tank in 0F freezer for 30 minutes before scraping out of tank using PTFE scraper.

3.6.1.1 Further process as required for end use.

3.6.2 Wash out with 190 proof ethanol.

3.6.2.1 Place in 0F freezer for 48 hours to winterize.

3.6.2.2 Filter at 15 microns to remove precipitated waxes.

3.6.2.3 Remove alcohol using Rotovape and vacuum oven.


Pre-cleaning residuals from Alkane refrigerants before use:

For processes using Alkane refrigerants such as R-290, 600, or 600A, even 99.99% purity can still have 10,000 Parts Per Millionth contamination from other gasses or longer chain molecule gasses.

To reduce the contaminants to the Parts per Billionth levels, you can open the dump valve 26, and hook the new refrigerant tank to the Terpenator injection port.

If you inject the refrigerant into the injection port, and recover it as normal using the Haskel refrigerant recovery pump, the heavier residuals will be left behind in the lower Terpenator tank, where they can be rinsed out with denatured alcohol.

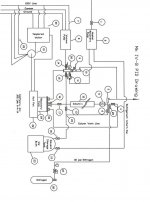
Mk IVB P& ID Drawing:

The following P&ID demonstrates how the Mk IVB can be installed using tempered water for column and pot heating, so that the only electrical components in the extraction enclosure itself, are thermocouples operating in millivolts. Minimum heating requirements for the pot boiler is 2kW, and another 2kW for two columns
 

Attachments

  • Mk IVB PID 001.jpg
    Mk IVB PID 001.jpg
    66.8 KB · Views: 30
Last edited:

Gray Wolf

A Posse ad Esse. From Possibility to realization.
Mentor
ICMag Donor
Veteran
GW, are you guys measuring the actual butane stream temps coming out of the cooler, or going off exterior column temps? What were the temp readings you were getting? With my SS coil chiller I'm getting the column exterior to -35 to -40C, which seems to be working well. I was going to focus on upgrading my prechiller as I agree it's the most efficient way to reduce wax pickup, but if I'm already in the right neighborhood I'll focus my upgrade dollars in a different area.

If that is your column exterior temperatures, you should be low enough.

We are currently using a infra red thermometer to read the fitting temperature at the injection point.

The counter flow design will include a thermocouple in the injection stream, with ancillary readout.
 

Gray Wolf

A Posse ad Esse. From Possibility to realization.
Mentor
ICMag Donor
Veteran
How long does it take you on average to recover a run? I believe I seen somewhere around 2 to 2 1/2hrs?

It can vary a lot, depending on oil content, which adds to surface tension and slows down recovery.

The temperature you run the lower pot at makes a huge amount of difference, as does the recovery pump.

The automated Mk VA2 digital timer readout showed Mary's shakedown run at precisely 2 hours and 11 minutes. She was running a DI heat exchanger and 60/<85F on the pot.

The Mk IV's are faster, and the owner of two automated Mk V's and a un-mounted Mk IV built by WolfWurx, recently described the Mk IV as the Cummings diesel of the extractor world. He runs it hard while the automated units purr along in the background.
 

Grow4Flow

Member
GW,
How about recovery times running passive? i hate using a recovery pump on my IFE, but looking forward to running the MKIV.
 

Latest posts

Latest posts

Top