What's new
  • ICMag with help from Landrace Warden and The Vault is running a NEW contest in November! You can check it here. Prizes are seeds & forum premium access. Come join in!

Trick my Pod - The complete Aeroponics primer

Pod Racer said:
Now, for you my friend Old Bubbler.

Just use a black plastic trash can, the normal big yard type. You can drill a hole near the bottom and using a rubber gromet and barb fitting, connect directly to your pump. The pump can be outside the can, leaving no heat in your root zone. :yes::

Thanks for the follow up PR and the tips. Hope you don't mind me picking some more of your mind.

On the buckets - I remember a tip from the TAG 101 thread (I think) that you gave saying the bigger the root space the better, goal is to grow "pom-pom roots." This is why I was thinking the 44g drum because as far as supply and the required space it's not an issue and in fact if I turn the prototype into a full blown system I'll run with 4 of them (I already have the single drum for the prototype). Wouldn't it be better to run with them because I can rather than the smaller garbage bins as I reckon they'd have almost 2.5+ times the volume? Or do you think it's overkill and the smaller bins are more suitable?

Pod Racer said:
This set up, as long as the internal temps don't get above 78°F should allow you to grow monster Aero Trees that should just be amazing.

With this in regards to the pump, I guess that would mean a submersible pump would generate too much heat? Though my preference is too go submersible because I'm familiar with them it's not a major issue just a bit of re-design and research. But just too clarify on submersibles - any that you are aware of that would satisfy heat, psi and other requirements such as turning on/off without cavitation failure?

My full plan if the proto-type works is the 4 drums, each with the overflow back to the resorvoir at the "sump height" which woul be about a 1/3 of the drum volume (I'll need a low wide volume resorvoir). I planned on having 2 x submersibles in the resorvoir with each feeding ALL buckets 50/50 of requirements (so if one fails, the other keeps them alive - I'm even thinking 2 x resorvoirs for the same reason). If I have to use external pumps I'll still be running two for redundancy.

I plan on regular water changes as I do with my bubblers. I'll have a seperate low presuure small pump that pumps water from the resorvoir to all buckets for water changes so it overflows back to the resorvoir which I then dump, re-fill the resorvoir and repeat. I do this with my bubblers and dependant on the size of the resorvoir you're theoretically replacing 1/4 your water every cycle which I do every 2-3 days (theoretic full dump and re-flill every week and a half or so). I'm also thinking I'll keep airstones both in the reservoir and all the sumps to keep the water alive (hate dead water).

NOTE if you're wondering why I MUST have the sumps (3rd the drum depth) when if I have a resorvoir I can just drain to it and be done with the need it's because of the vertical space and the fact I won't have to build supports. If I was to have a completely "empty drum" that fully drains I'd have to elevate the drums above the resorvoir, where as if I have the resorvoir and drums both sitting on ground level I have to accept the same depth of water in my drums as I do in my resorvoir - which is why I'll need a low, wide and long resorvoir

As for progress pictures and such I'm all for that as long as this site hosts or someone knows an anonymous host or similar, I just don't know how any of that works and am wary of it.

And I love bubblers too and they truly do rock. But I've always looked at my beautiful life giving bubbles and wondered how to deliver more and more and more of them without creating a washing machine in a bubbler bucket - and from what I can gather only aero can do that.

It's good talking with you.
 
oldbubbler said:
This is why I was thinking the 44g drum

Actually thinking about this, I think I maybe selling my drum short and mis-leading you on it's size - I've sort of got this notion of the old drums we used to cut in half to make BBQ's out of before we realised the crap could kill you.

These things are biiiiiiiig. Judging from memory I'd say she stands a good 900-1000mm and about 500mm+ dia - I'll measure it up proper next time I see it.

Picture a drum that would be the perfect height at a BBQ for a beer, mull & nibbly's table

I don't know what that would give me gallons/litre wise because I'm hopless at applying pi but I reckon I may be under-estimating @ 44g
 

Pod Racer

Member
Absolutely, the larger the root zone the better. I did not understand the size you were speaking of and just for anyone that doesn't have access to 'drums' they could use trash cans is all I ment to suggest. A set of 4 would be perfect.

I've posted over 2000 pictures on OG and probably 1500 here before getting my ass canned the first time(s). :bat: I've never heard anything or had anything come back to bite my ass, knock on wood. I feel this sight is fairly secure. Thank Gia, no? :sasmokin:

As for having 1/3 of the drums retaining water, that is actually a great idea. The one thing I've noticed is that the plants seem to do much better with their tap roots fully submerged and able to drink at will as opposed to being left dry. There are two types of roots: Laterals -- those feeding the buds, and Taps -- those feeding the structure of the plant. One needs to respire, the other appear to enjoy being straws that just continually wick water to the leaves for gas exchange and turgid pressure. I see this very clearly in the difference between the soil grows I've done and the DWC and Aero.

The Aero runs where there is no res. for the taps to soak in tend to leave the buds a bit more 'airy' at the end, whereas soaking taps in those original 'pods' come out thick and solid with lots of mass. They tend to seriously inhale water towards the end sucking as much as 2-3 gallons a day out of the res. for just 8 - 12 plants. So keeping a res at the bottom isn't a bad idea at all.

My design here actually allows for the taps to 'catch' the runoff as it returns to the res. but the angle is very moderate so they have lots of time to pull water that is moving slowly back to the res up as needed. And in 3 minutes there is another blast. If I were going to do trees, I'd make sure to definitely leave about a foot of water in the base of the rig.

The issue with submersibles is that they are not strong enough to generate a True Aeroponic mist. Just spraying the roots with large droplets of water would be akin to NFT as the 'sheeting' action is the mechanical breakup of the H20 and elements, whereas in True Aero the droplets fall directly into the 50 micron holes in the root hairs.

Submersibles also don't work well with intermitten use and tend to lock up or fail and they generate a lot of heat when put up against heavy pressure.

The Dia. pumps are designed for exactly that purpose: intermitten spraying at high pressure, without heating or issues. I've been using that same pump for going on 3 years now and haven't had an issue yet. I've retired many a 1000 gph submersible to the trash.

Submersibles can usually only generate at top performance about 8 psi, if you are lucky, a far cry from the 50 psi that is usually required. 35 psi is way at the bottom of any Aeroponic system, the droplets are just not manufactured at lower levels so a pump that can 'push' the nutrient solution through at high pressure 'atomizes' the water particles and negatively charges them as well, like magnets they adhere to the root hairs like antennae that is positively charged. Once the two meet, the loop is closed. This is why in True Aero you don't 'spray' the roots as much 'mist' with the aerosol vapor as this is the heart of the exchange mechanically on an atomic level.

Fog is too small and the particles tend to just drift aimless until they collect enough to become 'charged' and adhere to the surface of something, usually the wall of the rig rather than the root hairs, but an enclosed space would force the same eventual respiriation - thus foggers work, but the fog must be continual and always thick and contained.

Having a large void for the roots to hang free in allows and forces them to reach out for the droplets that are drifting by and you eventually get those Pom Pom roots as the 'ball' creates an inverted 'tree' where all branches and 'leaves' are available to catch the droplets.

It is the mirror of sun light and the plant above. The light energy is like aerosol solution, as the branches extend to expose more and more leaves to grab energy the root branches do the same. The aerosol moves through the root tissue like lung tissue being absorbed throughout if dialed in correctly.

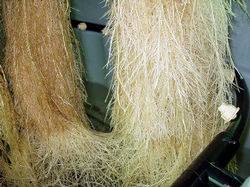
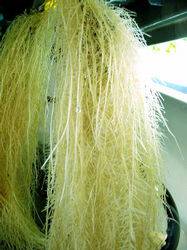
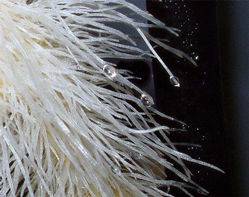
In your drums, if you were running 50 micron foggers at 100 psi, you'd see massive roots on your plant something akin to this:


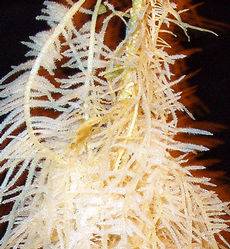
You can see when you magnify these roots that the hairs fiber out smaller and smaller, with DWC and submersed roots you'll find they appear morel like this:


as opposed to this:


I hope that helps to better explain the theory behind the needed 'power' behind the pump. It is the number one reason those commerically available 'aero' units aren't truly 'aero' as most are run by submersible pumps just spraying the roots in a fence post - which is truthfully just NFT.

Aero means Breath - not splash or spray, the roots need to breathe like you do and is the key to how they eventually evolved into animals in my belief. After all we are just a walking garden able to carry our water supply with us as well as our nutrients, but the respiration is still the key to all life on this planet - or Plant Net. Git it? :yes: :wave:
 
Last edited:
Mate your tips have been invaluable and today I've been talking to my business partner in all this over a long wet lunch that got longer and wetter the more we discussed this (he's the practical one, I'm the innovator).

He assures me he knows exactly the kind of pumps you're talking about and it's his opinion that if the proto-type works we don't go half measure on this and we get HP variable speed pumps WITH the pressure chamber as he reckons it won't wear the pump as much as once the chambers pressurised it'll do most of the work (he's a builder so he's instaling water systems in houses quite often - in Oz, rural houses not on town water have these water/pump systems installed to provide mains pressure throughout the household and he reckons they're small, quiet, powerful and easy to install and maintain.).

As of today we've seperated two clones in our vege system that we're gonna use as the guinea-pigs (same strain, cloned same time, approx same size) - one will be done in a bubbler, one in the aero.

We'll be starting the experiment next cycle when they're due to go in flower in about 4 weeks and hopefully eight weeks after that we'll be measuring the difference.

I will keep you up to speed on all progress and I'll find a way to provide some side by side comparison pics as we progress through to completion.
 

Pod Racer

Member
Excellent! :yes:

You'll find most everything you'd need at your local (or online) RV or Marine outfitter. They use these systems in RVs and on Yatch for showers, faucets, tolilet, etc. We all used to go with the pressure tank, but found it unnecessary with the variable speed pumps. The 'smart' pumps just slow down to adjust to the pressure maintaining it at 50 psi or whatever the rating is. No accumulation tank is needed, however if you use one and a selanoid valve with a timer there is no sound to worry about.

I'd suggest using the best nozzles you can get for the finest spray as well, since you are in such a confined space, it will ensure that you even if you run your pump longer than the standard 30 seconds on (I run at around a minute on these huge rigs holding 32) the droplets wont saturate the roots just fill the cavity with lushious aerosol.

It should be sweet. I look forward to seeing your set up and run, science is so hot! :wink:
 
Pod Racer said:
We all used to go with the pressure tank, but found it unnecessary with the variable speed pumps. The 'smart' pumps just slow down to adjust to the pressure maintaining it at 50 psi or whatever the rating is.

Very interesting what you say about these pumps, and I will be sending the link for the pump you recommend to my mate for his input - I'm the "idea's man", he's the practical one who puts my grandiose visions into practice or me back to planet earth. I'm not too concerned over which one we go for but it is comforting to know that either/or will work.

I'll be keeping it reasonably real to your parameters particularly these ones:

1. PSI > 30, 50=Ideal, 100 psi even better.
2. Interval cycling 20-30 seconds on, 3-4 minutes off (Dark periods may extend dry periods).
3.Average droplet size 50µ (micron) nozzles (acceptable ranges 30-80µ) with flows < 2 gph preferably .5-1gph with screen filters of 150 and up.
4.Target root temperatures maintained at 68F. (Mature clones lower temps/younger prefer warmer) Temperatures should never exceed 74F (Dangerous).
5. The greater the aerospace around the root zones the better—lateral root development equals bud thickness and development your goal are pom pom roots.


BUT... I ain't gonna lie and tell you I even understand "Ca:Mg 3:1
NO3:NH4" and all the rest of it yet alone try and put it into practice, I got one word for all that - "nutes".

And on which, particularly for the proto-type experiment I'll be using the same nutes and water parameters for my aero as my bubbler as much through needs as for comparison.

We use "Dutch Master" (www.dutchmaster.com.au) for our bubblers as we've found they worked best ourselves (everyone's got a favourite nutes story) and I intend running them in the aero prototype and if suitable I'm thinking we'll stick to them unless they're totally aero inapropriate.

Just on that I read you should really weaken nutes for aero - I pretty well follow the manufacturers specs minus about 15% odd for my bubblers (after trial and error) - applying the same principle what would you reckon for aero? Minus 25% odd? More? I know we're talking basic specs here but that's how I operate, technicality gets away on me pretty quickly.

And I'll be following the tip on the nozzles and be looking for the ducks nuts for sure. Just on that I was web-surfing and noticed you can get them in a direct spraying variety (spray direct to the roots) or ones that have deflectors (so they don't spray the roots directly but hit a shield and deflect and difuse) - which of thise would you recomend? I was thinking beacuse of the confined space the indirect deflector types may be more suitable?

Cheers! - your virtual beers are on me!
 
Last edited:

Pod Racer

Member
Calcium is the Key

Calcium is the Key

Any nozzle that fits your rig that can generate a 50 micron droplet is sufficent, you have to really look for that information however. Any of the standard 'fogger' time nozzles from the 'cooling' line will work, just avoid anything rated for under 10 psi as those wont.

DM ONE is my preference, as well as most TAGgers. The Ca:Mg ratio just has to do with avoiding lockout or deficencies later - TAG is prone to two types of deficency: Ca and K. They strike right around the same time and have something to do with the transition into flower.

As for strength, what we have found is that True Aero takes insanely low amounts of nutes compared to the other 'soaking' methods. In other methods you are forcing the roots to 'absorb' the nutrients by submersion (where the fine hairs wont develop) or only watering 3 times a week, whereas in Aeroponics they literally 'Breath' in the nutes so as a rule I keep them to about 1/2 recommended strength or less. Right now, in the first few weeks of vegging, I am running at 350 ppms. 600 to 800 would be tops at full growth, anymore and you'll start to see lockout of the Ca.

Same from Flower, in DWC bubblers you can push some strains as high as 2000 ppms, however in True Aero you'll only top out at 1000 to 1200 (if even that). You could proabably have amazing results with as little as 800 in full on bud development.

Its hard, because we all think 'more is better' however try to remember you are literally 'watering' your bare roots every 5 minutes not every other day with soil and other matter to absorb and eventually release nutrients. The roots will inhale smaller amounts of nutes easier and more often rather than slowly absorb over long periods.

Hence the amazing growth.

The Nitrogen ratio as well is designed to avoid 'burning' or lockout of the K as those ratios have been found (for Aeroponics) to be ideal.

DM One has them in exactly the correct ratios - but to mix by their instructions I have found the ppms well in excess of 2400. So I just dose mine by meter to the level I want and find the R/O hits the 5.8 mark on the dot. So it is truly a personal pref.

Others like Ionic, and Botanicare as well as BC seem to have similar ratios and work very well also. I haven't used Ionic in a while but will be doing a run with it again shortly, just have butt load of DM ONE as I bought the gallon jugs and only use about 1/4 cup per run. This is why NASA has done so much research in this field making it easier to find the truth. In space they want minimal water usage as well as minimal nutrient expense. True aero can almost run on 25% the usual amount as it is the most effective at nutrient uptake and transport.

My only suggestion is to start out very low 1/3 would be ideal. See how your plants respond (they wont starve for sure) and then start to ease up. I have the best results with staying under 1000 ppms throughout flowering. Above that I start to see Ca lockout from too high a N and K as they will displace the Ca (needed to build).

Remember, the roots are respiring so they can gather the N from the air along with the canopy and K only becomes an issue (if ever) in late flower. Meanwhile Ca and the micros need to get into the plants themselves in anticia---(say it)--pation of the seed production.

This is the 'Loading' Phase in early flower.

You will find the only real mastery to TAG is catching that bell curve up and down. You need to load Ca, N and micros going into the first half of flowering (mostly in the very beginning) and then higher K will be demanded in later flowering (you'll see it in the PH shift). But even then I have only experienced lockout with using P/K boosters.

I use the DM One Flower with their supplement Flower Max (sparingly). But too much K will choke them early on and too little N and Ca (inside the plant) in later flowering will result in 'airy' buds.

A nice steady ramping up from 300 to 600 for vegging, 400 - 800 for flowering. If you have a massive K whore (like Oasis or Widow) you can push up to 1200, but it will burn the hell out of any Skunk line. They seem to enjoy much lower (850 tops) ppms.

Good luck and may the Ærocana be with you. :joint:

This is White Widow under about 800.


And at 1200


I used Hydroplex (botanicare's P/K booster) and you can see the lockout on the leaves (those crispy edges and yellowing) is do to the N displacement at such a high level as well as P, but it packed a hell of a bud on them. :joint:

However the Skunk in the other pod were all but vaporized by it. They did throw apple sized nuggets though. And I was completely ignoring this run. Go figure. :chin:
 
Last edited:

BlindDate

Active member
Veteran
Pod Racer........The roots look like pom-poms because they are air pruned. That is a result of not getting enough moisture. This will stunt your plants or limit you to growing only small ones. That is why all those Shira fogging machines could never grow good weed.
I don't mean to break your bubble. The system would make an excellent cloner.
 

Pod Racer

Member
Hey Rosey, long time no see. Unfortunately No Oasis, though I wish I were - love that shit! However, only running Bubbliscious and Urkle with a possible Black Russian in there somewheres. :bat:

Air prunning... LMAO that's a new one. :pointlaug Blindmate, don't you ever get tired of badgering me with your retarded comments. Apparently not. :confused: Like they say, next time you have a thought...let it go. Seriously. I'm not here for assistance, I am quite aware of what I'm doing thanks the same. :wink:

Anyhooo..... Clones are all in and ready to get jiggy wit it! :lurk:

 
Last edited:

flgreyhound

New member
Hey POD....long time.

Not sure if you remember me, but I posted on here about a year ago...when I built my first TAG unit based on your designs. I'm still running the same rig, though I recently re-designed the growing chamber based off of....."WhereisBrian"...I think. It's built out of cabinet plywood and the inside is coated in West Marine Epoxy. I actually meant to ping him to see if that held up for him...I guess I'll find out the hard way.

Anyway, I'm starting a new grow with the new TAG unit. I know you're a big DM fan for nutes, but I started with Advanced Nutrients and have a feel for them, so I'm staying with them (not to mention I have a whole cupboard full of the stuff! lol). So far I've been really happy with my harvests and hopefully this round will be no disappointment. I'm actually going to try running their organic nutes; Iguana Juice this time. I'll let you know how it goes.

Good to see your still here....in case I need saving! lol.

On your new setup, I see you are using that foil covered foam board for your tops. Aren't you worried it won't be able to support the weight of the plants? That stuff isn't all that strong (yea...I have some in my garage right now!)...just a thought.
 
Last edited:

Pod Racer

Member
Hey flgreyhound, yah I remember you, not that old a stoner. :wave:

I'm planning on setting up a scrog screen once these bitches take, so I'm hopeful that the screen will carry the majority of the weight, but you are right, I might end up rethinking that. I just love this shit cause its cheap, insulated and reflective, but the floros have already shown me that it will sag with weight left on it. There is only a plant per sq. foot, so tied up in a scrog (I'm using heavy duty plastic fencing) it should hold.

Brian's TAG Towers did about as well as my Hammock I'm afraid, he took the entire thing down to retool, but I'll let him tell ya about it. It was a brill idea, but as we have all found getting the right components and getting them to work with each other is a freakin' nightmare. Just when you think you have found a great product you then have another 5 obstacles to overcome to getting it to work with what you have.

My next rig will be a PVC grid that supports the foam board and I have found this like 1" thick crap that should do the trick, but there is always a need for innovation. If I have issues I just hotglue a strip of wood or other supporting material directly to the foam board and it gives it a bit more 'backbone' to hold up. Finding the perfect sheet would be tits, but haven't yet. Though they do make an insullation that has webbing in it now, I used that on the interiors for ridgid strength.

Like I said, I'm not that thrilled with this rig. I want the same design, but a more Pro setup, but I had like 50 rooted clones going nuts waiting to have some room2grow, so I had to work with what I got. You know how that goes.

But speaking of which, probably wouldn't be a bad idea to go ahead and add some reinforcements to that top sheet while the girls are still small. I am planning to veg them big and fill that room.

Good to see my old friends still around and kicking, and Tagging no less. :yes: Does a heart good. Glad to see ya friend. :friends:
 

BlindDate

Active member
Veteran
Air prunning... LMAO that's a new one. Blindmate, don't you ever get tired of badgering me with your retarded comments.

Sorry for my "retarded comments", but those roots (in the picture)are clearly stunted from lack of moisture. Air pruning is a potting method that growers use that involves a porous container to stop root spiraling once the roots hit the container wall. You have managed to do the same thing by withholding sufficient moisture. This limits root mass and everyone agrees that root mass = bud size. Until your "Pod" can show this board some impressive gpw numbers, the method is no better than any other.

I would expect a little more respect from you since I taught you how to eliminate 90% of your imaginary nutrient problems by installing a chiller. Otherwise you would still be running around like a newby chicken with his head cut off yelling lock-out!! lock-out!!
 
Last edited:

flgreyhound

New member
Actually, POD, after going back and reading thru the original thread it was GroNut and JustATry who were talking about building the grow chambers out of plywood and then using West Marine Epoxy to waterproof them.....so yea, if you could ask either of them if they had any problems with de-lamination or leaks, it might help me sleep a little better.

On a separate topic....what are your thoughts on running "organic" in Aero? The reason I ask is I hear so many guys in the AN forums who talk about their 100% organic grows (in organic soil...not hydro) who say the taste/smell is so much better as well as one guy who claims his bong doesn't turn black but rather a golden color. He claims this to be because organic is so much 'cleaner'.

Now, obviously we can't duplicate the organic soil, but I was thinking the rest could be duplicated. In fact a friend of mine sent me a link for a company that is doing this....100% organic in hydro/aeroponics (granted...probably not true Aero).

http://www.organicsalive.org

What do you think?

Oh...and on the foam board...I know exactly what you mean. I had used it to construct my first grow enclosure just because it was covered in the reflective foil. But I noticed on my last go 'round, that my top was starting to bow down into the chamber....I am using 1/4" plexiglass painted white. I'm going to have to add some support underneath it as well.
 
Last edited:

Deadic8d

New member
nutes?

nutes?

First, Pod... Thanks for all you've done for us all here!! I'm kinda mixed on the nute thing as you say you use DM1 and their bloom supplement and I follow that OK, but then yoiu say to cut back on Ca and N at week 4 or 5 of flower right? Do you just cut back on the DM1 or are you mixing other nutes in with the DM.... lost as to this subject. :confused: I'm in the middle of making my TAG system right now and I've found a site that has these pumps. Looks like the same you linked to earlier but about $80 cheaper pumps Please help on this nute thing as it is the only thing left to order in. Thanks again for all of your help PR
 
Last edited:

Deadic8d

New member
damn knew I should have asked but then reading back on the posts everyone kept reefer(huhhmmm)ing to the higher volume smart pumps so that is what I went for.
 

Pod Racer

Member
Hey Deadic8d, No, didn't say cut back on the Ca and N in flower. There is a deficency that developes around the 5th week of both Ca and K. I was stating that higher N locks out the Ca and K so ppms using standard fertilizers will displace the Ca and K causing the Deficency.

You should load heavy on N going into flower as once the plant flips to flowering mode, it starts to dump all the extra N back into the root zone (your res). You will see it as a rapid drop in Ph where before hand the Ph tends to drift up as the plants stretch (using the N) once in mother mode they neglect the N in favor of P/K mostly K for the 'seed pods tobe'. You should still be adding N, you will just see that ppms will start to drop and the Ph, the N will cause the ph to drop and if you just keep adding the same nutes the residual N will compound in the water causing lockout. Sort of like this:
597604-14WonderTwinsLeafLock.jpg
597604-14WonderTwinsLeafLock2.jpg


Instead of like this:


In nature before a plant goes dormant and while in flower it dumps excess elements like N into the root zones for storage, sort of like grass. That is where the legumes developed, or like Irisis where they store energy for next year.

Sort of like we crave milk as children as our bones grow and we 'stretch' however once done growing the need wanes. Until your too old, of course but that deficency is caused by another issue.

Does that cover it? :chin:

It would probably be a great idea to dump the res at the first sign of massive Ph drop around week 4 to ensure there isn't a build up of N as it will retard the maturity of the buds and flower as well. That is also the 'crisping' some see later in flower thinking it is nute burn. It is actually a lock out of K and Ca. because there is excess N in the water.

They literally stop absorbing N overnight. I've come in to see it drop to a ph of 4.6 in 12 hours, add K to 6.0 and return the next day to 4.8 again. It takes about 3 or 4 days of adjustments till it levels off and then it wont drop again.
 
Last edited:

Deadic8d

New member
Ok, so what if I don't veg for that long? I'm only planning on one week of veg and then flower.... using DM1 what else do I add to it or just that? This is my first hydro try so adding nutes is new. Always been soil. Have a R.O. system coming, pump coming, sprayers here. I plan on 2 to 3 tubs like your old system setup so any pointers will be greatly appreciated. I read earlier that all you use now is DM1 and in flower you add some of their bloom product lightly. Is that all there is to it? :chin:
 
Last edited:

Latest posts

Latest posts

Top