-
ICMag with help from Landrace Warden and The Vault is running a NEW contest in November! You can check it here. Prizes are seeds & forum premium access. Come join in!
You are using an out of date browser. It may not display this or other websites correctly.
You should upgrade or use an alternative browser.
You should upgrade or use an alternative browser.
Trick my Pod - The complete Aeroponics primer
- Thread starter Pod Racer
- Start date
Reg Dunlop
Member
pod racer,
One would gather that the more misters a set up would have the less psi that will be offered to each mister,less yet if you were running a verticle system where the nutrients need to be pumped upward.So say in a verticle system in which there is 160-175 mini jet misters,which kind of pump would you suggest as ideal.I seen in one of your older threads here a fellow who was in the midst of setting up a verticle tag,but if I remember correctly it was binned? If you have any suggestions on pumps for this kind of setup,It would be greatly appriecated!
Reg,
Last edited:
Pod Racer
Member
Hey Reg, Honestly I have never had any luck with verticle growing aeroponically so I abandoned it after a few attempts that failed miserably. If I had to suggest a pump for Verticle TAG it would be a Sprinkler pump, the high muscle type. I would also suggest feeding from the top down, rather than pushing against gravity.
I have returned to flat aspect growing and have found that actually I get more yield with 1 plant per foot than anything. Hence my next pod is a 2x8 (16 plant) pod scrogged at 6" so each plant fills its own sq. ft. This way I can run low numbers on everything; lights, nutes, misters, bills.
TAG isn't great for High Density Growing as its fame lay in its ability to maximize the plant's potential to produce. So I have found that a sq. foot mentality above and below the 'ground' level works best. I have yet to solve this in a vertical aspect.
Oddly NASA appeared to use the vertical 'pocket' method, where the plants are more at a 45° angle in tubes sharing a central feeding collumn. These rotate with the light source remaining between the collumns, but they had unlimited space and this was for research on aero-respiration not growing mechanics.
I have yet to surpass my own bed method of the 2x8 pod, so I'm sticking with that as I have it down finally. All others are purely experimental and I wouldn't bank on them, but worth the attempt for sure. I'm sure there is a way, I just haven't discovered it yet. Currently it isn't as pressing as this bullshit Powdery Mildew Issue I'm dealing with, more toys...hurray.
But soon, back to the build. Its just spring and my ass is sore from working in my gardens getting everything ready for the summer. I am getting too old to be doing this shit.
I have returned to flat aspect growing and have found that actually I get more yield with 1 plant per foot than anything. Hence my next pod is a 2x8 (16 plant) pod scrogged at 6" so each plant fills its own sq. ft. This way I can run low numbers on everything; lights, nutes, misters, bills.
TAG isn't great for High Density Growing as its fame lay in its ability to maximize the plant's potential to produce. So I have found that a sq. foot mentality above and below the 'ground' level works best. I have yet to solve this in a vertical aspect.
Oddly NASA appeared to use the vertical 'pocket' method, where the plants are more at a 45° angle in tubes sharing a central feeding collumn. These rotate with the light source remaining between the collumns, but they had unlimited space and this was for research on aero-respiration not growing mechanics.
I have yet to surpass my own bed method of the 2x8 pod, so I'm sticking with that as I have it down finally. All others are purely experimental and I wouldn't bank on them, but worth the attempt for sure.
 I'm sure there is a way, I just haven't discovered it yet. Currently it isn't as pressing as this bullshit Powdery Mildew Issue I'm dealing with, more toys...hurray.
But soon, back to the build. Its just spring and my ass is sore from working in my gardens getting everything ready for the summer. I am getting too old to be doing this shit.

purplegrimace
New member
POD
yo man its good to see that your back, i typed up this post explaining myself and shit and my respects to you, but it got screwed as a accidentally hit the wrong key, and thats when i got pissed. but yea man, props to you and your mission in spreading the TAG word. i was interested in learning aeroponics, being a organic soil grower. before i make the big shift though, i want to run a few test experiments to build my knowledge on the art before applying it (it just sounds like the right idea)
with that being said, i just wanted to know if you could guide more towards a line a nutes to start with, but i just want them to be as basic as possible, something i can start with that will good enough to sustain a decent crop. i want something i could build my knowledge off of, cuz im a touchy feely type of dude, you dig? when i get better then ill add the bud enlargers enhancers and all that good stuff.
i know you liked dutch master and the botanicare line, i was wondering if i should start off this those lines in a system that is certified TAE? lemme know your thoughts man
keep on rockin though man, your a rare breed in this stupid, ill forum world, and none the less a necessity, so dont let them morons get to you, cuz if they defeat you we all suffer a big loss, na mean?
F.R.E.S.H.
Member
awesome thread. I may ask some questions later.
G
Guest
nice job
bro !!! keep us upddated
bro !!! keep us upddated
Pod Racer
Member
Back to work
Back to work
Alright, enough creative loafing.
I'm not ready to fully finish this project, but I figured I'd go ahead and get started explaining the basics.
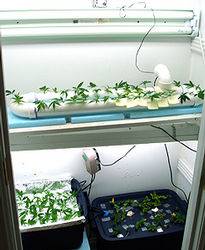
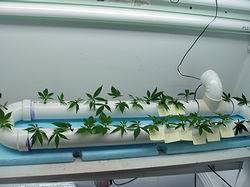
First a new toy I just came up with, my new PVC DWC Cloner. It rocks!
I just took 2" PVC and made a loop with an access for a mini pump (rio 90) that I place on its end so the jet shoots right down the tube. Circulating and aerating the water, it has remained around 68° F the entire day, even with closet temps in the 80's.
Meanwhile, back to POD BASICS.
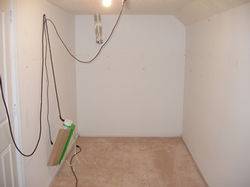
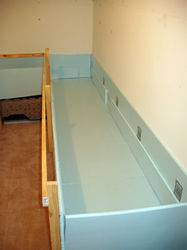
I no longer use the reservoir pod design, instead opting for a run off design. I frame out my pods, then line them with foam board insulation. Making a second level with the same board 1/2 way down the root zone to hold my Aero Rib assembly.
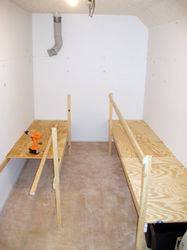
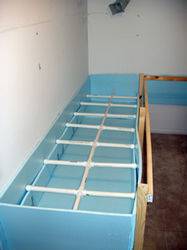
I then fit the ribs to the sides and line the entire pod with either pond liner or 6 mil black landscape plastic.
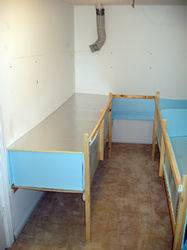
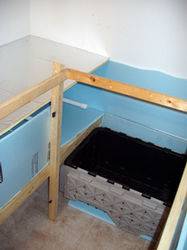
The tables drain to the back into a reservoir where the nutrients are then taken through the dia pump back through the rig. Then top this off with another foam board insulation (*this time with a foil radiant barrier) where I'll be mounting my PVC cuplings to hold my plants.
I'm still cloning out enough to fill this pod (holds 40) so I haven't gotten any further at the moment.
However next, after lining the pods and testing for leaks, I'll rig the pump.
Back to work
Alright, enough creative loafing.
I'm not ready to fully finish this project, but I figured I'd go ahead and get started explaining the basics.
First a new toy I just came up with, my new PVC DWC Cloner. It rocks!

I just took 2" PVC and made a loop with an access for a mini pump (rio 90) that I place on its end so the jet shoots right down the tube. Circulating and aerating the water, it has remained around 68° F the entire day, even with closet temps in the 80's.


Meanwhile, back to POD BASICS.
I no longer use the reservoir pod design, instead opting for a run off design. I frame out my pods, then line them with foam board insulation. Making a second level with the same board 1/2 way down the root zone to hold my Aero Rib assembly.


I then fit the ribs to the sides and line the entire pod with either pond liner or 6 mil black landscape plastic.


The tables drain to the back into a reservoir where the nutrients are then taken through the dia pump back through the rig. Then top this off with another foam board insulation (*this time with a foil radiant barrier) where I'll be mounting my PVC cuplings to hold my plants.
I'm still cloning out enough to fill this pod (holds 40) so I haven't gotten any further at the moment.
However next, after lining the pods and testing for leaks, I'll rig the pump.
Last edited:
Pod Racer
Member
Step Two
Step Two
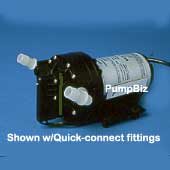
The next step is the pump. I use a variable speed diaphragm pump that adjusts to the pressure maintaining a 50 psi level. These are called 'Smart Pumps' as they don't need the previously used tanks, they just slow to meet the demand or speed up.
Noise is reduced by having the pump intake lower than the reservoir, as positive pressure appears to keep the pump from cycling hard. After awhile she sets into her own groove and you can barely hear her running.
Optimal industry standards for TAGing are 20-30 seconds of delivery to 180-240 seconds off depending on environment. Most rely on the 30/3 cycle of 30 seconds on 3 minutes off. This appears to be the maximum effective rate lessening in effectiveness as intervals become longer.
However if you desire to 'stretch' your roots, like the branches, you can reduce the frequency and force the roots to grow more vigorously, however this hasn't been found to be necessary.
15-minute timers are not to be used in TAG as they overly saturate and dry too long for an effective TAE.
This is the simplist design:
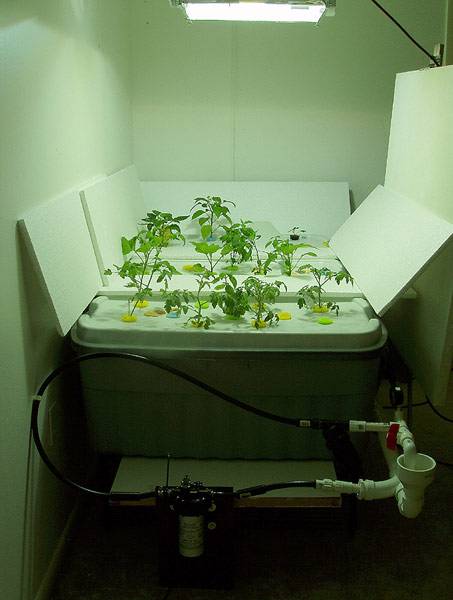
The only main components are:
The pump that can reach over or too 50 psi...
And an inline filter to assure that the foggers do not become clogged by debris or build up of salts or nutrients that have crystalized or fallen out of solution.
Foggers need to be checked regularily and maintenance is manditory. You have just got to deal with the fact that inbetween grows you will need to clean and inspect all your foggers.
Problems that arise are foggers busting loose (caps coming off) or clogs, both will cause problems. But a quick peek every now an then to assure coverage and saturation and you'll be fine. But you must remove and wash with Simple Green or other cleanser to remove any organic material between runs.
The mess filters aid a great deal in this area. 200 is the standard I use, with a metal screen, however you may use whatever you like. This is just a personal preference.

Fogger vary, however the best are the ones that have an internal filter of their own. You can use the standard cooling foggers, but the screw cap type (shown second) tend to clog easily. But do work for the first grow usually and are about .50 cents to the $1.50 for the higher quality nozzles.


And that is about it.
Nutrients are run the same as any DWC grow, except that the ppms are to be kept to 1/2 the usual amounts is not a little less.
Vegging: 200-600 max. I bump them up about 100 a week.
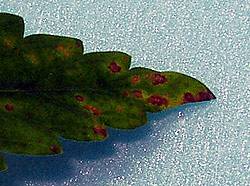
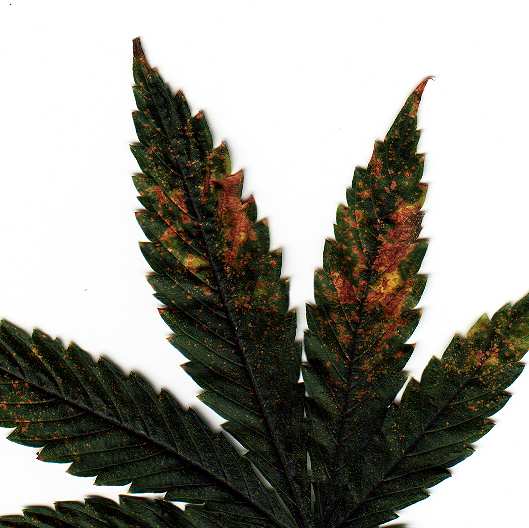
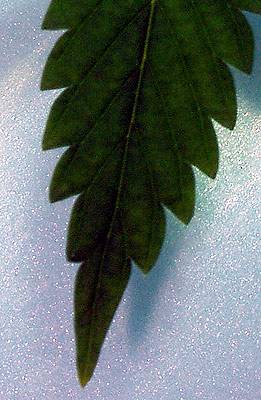
Flowering starts at around 600 but does not need to exceed 1000 ppms, truthfully you could probably do amazingly with as little as 800 ppms in final stages. You have to becareful of specific issues with TAGing. These appear around the 4th and 5th week of flowering when the plants stop taking up the Nitrogen and start to consume large quantities of K. You'll start to notice little 'rust spots' (seen below) which are often a combination of Cal. and K deficiency - They are rapid builders and consume a lot of water and P/K towards the end.
Bumping the P/K ratio will restore the leaves to this:
However dosing too high starts to cause the same 'lock out' and will appear as a deficiency when in fact it is only a lock out caused by higher levels of Nitrogen being backed into the nutrient mix.
This is best ofset by loading heavy on N early into flower and then reigning back heavy right around week 4, depending on the strain.
Happy TAGing!
Step Two
The next step is the pump. I use a variable speed diaphragm pump that adjusts to the pressure maintaining a 50 psi level. These are called 'Smart Pumps' as they don't need the previously used tanks, they just slow to meet the demand or speed up.
Noise is reduced by having the pump intake lower than the reservoir, as positive pressure appears to keep the pump from cycling hard. After awhile she sets into her own groove and you can barely hear her running.


Optimal industry standards for TAGing are 20-30 seconds of delivery to 180-240 seconds off depending on environment. Most rely on the 30/3 cycle of 30 seconds on 3 minutes off. This appears to be the maximum effective rate lessening in effectiveness as intervals become longer.
However if you desire to 'stretch' your roots, like the branches, you can reduce the frequency and force the roots to grow more vigorously, however this hasn't been found to be necessary.
15-minute timers are not to be used in TAG as they overly saturate and dry too long for an effective TAE.
This is the simplist design:

The only main components are:
The pump that can reach over or too 50 psi...
And an inline filter to assure that the foggers do not become clogged by debris or build up of salts or nutrients that have crystalized or fallen out of solution.
Foggers need to be checked regularily and maintenance is manditory. You have just got to deal with the fact that inbetween grows you will need to clean and inspect all your foggers.
Problems that arise are foggers busting loose (caps coming off) or clogs, both will cause problems. But a quick peek every now an then to assure coverage and saturation and you'll be fine.
 But you must remove and wash with Simple Green or other cleanser to remove any organic material between runs.
The mess filters aid a great deal in this area. 200 is the standard I use, with a metal screen, however you may use whatever you like. This is just a personal preference.

Fogger vary, however the best are the ones that have an internal filter of their own. You can use the standard cooling foggers, but the screw cap type (shown second) tend to clog easily. But do work for the first grow usually and are about .50 cents to the $1.50 for the higher quality nozzles.


And that is about it.
Nutrients are run the same as any DWC grow, except that the ppms are to be kept to 1/2 the usual amounts is not a little less.
Vegging: 200-600 max. I bump them up about 100 a week.
Flowering starts at around 600 but does not need to exceed 1000 ppms, truthfully you could probably do amazingly with as little as 800 ppms in final stages. You have to becareful of specific issues with TAGing. These appear around the 4th and 5th week of flowering when the plants stop taking up the Nitrogen and start to consume large quantities of K. You'll start to notice little 'rust spots' (seen below) which are often a combination of Cal. and K deficiency - They are rapid builders and consume a lot of water and P/K towards the end.


Bumping the P/K ratio will restore the leaves to this:

However dosing too high starts to cause the same 'lock out' and will appear as a deficiency when in fact it is only a lock out caused by higher levels of Nitrogen being backed into the nutrient mix.
This is best ofset by loading heavy on N early into flower and then reigning back heavy right around week 4, depending on the strain.
Happy TAGing!

Last edited:
G
Guest
great thread pod racer. a virtual wealth of detailed info. i'm along for the ride if ya got room. thanx for your work.
wm
wm
SacredBreh
Member
Looking good so far.......
Looking good so far.......
Nice dragon you have there. How you been PR. Lots to do outside with the nice weather.
I know it has been asked many times but where do you get those spray nozzles?
I have seen many but not sure which is the best and where to get them. The local Homy has a few and Lowes too. Do you just use the regular ones with a higher pressure to make the mist the right microns? I saw the ones posted earlier on the page but none in my area look like those.
Thanks.... Have been following and also reviewed the old thread on TAG.
Peace
Last edited:
F.R.E.S.H.
Member
So here are my questions :
Can you show us the timer you use please ??
i have seen aero system that spray constantly, what is the difference ? and why is that wrong ?
about the nuts , you said that deficiencies can occur. when does it occur ? Will it happen with regular hydroponic nuts like Hesi or Canna ? Will it happen if i change the Res once a week keeping the ppm low ?
About the back up pump in case of failure of the first one, can you show us the setup ?? when does the second pump start ? and how ?
Thanks man ...
I really like your vision of aeroponics because i got the same !! lol i want to go aero for a long time now. I ll built a systel like yours.
peace
Last edited:
If i want to purchase some stuff to store for later when i try this set up , will this pump be okay , i have some extra cash for the depot and figured i might grab it for later when it could be handy.
Will this model be good.
Aero Mist, Inc.
1.0 Gpm Misting Pump Kit.
Upgrade your Residential Misting System to Commercial Quality & Performance! Increasing the pressure to 1,000 psi, water droplets are atomized into a much finer mist for maximum patio cooling!
Each high pressure pump module comes complete with 5 micron sediment filter, adjustable pressure regulator, pressure gauge, solenoid valve (for stopping the water flow when system is switched off), 6 foot power cord (standard 110V plug), automatic drain valve, and 25 feet of high pressure nylon feed line.
• Fully adjustable
• Up to 1000 psi
• Increases the efficiency of your misting system 5 times!
Thanks for All YOU DO Pod. A few questions if I may. Can you give some more details to that simple design you showed . A drawing perhaps and a pic of the layout for sprayers. Is that a res underneath or not, and how is that valve setup working looks like a flush and clean? Please just a few details and I'm fine. Ordering sprayers and a pump like yours, but I'm not sure on other things. Are you using baskets under the lid and caps or just the neoprene ( and where do you get those?) Kinda new to this but am very anxious to go aero and bypass normal hydro. Just finished my second grow in soil and looking for better  !!!
!!!
 !!!
!!!whereisbrianV.
Active member
I need some TAG goodness.
oldbubbler
Member
Hope you're still around Pod Racer and/or others in the game as I'd like to run a science experiment past you's for opinion. I've read quite a few of your posts over the last few days but I ain't gonna lie and say I read all 53 pages of TAG 101 thread so I hope I'm not asking for opinions already given and apoligies if I do.
Firstly I'm an old bubbler man and I'm quite happy with the way it works, but having said that the words "tighter" and "bigger" that I see constantly applied to aeroponics obviously interests me. My current setup is a minimum plants - maximum yield type setup where I only run 1-2 (sometimes more) plants in my system but I grow them into giants (1m before I flower) in 60l bubble buckets which works out quite good at 8-9 weeks between harvest cycles (10 weeks grow, 8 weeks flower).
Now because of my preference for minimum plants on premises and space considerations, this sort of excludes me from a flat-bed, sea of green type aeroponic setup which brings me to my science experiment I plan to run right next to a bubbler (so I have a control to measure against) and here's where I'd like some opinions on wether it may work or fail or any tips.
Picture a 44 galon drum (plastic) with lid - hole in lid to fit basket that holds my veged 1m plant (done in 10 litre bubblers) ready for flowering. I'm thinking of filling it perhaps a 1/3 odd? which would be my sump with the other 2/3rs for aeroponics. So I put a pump in the sump which feeds sprayers lining the inside of the drum and away we go.
That's the prototype which I'd like opinions on. Now I know this may not (and probably will not) perform as well as or like a true aeroponic system - but like I said given my "minimum plants on premises" preference and space I'm not so much concerned with how it may perform v's a true aeroponic system, I'm more interested in views on how it would perform v's my current bubbler setup.
Opinions welcomed.
A question on pumps as being an old bubbler the only use I've had for pumps is to cycle water changes so I'm not rright up on pump technology. I followed a link you (Pod Racer) provided in another thread to a pump you recommend (high pressure, variable speed "smart" type pump). By mu observation this looks to be an in-line dry type pump - as in it's mounted on a wall etc and pumps from a reservoir. For my needs and given space and all the rest I'm thinking I need a submersible pump that will sit in my "sump" (bottom of my 44g drum) and pump from there. Do high pressure variable speed type pumps come in submersible variety? I surfed the web last night for hours and I couldn't find any that specifically said they were but that may be just me not knowing what I'm looking for. Most of the specs for thse pumps measure litres per minute as opposed to psi output which I know from one of your other threads I'm looking at attaining 50 psi.
What are views on this - will a submersible pump deliver the required psi? My gut feeling is no matter how many litres they tell you they can pump per minute, if they can't handle pressure they just won't pump - is this thinking correct or will something that pumps a given amount of litres per minute be OK even if it's not "smart" to vary it's speed to the required psi?
Any and all opinions welcome and there's probably more I wish to ask that didn't come to me right now so there may be follow ups even before answers.
Much appreciated.
Pod Racer
Member
Thanks kiwi, and all. Sorry for the MIA, just been mad busy with 'real world' concerns. It seems like there is never enough time to play in my garden of eden.
First updates:
Here is the final rig all taped in, yah I know....looks like shit and I agree. Not the polished turd I would have liked to see, but I'm gonna have to fix that later. I had too many rooted clones ready to go and needed this done.
So, lined and plumbed (see the aero spine for layout of sprayers) and ended up Duct taping the lids on to seal the light and spray. I'm getting really good coverage with the new cheapy sprayers.


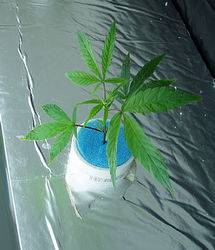
The pump sucks the nutrient solution from an old black plastic 'cargo box' $5 at HD and pushes it through a 200 mesh filter into the line. I took pictures but everything is black and you really couldn't see anything. You just have to be creative and see what works for your particular rig.

I also found a Pool Noodle, I cut them about 3/4" and trim out 1/4 of the disk to make my own cheapy pucks, until I get my neoprene ones in.
Eventually I'll have a fan running under the tables to cool the res and force the cooler air up into the room where there is a exit duct to the outside being pulled by a Dayton blower.
I'm vegging under floros as using HID is too hot and powerful for these little girls right now.
Now, for you my friend Old Bubbler.
You will need to use a Diaphragm pump to get true aerosol for your TAG Trees, but you are embarking on an experiment a number of us have been dying to attempt.
The set up would be very easy for you, and there are very small dia pumps that you can use that cost about $80 retail, probably $50 off the net.
Just use a black plastic trash can, the normal big yard type. You can drill a hole near the bottom and using a rubber gromet and barb fitting, connect directly to your pump. The pump can be outside the can, leaving no heat in your root zone.
Now, the line would then just run up to the top and re-enter the rig, where I would just make an Aeroring with foggers, like six, and if your pump is really small you could forgo the filter as its a single plant system and your nutes will be very low.
This set up, as long as the internal temps don't get above 78°F should allow you to grow monster Aero Trees that should just be amazing. I've been debating setting a run myself as the black trash cans are about the same price as those blk buckets - $5 at Wally World. However there is no idea how large these bitches could get. But I'd love to see.
I'll post a diagram for you in a few and the little pump you could use.
How is that? Whew!
Someday, once I get my own shit settled I'll attempt to do a single TAG thread, but there are so many variables that it always ends up being 50 pages long after all the questions are asked and answered. I've literally posted over 200 pages plus on TAG and there are still questions that arrise.
Its just like the old 'aero', with truly creative peps like there are here the sky is the limit. With TAG Trees, you might just reach it. :wink:
Feel free to share you pictures of your experiment, I'd love to watch. There are others here as well, like brianV. that can answer questions as well. He is just as skilled with a few TAG grows under his belt. Course, now he'll probably kick me in the ass for saying that. lol But I'm not always available and shortly I'm headed out of the country for a bit so I might loose touch here. But there are many TAGGers and the transition from bubblers to aero isn't a huge jump, just a lot less water.
I love bubblers, honestly they do rock, but for 32 plants - that is too much water for my 2nd floor. So I needed to find a better method and found my way to the ultimate environment for my plants.
I've been doing some soil grows here:
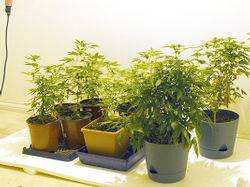
Which has taught me alot about the difference of wet/dry 3 times a week versus 150 per day. The stems are very thin and the growth slooooooowwwwwwwwww. I'm so accustomed to seeing an inch or two everyday, with soil...well, you all are familiar.
First updates:
Here is the final rig all taped in, yah I know....looks like shit and I agree. Not the polished turd I would have liked to see, but I'm gonna have to fix that later. I had too many rooted clones ready to go and needed this done.
So, lined and plumbed (see the aero spine for layout of sprayers) and ended up Duct taping the lids on to seal the light and spray. I'm getting really good coverage with the new cheapy sprayers.


The pump sucks the nutrient solution from an old black plastic 'cargo box' $5 at HD and pushes it through a 200 mesh filter into the line. I took pictures but everything is black and you really couldn't see anything. You just have to be creative and see what works for your particular rig.

I also found a Pool Noodle, I cut them about 3/4" and trim out 1/4 of the disk to make my own cheapy pucks, until I get my neoprene ones in.
Eventually I'll have a fan running under the tables to cool the res and force the cooler air up into the room where there is a exit duct to the outside being pulled by a Dayton blower.
I'm vegging under floros as using HID is too hot and powerful for these little girls right now.
Now, for you my friend Old Bubbler.
You will need to use a Diaphragm pump to get true aerosol for your TAG Trees, but you are embarking on an experiment a number of us have been dying to attempt.
The set up would be very easy for you, and there are very small dia pumps that you can use that cost about $80 retail, probably $50 off the net.
Just use a black plastic trash can, the normal big yard type. You can drill a hole near the bottom and using a rubber gromet and barb fitting, connect directly to your pump. The pump can be outside the can, leaving no heat in your root zone.

Now, the line would then just run up to the top and re-enter the rig, where I would just make an Aeroring with foggers, like six, and if your pump is really small you could forgo the filter as its a single plant system and your nutes will be very low.
This set up, as long as the internal temps don't get above 78°F should allow you to grow monster Aero Trees that should just be amazing. I've been debating setting a run myself as the black trash cans are about the same price as those blk buckets - $5 at Wally World. However there is no idea how large these bitches could get. But I'd love to see.
I'll post a diagram for you in a few and the little pump you could use.
How is that? Whew!
Someday, once I get my own shit settled I'll attempt to do a single TAG thread, but there are so many variables that it always ends up being 50 pages long after all the questions are asked and answered. I've literally posted over 200 pages plus on TAG and there are still questions that arrise.
Its just like the old 'aero', with truly creative peps like there are here the sky is the limit. With TAG Trees, you might just reach it. :wink:
Feel free to share you pictures of your experiment, I'd love to watch. There are others here as well, like brianV. that can answer questions as well. He is just as skilled with a few TAG grows under his belt.
 Course, now he'll probably kick me in the ass for saying that. lol But I'm not always available and shortly I'm headed out of the country for a bit so I might loose touch here. But there are many TAGGers and the transition from bubblers to aero isn't a huge jump, just a lot less water.
 I love bubblers, honestly they do rock, but for 32 plants - that is too much water for my 2nd floor.
 So I needed to find a better method and found my way to the ultimate environment for my plants.
I've been doing some soil grows here:

Which has taught me alot about the difference of wet/dry 3 times a week versus 150 per day. The stems are very thin and the growth slooooooowwwwwwwwww. I'm so accustomed to seeing an inch or two everyday, with soil...well, you all are familiar.

Last edited:


