What's new
  • ICMag with help from Phlizon, Landrace Warden and The Vault is running a NEW contest for Christmas! You can check it here. Prizes are: full spectrum led light, seeds & forum premium access. Come join in!

The Official Hempy Bucket Thread

LostTribe

Well-known member
Premium user
Good idea. Everybody seems to be trying to build a better mousetrap, which I can dig. But just go over to the coco hempy thread, and read all the bitching and complaining. "I can't get my ph right". "My shit keeps drying out too fast", etc.

None of that with original Hempys, just saying.

Thats why I would never run anything in these but Hydroton. I have a minimum of ph drift and really not enough to call for adjustment when using PBP line with RO.

Seems coco would eventually mess up your pump or drippers too but I do know of a friend running 70/30 coco/hydroton with good results also on the PBP line but I believe tap.
 

Jellyfish

Invertebrata Inebriata
Veteran
I use the original perlite/vermiculite formula, and use hydroton on top for easy watering. So you really use 100% hydroton all the way through? That's interesting.
 

LostTribe

Well-known member
Premium user
I use the original perlite/vermiculite formula, and use hydroton on top for easy watering. So you really use 100% hydroton all the way through? That's interesting.

Yes but remember my setup is automated for ebb n drain 4 floods daily in 12/12. Drip rings and a huge pump with buckets elevated and drain back to rez with pump off. Designed to be 5 gallon ebb flo bucket basically but I keep a small bit of water in the bottom of the buckets with the drain at 2 inches from the bottom of the bucket definitely helps as drippers and pumps fail and I am able to leave the system running for 7 days without even checking on it.

I just do 1 5 gallon bucket with 3/8" holes drilled out in the bottom inside another 5 gallon bucket with a grommet and barb at 2 inches from the bottom of that outer bucket. 1/2 inch tubing for drains to rez and 1/2 tubing to drip rings on a lil monster pump.

When I get it back up and running I will try to document if anyone is interested you can also PM me....

LT
 

Mitchman

New member
Micro grow/early flower

Micro grow/early flower

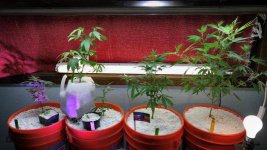
Hey peeps, ive attached a photo of my hempy system. As the title implies due to smaller grow area, will need be a "smaller" grow/yeild. First indoor grow so any advice would be welcomed. Ty and happy farming:) notes: 2 oscillating fans- aprox 70'. No co2- organic tea as nutes- ph looks good- had spider mites/pepper spray-aprox 5000 t lighting-18/6 cycle- watering every two days from tap
 

Attachments

  • 20170103_174259.jpg
    20170103_174259.jpg
    67.9 KB · Views: 39

Cannabis

Active member
Veteran
Looks good dude, you're already all over it. Lay whichever plants you grow over, so all the growing nodes, are as close to the same height as possible, and you'll be maxing them out by making it possible to get more light, on more chloroplasts,

and through manipulating the growth hormone production in them.

There's a hormone named Auxin: there's a family of em but the main one is named Auxin -and it drives the distribution of growth within the plant to set a species' typical, characteristic shape,

and in pot, the plant tries to send one or several very dominant spikes up into the air. Because pot uses the wind to pollinate.

It turns down growth to other, subordinate nodes, and you offset this through what's known as scrogging, or a "screen of green."

You also do it by physically tying the limbs down: and what you're attempting to do,

is have as absolute many
growing nodes on the plant,
within what I'll call a 'top tier'
as it's possible for you to enforce, over the life of the plant.

Most people tire out and stop training at some point and let a number of buds take over, because you have to be so OCD to train them every day, day and a half, for - however long they grow.

Within about two inches height is where the plant identifies the top tier of growing nodes.

If the growing tips/nodes are within two inches of this, the plant assumes them to be of pretty much, equal height.

Any time a node gets about two inches taller than the other top ones, the plant turns down growth to those below, and turns up growth, to those higher.

When you distribute auxin through the plant by continually leveling, and re-leveling the plant's top tier of buds, you make MANY growing nodes turn on growth to the plant's full genetic potential. The plant perceives these taller ones to be most likely to see free space above the surrounding canopy: open wind- and so feeds them even more.

It works better on some plants, but it's the same principle in them all; and you can use this growth amplification method

(methods: tying the plant to a flat net, or fence laid horizontally, is scrogging, L.S.T'ing, is Low Stress Training - this is just tying and tucking individual limbs manually, to ensure uniformity of top tier height.)

You can get yourself about 15, maybe 20 % weight in bud by rigorously leveling the tops of the plants right up till the day you chop.

The plants start correcting growth, in about 36 hours.

Not 24, but by 36 hours after the last height adjustment, the plant will have selected a couple of higher buds, and start goosing them, and turning down speed of growth, of those below.

So I just wanted to tell ya about that.

If the light bulb that's round in the picture is an incandescent? You should switch it out with an equivalent (or obviously, greater if ya can) - fluoro.

Fluoros make lots more light per watt burned, than incandescents.

People are usually surprised at - please don't despair at this, man - how little growth they can get, from the light they have.

Changing out any incandescents to fluoro is a pretty big deal.

It's a big hassle but when I used to grow indoors, I was always doing it with a 250 watt light; and I bought some of that plastic film they call panda plastic, it's black on one side, white on the other,

and I hung that like a tent, RIGHT around the plants, and it pretty dramatically increased the apparent concentration of light striking the plants. I'm real OCD and would struggle with the grow incessantly, trying to just MAX out what I could do with my rebel-against-the-empire dollar.

Since you have fluorescent lights, you should be aware that making the light come from the sides, and even below, also makes them put on more weight in flowers, rather than wood. Pot, especially the Sativas that grow primarily in warmer, wetter areas - it can be spindly. Admirable highs, but they are used to a much more fungus friendly world, and in competition with strongly growing competitive plants. So they make buds that are more fluffy to let air circulate and they grow tall, so they can compete.

Both these lead to the 'aw man...' effect when you're trying to grow a couple of bales from a five gallon bucket, yO.

And lack of light, is one of the main things that makes pot not gain weight. It just stalls out. And it'll do it forever too. It never gets to where "Oh, Ok, well then... we better start plowin' here, and catch up!"

Nah. It can't do that. So - just so you know, that's what I'm taking a thousand words to say cause I regret saying it LoL. . .


When you apply the light to the top, you're applying light to something designed by nature, to shield - to shelter the lower part of the plant, from a light source that's actually too strong for plants.


Like...there are just a FEW plants in the world, some true serious spines and sand and scorpions cacti - that can use, much more than 70% full sunlight. Like - it used to be something like 74% was the worldwide known max a plant could use.

But dig this: pot, is one of those plants, that can use a fairly high amount - it's about like many others as far as the amount of full sunlight it can process - I think it's like 70 percent. Don't remember exactly but anyway,

- one of the things about pot that will stymie you a lot, man - a LOT - is to not be able to lay in the old photo-stimulation,
with enough intensity,
to make the pot believe it's vacationing in Belize.

So what I'm saying here is to apply a high quantity of lumens, of photonic energy - to as many green cells as you can,

without overpowering whatcha call the 'shade' leaves or any one set of leaves, overdriving the shit out of them, by simply putting those leaves very near the light, and leaving them there,
and having the light raise higher and higher to accomodate those.

Large, adult leaves, that sorta form the general shape of the plant - they all turn as the sun goes by ya know, and they face the sun.

Well - in doing this you see - they SHADE the other green leaves and green chloroplasts in the stems, and - all over - so to the plant, can have quite a few of the chloroplasts down in that canopy
operating at a high rate of productivity,

with a minimum of extra huffing and puffing away moisture that might be precious down below in the ground - these "shade" leaves work out ok, for a sunlight environ. But their function of providing intermittant shade for chloroplasts below, leads to reduced efficiency of food production, of those outer leaves, themselves. There's so much light, in a sunlight environment, that - the plant's choice - plants in general, their choice, is to sacrifice some efficiency in the outer leaves, the shade leaves, to allow a VERY bright sunlight to pierce down into the canopy, in a flickering, intermittant, on-off mode.

The chloroplasts do better when they are stimulated with a high amount of light, then have it strobed: on/off, on/off, on/off.

But this happens at the expense of overdriving the shit out of the very outer/upper southerly leaves: and this is a considertion in evenly distributing the light throughout the canopy, by manipulating the lights: so you're illuminating the

most chloroplasts, with
the most light,
as much of the lights-on time,
as possible.

Standing lights on end, beside the plants, and turning the plants is one way to get a little bit of efficiency: you can reduce the constant stretch, in only one direction, this way.

Definitely do your best to get the light around the plants contained, too. You can really increase the amount of ambient light in there by contriving some kind of highly effective reflector around your little grow section there.

I used to do that a LOT and it's - admittedly, it's a lotta work but it can take your growth to a reasonable step up. There are different things you can use to do this reflecting, but mainly, styrofoam sheet: that's some nice stuff man.

It's got foil on one side that stops all light, and if you don't want the blue writing, just spread some aluminum foil over some of it if ya need to. And also, you can cut out pieces of cardboard and dollar store aluminum foil them. These really work, but of course they're kinda fragile. You can then lean these to reflect light back into your plants' immediate locale.

Yes: I confess: I knuckled in and bought Panda plastic, that black and white shit that costs a hundred bucks for a big ol' roll, but is like... it's like a grow room in a roll, yO. White on one side, BLACK on the OUTSIDE where you want to lower ambient light levels that would give it away, a lot of times, if it's a stealth grow.

It's light, it's heavy duty enough, that - you can work with it fine - and that stuff - man alive, that was a well spent hundred dollars ten years ago and I still have at least three quarters of it.

Containing your light: and really, getting enough.

If you aren't able to put more into it than the low end, there's a sorta cut-off point in HPS lights at 250.

Right at 250 watts, you can still turn them on and off, with those cheap plastic timers.

But a 400, melts standard Wal-mart timers and you're up in a larger expenditure for just a lotta stuff.

Below 250 watts for HPS,s the efficiency drops off: and the smaller they are, the closer you get to the point of fluoros, competing with the amount of light.

Right there at 250, there's a significant bump in efficiency over those smaller lights of the hps type: and a similar gain in efficiency isn't seen again till the 600 watters. Generally. Obviousl lighting's a huge field but at 250 you start spending a lot less per lumen, yet you can deal with the heat they put off quite easily with things like computer fans.

Welcome to Hempy growing Mitchman you're definitely going to have done something,
a lot of people haven't in their lives,
growing in perlite, and I assume eventually you're gonna get some vermiculite and throw in it.
The mixture is just fantastic.

I'm growing in coco hempies and also some wood chip 'heuglekulture' beds now - and I still prefer perlite/vermiculite. It's just excellent. It doesn't get boiling hot in sunlight as badly as dark colored media, either. That's a big one for me cause I put mine outside a lot in summer.

Seeing those pure perlite Hempy buckets made me long for the day when I first grew in some myself. I loved those things the way a Pooh-Bear loves honey. They are just nothing short of amazing.

The perlite's advantages are really something to behold and until a person's done it, it's kind of like they never really did something that's way, way cool.


Great looking layout for a starter, I hope you get some really great bargains and breaks so it makes a good amount of weed for you. Nothing on earth like growing your own hydroponic weed with NO noise and NO bills and NO equipment everywhere, and NO threat of root rot.


Hey peeps, ive attached a photo of my hempy system. As the title implies due to smaller grow area, will need be a "smaller" grow/yeild. First indoor grow so any advice would be welcomed. Ty and happy farming:) notes: 2 oscillating fans- aprox 70'. No co2- organic tea as nutes- ph looks good- had spider mites/pepper spray-aprox 5000 t lighting-18/6 cycle- watering every two days from tap
 

Cannabis

Active member
Veteran
I just looked at your picture again Mitchman those plants really DO look good for as much light as they're getting, I mistook your saying first

i n d o o r grow for 'first grow' so that's why I was going on and on LoL Sorry about that

Peace
 

vomeist

New member
Hi Guys, I've transplanted my babies into the Hempy buckets twice and both times they turn light green the very next. I have in perlite and giving them about 600 ppm using GH feeding schedule under 1000 watts light. Is this common with with Hempy bucket and perlite?
 

DoomsDay

Member
Any photos? Are you letting the roots hit the bottom of the bucket before transplant? There will be a fee days to a week where the plants are spreading roots to hunt for water again so upper growth will not be as prominent. As long as they sent dying and end up healthy, I wouldn't worry.
 

vomeist

New member
Any photos? Are you letting the roots hit the bottom of the bucket before transplant? There will be a fee days to a week where the plants are spreading roots to hunt for water again so upper growth will not be as prominent. As long as they sent dying and end up healthy, I wouldn't worry.

I'll take some but they are pale green like nitrogen deficiency. They are rooted clones that I transplant into the buckets. They were dark green before going into the buckets, but became pale green the very next day. I've raised my PPM up to 700 now but they are still the same. Is that normal? Or will they improve once the roots reach the bottom?
 

DoomsDay

Member
I would not call it normal, but I have noticed that plants tend to perk up once they reach the bottom res. in the bucket. Keep your eye on them but remember that you can also troubleshoot your plants too much and cause a multitudenof new issues in the pricess. I would keep everything the same that you have been doing to get the plants to the dark green you're wanting while in smaller pits, and just give the plants some time to adjust to their new homes. Also vitamin b1 never hurts to add to your transplant water. Helps with transplant shock.
 
Last edited:

chronosync

Well-known member
The less variables the better unless they are known and controlled. I just made that mistake by changing a lot of things up and now I'm honestly getting lost, chasing my own tail.
 

chronosync

Well-known member
I'll take some but they are pale green like nitrogen deficiency. They are rooted clones that I transplant into the buckets. They were dark green before going into the buckets, but became pale green the very next day. I've raised my PPM up to 700 now but they are still the same. Is that normal? Or will they improve once the roots reach the bottom?

My advice is to let them root longer. My guess is they wimped out when you put them in the big pool and hit them with juice. Try to feed them just like you were when they were happy until the roots are better established.

You ever shotgun a beer? Shit ain't easy unless yr grown and ready.

Also, maybe your pH was off in the new pot?
 

Pinball Wizard

The wand chooses the wizard
Veteran
I've noticed that seedling roots don't grow as fast in 2/1 perlite/vermiculite; as fast as soil?

(maybe?..I don't nute enough?)...maybe a good thing?

Vegging times are longer...IMO...8+ weeks


Mitchman

New member
Cannabis

Cannabis

TY for all the information, I have been experimenting with duck tape (look hard at photo) to begin that sea of green you mentioned. A Hawaiian once told me his people used rice water for flower/orchards so I have been using that every 3rd feeding which seems to be very beneficial. I will work on more illumination/reflection. Like you, im a bit OCD so i thought the hyrdo/rock medium would work well with over-watering and so forth. I have also been working on a hillbilly drip system for vinegar, which will drop onto baking soda to create c02.
 

Mitchman

New member
TY for all the information, I have been experimenting with duck tape (look hard at photo) to begin that sea of green you mentioned. A Hawaiian once told me his people used rice water for flower/orchards so I have been using that every 3rd feeding which seems to be very beneficial. I will work on more illumination/reflection. Like you, im a bit OCD so i thought the hyrdo/rock medium would work well with over-watering and so forth. I have also been working on a hillbilly drip system for vinegar, which will drop onto baking soda to create c02.
 

BombBudPuffa

Member
Veteran
I've grown in help us for years using all different combinations of grow media. My favorite is actually 100% perlite to the drain hole then 50/50 perlite/soil mix on top. You can grow 100% organic this way too.

I'll throw a cut in a hempy in a couple of weeks with my soil mix and post updates to this thread.
 
Top