What's new
  • ICMag with help from Landrace Warden and The Vault is running a NEW contest in November! You can check it here. Prizes are seeds & forum premium access. Come join in!

Cannabis Seed Storage

Hopefull Stoner

Active member


yes, brother grabbed 1k of the smaller 1.5/2.0 had credit on the snake site so was free basically, bought a label machine on sale new and 6 cartridges on the snake. need to learn the machine to do inventory using the labels. a pita that will make shit easier in the future.


how do you store your tubes. i was looking a the centrifuge vial racks trying to get the best bang for a buck. saw a 5 pack but wanted to know if i can stack them. will have to ask. $15 for the 5 different colored racks. i like that to be able to quickly id what is where.
 

Indie

New member
can u share ur step by step method tp store and also HOW YOU PREP/THAW TO USE PLEASE. THX. :ying:

Absolutely! It’s really pretty simple, Mother Nature freezes seeds regularly, but she starts slowly. This is after properly drying and curing of the seeds of course, I would not do this with green seeds.
When I receive seeds to run or long term storage, they go into a lightproof container and into the fridge. Fridge temps around 36°F. They generally stay in the fridge for 2 weeks before going into the first freezer. The first freezer is just a typical residential freezer, and the seeds spend about 2 weeks in there, and temps are about 15°F.
After the two weeks they go into a commercial deep freezer, and temps are -20°F.
Just a side note.....make the transfer from each fridge and freezer as quickly as possible, just as to not let the seeds come up in temp.
That’s where they stay until ready to thaw and grow, and at that point you just reverse the process.
Just remember warm them up slowly, don’t try and speed things up much or your germination rates will go down. Deep freeze, back to residential freezer, then back to fridge, then they are ready. Warming up process should take a month, so plan accordingly.
I use a small amount of heat when germinating my seeds, so that also may contribute to good germination rates with old seeds.
 

romanoweed

Well-known member
I bought those "bormioli quattro" . I read that smells goes trough them in Reviews, aswell some say this Exact model sometimes not closes perfectly...Well i will use them now.. Has a plastic at the Sealing Edges.. Not rubber.. Lets hope..
canvas.png - Click image for larger version  Name:	canvas.png Views:	0 Size:	73.1 KB ID:	17790471
 

fuutang

Member
The topic I want to discuss is seed saving
and storage of strictly cannabis seeds.[/SIZE]

acespicoli The Svalbard Global Seed Vault is a secure seed bank to preserve a wide variety of plant seeds. Seeds are kept at minus 18 °C (minus 0.4 °F). The low temperature and limited access to oxygen will ensure low metabolic activity and delay seed aging. (From Wikipedia) https://en.wikipedia.org/wiki/Svalba...t#Seed_storage

Full article: https://en.wikipedia.org/wiki/Svalba...bal_Seed_Vault

In theory, it may be possible to store Cannabis seeds too. Storing seeds in the vault is free to end users; Norway and the Crop Trust pay for operational costs.

Great pic of the Svalbard Global Seed Vault.
776px-Entrance_to_the_Seed_Vault_%28cropped%29.jpg
 

acespicoli

Well-known member
I bought those "bormioli quattro" . I read that smells goes trough them in Reviews, aswell some say this Exact model sometimes not closes perfectly...Well i will use them now.. Has a plastic at the Sealing Edges.. Not rubber.. Lets hope..

I would think that these jars would seal with an airtight vacum seal suitable for canning purposes like the US mason jar and French parfait Jars
looks like a good purchase :good:
 

acespicoli

Well-known member
acespicoli The Svalbard Global Seed Vault is a secure seed bank to preserve a wide variety of plant seeds. Seeds are kept at minus 18 °C (minus 0.4 °F). The low temperature and limited access to oxygen will ensure low metabolic activity and delay seed aging. (From Wikipedia) https://en.wikipedia.org/wiki/Svalba...t#Seed_storage

Full article: https://en.wikipedia.org/wiki/Svalba...bal_Seed_Vault

In theory, it may be possible to store Cannabis seeds too. Storing seeds in the vault is free to end users; Norway and the Crop Trust pay for operational costs.

Great pic of the Svalbard Global Seed Vault.

great seedbank the only issue I have seen with these seed banks is some species are listed as restricted due to nature of the plants legality
maybe you can check and see if there are any ascensions listed thus far and if they may be ordered or stored there.
we need to explore more of this type thing

welcome aboard look forward to seeing you here in the future :trampoline:
 

acespicoli

Well-known member
Disposable-Sterile-Medical-Supply-Gauze-Organic-Absorbent-Cotton-Wool-Balls.jpg - Click image for larger version  Name:	Disposable-Sterile-Medical-Supply-Gauze-Organic-Absorbent-Cotton-Wool-Balls.jpg Views:	0 Size:	43.0 KB ID:	17830304

Sterile organic 100% cotton


Bentonite Clay Desiccant 1 Pounds Loose Bulk Bentonite Clay Desiccant
can be oven dried as needed
Price:$18.78 Amazon
Disposable-Sterile-Medical-Supply-Gauze-Organic-Absorbent-Cotton-Wool-Balls.jpg - Click image for larger version  Name:	Disposable-Sterile-Medical-Supply-Gauze-Organic-Absorbent-Cotton-Wool-Balls.jpg Views:	0 Size:	43.0 KB ID:	17830304

  • Moisture/Water & Oil Absorbent
  • Absorbs up to 25% of it's weight in moisture
  • This listing is for 1-4mm granular Clay Desiccant
  • Fight mold, mildew, corrosion, and degradation with Clay Desiccant
  • Clay Desiccant is Non-Toxic Material
30% RH - 77F /25C = 8% approx moisture seed content
 
Last edited:

acespicoli

Well-known member
Govee Hygrometer Thermometer, Wireless Thermometer, Mini Bluetooth Humidity Sensor with Notification Alert, Data Storage and Export, 262 Feet Connecting Range


Visit the Govee Store


4.5 out of 5 stars 5,551 ratings


Price:$14.99


About this item
  • Smart App Control: Easily monitor temperature and humidity in real-time on the app. 262ft connecting distance (no obstacles) allows you to quickly get data remotely from anywhere in your home. (Not WiFi Version)
  • Accuracy: With a built-in Swiss-made sensor, the temperature is accurate to ±0.54°F and humidity is ±3%RH. Enjoy precise data from the hygrometer thermometer every 2 seconds.
  • Data Storage & Export: Featuring 20-day on-board data storage, you can get recent temp & humidity records through curve graph. Press "Export Data as CSV" on the app to export the last 2 years data to your phone.
  • Mini Compact Size: With smaller & compact design, this space-saving device is lightweight and portable. And you can place it at multiple locations by the hanging hole.
  • Prompt Alert Notification: Set preset temp and humidity ranges with the Govee Home App, and if levels fall out of that range, you'll receive a notification instantly.
govee.jpg - Click image for larger version  Name:	govee.jpg Views:	0 Size:	46.9 KB ID:	17874200
 

acespicoli

Well-known member
Stolen Jacked or borrowed info posted here for your viewing pleasure :D thx to everyone who worked on this, please dont credit me for the post

I did not write the following article but it was brought to my attention by another member (thanks @Brother Bard!) and I wanted to preserve the information here for future reference and to share with everyone here. :Namaste:

===========================================

Douglas.Curtis39
Husband, Father, Quality Oriented Cannabis Grower, & Author of Secrets to Growing Trichome Dense Cannabis
Follow

Make Your Own Excellent Quality, Feminized Pollen/Seeds Using Silver Thiosulfate Solution (STS)

Feminized Seeds are Awesome
Hermaphrodite plants are not awesome. Fortunately, it's possible to create cleanly produced feminized pollen. This pollen can be used to create seeds which are 99.9% female. As long as logical safeguards are taken, these seeds will not be any more sensitive to becoming hermaphrodite than the parent plants

This particular recipe for STS was originally published by Robert C. Clark. Today it is arguably the most recommended and successfully used method of feminizing cannabis. This write up includes the original recipe, along with practical useage tips and other helpful information gained through experience.

I know you'll be greatly pleased with your results. :)


Early-Dane-Spitting-Pollen-adjusted.png


Non-Hermaphrodite Plants Begin With the Parents

Stress testing your female plants is essential to removing breeding plants with hermaphroditic tendencies.
Even if you're not using feminized pollen, breeding with unstable parents can produce hermaphroditic seeds. It's extremely important to expose your potential parents to the stresses most commonly known to trigger hermaphroditic flower production. These include, but are not limited to, the following stresses:
  • Inconsistent Light Schedules
  • Pinhole Light Leaks During Flowering
  • Excess or Extreme Changes in Temperature
  • Bound Roots
  • pH too Low/High
  • Lighting Spectrum Change
  • Media Excessively Wet/Dry
  • Excessive Supercropping/Heavy-Trimming
  • Root Pruning
  • Proximity to Sessions (just making sure you're reading. lol)
  • Over/Under Feeding
  • Incorrect Nutrient Profile
  • Insects/Disease/Fungi
  • Pesticide/Chemical Exposure
  • Extended Flowering Time
Only females which stay 100% female should be used for breeding purposes.

Yes, Stress Testing

Choosing excellent parents can take a long time and consume a lot of resources. These factors are the main reason so many unstable seeds are available today (2018), Patience and persistence pays off here. The more stable the genetics you're working with, the quicker you'll have a large enough number of potential parents. Each stress takes 1-3 weeks to form male flowers. Stressing multiple clones, of the same plant, ensures accuracy of the test results.

The more stable the original female plants, the more valuable the end seeds will be. Keep stressing until you're absolutely sure the plant is stable. Again, be prepared for this process to take quite a while. Every extra ounce of effort you put into this portion of the program will pay you back in greatly increased quality. You can do it!:D

Silver Thiosulfate Solution (STS)
Molecule-Silver-Thiosulfate.png

(Image Rights chemspider.com)

STS is the most commonly used chemical mix, for creating stable feminized pollen. While it may not be the only method, it is arguably the most commonly used and is quite reliable. Female cannabis plants require ethylene production to form female flowers. Without ethylene being produced, the female cannabis plant will produce male flowers full of feminzed pollen. Silver Thiosulfate Solution(STS) suppresses ethylene production in plants. When this solution is properly applied to the bud sites of a cannabis plant, the plant will not produce ethylene. Again, without the ethylene, male flowers form.

The Basics of Making Silver Thiosulfate Solution
Can you mix a powdered drink mix? Congratulations! :D You have the skills to make Silver Thiosulfate Solution. STS is mixed up in two parts called "stock" solutions. These solutions are labeled A and B. Solution A is a mixture of silver nitrate and distilled water. Solution B is a mixture of sodium thiosulfate and distilled water. These two solutions can be kept in light-proof bottles, sealed and refridgerated, for extended periods of time, even years.

Chems-n-bottles-n-sprayer-small.png


Once solutions A and B are mixed together, the resulting mix is diluted with distilled water before using. Once mixed, the STS (both full strength and diluted) must be kept from light, and can be used up to a month when stored properly. I've used mixed and diluted solution which was kept in my refridgerator for over 9 months, but fresh solution definitely works the best.

Tools and Materials You Will Need
Where possible, I have linked the exact items I purchased and used. The remaining items I had around the house. 500g of Sodium thiosulfate anhydrous is a LOT of thiosulfate, so smaller projects may want to use the pentahydrate verion, because it's available in smaller sizes.
  • Silver Nitrate
  • Sodium Thiosulfate (Anhydrus and Pentahydrate Both Work)
  • Distilled or Reverse Osmosis Water
  • A Digital Scale Accurate to 0.1g
  • 2 32oz Brown Glass Bottles
  • 32oz Brown Glass Bottle w/Black Sprayer Top
  • 33 Gallon Black Trash Bag
  • Tape
  • 60 cc/ml Syringe
  • Surfactant (Yucca-Extract)
  • A Cool Dark Place for Storage (Fridge)
  • Nitrile Gloves
  • 500ml/2 Cup Glass Mixing Container
  • Small wire whisk
  • Safety Goggles
Basic Safety Recommendations
The following steps require careful measuring, along with basic chemical safety. It is strongly recommended you work on a flat surface with a plastic sheet or several layers of newspaper to protect it. Silver nitrate does stain brown to black, so gloves and safety goggles are recommended.
Sodium thiosulfate has a very low toxicity, make sure you still wash up any spills well to remove all concern. Both of these solutions can be safely rinsed down the drain, when followed by a large amount of water.

Measuring and Mixing Stock Solution "A"
  • Fill your 500ml measuring cup with 500ml of distilled water
  • Measure out .5g of Silver Nitrate
  • Mix the silver nitrate powder into the 500ml of distilled water
  • Pour the silver nitrate solution into a brown glass bottle and seal tightly
  • Label the bottle "A" Silver Nitrate
  • Thoroughly clean the 500ml container and rinse with distilled water
Measuring and Mixing Stock Solution "B"
  • Fill the 500ml container with 500ml of distilled water
  • Measure out 2.5 grams of sodium thiosulfate anhydrous, OR 3.9g of sodium thiosulfate pentahydrate
  • Mix the sodium thiosulfate with the 500ml of distilled water
  • Pour the sodium thiosulfate solution into a brown glass bottle and seal it tightly
  • Label the bottle "B" Sodium Thiosulfate
  • Thoroughly clean the 500ml container and rinse with distilled water
Keep Both "A" and "B" Solutions Cool and Dark!

Mixing and Diluting STS

The next step is to mix the two stock solutions together properly, creating the actual Silver Thiosulfate Solution (STS).
Before using the STS, it must be diluted to a weak solution for spraying!
  • Measure 50ml of stock solution "B" with the 60cc syringe and gently squirt it in the 500ml glass measure
  • Thoroughly rinse the syringe with distilled water, or change to a new syringe
  • Measure 50ml of stock solution "A" with the 60cc syringe
  • While whisking solution "B" in the glass measure, slowly squirt solution "A" into the glass measure in less than 30 seconds
  • Pour the mixed solution into the 32oz brown glass bottle with black sprayer top
  • Add 900ml of distilled water to fill the sprayer the rest of the way, leaving room for a little bit of surfactant
  • Add yucca extract in small amounts and shake well
  • Test spray on a leaf to if solution still beads up and rolls off
  • Add additional yucca extract and shake well, until the solution spreads across the leaf instead of beading up
  • Thoroughly rinse all tools using more rinse water than usual
You now have a sprayer bottle with a 1:9 dilution of STS and water. You want to do your best to protect it from light and heat. Personally, I wrap the bottle section with a black plastic trash bag and tape it in place. This is for additional light protection while it stores in my fridge. I've successfully used 9 month old solution which was wrapped and stored in my fridge this way.

Chems-n-bottles-n-sprayer-med.png


Successfully Using STS!
I've spent a great deal of time researching the best method(s) to use for success with STS. First I'm going to detail the steps I've used successfully myself. I'm also including the thoughts and tips I've picked up from other growers. Cannabis is a nearly infinitely variable plant, so it's best if you have information from as many sources as possible. Who knows which tip will specifically fit your plants and setup. ;)
Regardless of the spraying schedule you use, be sure to thoroughly saturate the branch(es) and beginning flower clusters.

Spraying Schedule I've Used Successfully
  • Spray branch(es) you want reversed 5 days before flipping to flower
  • Spray every 5 days until major male flower formation has begun
Alternative Spraying Schedule A
  • Spray branch(es) you want reversed 2 weeks before flower
  • Spray branch(es) you want reversed on the day you flip to flower
Alternative Spraying Schedule B
  • Spray branch(es) you want reversed on the day you flip to flower
A Note on STS "Burning" the Plant
Many growers have reported the STS solution 'burning' the plant. I strongly recommend diluting your spray further than 1:9, if you experience any burning of your plants.

Additional Tips and Tricks
As always, the more information you have, the better you can potentially achieve. The following are little things which can make a big difference in your results.

Using Clones
When possible, I've found it immensely helpful to work with clones of the same plant, reversing one or more for pollen in a small flowering area first. The pollen is collected and stored. At this point, the pollen can be used on any female plants, including clones of itself.
Though it does involve a second step of collecting and preserving the pollen until use, it allows you to create seeds without dealing with a reversed plant in the room. An additional up side is the ability to store the pollen for years, when preserved properly.

Pollen Control
I STRONGLY recommend using filtered intakes and outtakes on any flowering environment you're creating or using pollen in. Many growers have reported developing allergies to cannabis pollen, after working with it for years on end. Filtering the air going in and out of your flowering rooms keeps pollen contained. (mostly lol)

I use spray bottles of r/o filtered water and spray down the air in the room, any time I didsturb pollen. Knock the pollen out of the air after every session of working with pollen. Be sure to spray down the insides of tents and flower rooms after each run. This will minimize cross contamination from different pollen sources.

Diluting Your Pollen
Any visible bit of pollen you can see is made up of millions of bits of pollen, making one pollen per pistil pollination impossible. Mixing your pollen at one part pollen to 50 parts corn starch or flour prevents waste. Each pistil requires only one bit of pollen to create a seed and the dilution makes this easy.

Using a Makeup Brush to Pollinate With
Many growers report excellent results with evenly pollinating plants, when they use a clean makeup brush. The brush allows easy application of the pollen evenly across the plant. When the pollen is diluted with flour, you're easily able to see which flowers you've already pollinated.

Stubborn Female Refusing to Turn?
While the most stable female plants are the type of plants we strongly want to breed with, they are often difficult to get quality amounts of pollen from. These tips should help even the most stubborn female in your stable flip large amounts of viable pollen.

Test Different Spray Schedules
Flower out small clones of the plant you want to reverse. Use a different spray schedule with each clone, keeping careful track. You may find one schedule works much better than the others.

Use Colloidal Silver
Some growers have reported success with the alternative spray schedules, with a follow up spraying of a high ppm colloidal silver solution, 2-3 weeks into flower.

Collect, Dry and Crush the Pods
Have a plant growing great big clusters of male flowers which don't seem to open, or don't have much pollen when they do open?

When the pods have swelled and look like they are fully mature and should be opening, cut them off the stem. Wrap the clusters in paper towels and bury them in a sealed jar of dried rice. (Heat un-cooked rice in an oven at 150-170F for at least 12hrs and cool in a sealed jar) The rice will absorb the moisture from the pods and dry them completely.

When the pods are completely dry and crispy, gently crush them through a tea strainer, or similar fine mesh strainer. You'll find large quantities of viable pollen.

Old Spray (9+ Months)
When the sprayer bottle is properly protected from light, and kept in a cool place, the mixed STS can remain viable for months. You can check to see if the solution will most likely work by pouring a bit out in a clear glass. The solution should be crystal clear.

Any darkening of the solution means at least some of the silver has tarnished. Only use clear solution for best results. Here is a picture of a plant I reversed using STS which had been mixed and stored in my fridge for over 9 months. You can see it worked, but I believe the dish soap (instead of yucca) I added stressed the plant.


Follow his thread here


Poor-formation-Tsue-9-month-old-sts.png
 
Last edited:

acespicoli

Well-known member
borrowed
Storing Your Pollen for Years (Possibly 10+ Years)
Pollen can be stored for a long time in a freezer, as long as it has been thorougly dried. Silica packs do not absorb down to a low enough relative humidity, so dried rice is used.
Heat un-cooked rice in an oven at 150F-170F for at least 12hrs. Pour the hot rice into a sealable glass container (I personally use large peanut butter jars). Seal the jar and let it cool to room temperature.
Collect your pollen and carefully transfer it to a foil baking cup or other small container which fits in the jar. Seal the pollen in the rice container and set it in a cool, dark place for 7 days.
Toast some flour in a skillet on the stove until it is a dark tan color, then seal hot in another glass, airtight container and let cool to room temperature. This will remove the moisture from the flour.
Remove the pollen from the dried rice jar and mix it at a ratio of 1 part pollen to 50 parts flour.
Seal the mixed pollen in small containers, foil or plastic sealed pouches or (preferred) 1.5ml centrifuge tubes.
LABEL your containers carefully, using the specific plant name, date and any other information you believe you'll remember later. (Because there's a good chance you won't)
Seal the containers in a thermos and keep it in your freezer. The thermos acts as an additional thermal protection barrier, just in case you have a freezer issue years down the line. It also makes transferring pollen from one place to another a safe operation. Just be sure to keep the thermos at freezing temps, and to limit the amount of time outside the freezer.
 
Last edited:

herbgreen

Active member
Veteran
In plastic centrifuge vials w/seeds>organic cotton ball material>desiccate>mylar envelope heat sealed >mason jar w/desiccate

make sure .... if you use mason jar crank it good!

Airtight and temp store @35-40F or 4C

dedicated fridge....use temp gauge

:rasta:
 
Last edited:

AllStuff420

Member
Remember that grinders, pipes, and other paraphernalia should not be stored with cannabis. The ash and resin from burnt cannabis tend to linger and stink up the place. Keep weeds in a dark, cool place, and flowers in an airtight, glass jar packed as tightly as possible.
 

acespicoli

Well-known member

5 Tips For Germinating Old Seeds​

566605d180308ec7d9a85a1b8adfe578
byHarry Resin
October 7, 2016

1658794914809.png


Here are some good tips for germinating seeds that are hard to start or are having trouble germinating. Have some patience though as it could take anywhere from three days to three weeks for a seed to germinate. Some of these tricks I would only use if the seed has not sprouted after two to three weeks or if you have a few seeds in reserve from a batch that haven’t germinated.
Seeds are comprised of an outer hard layer and an embryo which is inside the hard shell. The reason that older seeds don’t germinatem well is that the shell has become to hard and water is unable to penetrate, this process of imbibition is the start of the germination process. The seed will swell with water and eventually the shell will pop open and a small tap root will erupt.
germinate3.jpg

One thing i wouldn’t do is to germinate your seeds on a paper towel. White paper is filled with bleach and other chemicals and is not a good thing for your plants. Use small jiffy starter blocks or a light soil:
1. Dilute 10ml (roughly one tsp) of Fulvic acid per litre (33 oz) of water.
2. Scuff the outer shell of the seed with some sand paper. Roll up a small cigar or sand paper or line a match box and gently shake the seeds over it. This will create micro abrasions letting in more water.

3. Use a lightly carbonated water. The extra Co2 will help the water penetrate the seed.
4. Use a light enzyme or seed booster, Plagron Nutrients has a very good one.
5. Finally if all else fails use an Exacto knife to slightly slice the seed open down the spine of the seed. This will make it easier for water to penetrate the shell.

~~~~~~~~~~~~~~~~~~~~~~~~~~~~
if anyone else has some useful germinating advice please share

germinate2.jpg
 
Last edited:

acespicoli

Well-known member
Four Hacks for Germinating Old Cannabis Seeds


Four Hacks for Germinating Old Cannabis Seeds​

When your old cannabis seeds don't want to pop, one of these four techniques could come to their—and your—rescue. Aging seeds are more difficult to grow than fresh ones and we'll explain what you can do to help germination.


72
18 May 2019
By Adam Parsons

The older a cannabis seed gets, the harder it is to pop. But hard doesn't mean impossible. If you've been saving your seeds for a rainy day and it finally started pouring, these tips could help you get most, if not all, of your old beans to germinate.

1. PRE-SOAK WITH SUPPLEMENTED WATER​

As cannabis seeds age, their protective outer shell hardens and prevents water from passing through. Unless the tiny, dormant embryo that lives inside the shell detects moisture, it doesn't know that the conditions are right to sprout. As a first step, pre-soak your old cannabis seeds for about 12 hours to see if that does the trick.
To improve your chances, use carbonated water and/or add one of these supplements that help with water absorption. Fulvic acid and most boosters also give your seeds a light dose of nutrients.
  • Fulvic acid
  • Germination booster
  • Hydrogen peroxide
  • Gibberellic acid
Keep the water warm, but not too hot. Aim for around 22°C. Avoid direct sunlight, and keep an eye on the glass. Do not soak seeds for prolonged periods, more than 24 hours can deprive them of oxygen and make them drown.
PRE-SOAK WITH SUPPLEMENTED WATER

2. SCARIFICATION​

Scarification, or scuffing the shell, can also help water pass through an older seed's tough outer shell.
To scarify your seeds, line a matchbox or other small container with sandpaper. Drop the seeds inside, shake vigorously for 30–60 seconds, then remove. You may not notice much of a difference, but the small micro-abrasions are sometimes enough to let water breach the shell and trigger germination.
SCARIFICATION

3. REMOVE THE RIDGE​

The seed's shell is made up of two pieces, with a seam going all around. The side that's raised more than the other is the ridge. A hardened ridge can make it difficult for the seed to open. To remove the ridge, run a sharp blade along the ridge on both sides. Handle gently and it should come off without damaging the inside of the seed.
Removing the ridge not only makes it easier for the seed to open, it helps with water absorption.
REMOVE THE RIDGE

4. SLICE THE SEED​

In a life or death situation, surgery may be the only option. Meaning—only do this if nothing else has worked because this technique ruins as many seeds as it saves.
  • Remove the seeds from any moisture and allow them to dry out completely.
  • Use a sterile scalpel to slice into the seed at the seam and open it slightly.
  • Try to germinate it again.
SLICE THE SEED


THINGS TO REMEMBER​

If you're going to keep seeds more than a year or two, proper storage will dramatically increase the chances of late-stage germination. Place them in an airtight container. Put the container in a refrigerator set at 6–8°C with 20–30% relative humidity. If excess moisture is a concern, add silica gel packs to the container.
As you proceed through these steps, the risk of damaging your seeds past the point of recovery increases. Between each suggestion, give them a few days to a week to germinate. Allow the outside to dry each time to prevent rot. Do not try all or multiple techniques at once.
In the future, consider growing your seeds before they get a chance to get old. They're not cheap, so letting them go bad is a waste in all kind of ways.
 
Last edited:

acespicoli

Well-known member
How to germinate old cannabis seeds


4 Top Ways How to Germinate Old Cannabis Seeds so they Crack Open​


by Parker Lewis


You may have found some old cannabis seeds that you forgot about.
Or maybe haven’t gotten around to planting them and are wondering how to get them to germinate.
The older they are, it’s hard for them to crack their shell.
I have tried various ways to get older seeds to sprout, some successful some not.
There are methods that work better than others.
These are the methods we found to help germinate old cannabis seeds and get them to sprout.
Let’s check them out,

How to germinate old cannabis seeds:​

Pre-soak method​

The pre-soak method is one way to kick start and germinate old cannabis seeds into sprouting.
We usually start all of our seeds off this way even if they are newer seeds.
It’s recommend you have your water solution at room temperature around 20 degrees Celsius or 68 degrees Fahrenheit.
You can have it warmer depending on the climate you live in. But not too hot.
** Please note: Do not soak your seeds longer than 20 hours or you risk drowning them **
There are a few different additives you can use hydrogen peroxide, carbonated water.
We have also heard of fulvic acid but (it is not covered in post because we never used it.)
germinate old cannabis seeds

Hydrogen Peroxide:​

When using Hydrogen Peroxide in soaking your seeds it adds extra oxygen to the water.
This can help the cannabis seeds absorb the extra oxygen for the tap root. Roots like oxygen.
To make this solution use a ratio of 100:1. Use 100 ml of water to 1 ml of hydrogen peroxide.
Next take purified water at room temperature and mix in your hydrogen peroxide.
Then place water solution in a shot glass or glass of your choice then drop the seed in.

Put the glass in a dark warm area.
Wait anywhere from 8-18 hours, tap the seed to see if it sinks. If it does then it has absorbed the water it needs.
You can now either plant it in the medium, pointy side facing down.
Or you can place then in a paper towel soaked container with your hydrogen peroxide solution and use the paper towel method to sprout them.

Carbonated water:​

To use carbonated water to germinate old cannabis seeds it’s really simple.
Use room temperature carbonated water (un-flavored).
We recommend you have your water solution at room temperature around 20 degrees Celsius or 68 degrees Fahrenheit.
You can have it warmer depending on the climate you live in.
Simply drop your old cannabis seed into the water and store in a dark warm area for about
Put the glass in a dark warm area.
Wait anywhere from 8-18 hours, tap the seed to see if it sinks. If it does then it has absorbed the water it needs.
You can now either plant it in the medium, pointy side facing down.
Or you can place then in a paper towel soaked container with your hydrogen peroxide solution and use the paper towel method to sprout them.

Scratch Method:​

With the scratch method it’s really simple to do all you need is a fine grit sand paper.
Some people use an empty match box to put the sand paper in.
Then the next step is to simply put the seed in a “matchbox with sand paper” and give it a shake once or twice is enough.
What I have found best if you don’t have an empty match box and do not want to take all the matches out of the box.

Cut a piece of sand paper about 3 inches by 3 inches.
Next roll it up so it’s the shape of a tube and wider than the seeds, then put some tape on it to keep it together.
Then just put your finger on one side of the opening to close it.
After that place the seed in the tube of sand paper put your other finger on top and give it a shake once or twice is all that is needed.
Once your old cannabis seeds got there shake on.
The next step is to put them either in a Pre-soak, paper towel method, or grow medium of your choice soil coco, rockwool.

Slice Method:​

The slice method is the last resort and a very extreme measure to try and get the seed to germinate and sprout.
After you have tried the methods mentioned above.
You will need a very sharp knife like a razor blade (make sure it is sterile, use some alcohol on it)
Take your old seed and make a slice along the middle of the seed where you can see the division of both sides of the seed.
Now place the seed into the soil, coco, rooting plug or Rockwool of your choice.

Ridge Method:​

Some cannabis seeds have a ridge on one side of the seed that is protruding.
You can try and gently remove the ridge with a razor blade if you wish this may allow the seed to sprout open.
Then place the seed into a growing medium or a sprouting method like paper towel or rooting plug.
cannabis plant

Final Thoughts​

Trying to germinate old cannabis seeds can be very difficult.
Especially if they are not wanting to crack open. About 50 to seventy 75 percent of the time this can be the case.
Try to use some of the methods mentioned like the scratch, pre-soak, and paper towel method.
You could be on the right track to getting them to sprout out.
When you have old seeds you should always try and germinate them.
Because you never know they just might grow up to be a fantastic cannabis plant.
If you want to learn more about germinating cannabis seeds check out our post on it here: Germinating marijuana seeds
Let me know in the comments your methods or if you had any success?
Keep growing!

~~~~~~~~~~~~~~~~~~~~~~~~~~~~~~~~~~~~~~~~~~~~
feel free to add to this topic if you have anything to share or link a ic article if its more in depth
 
Last edited:

acespicoli

Well-known member
If you have not seen his whole thread I recommend giving it a quick read tons of info from our ic brothers thread
edit: also added this link in the quick start post earlier on STS
 

acespicoli

Well-known member

Storing Seeds by Mel Frank​


Jul 30, 2021 by Mel Frank

When storing seeds, use the same principles as when storing pollen: separate seeds from all vegetative matter. Separating seeds from very dry buds with a kitchen metal mesh strainer makes this quick and easy.
Store seeds in small containers and include a desiccant; clean, dry seeds remain viable at refrigerator temperatures for easily 20 and more years. High temperatures, temperature swings, and high humidity are ruinous for seeds. For very long term storage, glass or metal containers are recommended by seed archivists, but I've used film canisters with great success.
35mm film canisters work wonderfully.

Do not store in baggies as these may leak or break, particularly if taken in and out of storage. Most plastics actually “leak” after time, but film canisters are especially tough and impermeable and keep contents reliably dry. Storing seeds in plastic baggies is particularly bad.
Glass jars are impermeable, but leakage may come through their covers, and more desiccants must be used in larger containers. Divide seeds among many small containers as any one failure is not a total disaster.
Refrigeration is my preferred, long-term storage solution and I’ve had 100% germination with seeds stored more than 20 years.
I’ve had less experience with frozen seeds, but had almost 100% germination with seeds frozen for 15 years. However, some were weaker than refrigerated seeds—their embryonic leaves had gray areas, indicating dead or dying tissue, but with tender care, 90% grew into strong, normal plants (Photo Below).
The photo shows Skunk#1 seeds with tissue damage after being frozen for 14 years.

The photo shows Skunk#1 seeds with tissue damage after being frozen for 14 years.
This may have had to do with a freezer failure during this time. That convinced me that refrigeration was better, as refrigerator failure would not be as deleterious to seeds going from cold to household temperatures than frozen to thawed. Seeds cannot be taken in and out of a frozen state without harm, but can, in my experience, be taken out of refrigeration for short periods as long as stored with desiccants.
Mel Frank
 

acespicoli

Well-known member
From our friend Khalfia

Collecting And Storing Pollen : Cannabis Males & Reversed Females​


Although making seeds is easier than breeding, collecting and storing pollen is an essential skill that all aspiring breeders must master. Whether you are a future cannabis breeder, a hobby pollen chucker or you’re just reading this for “educational purposes”, welcome!
In this tutorial, we are going to go over how to successfully harvest and store pollen from both cannabis males and reversed females.
If you want to do this seriously and create your own stable cannabis strain, it is paramount to learn the basics of cannabis breeding. However you may also want to make seeds just for fun which is fine too. Let’s delve into it!
Harvesting Cannabis Pollen

Collecting Male Pollen​

Collecting and storing pollen from a male plant is often easier than harvesting feminized pollen.
Male cannabis plants can produce copious amounts of pollen. Furthermore, a little bit of pollen goes a long way so you will just need a small amount of it to make hundreds of seeds!
The best time to collect male pollen is usually about 1 week after the first flowers begin to open. Keep in mind that this is strain specific so it can vary greatly.

What you need to get started:​

  • dehumidifier (Not needed if the Relative Humidity is under 45%)
  • table with a flat surface
  • pair of tweezers
  • sieve or mesh screen
  • plastic card
  • sheet of paper
  • test tubes
  • garden sprayer
Because humidity destroys pollen viability by causing the pollen spores to germinate, the environment has to be very dry. If the Relative Humidity is over 45%, it will be paramount to use a dehumidifier.
Pollen grains are invisible so make sure that you are collecting your pollen in an airtight room or a room far away from your flowering females.

4 Steps To Collecting Pollen​

Step 1: Place the male plant above the table with a sieve between the table and the plant. Male cannabis flowers are very moist and this can ruin the viability of your pollen.
Step 2: Gently shake the male clusters above the sieve. The pollen should end up on the table and the male flowers should remain trapped in the sieve. Remove all foliage remnants and male flowers from the pollen powder using your tweezers.
Cannabis Pollen Collection

Step 3: Let the pollen dry with the dehumidifier running for at least 12 hours.
Pollen doesn’t store well at room temperature so the dehumidifier will help suck up the moisture faster.
Step 4: Collect the pollen from the table using a plastic card. Slowly push it onto a sheet of paper previously folded in the middle.
Beware! Always thoroughly spray yourself with water as soon as you leave the room. Pollen grains are tiny and after collecting pollen, your clothes will be full of invisible pollen spores. It is very easy to contaminate your female plants that way.

Short Term Storage VS Long Term Storage​

Short term storage:​

After waiting for 12+ hours, gently poor the pollen into your airtight test tubes and store them in a fridge.
This pollen should remain viable for 3 to 6+ weeks that way. This method is great whenever growers want to stagger the pollination of their female plants.

Long term storage:​

Use an airtight glass jar with a couple of silica gel packs in it. Poor the pollen into a small paper pouch and place the paper pouch into the glass jar. After about 48 hours, you can then mix up the pollen with dry cooking flour (1 part pollen / 1 part flour) and fill up your test tubes.
Finally, the test vials can go straight to the freezer.
Always let the tubes come near room temperature before opening them so as not to draw warm moist air. When done properly, you can store pollen for several years using this method.

Collecting And Storing Pollen From Reversed Females​

Harvesting pollen from reversed females is a similar process though it is often trickier. Not all female cannabis plants can be reversed. Some will produce male flowers devoid of pollen, some will produce male flowers with tiny amounts of feminized pollen and some will give male flowers with good amounts of pollen.
Reversed females almost never produce as much pollen as male plants.
For that reason, instead of shaking the clusters above a sieve, it is better to pluck the mature male flowers one by one and tap them against the table using tweezers. By doing that, the small amount of pollen trapped in the flowers should fall off onto the table.
You can use a black table in order to see how much pollen these reversed flowers contain.
Note that reversed females take longer than male plants to start producing pollen. Therefore, feminized seed makers should start reversing their donor females at least 1 week before flipping their receiver females to flower.
Feminized pollen storage however is exactly the same process as regular pollen storage.
Revesed-Uzbek-Landrace-Female-768x1024.jpg

Fresh Pollen VS Stored Pollen​

Although it is possible to store pollen for a long time, these tiny spores are very sensitive to temperature variations and humidity. The pollination may work very well but it can also fail. Pollinating your cannabis plants using fresh pollen is a sure-fire way to get lots of seeds.
 

acespicoli

Well-known member

Seed germination​


The germination process​

If a seed is given the right conditions and the embryo is alive it will start to grow. This process is called germination.
This is how it happens:
Water has softened and split the testa. This allows water and oxygen to enter the seed.
Energy is needed before a seed can germinate. The food stored in the seed is used up to produce energy for the growing embryo. This process is called respiration.
Oxygen is required for respiration and it comes from the air. This oxygen combines with the food during respiration, to release stored energy used for growth.
Water enters the seed through a small hole in the testa called the micropyle. The water is then used in chemical reactions inside cells in the seed.
Warmth is needed to speed up the chemical reactions that take place in the seed. Warmth also speeds up the making of new cells when the plant embryo is growing. Therefore low soil temperatures for example, will slow down the rate of germination. Each species of plant will have a particular temperature range that its seeds will germinate in.
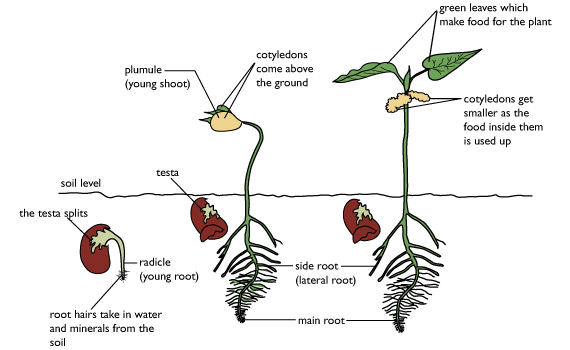
The radicle is the first part of the plant embryo to grow once water and oxygen enter the seed. Soon it comes out from the seed. Next the plumule emerges. The green leaves develop and function. They will now make the food for the plant using the process of photosynthesis.
Here is a diagram showing the stages of germination.
Diagram showing the stages of germination

Viability of seeds​

If a seed is viable it is alive and capable of germinating and growing. Remember seeds are made up of an embryo plant and a food supply. The embryo must be alive for germination to occur, so seeds must be stored properly. Seeds vary in the length of time they will stay viable. Indian lotus seeds, which were buried in a peat bog for an estimated 1000 years, germinated perfectly. However, generally, the older the seed the less likely it is to be alive.
Seeds should be stored correctly to be able to survive and germinate. If they are stored incorrectly then the food store will be used up during respiration and the seed may die. Heat will speed up respiration and therefore use up stored energy. Seeds should be stored in cool, dry conditions away from direct light (not in a shop window). The viability will decrease over time so seed packets have a ‘use by date’ on them.
When a number of seeds are sown, they might not all germinate. It is useful to know how many of a given batch of seeds can be expected to germinate.
 
Last edited:

Latest posts

Latest posts

Top