What's new
  • As of today ICMag has his own Discord server. In this Discord server you can chat, talk with eachother, listen to music, share stories and pictures...and much more. Join now and let's grow together! Join ICMag Discord here! More details in this thread here: here.

a ppk for a 6 plant limit

Mugwump

New member
Great googly moogly av8or, you're squared away! Ex-mil? Impressive. I guess av8ors become dead av8ors without attention to detail.

I hear you about understanding the concepts. I have a handle on those, I believe. The big one is the wick/tail: The difference between the bottom of the top tub and the surface of the solution in the bottom tub controls the "wet zone" in the top bin, due to the balance of gravity and the capillary pull of the medium used. I get the leveling of solution levels between the reservoir and tubs via adjustment of the (reaction-constrained) float valve.

The system is brilliant in its simplicity. Using the feeding to pull O2 into the roots, using the tail to control the micro environment, root-fouling and backup watering...just elegant.

That said, I'm a guy looking for a formula. That's one of the attractions of the system. If you don't mind I'll continue my research and then lay out my plan before the forum to ensure I don't do anything stupid, e.g. see your warning about perlite/watering schedule. I love to experiment and tinker, but I'm constrained for time. Starting with an 80% optimal solution would be ideal.

Thanks again for the gift of your time. I really appreciate it.
 

DunHav`nFun

Well-known member
Veteran
Wanted to stop in and show respect for Av8or since he`s come so far in such a short time as far as PPK`s goes that is....now...

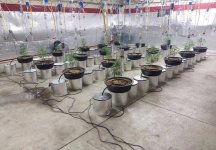
In your big room pic with each planter having it`s own rez , why`s there a bucket on each side of each planter...?.....reason I ask is because you growing each plant with it`s own pump is exactly what I did last summer , but I just had a lower sump rez that caught the overflow and stayed topped off via float valve on an upper main rez....anyways....

I`m sure all the guys here would love to know how your jacked up 185 gph PPK`s function Av8 so hook us up.....

Peace....DHF.....:ying:.....
 

av8or

Member
Great googly moogly av8or, you're squared away! Ex-mil? Impressive. I guess av8ors become dead av8ors without attention to detail.

I hear you about understanding the concepts. I have a handle on those, I believe. The big one is the wick/tail: The difference between the bottom of the top tub and the surface of the solution in the bottom tub controls the "wet zone" in the top bin, due to the balance of gravity and the capillary pull of the medium used. I get the leveling of solution levels between the reservoir and tubs via adjustment of the (reaction-constrained) float valve.

The system is brilliant in its simplicity. Using the feeding to pull O2 into the roots, using the tail to control the micro environment, root-fouling and backup watering...just elegant.

That said, I'm a guy looking for a formula. That's one of the attractions of the system. If you don't mind I'll continue my research and then lay out my plan before the forum to ensure I don't do anything stupid, e.g. see your warning about perlite/watering schedule. I love to experiment and tinker, but I'm constrained for time. Starting with an 80% optimal solution would be ideal.

Thanks again for the gift of your time. I really appreciate it.

Haha, you got it boss. A dead av8or indeed. And yes, I'm a vet. That's how I got into all this, actually. Refused the VA's drugs (you can probably guess) and chose to try smoking weed instead. That turned into me growing my own and now here I am, doing this full time.

Anyhow, it sounds like you have it all squared away to get started. I'm looking forward to seeing how you implement your system in your space! Good luck, brother.
 

av8or

Member
Wanted to stop in and show respect for Av8or since he`s come so far in such a short time as far as PPK`s goes that is....now...

In your big room pic with each planter having it`s own rez , why`s there a bucket on each side of each planter...?.....reason I ask is because you growing each plant with it`s own pump is exactly what I did last summer , but I just had a lower sump rez that caught the overflow and stayed topped off via float valve on an upper main rez....anyways....

I`m sure all the guys here would love to know how your jacked up 185 gph PPK`s function Av8 so hook us up.....

Peace....DHF.....:ying:.....

DHF, thank you for the kind words, sir! In case some of you all haven't caught on in previous posts, I can't take credit for all my fast learning. A few months back I started working with D9 so everything I post is our work, not mine. So everytime I say "we" in a post, I'm referring to D9 and myself.

I've got two more facilities that I'm currently working on. The Lorax has started his build and I'm helping him get that going. I'll have him do a threat as a first time grower, too. I'm also looking to build another facility here quick and then start in on a large recreational site, as the state keeps tightening the noose on medical laws.

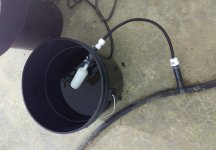
And now to the three bucket system. Bucket #1 has a float valve and the input feed. It is connected with 1/2" tube to bucket #2 with the plant on it. In line, bucket #2 is connected to bucket #3 with the pump in it. This allows very slow and even introduction of fresh nutes. Having such a large floor space and wanting to move the entire ppk site from a 4 to a 6' center, shimming buckets for level air gaps was out of the question. We had to create an all-inclusive modular unit that was scalable. If you put the float and pump in a single larger bottom tub, you can't access them with a huge flowering plant on top. We came up with a three.bucket system. Two also works but it was cheap, fast and easy to just put three in. Besides, it mixes the fresh nutes in more steadily. Like having the cereal box float valve bucket with a hole drilled in it. It's just a 3.5 gallon cereal control bucket.

Hopefully that made sense. I'll unpack it further if need be.
 

McKush

Éirinn go Brách
ICMag Donor
Veteran
Hey Av8or & Delta9nxs - glad you have finally announced it! I had to correct my typing a couple of times.

Best of luck to you both, but I'm sure you won't need any luck. What you are doing is impressive gents.

plz keep the pics flowing, we are all rooting for you (bad pun intended)
 

Oysters

Member
A few months back I started working with D9 so everything I post is our work, not mine. So everytime I say "we" in a post, I'm referring to D9 and myself.

Very happy to hear that. Like everyone else who's tried ppk, D9's the one who made it all happen. Not seeing any recent posts from him has made me somewhat anxious about his absence, so it's great to hear that D9 is hard at it.
 

Oysters

Member
Great googly moogly... I get the leveling of solution levels between the reservoir and tubs via adjustment of the (reaction-constrained) float valve.

Mugs, anyone who can combine googly moogly and a parenthetical about "reaction-constained", will have no problems running a ppk.

Unlike the others you've heard from since checking in - who know a lot more than I do and have some monster grows to show for it - I'm about where you are in just starting out. I'm only on my second grow. Here are a few pics of my 3x3 tent grow that may be of some help.

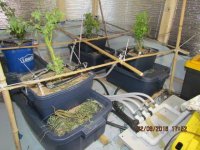
I have a single 7 gallon pot inside a muck tub using Turface in a 3x3x6 tent located in my basement.


The reservoir is a 20 gallon container to the right of the tent. The pump and (reaction-constrained) float valve control res is below in a 14 gallon container. The duct taped up blue recycling container on the other side feeds the redneck towel and bucket humidifier inside the tent.

Here's inside the tent.


I got nervous that the seedling I planted at Christmas wouldn't make it, so I planted another seedling in the same tub. Both ended up surviving, but I'm sure it is not recommended to grow 2 plants in the same pot. But, oh well. The light is my diy version of six 3590's. I started at 240W at the wall and ramped up over time to 320W. Just today, after returning from a one week trip (my second week long trip since the seedlings were planted), I turned it up to 400W. As you see, I'm running out of height and the lamp is as high up as it can go which is causing some worry.

Being able to travel is THE best feature for me about ppk. Like you, it's what made this the only choice when trying to figure out if I could try a grow knowing I'm often away. Good luck.
 
R

RSN

Hey: - I'm RSN and just finished by first grow "a ppk". Goji OG and MotraRebel Genetis remains. Trying to post remains of plants.

-
RSN
 

Attachments

  • IMG_1258.JPG
    IMG_1258.JPG
    56.1 KB · Views: 24

Snook

Still Learning
I did some experimenting with SCROG and PPK a few years ago:

[URL="https://www.icmag.com/ic/picture.php?albumid=63672&pictureid=1560318&thumb=0"]View Image[/URL]

[URL="https://www.icmag.com/ic/picture.php?albumid=63672&pictureid=1560317&thumb=0"]View Image[/URL]

[URL="https://www.icmag.com/ic/picture.php?albumid=63672&pictureid=1560268&thumb=0"]View Image[/URL]

The screen is just over 4' 3" by 4' 3" square. The grid is 4" by 4". I finished the plants with a 600 W Hortilux HPS. Worked very well.

I had (1) plant-per-light, and more viable, flowering canopy due to the SCROG than any other horizontally-lit PPK I've seen yet (especially where guys have multiple plants per light) but I still don't consider a 4' x 4' canopy of solid bud to be a "tree".

The 3.5 gal top container was not full to the top of media and it was almost too much media for this size of plant.

Look at Delta9nxs's pictures and you'll see large plants with at least (1) large bare HPS bulbs hanging vertically beside the plant with the arc tube aimed directly at the center of the plant mass and much closer to the plant.

That is a tree.

Guys have a single light fixture hung way up above multiple plants that have a fraction of the nodes (branches/budsites) that you see in D9's pics (and actually fewer nodes than resulted in the above SCROG) but use the same amount of media. Then they keep it soaked and wonder why they have problems.

While there aren't very many of those threads (thankfully), I feel they kind of cast the PPK in a negative light which is disrespectful to the time and effort D9 put in bringing this thing along. Their problems are not due to any fault in the way the PPK works; they'd have just as many issues if they removed the PPK part of their grow and just hand-watered a few plants in pots full of coco.

It's also a huge disservice to other new growers who would really benefit from using the PPK but get discouraged after seeing smart, accomplished people who put in a lot of hard work just not get there.

Fortunately that is a very small minority.... and you are pressing ahead and have not been discouraged :biggrin:

If you do go with SCROG, this type of screen worked pretty good for me:

[URL="https://www.icmag.com/ic/picture.php?albumid=63672&pictureid=1529414"]View Image[/URL]

I hung it on chains so I could move it up and down for training and re-arranging the plant until the it was in full stretch post-flip.... and then it was very easy to move it up a bit as the stretch finished. You will have to experiment a bit in your own garden but something like this gives you options and flexibility.

The string was very tight and available for cheap at Home Depot. At harvest time I just made one cut and was able to remove the entire grid.

I pre-drilled each screw hole to prevent the wood from splitting.

-----

As far as CBD etc… it's not as simple as looking at a seed catalogue and then picking one that is "high CBD” nor are higher levels of CBD in your buds achieved by simply letting them go longer on the plant before you harvest.

In terms of medical applications of cannabis, this is a controversial topic.

The concept of a "high CBD strain" works great for the marketing efforts of breeders and the sake of simplicity when new medical users and growers are shopping web sites... but when it gets down to actual medical use it is far more complicated.

At the moment, even the word "strain" is not accurate. "Cultivar" and "variety" are correct and "Narrow-leaf drug cultivar" and "Broad-leaf drug cultivar" is the proper terminology for what are general referred to as "Sativa" and "Indica".

This is just FYI as pretty much everything you see/read will still use Ind/Sat and if you’re sourcing seeds or cuttings, you have to start somewhere.

The premise of a "high CBD strain" is pain/symptom relief with reduced "high" effects. I suspect that is accomplished most easily through the use of extracts and that's a bit outside of the scope of this conversation.

The premise of testing for CBD and THC levels again has more to do with having a way to compare different flowers (and their derivatives, BHO/Rosin etc) for the purposes of having some easily relatable information about a specific seed, cutting or flower.....

.....than of providing specific information of how using/smoking/dabbing/ingesting will actually affect and/or benefit you.

There are countless competitions and "cannabis cups".... and the commercial side of the industry is presently exploding (marketing, websites, dispensaries).

The terminology and testing are more a function of the need for a common language than of efforts to get to accuracy.

Keep this in mind as you select seeds or cuttings to try. And that's the key... narrow down your choices by reading, researching and talking to people who've tried things if that is an option for you but you're going to have to try a few different things and see what it feels like... and expect that your patients will experience it differently.

Something that tests high for THC should give you a good kick... but it's more than the THC. Same with "high CBD".... there are other compounds that are produced by the plant that affect your experience…. and you will experience one variety differently than someone else.

Lots of examples where a flower that tests under 20% THC gets a user much higher than a flower testing north of 20% THC…. and other patients are finding flowers testing 2% to 4% CBD to be the most effective for pain and symptom relief.

Word-of-mouth and then your own testing and comparison will be your best guide. Expect it to take time and in fact it can be a never-ending process. Try and work with cuttings if that is viable for you as you’ll be able to cover way more ground in less time than with seeds.

If you have limited options and are stuck for a starting point, you could try and get some Barbara Bud seeds from House of the Great Gardner as I know that plant was selected by consensus in a large medical-user community and is considered to be “CBD-ish”.

As for harvest times or window… best to just experiment over a few grows. Harvest plants at different times, keep track of what was taken when and then see what the effects are.

Often letting a plant go well past the harvest window in an effort to obtain more "CBD" effect generally results in degraded resin, compounds that were once active that just continue to break down. Smoking something and then just going to sleep is kind of pain relief I guess.... but you can definitely get more pain relief and still remain awake.

Take the time to learn how to properly dry (and even cure) your flowers.

There’s no really easy, quick way to achieve your goal…. but that’s the fun of it!

Wow, BM.. that's some post. :tiphat:
Some say its easy but without those experiences, allot of reading and sorting thru good and bad advise, it isn't. Thanks.:tiphat::tiphat:

EDIT: OH! theres no implication that there is any bad advise in your post
 

Mugwump

New member

420ish

Active member
My space is 3'x3', but my light looks identical. I was only planning one plant in the space.

i had 4 ready to go.i threw em all in and flipped that day.i think i will be trimming alot off.i used one of my new 4 cob lights to power veg and it filled those plants out great in three weeks.they were small before i threw in the 4 cxb 3590 3500k .they were vegging under 100 watts of vero 10 5k
 

Grow4Flow

Member
Here's a 144 seed pheno hunt. We selected one plant at the end that became a mother. I'm flowering the second place plant elsewhere (as I mentioned in the previous post) and she's enormous.

For those using turface, we build a screening machine with a 55 gallon drum, large zip ties, screen and a small cement mixer. It works very well.

Also pictured is a 20 plant flower room that's 27x32'. Check out the flipping lights and the ceiling grid. I developed the grid myself! When the plants go in the room, they're all collapsed in on 4' centers. As they grow, the entire lighting grid expands outward to a max of 6' centers. I can keep light on them really intensely like this.

I put reflectix on all the sites since then and have switched to perlite. I've been moving a lot of plants around so it gets tiresome on the back with turface.

are you having to manually fill each of the sites rez buckets individually? how do they get topped off?
 

DunHav`nFun

Well-known member
Veteran
are you having to manually fill each of the sites rez buckets individually? how do they get topped off?

See ....That`s my thing as in how all 3 buckets work together....My bastardized version had a top off rez that was elevated and worked via float valve , but I suppose it has everything to do with maintaining the air gap in the planter constant if I was a guessing man , but I`ll defer to Av8 to explain....and then....

I do guess each individual plant module needs topped off ....how often ?......

Thanks...DHF...:ying:.....
 

420ish

Active member
Here's the easiest cloner ever. Ten gallon Rubbermaid filled half way up with 250-300 ppm jacks/calnit. Thermaloam wicks through the bottoms. Cut holes in the lid to recess the solo cups down to the water level. No air gap. Ten to fourteen days later, roots will pop. The root luc below was taken on day 12. Not too bad. Here's the trick...the room is 80℉ and 75-80% RH. This is a must. I'll not even bother with another cloning method. This is way too easy.

Oh, here's the mother of the pheno hunt that we did choose. She's a seed grown plant and has been hacked up a bunch but I'm going to flower her out, too. Probably get another three off her.

Lastly....I dealt with the algae in the last post. They all have reflectix covers now. I got busy doing something else and let the algae go longer than I like. Apologies if this offends anyone's sense of perfection, to borrow a phrase from a certain ppk inventor.
have you used the cloner with turface?do you need more wick using the perilite?
 

420ish

Active member
Thanks! That's really quite encouraging. Great progress on your first attempt! Those two plants have significantly different phenotypes, don't they?

Yes, traveling is going to be my biggest challenge.

Thank you for the good wishes. Best of luck with your grow.
i work out of state alot and it has been flawless except for when i adjusted the pump time and then had to be gone for a week.it was too wet and when i got home had 20% leaves with the spots and over watering symptoms.adjusted and now two weeks later they look great again.
the only problem was mine and not the system.
i offer thanks to all the helpful people on here and to d9 especially for this great design and all his help!
 

av8or

Member
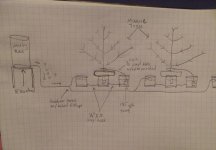
Feel free to mock my amazing drawing skills.

Pictured is a diagram showing the flow operation. At least I hope it does. Mix your nutes in the typical bulk/stock tank but ensure that it's elevated as DHF suggested. I use a Goodyear or continental rubber hose to go from the stock tank to each line of ppk sites. From there you put a threaded male 1/2" hose barb in it with a 1/2" pvc threaded cap attached. Drill a hole in the cap and pop a 1/4" vinyl tube in. From there, Daisy chain each bucket site with the same 1/4" tube. You can use the quick disconnect push fittings to T the 1/4" feed line coming.off the Goodyear hose to plum the successive three bucket sites or you can T the Goodyear hose. That's up to the builder. I use the Goodyear hose because I'm dealing with larger plants and a lot of them so they demand a large flow of water. Smaller systems can get by with just the 1/4" tubing throughout. We have a couple 8 plant rooms that don't use hose and instead only use 1/4" tube. Anything 12 sites and above seem more suited for a larger diameter feed line, hence the hose.

Did that clear things up?
 

Attachments

  • IMAG0271.jpg
    IMAG0271.jpg
    81.6 KB · Views: 21
  • IMAG0825.jpg
    IMAG0825.jpg
    35.1 KB · Views: 21
  • IMAG0817.jpg
    IMAG0817.jpg
    49.9 KB · Views: 20

av8or

Member
have you used the cloner with turface?do you need more wick using the perilite?

We haven't tried this cloner with turface. I'm not entirely sure if it would work. I don't see why not...? We see a lot of evaporation being drawn up through the perlite solo cups keeping everything perfectly airy and wet. Try it out and get back to us! I'd like to know if it works. Hell, it'll only take one of ya two weeks to find out!
 

McKush

Éirinn go Brách
ICMag Donor
Veteran
Feel free to mock my amazing drawing skills.

Pictured is a diagram showing the flow operation. At least I hope it does. Mix your nutes in the typical bulk/stock tank but ensure that it's elevated as DHF suggested. I use a Goodyear or continental rubber hose to go from the stock tank to each line of ppk sites. From there you put a threaded male 1/2" hose barb in it with a 1/2" pvc threaded cap attached. Drill a hole in the cap and pop a 1/4" vinyl tube in. From there, Daisy chain each bucket site with the same 1/4" tube. You can use the quick disconnect push fittings to T the 1/4" feed line coming.off the Goodyear hose to plum the successive three bucket sites or you can T the Goodyear hose. That's up to the builder. I use the Goodyear hose because I'm dealing with larger plants and a lot of them so they demand a large flow of water. Smaller systems can get by with just the 1/4" tubing throughout. We have a couple 8 plant rooms that don't use hose and instead only use 1/4" tube. Anything 12 sites and above seem more suited for a larger diameter feed line, hence the hose.

Did that clear things up?

I like your system and can't wait to see what these girls turn into, especially like how you can tailor the gap to each plant individually. I do the same with my tripod bases. Of course I had to do the tripod bases anyway but its a nice additional feature.
 

Latest posts

Latest posts

Top