What's new
  • As of today ICMag has his own Discord server. In this Discord server you can chat, talk with eachother, listen to music, share stories and pictures...and much more. Join now and let's grow together! Join ICMag Discord here! More details in this thread here: here.

150w HPS Club and Resource Guide......

bounty29

Custom User Title
Veteran
Well, I've got some good news! I got most of the rest of my stuff in the mail today. But the bad news... The HPS ballast is about twice as large as the electrical box I prepped for it. Prepped meaning can't be returned. Bad move on my part :badday: Actually, I just looked at the receipt. It was $1.06. I guess it's not as big of a loss as I thought, that's good.

But seriously, this thing is 4"x2.75"x3.75" and about 10 pounds! I didn't realize they were so large/solid.


I was also expecting the wires coming off the ballast/ignitor/cap to be colored, but they're all white, which is kinda shitty. They are all labeled, but without a wiring diagram. Makes me a little less confident, but no worries, I will not proceed until I am 100% positive of what I'm doing. I've got all day tomorrow to work on it, I'm sure it'll be together and setup in less than 24 hours. Any help is appreciated, of course. I know electricity is not something to be played with, and I am always extremely careful.
 
Last edited:

sugabear_II

Active member
Veteran
Hey bounty,

That's a big f-in ballast - are you sure it's a 150?

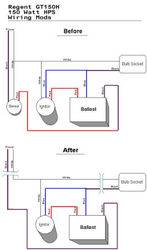
anyways here's some wiring diagrams and pictures to help you out.


p.s. the old FAQ from OG is around page 12 or something - I don't know just go to page one an filter on me and you should find it eventually.

-suga
 

bounty29

Custom User Title
Veteran
The ballast is definitely a 150w HPS. I think the problem is it's a 120v/208v/240v/277v ballast. I got it from 1000bulbs, it's the second one down on this link. I didn't realize that would make such a big difference. haha, get it, big? :badday:

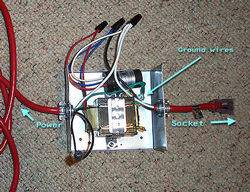
Oh well, I guess if I ever move to Europe, I can still use this... guh. I just wanted a ballast with a capacitor, is that so much to ask? Anyways, here's the spec sticker on the ballast, I can definitely wire it up, I didn't look at this long enough for me to realize this is all I need right here.


And just to make sure, does this all look right?

 
Last edited:
G

Guest

bounty, that thing is the same size as my 400 ballast, CRAZY! make sure to throw up some nice pics when ya got everything setup. you've got the light, what else could there possibly be? :biglaugh: just playin, let us know if ya need any help

bob i'm so sorry to hear about your loss, better safe than sorry! hopefully you won't be outta the lineup for too long bro. please do continue to hang out, the more the merrier!
 

green_grow

Active member
Veteran
you're making the right move, bob. meanwhile, the studying time will be fun AND you can always practice taking cuttings off houseplants, experiment with different growing mediums for them , etc., etc. indoor gardening is still quite legal for every other kind of plant.

handsome crop, link !
 
Last edited:
Yelpers, what you've got is a multi-tap ballast. Meaning you can use all those different voltages. I was going to say that the diagram is on the ballast, but I see you found it. The only thing I see, is to take off that part saying "three prong plug", everything else looks right.

The COM is the common or negative (whites). The Positive leads will have the voltages written on the wires. 120v, 208v, 240v, 277v (to black). Pick the one you will use, say 120v and tape the others in a bundle to get them out of the way. The green from your power cord goes to the body of your ballast box. The wire going to your Capacitor will have "CAP" written on it. If there is anything I miss, please chime in.

BOB: sorry for your loss. I know all too well how that feels to shut it down but it is better to err on the side of caution. Do you what lead to the friend getting busted? Just watch what you say and do around him. Hate to say it but when some people get busted, they will turn on their own grandmother if they think it will help them out. Usually in the long run, it only strengthens the case against them.
 

bounty29

Custom User Title
Veteran
I'll be going to home depot today, do they have electrical boxes that big? I also need to fit a 2.5"x1"x1.75" ignitor and a 2.75"x1.75" capacitor in there. Oh well, gives me something to do today... I should also have my floro setup finished shortly!
 

Pipedream

Proudly Growing My Own Since 1969
Veteran
Bounty - Good luck with the new ballast. Looks like a good heavy-duty unit that should last for years to come. I assume that when you say you need to fit a cap & ignitor in the box, you are referring to the ones already installed by the manufacturer, and not additional ones. Also, keep in mind that a cool ballast always works better than a hot one. They are more efficient, have less internal resistance, and last longer. The reduced resistance will actually give you a drop more light. All that being said, be sure your new box has sufficient air space, and cooling vents or fins, and that the ballast core is securely mounted to it. This will help the box act as a heat sink wicking excessive BTUs away from the unit. One more thing, don't skimp on the quality of the wire you use between the ballast and socket or the plug end as well. I usually find that the best option is to purchase a short but heavy guage extension cord. Cut it in two pieces and you have what you need for both sides.
 

sugabear_II

Active member
Veteran
bounty - they should have electrical boxes that big, unfortunately they'll cost more than $1.00 and change, but shouldn't be more than $20. The bigger ones come in cardboard boxes and if you home depot is setup like mine they'll be on the opposite side of the isle from where you got the little one.

-suga

p.s. Hey Linksys - nice job on the harvest - enjoy the smoke :joint:
 
Last edited:

bounty29

Custom User Title
Veteran
Pipedream - I bought all 14gauge wires to work with, and from the looks of it the wires on the ballast are 16 gauge. Weird. There isn't anywhere on the ballast to attach it to the box, I think I'm just going to have it sitting on top of the cabinet at first, see how hot it gets.

Suga - Yeah, I just got back from HD, I picked up a 6"x6"x4" box and that just barely fits everything, I might have to just leave it be for the time being and get a larger one next time I go there. Like I said earlier I won't be flowering for at least 5 weeks so I can wait on that a little bit. The box I just got was like $12.00, the next one up is like $16, so we'll see. Thanks a lot for all the help everyone, you're all making this a lot easier.
 

bounty29

Custom User Title
Veteran
Well, my CFL setup is complete, I just need to hang it now. Let me tell you, I had to wait about 5 minutes before I could read again after turning these on to test them. They're bright!

I've got seven 6500k lights, and three 2700k lights, as you can see in the picture. They're all 15w, so I've got 150w of CFLs for my plants from the time they're seeds until I'm ready to flip on the HPS for 12/12.


There's a mess of wires, I'd like to clean those up, I'm not quite sure how right now though. Maybe just tape them all down to the outside of the frame? :chin:

Alright, it's been a few hours, and I don't feel like posting twice in a row, so here's what else I've done!


I got my remote ballast all wired up, and it fired right up on the first try! I was expecting it to blow up or hear some snap crackle pop, but it just lit up, kinda blue and dull for a second, I thought something was wrong, and then it began to glow brighter and brighter! I thought it was pretty sweet. But wow that bulb got hot fast, I didn't realize that they got so hot. I'll definitely be getting a glass shield for it now.


I got two of those for $0.97 at Wal-Mart this morning, I think I'll rig one up on top of the light, should be better than nothing, I don't think I want to invest in a high quality reflector/hood this time around. My fans should be outside my door in a few hours, and then my AC>DC adapters should be here monday.

I think I'll get the back of the cabinet all drilled and have the fans all hooked up and everything by tomorrow night, and then I should be good to go. I'll just need to hook up the fans to the adapters and I should be off in less than a week!
 
Last edited:

Pipedream

Proudly Growing My Own Since 1969
Veteran
Bounty - I'm slightly confused. When I look at the first pic of your ballast, I see a unit that appears to have both the Cap and Igniter built into the core unit. This is very common, and they work well as provided. In fact, I can actually see what I think is the Cap. However, when I look at the assembled unit that you made, I see an external Cap and Igniter has been added. Did these come included with your ballast, or did you order them at the same time in addition to it? If I were you, I'd remove both of them and test your ballast without them. You'll likely be surprised that it will work fine and that the additional units are not needed.
 

bounty29

Custom User Title
Veteran
Oh no, everything is attached very securely and it all came as one unit. There's the large metal block with the off white protrusions from either side, the capacitor(cylinder on the right side, on the bottom in my pic) and ignitor(on top of everything.) The reason it's so big is because it can be wired for 4 different input voltages... that's about all I know. It worked fine, buzzed a very small amount when running (normal, right?) and seemed good.
 

Pipedream

Proudly Growing My Own Since 1969
Veteran
It came with those large seperate Cap and Igniter already wired to it, or you had to do it?

Is that the e-conolight $18.90 unit?
 
Last edited:

bounty29

Custom User Title
Veteran
Nope, everything you see came all pre-wired to the main unit. I just had to attach the extension cords and put it in a box. Wow, soudns a lot easier than it was, I think I overly complicated it.

It is not the e-conolight model. I was going to get that one, but there is no capacitor and from the things I've read, I'd rather have a unit that has one. So I ordered this unit from 1000bulbs.com, along with all of my CFLs.
http://www.1000bulbs.com/product.php?product=467
The only other option for a 150w ballast from there was for 480v or something. If I had known it was going to be this massive I would've looked elsewhere, but it's not really a major issue.

So... if I had to do it again, I'd probably get the 150w HPS ballast kit from businesslights.com, that would probably be a more reasonable size.
 
Last edited:

sugabear_II

Active member
Veteran
Yeah bounty I also notice that you have the large size bulb with the mogul base as opposed to the smaller ones with the medium sized base. Again nothing wrong with that. I wouldn't be suprised if your's puts out a tad more light. I think the second extra protrusion on your ballast core is related to the multi-tap nature of the ballaset, like you said.

I see you found the larger box - make sure to punch out a few extra of the punch out holes to allow extra ventilation.

So is the core just sitting in there? you might consider a dab of high temp epoxy to secure it to the case. They really humm once the lamps been running for a 12+ hours and the more secure the core, the less humm. I was able to pop out two of the pop-outs and thread a metal hose clamp throught there and tighten it down on the metal part (as opposed to the white protrusions) of the core securing it to the case.

Anyways it's looking really good man - things are definetly coming along for you. :yes:

I'm busy myself working on my new c-25 cabinet. The box was short a few parts (door hardware) but I called millspride and they have sent the parts express it out to me. So I still need to get a back piece cut. I'm trying to decide how to do the ventilation. I've already decided that I will cut a whole in the shelf at the top of the lower chamber - then I'll mount my carbon scrubber and dayton together sucking through the scrubber. I think I may just have it exhaust into the upper chamber where the electricals will be and then leave a large opening at the top back for the air to just flow out of.

I'm stuck between either mounting intakes in the floor as I did with my current cabinet or mounting them on the back level with top of the buckets. I'm also considering using a dark room light trap vent instead of my normal double PVC elbow. Any thoughts are welcome.

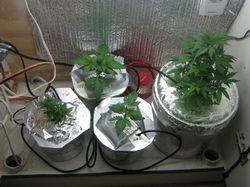
So as I said I'm busy... here's my current cab with 4 plants just now starting 12/12, from left to right front we have a cutting of the woodhorse trainwreck I just grew, next two are the oregon90 x burmese pure (ob1 for short) seedlings from the seeds I just made at just under 3 weeks old, these are all in 2.5 quart contianers and will need to be moved into larger buckets in a week or so - so I gotta get that big cabinet done - anyways I can grow these till they show sex in these buckets but after that they need a bigger bucket, finally on the far right is the trainwreck mom - really bushy and doing well suprisingly after the abuse she went through a weekend without power to lights or air stone I nearly thought she was going to die from root rot so I took clones but she came back anyways and I think will flower out really nicely at this point.


So that's that and next I want to share my little cheap ass wick system. Let me know if you think it's worth posting as a FAQ or something...

Materials

(2) 4 cup 32 oz ziploc disposable tupperware containers
(1) 2.5 cup ziploc diposable tupperware container
(2) oil lantern wicks
some perlite

The 2.5 cup ones fit inside the 4 cup ones, both are square and you can get a pack of 4 for a few bucks, the oil lantern wicks are like .89 for three, and most people have a bag of perlite laying around. Four 1” rw cubes for four clones or four seedlings can fit into the setup. Coco starter plugs could be used instead or you could just stick cuttings directly into the perlite if you want.

So it’s pretty basic we take the small tub and cut two slits into the bottom on opposite corners about 1 inch in length. Then we push through the wicks until the piece on top is long enough to go to the other side as you can see in the picture.


Here you can see how the small one fits into the big one. Mark a line on the big one about a ¼ below where the little one comes to. Also you can see the second big one and how a whole has been burned in the bottom with a lighter, use this one as a humidity dome for clones, but leave it off for seedlings.


As you can see in this picture the dome just sits on the top of the big unit. It works perfect and provides a nice difuse light for clones

Next a handful of perlite is put into the small container, how much you add depends on whether you use coco plugs, or rw cubes, or just the perlite. Also you can see that there is a bucket with perlite and water in it. The perlite should be poured into a bucket of ph (5.4~5.6) adjusted water to which you can add a little stuff such as a drop per quart at most of flower nutrients, a drop of bleach or some other product to prevent damping off or rot, and anything else you feel, or nothing at all. You want to mix it up good and scoop out only the perlite that floats, this prevents any junk and dust from getting in your mix.


So then I place my four rw starter cubes with four little seedlings just now getting popping their heads up. You want the perlite to form a little tub around the tub around the cubes. I also added a layer of hydroton I had to keep the perlite from growing harmless green algae.


Then we add the same suff you washed the perlite with to the bottom, resevior, container of our wick system up to the line you drew on the side. The wicks should be hanging down into the water. Here’s a side shot showing what I mean.


so that's that and we put the seedlings back under the cool blue CFL in my little veg cabinet. The ones with the markers are my last two burmese pure seeds and I'm hoping for one of each to make some f2s. The other little one is a clone of the trainwreck that I took just in case.


-suga
 
Last edited:

bounty29

Custom User Title
Veteran
I like that perlite wick system suga. I've got like a quarter bushel of perlite left, and I definitely wanted to use it for when I take clones for sexing, I might just have to do it like this. Nice compact setup, should be minimal maintenance.

About my HPS, I couldve gotten a medium base/bulb, but the mogul sized one was the same price, and I think more lumens. It wasn't a whole lot, but it's a small space so every little bit counts right? I think what I'm going to do with the remote ballast is just leave it the way you see it on the floor, with the top off, so it doesn't heat up. It'll be on top of my grow cabinet, hidden behind my hermit crab tank. That's right. Hermit crabs.


Medium 150w HPS
Initial Lumens - 15,800
Lumens (Approx Mean) - 13,400

Mogul 150w HPS
Initial Lumens - 15,700
Lumens (Approx Mean) - 14,100

I dunno, whatever, I don't think it'll make too big of a difference. I might not yield the pound I was shooting for, but hey, I should get close :joint:


Well I should get the back attached in the next few days, the fans mounted, and the CFLs hung. Hopefully I can have the seeds germ'd by next Wednesday or so.
 
G

Guest

Hey guys,just wanted to throw up a few pics at 43 days flower....


sugabear I really like the job you do man :yes: everything looks really excellent!!


Nice harvest linksys!!!!!!!!


ok some pics


the very sativa one


the rest


Y'all have a good one :joint:
 
Top