What's new
  • As of today ICMag has his own Discord server. In this Discord server you can chat, talk with eachother, listen to music, share stories and pictures...and much more. Join now and let's grow together! Join ICMag Discord here! More details in this thread here: here.

The Gorrilla Water Collar

G

Guest

Lunatick, Ive discovered that hole size and location is critical as well. I originally buried my jug with 8 -1/4" holes and i couldnt pour water in fast enough. I reduced the hole number to 6 -1/8" holes, with 1 at the bottom, up 1", up 1" and then 3 holes about 3" below grade. This size provided the water a 10 minute drain from the jug.

I also discovered that its benefiicial to put several inches of dirt under my jug, but on top of the plastic liner. That allows that small pocket of soil to accept and hold the water from the jug.
 

lunatick

Member
hi sliverback,hole size and location is definitely important,how ever ive found that wile using a plastic liner(or not a fully contained area)it is much better(water wise) to drill the holes only in the bottom,mainly because holes above the plastic liner will allow air escaping from the system.

due to the fact that in my case i used a small amount of soil about 1 gal,plus that semi closed grow area(a pot)i could go about 10 days between watering(1.5l bottle still had water in it after 7 days),i suspect that if ill just reduce the number of pinholes,4 holes at the sides bottom will b sufficient,doing that i could reduce moisture level and extend the time between refills.

ive all so found that a plastic liner and dirt under the jug are important.

maybe ill try the wet pot idea in addition to the water collar.
 
G

Guest

the liner is critical Lunatick. Im just using a 1/2 liner, only 1/2 of the hole, the end with the watering jug has the liner, the other end of the hole is natural

HK423, a tube would work fine, in fact, i almost used a single
1 1/2" tube about 2' long and run it directly under the plant about
4" deep with some tiny leach holes. It would work fine, i just couldnt find a supply of hose that size that was economica enough to use it. It would have to be rigid enough to keep its shape and about 1$ per foot was the cheapest i could find. I plant 40 plants X 2$, damn.
 

scaramanga

Active member
Hey Silverback, since you need about 80 feet of hose have you tried going to an auto parts store and asked about buying in bulk? I used to manage one and we used to sell large spools to the mechanics shops. Some were 100 foot spools of large diameter hose. You could certainly pick these up at a good discount over buying by the ft.

Check out my soda syrup bags, I plan on using them to transport the water and then connect it to a water collar.
http://icmag.com/ic/showthread.php?t=120133


Great thread SB.
 
C

coxswain

Inspired by this thread I decided to try this method. I gathered and carried 5x10l container buckets to the site. Made 8 x 3 to 4 mm holes to the bottom of the bucket. Experiment didn't went very well. Water drained after a couple of days. I'm sure size of holes was to big.

I'm thinking of plugging 6 holes and only keeping 2 or even only one open.

I burried them approx 15cm deep and just layed on a thick cotton cloth.

picture.php


Smaller size holes is the way to go and some sort of medium to hold moisture between reservoir and earth. This medium should be a lot more wet then surrounding earth. Sort of a buffer.

I had both. Holes with liner and holes without it. Same result. Holes in reservoir were just to big.
 
G

Guest

You are absolutely correct on all accounts coxswain. Hole size is immportant as is an organic pad to set the container on. I also found out very quickly that with the top left on the container, i had several float out after heavy rains. So... either leave the top off or bury it good and deep.

Weve had plenty of rain so far so i haven started filling my containers yet.
 
C

coxswain

You are absolutely correct on all accounts coxswain. Hole size is immportant as is an organic pad to set the container on. I also found out very quickly that with the top left on the container, i had several float out after heavy rains. So... either leave the top off or bury it good and deep.

Weve had plenty of rain so far so i haven started filling my containers yet.

Ah yes. You're using two jugs one on top of another. I only use one 10l container. I feel it could be easily burried 30 cm or so deep.

I'm thinking on how to plug the holes and what to lay below it as a "buffer" till the dry season come.
 
G

Guest

Hey all

I know several of us are experimenting with different approaches to the same goal, but i wanted to go ahead and report that my easiest and cheapest approach is performing far greater than i imagined. It has reduced my watering from 1 gallon per day, to 1 gallon every 4 days.

See the jug? Its mostly buried


picture.php


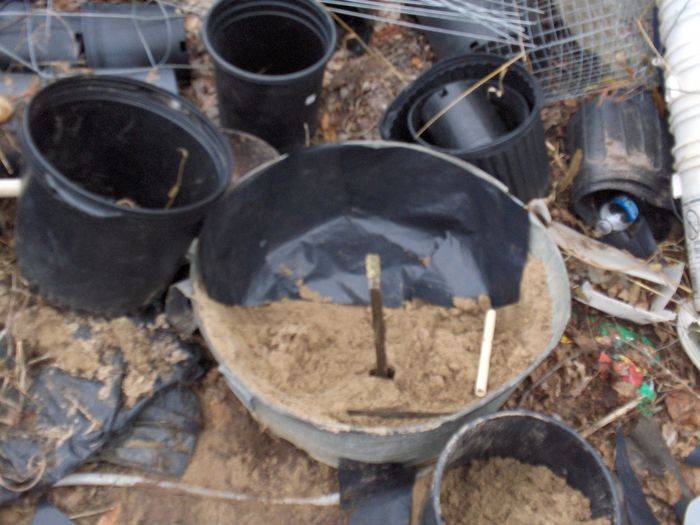
See the picture below, the metal tub represents the planting hole . The stick represents plant position

Underneath the jug is a 1/2 hole liner of plastic and about an inch of compost/water chrystals.. Only 1/2 of the hole is plastic lined so that the plants roots arent confined.. this allows the jug to leach out in that area yet the plastic keeps the moisture from being drawn away by the surrounding soil

The only way the moistue can escape the plastic lined area of the planting hole is to be absorbed toward the plant. I cant tell you how well this is working and of course, the jug was free, no cost.
38268silverback_0801.jpg
 

DimeBag65

You will not be forgotten
Veteran
bumping threads that need attention this time of year.. RIP SilverBack...

water to the plants! :joint:
 
Any report on how these systems went? Sry I'm a newb but what happened to SilverBack?

His first design seemed like it was the easiest and after reading this thread I'm thinking about trying this. So any help or reports would be great! Thanks.
 

wisco61

Member
I used them and they worked well for what I was expecting. My soil is super sandy, so I just wanted them to evenly and slowly water the plants. A 2 liter took about 30 minutes to drain in my situation, and the plant got a good deep watering. So while it wasn't an irrigation solution for me, it did serve a purpose.

Critters did seem to be interested in the collar. A couple times they dug down towards it, but it didn't really cause any damage to the plant. They may have been after the moisture in the bed of water crystals I had under the collar. I will bury them deeper this year, about 3 inches I think and not add extra water crystals.
 
Thanks Wisco!

Which design did you use? Think I am going to go with the original one. Did you plug the ends of the pipe or have them sealed? And was your reservoir sealed? Thanks!
 

Beautiful BC

New member

http://www.icmag.com/ic/showthread.php?t=137111

A real voice of experience and a true legend. May he rest in peace.

@water collars: These work great, and not just for cannabis. Like drip irrigation, they deliver water to where it's needed - the root zone - while minimizing surface evaporation. I use coiled flexible plastic hose (drill holes in it) buried underground to water tomatoes. More even and efficient watering.

Thanks!

Were the ends of your hose sealed or did you have a complete loop out of the T? And did you use a 2 liter bottle?
 

wisco61

Member
Thanks Wisco!

Which design did you use? Think I am going to go with the original one. Did you plug the ends of the pipe or have them sealed? And was your reservoir sealed? Thanks!

No ends on mine, they were a complete loop. My "res" was upside down 2 liters so they were sealed.
 

RudolfTheRed

Active member
Veteran
Its days like this that make you really miss silverback and his great advice. This guy was a genius as far as I am concerned and had so many good ideas.
 

D.S. Toker. MD

Active member
Veteran
Hey

I cant overstate how this thread has changed my watering practices, but after trying several different versions, i have settled on a very simple, (slightly modified) but highly effective application of the method.

I simply bury a "poweraide" bottle, (or any small plastic bottle} with 1/8" holes drilled in the bottom half of it right next to my seedling when i plant. The top of my bottle is even with the soil. Even when the plant is 8' tall, i can unscrew the top of the little plastic bottle and water my plant. I know that every single drop went directly to the root area.
The results of this activity are truly unbelieveable when compared to traditional methods of watering. Its reduced my watering by more than half.

Even further, it allows me to feed organically. Where i live, if you pour organic tea on the surface around the plant, animals will come along and dig at the soil because the smell the nutes. The bottle allows me to deliver the tea below the surface and into the roots.

I cant say enough good things about it.
 

harold

Member
I use coiled flexible plastic hose (drill holes in it) buried underground to water tomatoes. More even and efficient watering
.

does it matter how big the holes are?... sorry if this is a daft question lol but i want to get all the details right before i attempt this.
 

Latest posts

Latest posts

Top