What's new
  • ICMag with help from Landrace Warden and The Vault is running a NEW contest in November! You can check it here. Prizes are seeds & forum premium access. Come join in!

The Cab Club

I have so many articles and other websites I get info from and I read somewhere about starting flower at different heighst for different strains. I'll take your word for it though.

I am glad I got 2 MH conversion bulbs with my light. I was thinking of throwing them on ebay but now I think I will use them. I originally intended to veg in my veg chamber them move to flower 12/12. But now I will just keep veg for clones and mother and veg to desired height in my flower chamber with my MH bulbs (18/6 or 20/4). I read some sleep helps growth better then full 24 on veg.

yo man, if you want to make your shit adjustable, just do it like so:

build base out of pvc. make sure the four corner supports are facing vertically (and are kind of long) and then measure screw holes for where you would want your screen to sit, drill a hole, and attach a smaller pvc to each of the corresponding four corners. it'll slip inside the other pipe and be able to stop wherever you want.

kind of hard to explain, let me know if you need more clarification and i won't try to make sense when i'm so fucking baked.


here's my cab!

last pic is lights on, doors closed. i think if i just go get panda film i can make this thing legit.
 

gates3rd

Member
Hey

250Watt Philips HPS
250Watt Parlux Ballast (damn loud thing)
180 cbm/h LTi & CF keeps temp low,
Honeywell Fan
100*50cm Space,
80*50 optimum light range, i think 80+ is too far for a 250watt

On the pic u see:
3,4L Coco, LST, bigbang, trainwreck, thaitanic
 

Attachments

  • bloom1.jpg
    bloom1.jpg
    72.3 KB · Views: 33

jimbo420

Member
yo man, if you want to make your shit adjustable, just do it like so:

build base out of pvc. make sure the four corner supports are facing vertically (and are kind of long) and then measure screw holes for where you would want your screen to sit, drill a hole, and attach a smaller pvc to each of the corresponding four corners. it'll slip inside the other pipe and be able to stop wherever you want.

kind of hard to explain, let me know if you need more clarification and i won't try to make sense when i'm so fucking baked.


here's my cab!

last pic is lights on, doors closed. i think if i just go get panda film i can make this thing legit.

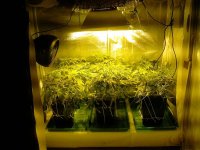
I understood it completely...partly because that is exactly like I imaged building it. BTW you and I have a few things else in common other then the same scr0g idea, you work area is a mess and you too have light leaks!
:comfort:

Thanks for the tips. :tiphat:
 

jimbo420

Member
B-roni, How large is your cabinet? and will it accommodate 12 plants?
My cabinet is 24" deep x 30" wide I plan on starting with 6 plants from seeds and ending up with 2 plants that I will be taking to flower. My last grow was just 2 plants and I don't see how I could have flowered any more than that in my cabinet.

picture.php


This is only two plants.

You and I look like we have the same bin. I too was going to put white duct tape on the top. I have a few more questions about your scrog design if you don't mind. I'm actually picking up a baby gate tomorrow thanks again to Craigslist. I am very visual so the basic frame is easy enough. But what is the reason again for the "V" design? Also, how tall would you say the tops of these ladies are to the base of the bin. I will have about a foot give or take to grow (just a guess, would actually need to measure). So I am not sure if the "V" is a good or bad thing on my situation. I assume also that I could have my scrog closer to the bin top and veg for less time. The only thing is would be I need to know the height of the net pots to make sure I can get get the in/out with out disassembling the scrog.

Thanks for the help! :thank you:
 

gdbud

Member
what is the reason again for the "V" design?
I was thinking in theory the outside buds on the V would be the same distance from the light as the center buds. But it did not work out that way and I'm thinking on this next grow to scrap the V design and go with a flat screen.

Also, how tall would you say the tops of these ladies are to the base of the bin.
It was closer to 18 - 20" it stretched more than I thought it would and I was not home at the time to keep it tied to the screen.

The only thing is would be I need to know the height of the net pots to make sure I can get get the in/out with out disassembling the scrog.
I had 8" of room between the reservoir and the screen.
 

jimbo420

Member
I was thinking in theory the outside buds on the V would be the same distance from the light as the center buds. But it did not work out that way and I'm thinking on this next grow to scrap the V design and go with a flat screen.


It was closer to 18 - 20" it stretched more than I thought it would and I was not home at the time to keep it tied to the screen.


I had 8" of room between the reservoir and the screen.


Thanks for the help. Well in that case I think I will go with original idea of a flat scrog as well. The cab I am mocking that started it for me was growing 3 plants in a flat scrog. I was hoping I could use my bin for 'up to' four plants. But I am hesitant seeing you growing 2 and having that much reach on the plants.
 

gdbud

Member
picture.php


Here is a picture of the control room of my cabinet.

Top Left is my srcubber and the gage that reads the static pressure across the fan, This lets me know how hard my fan is working and if my cabinet is working under a negative pressure or not.

Top right is my water reservoir with a sight glass that tells me the water level in the reservoir.

picture.php


Inside the cabinet The top left gage is the read out display for the exhaust sensor (its a indoor outdoor thermometer with a remote outdoor sensor) and I have the sensor placed in the air space below the carbon bed.

The gage right below the exhaust gage is for the air intake sensor which I place in the intake plenum.

With those two gages I get the temperature difference between the incoming air and exhaust air. (more on this later)


Moving right the next device is the speed controller for the fan.

The next device id the light timer.

The next device with the yellow plug is the Kill A Watt device. I have my whole cabinet running through this device. The Kill A Watt give me the total watts, amp, voltage I'm using. The lenght of time in hours I have been running the cabinet for that grow and the total cost of electricity for the grow.

Now by using the temperature difference between the incoming air and exhaust air and the total watt I can calculate the fans CFM.
CFM = total watts * 3.16 / (exhaust temp. - incoming air temp.)
Total watts = 566
exhaust temp. = 97
incoming air temp. = 72

CFM = 566 * 3.16 / (97-72)
CFM = 566 * 3.16 / 25
CFM = 1789 / 25
CFM = 72

So my cabinet is running with 72 CFM at 0.90 in of water (static Pressure) and Keeping the inside of the cabinet at 10 degrees above room temp.
 

mule420

Member
Here is a picture of the control room of my cabinet.

Top Left is my srcubber and the gage that reads the static pressure across the fan, This lets me know how hard my fan is working and if my cabinet is working under a negative pressure or not.

Top right is my water reservoir with a sight glass that tells me the water level in the reservoir.


Inside the cabinet The top left gage is the read out display for the exhaust sensor (its a indoor outdoor thermometer with a remote outdoor sensor) and I have the sensor placed in the air space below the carbon bed.

The gage right below the exhaust gage is for the air intake sensor which I place in the intake plenum.

With those two gages I get the temperature difference between the incoming air and exhaust air. (more on this later)


Moving right the next device is the speed controller for the fan.

The next device id the light timer.

The next device with the yellow plug is the Kill A Watt device. I have my whole cabinet running through this device. The Kill A Watt give me the total watts, amp, voltage I'm using. The lenght of time in hours I have been running the cabinet for that grow and the total cost of electricity for the grow.

Now by using the temperature difference between the incoming air and exhaust air and the total watt I can calculate the fans CFM.
CFM = total watts * 3.16 / (exhaust temp. - incoming air temp.)
Total watts = 566
exhaust temp. = 97
incoming air temp. = 72

CFM = 566 * 3.16 / (97-72)
CFM = 566 * 3.16 / 25
CFM = 1789 / 25
CFM = 72

So my cabinet is running with 72 CFM at 0.90 in of water (static Pressure) and Keeping the inside of the cabinet at 10 degrees above room temp.


Man I took the tour of your cab and it's a dam good thing I didn't read that before I started my big room! I would still be trying to make my 2 & 1/2 cabs work out... That thing is sweet! Holy cow I love the light and how you made it all work! And the radius on in the intakes ingenuous! I will be adding that to my future plans for my intakes :jump: I knew I was missing something, I just found it! I cut valve jobs on 5 angle's for a better radius for flow when porting and polishing heads, why didn't I think of that??? Peace and puffs
 

SKUNK420

Member
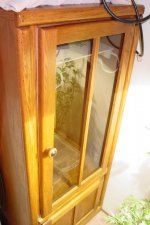
china cab

china cab

Found this china cab at a yard sale. Using it to hold moms . You can see them in a reflection off the glass. They are getting a 250w boost out side the cab for a couple hours. Going to set it up with 200w of T5 lighting ( not the ones you see in the pic). Anyway these china style cabinets are great. The bigger ones are not cheap. Construction is usually good to great on these type of cabs. All I had to do was add a 1/2 piece of plywood to cover the back, cut a vent hole and hook up the filter/fan which sit on top the cab. Looks great when the glass door is shut and the lights are on. I'll get some more pics soon.
 

Attachments

  • china cab.jpg
    china cab.jpg
    38.6 KB · Views: 34
M

m00nchild

Man I am SOOOO happy that the Cab Club is still alive and kickin!! Life got in the way for me, seriously, for such a long time now, that I've been unable to hang out on internet forums.

The good news, though, is that my grow cab is still alive and well. Since the last time I've posted, I have been able to officially sex all of my seedlings. I ended up with only 1 female Hashberry, which has been very compact and indica-looking since the seed popped, but is still in vegetative mode, so I can't speculate on what pheno I have. I just know it has female preflowers. I then repotted and cropped it, in order to make it into a bonsai mother, and it now resides up in the vegetative shelf of my cab, where I also have 8 cuttings attempting to be rooted.

Down in the lower shelf, I have a scrogged Super Lemon Haze which is in week 5 of flowering. It was a freebie seed, and it has been exceeding my expectations every step of the way!! I sincerely hope I am able to reveg it after harvest, because this plant has been the happiest and most heat resistant plant I've ever come across! That says a lot (to me, anyway) about Greenhouse Seeds' gear.

Next to the SLH is a pot in which I transplanted all 5 of my unsexed Satori seedlings, then placed under the HPS for some 12/12 sex determination... exactly 7 days later I was able to determine that 2 of the 5 seedlings were male, so those were promptly destroyed. Then, of the remaining females, 2 of them were a short, compact, dark-green, indica-leaning pheno, while 1 was quite a bit larger, more sativa-leaning, and a light-green/bronze color. Because of my limited space, I had to choose which pheno to keep, and I chose the tall bronze colored sativa one. I hope I chose the right pheno, it's just that I want my Satori pheno to be heavily sativa, since I plan on having Hashberry as my more indica-leaning variety.

Anyway, it's currently dark-time in my cabinet, so I can't take any pictures, but at 11:00 tonight I am pulling the camera out! I will upload pics then, if anyone cares. I just want to tell everyone THANK YOU FOR PARTICIPATING IN THE CAB CLUB!!! Here is some more punch and pie:

strides%20fruit%20punch2.jpg
6a00e552792fa2883301156f93f328970b-pi.jpg
 
M

m00nchild

Well, I can't take good photos at night time, so I'll have to take some tomorrow morning instead. I tried, but the artificial lighting in the back bedroom is just too crappy. :mad:
 

Garuda

Member
Veteran
ahhh, that cake looks much better than the first one :D impressive amount of constructing and macgyvering brainpower gathered here and show their cabs, I like it :).
Your construction is soo awsome gdbud, the improvised airflow turns out to be perfect for the intake. nice.

I'll take an overview picture of my 2x55W PL-L cab later and post it here, in the meantime I can offer some info in the thread linked below, i recently added some pics of my previous cabs too :)


Greetings,
Garuda.
 
M

m00nchild

Okay, I can finally show some new pictures! First up we have a few pictures of my Hashberry bonsai mom:

049.jpg


046.jpg


045.jpg


051.jpg


050.jpg


Then, a few pics of the Super Lemon Haze in its 6th week of flowering:

043.jpg


041.jpg


040.jpg


039.jpg


036.jpg


035.jpg


033.jpg


Lastly I have a pic of the whole cabinet with doors open. You can see the Satori up in the top shelf that I just bent over to become a mom:

053.jpg


And that's all for now! I'm really hoping the SLH will pack on some more weight in its last few weeks of flowering... it's at 6 and a half weeks and I think it looks skimpy, but it also looks very sativa, so I'm not sure? Seems like I'll be going past 10 weeks, but we'll see. It already smells a LOT like lemon peels, I'm amazed! But if the yield is crappy I just won't reveg it, no big deal. It was a freebie seed. :)

I'm really looking forward to getting the mandala genetics going!
 

leflll

Member
Searching for a Cab

Searching for a Cab

Hey everyone,
Ive been looking for a new cab for awhile now. I want something thats about 36"W x 24"D x 55"T. I want to use a 400 watt cool tube with Can2600 filter and I'm thinking a 6" Vortex should be good with 2 8x8 Darkroom louvers for intake. I'm ready to give up and build my own but i have little carpentry skills. First of all what would be the best and cheapest kind of wood I should use.

Thanks for your input all suggestions greatly appreciated.
 
M

m00nchild

Those dimensions you gave are about the size of an average wardrobe. I'd start looking on craiglist for one. Another possibility is a hutch-style entertainment center.
 

simon

Weedomus Maximus
Veteran
Hey everyone,
Ive been looking for a new cab for awhile now. I want something thats about 36"W x 24"D x 55"T. I want to use a 400 watt cool tube with Can2600 filter and I'm thinking a 6" Vortex should be good with 2 8x8 Darkroom louvers for intake. I'm ready to give up and build my own but i have little carpentry skills. First of all what would be the best and cheapest kind of wood I should use.

Thanks for your input all suggestions greatly appreciated.

1. There's no such thing as best and cheapest. I'd suggest marine-grade plywood, or perhaps even melamine.

2. A Can2600 is tiny. With a 6" Vortex, you may want to look into a Can50 or a Can66. Good luck.

Simon
 

pharvy

New member
Hey everyone,
Ive been looking for a new cab for awhile now. I want something thats about 36"W x 24"D x 55"T. I want to use a 400 watt cool tube with Can2600 filter and I'm thinking a 6" Vortex should be good with 2 8x8 Darkroom louvers for intake. I'm ready to give up and build my own but i have little carpentry skills. First of all what would be the best and cheapest kind of wood I should use.

Thanks for your input all suggestions greatly appreciated.

.. i've been designing a cab with very similar dimensions.. my flowering space will be 36"x24"x48" also with a 400 watt hps. once i start construction ill have my blueprints and construction journal up and going. hopefully some of my ideas will help.. ill be following along the lings of ticks box found here.
https://www.icmag.com/ic/showthread.php?p=443825
 
Top