What's new
  • As of today ICMag has his own Discord server. In this Discord server you can chat, talk with eachother, listen to music, share stories and pictures...and much more. Join now and let's grow together! Join ICMag Discord here! More details in this thread here: here.

Philips 315w CDM Elite (CMH)

Scrappy-doo

Well-known member
Veteran
You have any idea on specs for cab size for 3 of these in a single row? I think rives said they have a 3x3 footprint, so I was planning a 3x9 cab, but not sure how tall I should make it. I know Ideally they should go above the cab with holes cut in the top.

Also, I have a 1 k perpetual flowering room going now and was planning on bringing those plants right into this new cab. Height on my girls range from 2-3 feet.

Hoping the change in lighting from hps to cdm will only benefit those already well into flower.
 

oceangrownkush

Well-known member
Veteran

Looking good! Sorry if its posted already but this thread is epic, was hoping you could let me know what kind of a footprint you're getting with this 315w? I have been reading 4x4 is optimal but curious to see if your results come from something closer/smaller.

Good job!
 
You have any idea on specs for cab size for 3 of these in a single row? I think rives said they have a 3x3 footprint, so I was planning a 3x9 cab, but not sure how tall I should make it. I know Ideally they should go above the cab with holes cut in the top.
They don't have a 3'x3' footprint, but I think rives said he used one in that space.

I'd leave at least 15" from the canopy, but that depends upon your specific space.

I personally don't like the concept of "footprint" because it's not nearly useful enough nor informative enough in terms of data. A standard footprint assumes all rooms are the same, and they're not. That's why it's important to measure the irradiance, to optimize fixture placement and distance to canopy.

The best way to do this is using a good quantum sensor, like LI-COR, not Apogee (or the rebranded version sold by Sun Systems). However, the LI-COR is near $1,000 at the lowest cost, so using a NIST certified lux meter, and a lux to PPF conversion factor is probably the best way for most people to go. Ranger is doing that exact thing, and is starting a thread on it here today or tomorrow where I'll help him calculate the factor for his specific lamp, however, for the lamp you're using Dr. Bugbee has already calculated that conversion factor so it's easier for you to use this method.

One thing to know is they work best when you make use of wall reflectance, so make sure your walls are covered in ORCA Film, or at least two coats of white paint. Mylar, Panda film, etc., are all a waste of time compared to ORCA Film or white paint.

I'd contact Cycloptics directly and ask them what space they recommond for a few fixtures, if I were you. However, it's best if you know your target irradiance, and I would suggest 700-800 PPF for veg and 700-900 PPF for flowering.

Also, I have a 1 k perpetual flowering room going now and was planning on bringing those plants right into this new cab. Height on my girls range from 2-3 feet.

Hoping the change in lighting from hps to cdm will only benefit those already well into flower.
Yea, it should.
 
Last edited:

rives

Inveterate Tinkerer
Mentor
ICMag Donor
Veteran
You have any idea on specs for cab size for 3 of these in a single row? I think rives said they have a 3x3 footprint, so I was planning a 3x9 cab, but not sure how tall I should make it. I know Ideally they should go above the cab with holes cut in the top.

The modeling that they did for me was done based on the plants being a minimum of 3' below the reflectors and a maximum of 6'. Cycloptics was doing free modeling at one time, I don't know if they still are or not.

I haven't used the Cycloptics reflectors. I looked into them pretty closely for a long time, but my applications require vented fixtures. I wound up using the Bell 600MV reflectors.

Tenthirty has used them, but I'm not sure of anyone else that has.
 
Oh, it was Tenthirty, that's right, thanks.

About modeling, they never did it for free as a rule, but they did do free modeling for some people. Back then Richard Tuck was still with Cycloptics, and he was the one doing the modeling, and at that time they charged $1,000, of which $500 would go to the purchase of the units.

Now that Richard is no longer with Cycloptics they now use LTI Optics for the modeling, which costs $1,000 per model, if I recall correctly.
 

Scrappy-doo

Well-known member
Veteran
Thanks for the info. Yeah I plan on picking up some orca film for this new build. Looks like with this reflector it's not quite as simple as 3 lights need A x B x C size cab.

Part of me is kinda wishing I just went with a different hood. Woulda been a lot easier.

Hey Rives, why are you not using the cycloptics reflectors anymore? You getting better results with your custom setup? I remember you saying something about doing a closed hood that can be air cooled because you dont use an air conditioner? I'm hoping to not use one either but if need be I will. Right now I cycle air to the rest of the apartment which has central air.

Edit- just read your post above. Nvm.
 

Jhhnn

Active member
Veteran
The modeling that they did for me was done based on the plants being a minimum of 3' below the reflectors and a maximum of 6'. Cycloptics was doing free modeling at one time, I don't know if they still are or not.

I haven't used the Cycloptics reflectors. I looked into them pretty closely for a long time, but my applications require vented fixtures. I wound up using the Bell 600MV reflectors.

Tenthirty has used them, but I'm not sure of anyone else that has.

If a person wants to avoid A/C then vent hoods and two stage cooling (from ventilation 101) provide a solid answer. I think that holds regardless of the lamps used. The more power you have, the more advantageous it becomes. At some point & in some situations, A/C is the only answer.
 

adilerr

Member
Hi guys, got a question for you CMH users.

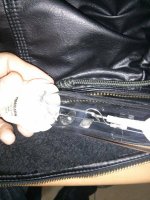
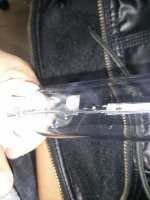
I think some sellers sell used bulbs, I say this because the first set of bulbs I bought (Agro & 942 T12) looked new out of the box, no visible marking/stains on the ceramic core but after some usage I started seeing yellow spots/coloring on the ceramic core.
Now I got a couple of bulbs from two different sellers and both (942 T9's 315w & 210w) had yellow marking on the core plus some markings on the glass right out of the box.

What do think? Is the yellow marking on the core means its been used?
 

adilerr

Member
Pics of the bulb I just got.
 

Attachments

  • IMG_20150319_140440.jpg
    IMG_20150319_140440.jpg
    23.6 KB · Views: 39
  • IMG_20150319_140545.jpg
    IMG_20150319_140545.jpg
    24.9 KB · Views: 31
  • IMG_20150319_140731.jpg
    IMG_20150319_140731.jpg
    82.6 KB · Views: 29
  • IMG_20150319_140756.jpg
    IMG_20150319_140756.jpg
    47.5 KB · Views: 37
I can't be certain, will perhaps check after lights out tomorrow...but I think the change between new and used is much less subtle...Like from white to brown...well...not quite...but yeah.
 

T_B_M

Member
Hi guys, got a question for you CMH users.

I think some sellers sell used bulbs, I say this because the first set of bulbs I bought (Agro & 942 T12) looked new out of the box, no visible marking/stains on the ceramic core but after some usage I started seeing yellow spots/coloring on the ceramic core.
Now I got a couple of bulbs from two different sellers and both (942 T9's 315w & 210w) had yellow marking on the core plus some markings on the glass right out of the box.

What do think? Is the yellow marking on the core means its been used?

I had some of the same, except not as many spots and they were slightly darker. It could be some of the chemicals they put in there. I think the yellow means it is new. My marks started dissipating over time as I've used the bulb more.
 

T_B_M

Member
Thanks for the info. Yeah I plan on picking up some orca film for this new build. Looks like with this reflector it's not quite as simple as 3 lights need A x B x C size cab.

Part of me is kinda wishing I just went with a different hood. Woulda been a lot easier.

Hey Rives, why are you not using the cycloptics reflectors anymore? You getting better results with your custom setup? I remember you saying something about doing a closed hood that can be air cooled because you dont use an air conditioner? I'm hoping to not use one either but if need be I will. Right now I cycle air to the rest of the apartment which has central air.

Edit- just read your post above. Nvm.

I have a 5'W x7'L x6.5'H room with an LEC630 fixture from Sun Systems. This light heats my room to 10 degrees above intake air temp. These lights are not like HPS when it comes to heat. My 250W magnetic HPS throws off as much or more heat as this fixture with both ballasts and bulbs integrated. The ballasts are so efficient they hardly heat up at all. I can place my hand anywhere on the top surface of the reflector and not have to move it away. Its hot but not scalding hot like with HPS.
 
Hey guys,
I have tried twice now to dim my ballast by flipping the switch inside the hole on one end of the ballast, but it will NOT fire.

Any suggestions?

What are those other 2 wires for?

Should they be connected when I do this ?

Thanks
FW
 

adilerr

Member
The switches (2 of them) are for switching between 210w and 315w operating modes - not for dimming.

You need 0-10V controller connected to the purple & grey wires.
 

Ericos

Member
Thought I share some numbers from my multi kelvin runs. My CavemanOG pulled through better than expected. Considering the pH issue early on.

15 plants in 2 gallon grow bags with about 2x 315w per 2x4 tray got me 427g. Almost a full #. My BDS Special are about to get harvested and expecting over 1-1/2 # close to 2# going by size.
CMHFTW!
 
Hey guys,
I have tried twice now to dim my ballast by flipping the switch inside the hole on one end of the ballast, but it will NOT fire.

Any suggestions?

What are those other 2 wires for?

Should they be connected when I do this ?

Thanks
FW
Um, you dont dim by flipping the dip switches. you dim by connecting "thoes other 2wires" to each other.

Once the lamp is at full power, it will begin to dim very slowly if thoes two wires are connected, untill ~50% brightness. It will re-brighten very quickly if they are disconnected

The two wires ( purple and grey?) are a dimming input which needs between 0-10V, where 0V= 100% light and 10V = 50% light. The other wire is a 10V out. i wired a simple wall switch to them to dim at first. flipped it on for dim 50% and off=100%. now i PWM them as needed. You can buy an silly expensive 10v dimming controller you hook the two wires too, but...

power down your ballast. Put your dip switches back to the 315 configuration, and repower your ballast. It will fire. then dim as detailed.
EDIT
http://prntscr.com/6lgfqr
RIVES! Is that chart backwards? Don't you have 100% at ~0V and 50% at ~10V? With a little tolerance on either end?
 
Last edited:
Thank you very much LP !!!
I thought so, I HAVE read every post of this thread AND the HUGE sticky thread.
I thought I read that somewhere, just wanted someone in the know to verify.
Lord knows you can't get the guy at "Advanced" to respond...
Thanks again dude, you rule this thread !

FW

Um, you dont dim by flipping the dip switches. you dim by connecting "thoes other 2wires" to each other.

Once the lamp is at full power, it will begin to dim very slowly if thoes two wires are connected, untill ~50% brightness. It will re-brighten very quickly if they are disconnected

The two wires ( purple and grey?) are a dimming input which needs between 0-10V, where 0V= 100% light and 10V = 50% light. The other wire is a 10V out. i wired a simple wall switch to them to dim at first. flipped it on for dim 50% and off=100%. now i PWM them as needed. You can buy an silly expensive 10v dimming controller you hook the two wires too, but...

power down your ballast. Put your dip switches back to the 315 configuration, and repower your ballast. It will fire. then dim as detailed.
 

Latest posts

Latest posts

Top