What's new
  • ICMag with help from Landrace Warden and The Vault is running a NEW contest in November! You can check it here. Prizes are seeds & forum premium access. Come join in!

passive plant killer

*mistress*

Member
Veteran
Pros and Cons of 24/0 VS 18/6

24-2=
22-2=
20-2=
18....

more light=potential more made & stored energy. directing the energy to flowers when finally dark come...maybe...

@ cactusjack...
similar to automatic pet waterer config;)...

imaginary planty seem like top water 1-2 tymes per week. even if sub-irrigated.
maybe large trough & feed every other day, if want 1 large res.... the run-off from day 1 used thru day 3, when more solution poured, esp if use wick.
if use buckets, square 4 gal fit into round 5 gal, neat. wick in 4, down into 5...
:2cents:
 
Delta – Wow! I love your dual float valve idea! One valve in the reservoir functions only as the float on a lever arm and the other is above the bucket and actually controls the flow. The two float arms are slaved together with a simple linkage. You are right though; the flow characteristics from a float type control would be pretty poor. It would start and end as a dribble. The nice slug of liquid you desire would not be present.

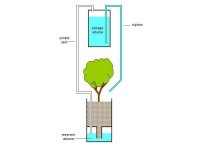
So toss the idea of a mechanical float valve and check out the attached approach that has no moving parts. It’s a simple siphon, but the “finger on the top of the straw” is down in the reservoir, not on top of the straw. It works. I’ve been splashing around in puddles on my kitchen floor all night.

When the media wicks up enough liquid so that the reservoir level drops and exposes the bottom end of the control vent line, liquid flows from the supply volume and is dumped to the top of the bucket. A nice slug of liquid that starts and stops smartly. When enough liquid runs down into the reservoir to cover the bottom end of the control vent, flow stops.

This is only a cartoon and there are some un-shown hardware details that make it function reliably and I’ll post those in a few days. There are also the traditional problems with this hamster feeder approach. The most annoying of which is that the supply volume container must be pretty tough to take suction loads since the greater the drop in the siphon, the greater the suction. There is a simple solution to this problem that I will also post later. I have a working solution, but I think I can make it even simpler.

Sorry, but as you point out, this approach won’t work for your multi-bucket arrangement. I need to think a bit about how that problem might be overcome. Getting very late here. Time to pack it in.
 

Attachments

  • siphon1.jpg
    siphon1.jpg
    22 KB · Views: 23

delta9nxs

No Jive Productions
Veteran
“I’ve been splashing around in puddles on my kitchen floor all night.”

ha, ha, ha! While I tossed and turned thinking about ways to make this work. But seriously man, you really know how to party. This is hilarious! Some folks think pot heads are inherently lazy, unmotivated, and mentally slow. Just lounging around all day smokin', with stupid grins on their faces. I move around doing shit all day, thinking about this stuff. But still smokin'. Unfortunately, I still have the stupid grin.

As mistress stated, like a hamster waterer or maybe an office water cooler.

Again good for one plant as with multiple res's when you break siphon on one, the volume tank would feed all of them. That doesn't mean you couldn't put a small tank on each one.

The 4 oz's per hour at 96 per day and the 8oz's per 2 hours at 96 per day did not produce any over watering symptoms but I have decided it keeps the tops a little too wet. When I last did the old pick up a fistful of coco and squeeze it trick, I got significant dripping. So I have now gone to 4 oz's every two hours for effect. This cuts the top input to 48 oz's per day in veg. Same volume as the 6 oz's per 3 hours program. Maybe the number of waves per day has an effect, maybe not. The cyclestat has a photo activated switch that can itself be turned on and off. With the 6 oz's per 3 hr schedule I was letting it fire once during the dark phase. I think i'm going to turn the feature on to stop watering during that period. With this activated I would get ten burst of 4 oz's per day or 40 oz's total. The cool part of this feature is that it will fire as soon as the lights power up, the beginning of the photosynthetic process.

I now have 8 of the 9 in flower hooked up for sub-irrigation. These big flowering plants pull a lot more water than the veg system. I'm not sure I can get a week from that 45 gal drum feeding both systems. Good thing I installed a third tire valve on it. All I have to do to increase volume is slave a second drum with a single valve.

About the drip rate measuring tool. Even without all the math and factoring this could be used to compare old bulbs and new bulbs for efficiency. Measure the flow with one bulb then immediately take it out of the fixture and put in the other one. Measure again. Same plant, humidity, temp, etc. you could do a fast comparison of a hortilux and a cmh, for example. Or ordinary hps bulbs with ag hps bulbs. Not really quantifying but doing a relative comparison. If one produces 17 drips per ten seconds and the other produces 13 within minutes of each other you would have an idea. Repeat it a few times to verify.

It is now 7:45 a.m. And i'm tired, time for a nap.

Later on
 

delta9nxs

No Jive Productions
Veteran
i was taking some cuts today and i use a wick cloner. i thought this would be a good illustration of the perched water table and how it is eliminated by a wick.
 
Last edited:

delta9nxs

No Jive Productions
Veteran
In the first shot the container, which has 4 holes in the bottom, with a wick in one, has just been overfilled with water almost to the top. You can see water running heavily from all 4 holes.

Number 2 shows the water has stopped flowing from the three drain holes but is still flowing from the wick. The perched water table has been established and is visible, barely. It is being eliminated by the wick. without the wick it just sits there until eliminated by evaporation and transpiration.

Number three, within seconds of number two, shows what happens when you change the shape of the pwt by any method. Remember the pwt will exist at the same height in all containers with the same medium. No matter the volume, height, or width of the container. You can clearly see the pwt. When I turned the container I changed the shape of the pwt. The original pwt was too great a volume to maintain the same height in the medium, so it began draining the newly created excess through the drain hole.

Number four, the container is righted and the wick has been given sufficient time to eliminate the pwt. Please notice the pwt is no longer visible and the wick has stopped flowing.

This wick is also being used to supply the container with moisture so it is short.

If you want to use a wick as a drain only your container needs to be at least 8” above a body of water. The body of water keeps hydraulic conductivity constant through the wick.
 

delta9nxs

No Jive Productions
Veteran
hey, carl, i was talking about a set up where you intentionally want to use it as a drain only. just a cloth or media wick hanging 8" down into the res or catch basin. this distance pretty much overcomes capillary rise.

my set up is intended to feed also, so even though my sump/wick is 7" the water level is only 2" below the medium.

sorry for not being more clear. d9
 
C

Carl Carlson

oh I see, you mean the length/height is super-critical.

What is the science behind that?
 

delta9nxs

No Jive Productions
Veteran
“oh I see, you mean the length/height is super-critical.

What is the science behind that?”


carl, every medium has a capillary rise potential. This is how high the substance will wick water. And we're talking water in a medium with air pore space, not solid water, turface and perlite are both around 6.5”. Coco seems to be a little higher than that. Fabric or fiber wicks have a capillary rise potential too. The general consensus is that 8-9” will overcome the rise potential and allow one way flow only.

Take a paper towel and hang it in a tray of water so it just barely touches the water. The towel will pick up water and take it upwards until the capillary rise potential is met. There it will stop and go no further.
 
C

Carl Carlson

thanks for the data.

I'm watching the PWT in action right now as I rinse expanded coco mix bricks with plain water, post-rinse them with nutrient solution and than hold the pot at an angle in order to fully drain each one before the transplant goes in.
 

oldone

Member
Hi D9,

I grow in a cab and have a space 27w x 23d x 15h = 4.3 sft area or 5.4 cu ft for the whole flowering plant(s). Scrog city. (Thats 69w x 58d x 38h cm) I have about the same area below it for everything else. Right now I have an E&F jammed into it.

So I am looking at building mini PPKs. I like eliminating the pump and timer and the waste reduction too.

I also like the idea of a control bucket. I wonder if I could connect control to PPK via a siphon hose instead of having a conventional connection. I think it might work better in a smaller area. Of course the hose would have to be well supported at both ends.

Is epoxy safe to use in plastic buckets and/or will it affect the plants?

Thanks,
OO
 
Warning!

Warning!

Anyone considering a siphon setup similar to what I posted in post #462 of this thread... sorry, but be aware that although it will feed as suggested, it will only do so under very limited configuration parameters.

I'm in the process of writing up a robust evolution of this concept that relaxes or eliminates these limits and provides other improvements over more common siphon feeders. I'll post this in a new thread so as not to distract further from Delta's fine PPK thread. Will provide link to the new thread as soon as it is available.
 

delta9nxs

No Jive Productions
Veteran
here is a greatly simplified version that is fast and cheap to build. as i did not know what i was getting into and what might be required down the line my original design was unnecessarily redundant. i used those big tubs because i already had them. they already had a hole in in the standpipe position so i put the standpipes there. i did not know i would be linking them. i wanted the center module to stand up on it's own once removed from the tub. there is an alternative for that.

these plastic pieces are cheap, under $15 dollars. there is very little manufacturing to be done.

the only tools needed are 1.5" and 2" hole saws, a 13/16" spade bit, and a 5/16" twist drill to assemble it to this point.

all items from lowes. home depot probably has them too. every plumbing store has the sink parts as they are the most common way of doing what they do under the sink. the 13/16" spade bit is for the 1/2" pvc plug you see. a hole in that position and a baster makes readings fast and easy.
 
Last edited:

delta9nxs

No Jive Productions
Veteran
If you have to remove the bucket from it's reservoir you will need a place to set it. This could simply be another bucket with a lid and a hole. You will still need to plumb the reservoir for your configuration. I'm surprised no one has tried the tire valves. Work great with no leaks. 15/32” bit

oldone, i'm having trouble picturing what you mean with the siphon. I wonder why you would opt for a siphon from the control to the res when you could use these fail safe fittings letting gravity help you control level.

I've done a lot of epoxy and fiberglass boat work and to my knowledge, epoxy doesn't bond well to most plastics. A better choice would Amazing Goop, plumbers edition. Lowes, hd, wally's.

editing to add: oldone, this could be scaled down using other containers.
 

delta9nxs

No Jive Productions
Veteran
there is something i want to be very clear about at this point. the device you see pictured above will work very well using either top or sub-irrigation alone.

if you just want to grow a few plants for medicine or personal use there are two simple, different, ways this could be operated.

if you want to hand water the tops only you could just put the rig shown above in a catch tray of some kind, drill a hole in the sidewall at the desired level and water until you get a little run off. not much run off, just until you see an overflow so you know it's full.

in between daily top watering the sub system takes over, supplying the plant continuously. you can't over water with this method in coco and the plant will never suffer a water stress event from drying out.

almost fail safe. the drawback being that you have to be there every day.

in coco you definitely want to water daily at least a small amount to keep the res level close to ideal and the top moist.


The next method is sub only. With this you get more time away and less work. It requires some way of level control in the res and a separate supply tank. You size your volume tank for the time frame you need.

It does grow a smaller plant than than the top water method described above. But it will still be beautiful and healthy. I got 7 1/8 oz's from one.

If top yield is your absolute, go with the sub and pulse method.

d9
 
C

Carl Carlson

even I can do this

are the holes in the bucket just because it was a demonstration bucket or are they part of the design?

in your example - 5 gallon bucket with that size tub - how big is the res. with the drainhole added?
 

Latest posts

Latest posts

Top