C
Carl Carlson
D9 what exactly is that ring used to hang your bulb in veg setup? i need to copy that or something similar
Hey, cactus... What kind of glue did you use?
 tech delta9nxs!
... in a glass of water in which a teaspoon of sodium salt (Na) has been dissolved. only water leaves the glass during a drying event. when the evaporation process is over the salt is left behind.
... If you stall a plant for any reason it permanently affects potential.
That's deep - a pretty profound summary. I dig it.
Later on
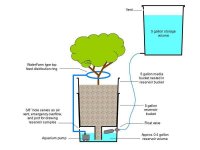
Delta - I've got a little $15 digital timer from HomeDepot that will do up to 20 cycles/day. Shortest interval is 1 minute. Smallest aquarium pump I have does about 30-40 GPH at 12-15" head. Can't find a smaller one. I'll have to add a bypass to cut flow down into the 6 oz/cycle range. I've been thinking of a WaterFarm type ring for distribution made out of 1/4" irrigation tubing. This got me thinking that maybe a WaterFarm type air lift would be better since its flow is relatively low and better suited for this self contained unit. Jury is still out which way I'll go. I've thought a bit more about a continuous system, and I think your pulsed "tidal" system has definite advantages.
I'm currently running 80/20 turface/coco so I don't think I'll bother with the top feed kit in this unit. I'll be starting 100% coco with the top feed kit later this month when a couple of other plants come out of flower. Cartoon of my layout attached. I've only drawn a single media well even though I have two, one on either side of the central float valve.
Next week I take a 400-mile round trip drive to pick up several sacks of Atami coco. One of the joys of living on the edge of the world is the long drive to get to a "big" city for serious shopping. Also on my road trip shopping list are a handful of Air-Pot units (available within 2 miles of the coco!). I don't know if I'll use them right away, but discussions of root pruning have got me thinking that they may be my next step. As far as I can tell, Air-Pots look like the cats pajamas.

Professionals in commercial agriculture must laugh their asses off at this absurdity. This is agriculture, folks!