What's new
  • ICMag and The Vault are running a NEW contest! You can check it here. Prizes are seeds & forum premium access. Come join in!

Off the shelf retail store screw-in LED and CFL bulb comparisons

R

ratsidecar

Im gonna search the thread. Can you link me a build for that board please? I love that light setup.

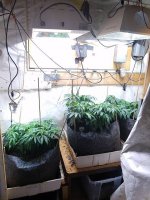
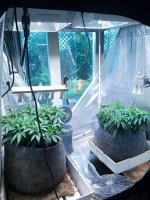
Hi its pretty simple to build. I chose a piece of coated chipboard also called furniture board in some places and the stuff cheap kitchen units are made of.

Cut it to the exact dimensions of the growing area.

Measure and mark it out into a grid so the bulb holders wil be equally spaced apart so it will look nice and neat and to get an even coverage.

Drill a hole at the centre of where each bulb holder will be, I used a 10mm drillbit and wiggled it about a bit in the hole once it was through to enlarge it slightly. This will be where your wires from the bulb holders run up through the board, across the top of it and back down through another hole to supply power to the next holder.

Get some cable, I used 3 core electrical cable as it worked out cheapest, Insert it through one hole, feed it through the next one and leave around 2-3 inches hanging free through the hole in the board at either end of it. Cut the wire and use this piece as a template to cut another length for each bulb holder.

Strip the outer insulation off each of your short lengths of wire and discard, you will be left with just the inner 3 wires from each section.

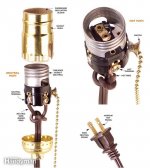
Choose what side or position you want your main power feed to come in at, I always choose the end bulb on one side. Wire a suitably long length of 3 core cable through the board onto the first bulb holder. Wire a plug onto the other end, make sure this piece of cable is still fully insulated for safety.

From the first bulb holder wire + to + on the second holder, - to - and earth to earth if you have a space on it to attach an earth wire. Continue this like a big snake from one bulb holder to the next until you get to the end of the chain. Give each wire a little tug after you secure it to make sure it wont come off. Pay attention to polarity markings on the bulb holder and your wire colours to make sure no mistakes happen, triple check everything after you have wired it up. In the UK brown wire is + blue wire is - and earth is green/yellow stripey wire. Colour codes for other countries are here https://www.allaboutcircuits.com/textbook/reference/chpt-2/wiring-color-codes/

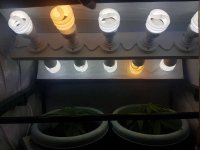
Now screw the bulb holders to the board, you probably wont need to pre drill the holes for them as chipboard is pretty soft. Pay attention to the length of your screws so they dont poke through the other side when they are in as they could snag on your wiring and be a risk. At this stage you can plug your bulbs in and power it up and make sure they all light up. If they dont check all your wiring again, if they do then happy days you are almost finished.

The top side of your board will look a mess now with untidy spaghetti wiring all over it. Use a bunch of these http://image.made-in-china.com/43f3...ircle-Round-Cable-Clips-Flat-Cable-Clamps.jpg to tidy it all up and make sure nothing is hanging loose and its all nice and secure and pinned down to the board. Pay lots of attention to the main power wire as if you give it a good tug by accident you want it secure so it cant come out.

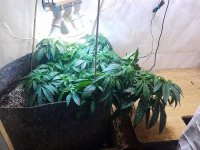
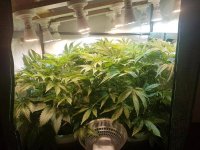
To secure the finished board inside your growspace I used 2 pieces of wood on their ege screwed into the side of the box and pushed the light board up against them from underneath and screwed it into place. Its height isnt adjustable this way but it really helps stiffen up the wardrobe it is fitted in and this will help to take away some of the vibration through it from extractor fans etc, Hope this helps you.


earthwyrms

Active member
i previously mentioned a osram 5000k "100w" led that is 18w

i meant Cree
it has a nice heatsink on it

also, i like to use PTFE teflon tape to wrap wire splices, excessively, and then i like to wrap that in regular tape, so it doesn't unravel and to give some strength to the patched wire.

~1$ for 5 medium size rolls
http://www.ebay.com/itm/301598735476
 
Last edited:

earthwyrms

Active member
ALSO, SOMETHING REALLY HANDY THAT HAS BEEN ELUDING ME FOR A LONG TIME

AC PHASES
 

Attachments

  • FH05NOV_WIRSOC_01.JPG
    FH05NOV_WIRSOC_01.JPG
    59.2 KB · Views: 20

Terpene

I love the smell of cannabis in the morning
Veteran
The LED penetration test continues! We're now 6.5 weeks in and the 7' tall Mauritius x Ethiopian continues to stack without any appreciable loss of thickness to about 3' off the bulbs. I had to zip tie sticks to my previous sticks as the branches were starting to droop all over the place under their own weight. We're contained for now at least....
picture.php
 
G

Guest

Looking stellar as always,Terpene!:tiphat:

What's the distance you keep the screw ins from newborn seedlings?
 

Terpene

I love the smell of cannabis in the morning
Veteran
Have you noticed way less stretching with led's?

Well...mostly yes and a little no. Mauritius x Ethiopian is an untested F1 cross from Ace, so theres no way to know what to expect other than "they run 18-20 weeks, expect haze-like stretch" as Dubi generally grows outdoors. I'm also topping multiple times and twisting / bending / snapping stems with LST in veg.

I would say that 20w per sqft is as bright as you need to be in veg, 30w per sqft is what I am currently flowering under and I don't see any need to go brighter as the plants look like anything I've seen under HPS/MH/CMH bulbs. Hell, at this point with production lines I am trying to out-yield my friends with 1000w bulbs on a per plant basis. :laughing:

What's the distance you keep the screw ins from newborn seedlings?

My micro/seedling veg is a 2x2x2 box with six 14w 4000k Feit bulbs lighting the space (21w per sqft). I tend to place the seedlings around 6-8 inches under the bulbs with the rest of the micro veg canopy. According to my ghetto light meter, thats 1000umol aka HPS flowering bright at the canopy. Its total overkill, but I prefer to veg at maximum brightness. I warn you, it really speeds up the veg process - I am continually waiting for space to clear up in flower to keep up with my veg cabinet.
 

isitisi

Member
Hello I will start my next (actual) grow soon and I found a 30w led (10x3w) 2700k and I am going to buy some lower watt leds with different k's. As I'm going to do a pc grow I have some temperature issues so I want to shut down some of the leds when it is too hot and later as I activated them I'm going to shut down others and run them all the time when the pc case is not hot. Will it cause problems? Is it stupid idea?
 
my cheese candy has nodes like every 12/8th inch to 1/4 inch under these led's (2700k). gave my friend some cuts and he did them under 600w hps. his nodes were like 3-6 inches apart.
 

earthwyrms

Active member
terpene

i'm hoping to run the mauritius x ethiopian; but, i am not sure if i can get to it soon enough. so i want to make the suggestion that you mix it wih the ghana from cannabiogen,

because i took a look at that thread and wow, i didn't really have it click, untill i looked at your pictures of the mauritius x ethiopian

and when i saw more pictures that were newly posted of the ghana. then it clicked, but i forgot where i saw that someone was running the mauritius x ethiopian cross untill just stumbling on this again.

bulb inside, N is neutral, white wire was to the bulb case when i cracked it off with a vice, th.jpg
seed germination and cutting rooting attempts.jpg

this is a generic walmart phillips copy 8.5 or 9W (the phillips is 8.5W) i cracked the base of with a vice, after crushing and loosening it, all the way around. the casing N (NEUTRAL) was where the white wire was attached, i'm guessing I means HOT because on an old laptop charger (3 prong grounded), the prong which goes to the large plug slot (neutral) has an N under it, the other one (hot) has an I

so that DIY projects are in phase

the contacts are brittle and before i realized i need to affix the wires to the board with superglue for support, i broke off a contact and am out of a soldering iron currently, but thin wire wrapped aroun the transistor lead and superglued above it to keep the wire from moving, and also over the nearby contat to prevent wire shorting, helped, the i superglued the other wire above the contat too, because i broke off both contacts on a different bulb which i need a soldering iron to fix. the two in the box were my forst work and they weren't stressed to break yet so if i squeeze real good there is a tiny bit of superglue to fix their wires on alright. i use PTFE tape and then regular tape to seal bare wires because PTFE is a better insulator than electrical tape, which i always found less than ideal.

:)
 
Last edited:
R

ratsidecar

flushing started today, a week or so until chop. could have let them go a good bit longer but ran out early :(
Black destroyer and an unknown strain.
 
R

ratsidecar

Just found a brilliant tool for plant training,a pair of pliers. Its easy enough to squish a stem between your fingers to spread a plant out when it is small, but its much harder to do when the plant has grown up a bit and the stems wont squash enough to bend, and trying to forcibly bend them just makes them snap.

With a pair of pliers you can just reach in, give them a quick squish and you now have a perfectly bent branch that can be arranged to your liking. Awesome
 

argo430

Member
Veteran
The closet had a dark corner so i supplemented the 630 W with 40 more. I think I have lost it...

670 W in veg.
attachment.php


Photons are awesome!
 

Attachments

  • 66pol.jpg
    66pol.jpg
    80.4 KB · Views: 19
  • no3stinky.jpg
    no3stinky.jpg
    88.7 KB · Views: 21

argo430

Member
Veteran
I don't need to but each plant has its own 315 and a few extra led's thrown in the mix for good luck.
 

Attachments

  • my spray today and some patches from some of the bases i put video games in.jpg
    my spray today and some patches from some of the bases i put video games in.jpg
    71.5 KB · Views: 29
  • morning goo.jpg
    morning goo.jpg
    55.6 KB · Views: 25
  • a lil more training and foliar feeding pm prevention wetting agent.jpg
    a lil more training and foliar feeding pm prevention wetting agent.jpg
    107.6 KB · Views: 29
  • clsttraining day.jpg
    clsttraining day.jpg
    79.9 KB · Views: 23

meehi

New member
My CFL Hood vs LED Hood??

My CFL Hood vs LED Hood??

Hey guys I just swapped out my diy CFL Hood for another diy LED Light thanks to this post. However I'm not 100% sure it's going to work out better than my original light. When looking in the tent the overall brightness seems lower however the light appears more piercing.. I dunno..


Specs for the CFL Hood is a follows. 10x20Watt Spiral CFLS vs 12 x 9.5 Watt LEDS. Pictures below. Do you think I made the right choice swapping out the lights? I have 2 plants growing in a 24x16 inch tent each in a 2.6 gallon coir hempy bucket. (Things are getting very tight in there.


P.s. It's my first grow ever so really hoping for a few nugs :)


Attachments

  • 20170525_210454.jpg
    20170525_210454.jpg
    37 KB · Views: 28
  • 20170614_182219.jpg
    20170614_182219.jpg
    84.2 KB · Views: 27
Top