What's new
  • ICMag with help from Landrace Warden and The Vault is running a NEW contest in November! You can check it here. Prizes are seeds & forum premium access. Come join in!

LED FAQ) Building and DIY

GDSBurns

Member
View Image

i use an adjustable voltage ac/dc thing(10 bucks for 1500mA/ about 15 fans)

this allows you to adjust the speed on the fans

View Image

just for reference the + is the blue wire
the - is the black wire( think lol i cant remember now)

View Image

Nice! Thanks!... I actually went ahead and bought an axial fan and im thinking it may be overkill for a panel. It comes with its own plug for an outlet. Its about the same size as a normal pc fan but much wider. This thing could probably be used for an intake fan for a tent. It has a nice amount of power.
l
 

CesarEL

New member
hey well this is the place to talk about taht

i assume you want an set up for your space?

i guess you saw my other thread?

https://www.icmag.com/ic/showpost.php?p=7222790&postcount=21


if u wanna use that as a veg
because you are in the USA you should get heatsinks from heatsink usa.com will be better

I have a spreadsheet to figure the cooling of heatsinks just ask if u wanna


id advise u get 3 of the 4.85 profile for those cobs(12 icnhes) but and run 4 chips on each-but you cant just change the drive current dude stay at 350mA as is doesnt work that way

or even better get 2 of the 2.8 profile 4ft t long) and run 6 cobs on each/ 4x 2ft


alll your other questions have been aswered multiple times in this thread

ill get back to you a bit more on this later
Thanks for the tips. Idk if you saw but I ordered 10 vero 18 and 1 hlg-185-c700a (would this combo make sense in a 2x4 tent?). Can I just get (2) 4.85"x15" and put 5 on each? Would I need additional lighting?
 

CesarEL

New member
Sorry it's actually 8 cobs.. lol. So would that make sense running them @700A in the tent size? And would i need fans for the 4.85 sink?

Sorry I've been a mess on these forums posting in multiple places. I'm sticking to this.

Thanks again,
-K
 

Dion

Active member
Sorry it's actually 8 cobs.. lol. So would that make sense running them @700A in the tent size? And would i need fans for the 4.85 sink?

Sorry I've been a mess on these forums posting in multiple places. I'm sticking to this.

Thanks again,
-K

picture.php

so the vero 18 @ 700mA is 44.21% efficient( tnx supraspl)

that means at 19.83w it puts off 11.06 watts of heat


if ur talking bout passive cooling then u need 6 inches of the 4.85 per cob

so probably 4x 16inch bars for 8 cobs would give good spread and awesome cooling

if u wanna use a fan it can handle 6 per ft

so get 2 bars 8 inches each

personally id go with the 4x1ft for better spread or look at a dif sink for spread

as for light its putting out about 3000L per cob so thats 3000L per sq ft in a 2x4 good for veg


driver is a perfect match( you could fit 2 more cobs on it fyi)
 
Last edited:

Dion

Active member
Today I finally installed an early version of my build in the tent.

It's 3x CXB3590 3000K CB driven@700mA, mounted on Arctic 64+ coolers with fans running @5V.

I did some cheap measurements with lights dimmed @700mA and full power @1400mA.
Tent is 120x60x175cm, around 1,25 cubic meters volume. No extraction fan, passive out on top of tent.
Measuring instruments - LightMeter App for android, temp/humidity meter, finger tips, hand:)

@700mA
Light on canopy - around 12000 lux
Upper limit of sensor - 30000 lux reached @20 cm under each cob
Temperature at canopy level - 27-28°C, humidity 58-65%
Temp of heatsink - not noticeable, feels just above room temperature
Temp under cob - hand feels slight warmth

@1400mA
Light on canopy - around 21000 lux
Upper limit of sensor - 30000 lux reached @ 30 cm under each cob
Temperature at canopy level - 29-31°C, humidity 50-57%
Temp of heatsink - a bit higher, I'd say around 40°C
Temp under cob - hand feels warmth at 10cm decreasing distance

Room temperature 23-24°C
Room humidity 65%


For now I'll keep the lights down to 75W until next week, then increase to 150W and add another set of 3 cobs with same specs.
Oh yeah, and I'll get an extraction fan.

Cheers

ur looking at about 880ppfd @ 1400mA and 456@ 700mA(assuming 36v version and in the 120x60cm tent)

very nice numbers
 

GDSBurns

Member
what u want is to drill and use self tapping screws

you must have a drill/can borrow one

other options are bad bad bad-I tried to use pads on a build a while back and cooked the cobs- i advise against it at all costs


so-you can get a cheap ebay driver for the single veg cob fyi)under $10)

Hey dion, i grabbed the self tapping screw and they arent drilling through. At this point i have 2 holes in my heatsink, should i just try another method? or am i doing something wrong?

Dont do much diy stuff often so this is racking my brain a bit. Cant figure why they arent pulling. They only go so far down then just spin in place.
 

Dion

Active member
Hey dion, i grabbed the self tapping screw and they arent drilling through. At this point i have 2 holes in my heatsink, should i just try another method? or am i doing something wrong?

Dont do much diy stuff often so this is racking my brain a bit. Cant figure why they arent pulling. They only go so far down then just spin in place.

Hard to say exactly what went wrong without more info on ur screw size drill but size and hole depth but if I had to guess if say u didn't drill the holes deep enoug then when they got to the end of the hole u threaded it.

Take the screws out
Check the depth of the hole
Compare to lenth of screw
Drill deeper by matching the lenth of ur screws to a mark on ur drill bit(go a few mm extra)

Screw them back in

Did that work?
 

GDSBurns

Member
Hard to say exactly what went wrong without more info on ur screw size drill but size and hole depth but if I had to guess if say u didn't drill the holes deep enoug then when they got to the end of the hole u threaded it.

Take the screws out
Check the depth of the hole
Compare to lenth of screw
Drill deeper by matching the lenth of ur screws to a mark on ur drill bit(go a few mm extra)

Screw them back in

Did that work?

Before i do that let me ask this. Should the screw be longer than the base of the heatsink? I bought small tapping screws cause i didnt want them to be to big for the cob. These screws might be 1/2" in length. Also should i pre drill a small hole then go in it with the self tapping screw?
 

Dion

Active member
Before i do that let me ask this. Should the screw be longer than the base of the heatsink? I bought small tapping screws cause i didnt want them to be to big for the cob. These screws might be 1/2" in length. Also should i pre drill a small hole then go in it with the self tapping screw?
Yeah u have to predrill the hole

No they don't have to be long but they can be, they don't hold much load so don't have to be too deep at all

U need to google ur screw size and drill the aprop te size hole for them

The screws don't dig the hole they just thread the hole

Ie it won't go in like wood, the hole needs to be there and should be a bit smaller in diameter than the screw

Google drill bit size for xxxx (#4 or whatever u have m2.5 ect)self taping screw
 

GDSBurns

Member
Yeah u have to predrill the hole

No they don't have to be long but they can be, they don't hold much load so don't have to be too deep at all

U need to google ur screw size and drill the aprop te size hole for them

The screws don't dig the hole they just thread the hole

Ie it won't go in like wood, the hole needs to be there and should be a bit smaller in diameter than the screw

Google drill bit size for xxxx (#4 or whatever u have m2.5 ect)self taping screw

Ok thanks will report back when im done. May post up a lic or two
 

GDSBurns

Member
Ok holes are drilled and the self tapping screws went in perfectly! Now i have to figure out which cord goes to what.

The driver doesn't title the cords pos or neg it just has acl- brown acn-blue and a funny image- green/yellow.

Once I can find out which is which ill wire it up.

Funny the driver didnt come with a manual
 

REALSTYLES

Member
Ok holes are drilled and the self tapping screws went in perfectly! Now i have to figure out which cord goes to what.

The driver doesn't title the cords pos or neg it just has acl- brown acn-blue and a funny image- green/yellow.

Once I can find out which is which ill wire it up.

Funny the driver didnt come with a manual
Brown is + Blue is 'and Green is Earth ground
 

GDSBurns

Member
I f you're in the USA it's brown to white, Blue to black and green to green

Thanks bro. I finished it up and these things are too fucking bright wow! I have only 3 on one heatsink and that baby is fucking crazy. Im almost positive those 3 are brighter than 400 hps. I see that you can turn them down using a screwdriver on the driver. How can i know what ma im running at? Is it auto set at 700ma factory?

Anyway thanks a ton to both Dion and RS. Now i just have to mount the driver and fan so i can put this thing to use!
 

Dion

Active member
Thanks bro. I finished it up and these things are too fucking bright wow! I have only 3 on one heatsink and that baby is fucking crazy. Im almost positive those 3 are brighter than 400 hps. I see that you can turn them down using a screwdriver on the driver. How can i know what ma im running at? Is it auto set at 700ma factory?

Anyway thanks a ton to both Dion and RS. Now i just have to mount the driver and fan so i can put this thing to use!

probably if u told me what driver u are using that woudl help lol

dude give me ur specs
garden size? cob type and bin? driver model?:)

to know teh current you would need to measure it
I assume you dont have a multimeter?
dont worry you can just eyeball it to get the rough draw or if you have a kilowatt meter that will get you pretty close as well
 

GDSBurns

Member
probably if u told me what driver u are using that woudl help lol

dude give me ur specs
garden size? cob type and bin? driver model?:)

to know teh current you would need to measure it
I assume you dont have a multimeter?
dont worry you can just eyeball it to get the rough draw or if you have a kilowatt meter that will get you pretty close as well

I think i did before but i will again no prob...

3- cxb3590 72v 2 are 3500k 1 is 5000k
Meanwell HLG 185H C700a

2x2 room

Had 4 of thw cxb's but only used 3 as advised by you cause they might be overkill for the room
 

Dion

Active member
I think i did before but i will again no prob...

3- cxb3590 72v 2 are 3500k 1 is 5000k
Meanwell HLG 185H C700a

2x2 room

Had 4 of thw cxb's but only used 3 as advised by you cause they might be overkill for the room

ok sorry o got confused because u said you had 4 of the 3500k

also didnt say what bin u had

btw the 5000k is the one id be using in the veg(unless you have 2 5000k and 2 3500k?)


yeah the driver goes 350-700mA

so at max should be 700 at min 350

in a 2x2 with 3 x 3500k(2x3500k+15000k will be a hair higher) assuming CD bin at max u are looking at about 994 ppfd
at min about 511.6

so basically you can start the flower at min ( or whatever u want) and eyeball it acording to stretch/stress until you go to max


with that range min or max and anything in between will all be sufficent without going overboard and causing stress to plants

there is much discussion about optimum ppfd for indoor cultivation
but I assure you you wont be hurting for light with those numbers


also all ur wiring colour questions are answered her on page 2

http://www.meanwell.com/mw_search/hlg-185h-c/HLG-185H-C-SPEC.PDF
 

bob857

New member
I f you're in the USA it's brown to white, Blue to black and green to green

No. That's wrong. In household wiring the "US National Electrical Code (for both AC and DC) mandates that the grounded neutral conductor of a power system be white or grey..."

First attach the green/yellow wire to the ground wire. Next attach the blue wire (AC/N) to the white neutral wire, and finally attach the brown wire (AC/L) to the hot black wire.

https://www.google.com/search?q=home+wiring+colors&ie=utf-8&oe=utf-8
 

REALSTYLES

Member
No. That's wrong. In household wiring the "US National Electrical Code (for both AC and DC) mandates that the grounded neutral conductor of a power system be white or grey..."

First attach the green/yellow wire to the ground wire. Next attach the blue wire (AC/N) to the white neutral wire, and finally attach the brown wire (AC/L) to the hot black wire.

https://www.google.com/search?q=home+wiring+colors&ie=utf-8&oe=utf-8
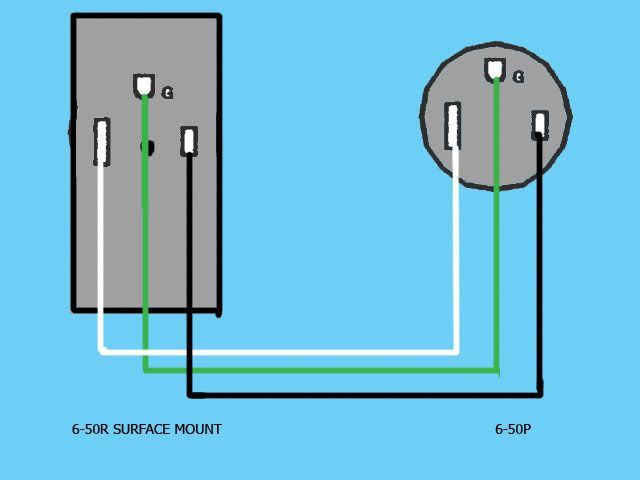
Ah have you wire up a meanwell driver to a US cord. I have and what I told him is what I've done over 15 panels lol


6-50EXT-WIRING.jpg
 
Last edited:

Latest posts

Latest posts

Top