What's new
  • ICMag with help from Phlizon, Landrace Warden and The Vault is running a NEW contest for Christmas! You can check it here. Prizes are: full spectrum led light, seeds & forum premium access. Come join in!

DIY Organic Potting Mix's for Grass - Ace Spicoli

acespicoli

Well-known member

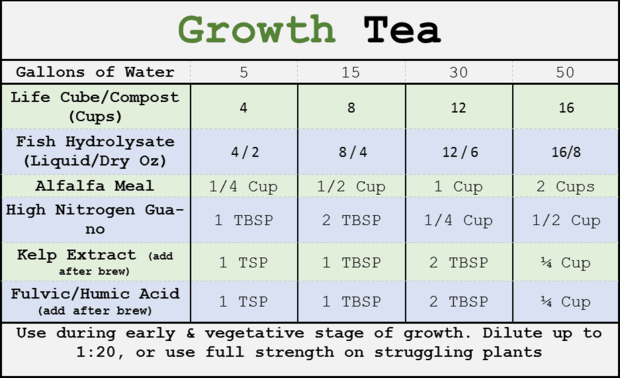
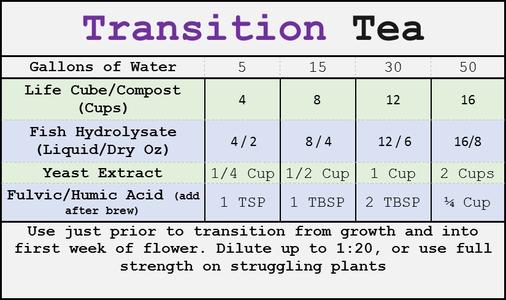
Compost TeaLAB Recipes

Don't let things get too complicated right off the bat. Start simple with a Basic Compost Tea. Once you get to know how a basic brew should go, and how your garden responds, you can start to experiment with other ingredients and really have some fun with it. Here's TeaLAB's Basic Compost Tea Recipe, followed by several recipes that include more ingredients. If you don't have all the ingredients, don't worry, you can potentially find a substitute or go without and still do a great job.
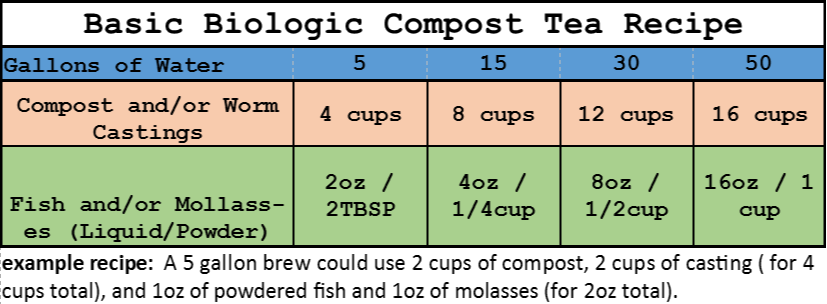
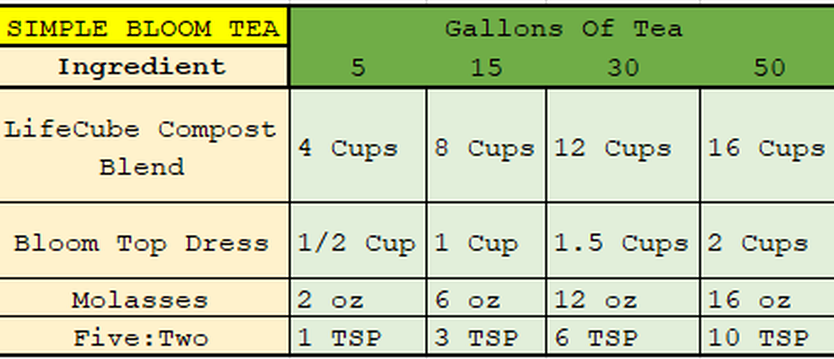
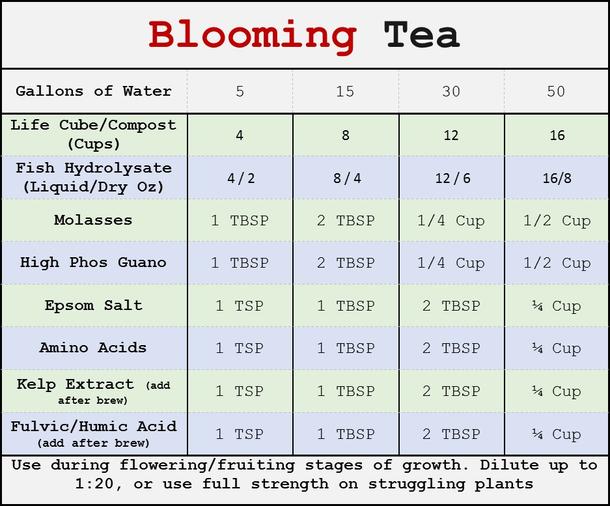
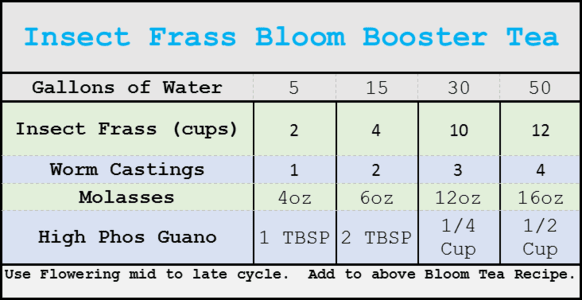
Picture


Picture


Picture


Picture


Picture


Picture


Have a great recipe that you want to share with other gardeners? Let us know! Email [email protected].

1710955910711.png
 

acespicoli

Well-known member

How to Make a Compost Tea


parts

1 Making the Tea

2 Steeping the Tea

3 Using Compost Tea

Other Sections

Questions & Answers

Video

Related Articles

References

Article Summary


Reviewed by Ben Barkan
Last Updated: September 9, 2022 Approved

Compost tea is a well-balanced and nutrient-rich fertilizer that you can make by brewing compost in water. This fertilizer can be used on flowering plants, vegetables, houseplants, and crops of all sorts to increase growth, blooms, and yields. The trick to making compost tea is using well-aged compost that doesn't contain any dangerous pathogens, and using a pump to aerate the tea as it brews. That way, the beneficial microorganisms in the soil are able to thrive in the tea, and this makes for healthier plants.

Part 1

Making the Tea​


  1. Step 1 Dechlorinate your tap water.
    1
    Dechlorinate your tap water.You'll need around 3 gallons (11 L) of water to make the tea. Let the water sit out in the sun and fresh air for several hours. This will allow any chlorine in the water to break down, because chlorine will kill the beneficial bacteria in the compost tea.
    • You don't have to aerate the water if you're using well water or another water source that doesn't contain chlorine.[1]


  2. Step 2 Place a pump aerator in the bottom of another large bucket.
    2
    Place a pump aerator in the bottom of another large bucket. To make the compost tea, you'll need a 5-gallon (19-L) plastic bucket. Place the aerator from a pond or aquarium pump in the bottom of the bucket. You'll attach this to an external pump, which will keep the tea moving as it brews.[2]
    • Make sure the pump you use is capable of moving at least 5 gallons (19 L) of water.
    • The pump system is necessary to aerate the compost tea as it brews. Stagnant tea will become anaerobic, and this won't be good for your plants.


  3. Step 3 Attach the aerator to the pump.
    3
    Attach the aerator to the pump. Attach one end of a flexible tube to the aerator in the bottom of the bucket. Attach the other end of the tube to the pump outside the bucket. You can either leave the pump on the ground beside your tea, or clip it to the side of the bucket, just make sure no excess water runs back into the pump.[3]


  4. Step 4 Fill the bucket halfway with loose compost.
    4
    Fill the bucket halfway with loose compost. When the aerator is in place and attached to the pump, add mature compost to the bucket. Don't fill the bucket more than half way, and don't pack the compost down. The compost must be loose for the aerator to work.[4]
    • Be sure to use aged compost, because unfinished compost can contain harmful pathogens that you don't want to spread onto your plants.[5]
    • Mature compost will smell sweet and earthy rather than like alcohol or rotting food.


  5. Step 5 Fill the bucket the rest of the way with water.
    5
    Fill the bucket the rest of the way with water. Once you've added the compost to the bucket, add enough water to the mixture to fill the bucket. Leave 3 inches (7.6 cm) of head room at the top of the bucket, so that you can stir the tea without spilling it.[6]


  6. Step 6 Add an ounce of molasses and stir the tea.
    6
    Add an ounce of molasses and stir the tea.The molasses will provide food for the beneficial soil bacteria, and help them grow and multiply. When you add the molasses, stir the tea to fully combine the water, compost, and molasses.
    • Use unsulfured molasses, because sulfur can kill the beneficial bacteria.[7]


Part 2

Steeping the Tea​


  1. Step 1 Turn on the pump.
    1
    Turn on the pump. Once you combine the compost, water, and molasses, plug in the pump and turn it on. The pump will send air to the aerator in the bottom of the bucket and ensure there's plenty of oxygen and circulation in the tea.


  2. Step 2 Steep the tea for two to three days.
    2
    Steep the tea for two to three days.Compost tea takes anywhere from 48 to 36 hours to brew. The longer you brew it, the more microbes there will be in the tea. Don't brew the tea for longer than three days, because the microbes won't have enough food to survive longer than this.
    • The compost tea should always have an earthy smell. If that changes, throw out the batch and start again.


  3. Step 3 Stir the tea daily.
    3
    Stir the tea daily. As the tea brews, stir it at least once a day to make sure that no compost matter is sinking to the bottom. This will also ensure that everything is moving around the way it should.[8]


  4. Step 4 Turn off the pump and strain the tea.
    4
    Turn off the pump and strain the tea. When the tea is finished brewing, shut off the pump. Remove the tubing and aerator from the bucket. To strain the tea, line a second 5-gallon (19-L) bucket with a burlap sac or large piece of cheesecloth.[9] Pour the tea into the lined bucket. Wrap the bag or cheesecloth around the compost and pull it out of the water. Squeeze the bag gently to remove excess tea.


  5. Step 5 Return the compost to the pile.
    5
    Return the compost to the pile. Once you've strained out the solids, the compost tea is ready to use. Turn the compost out onto your compost pile, and work it back into the pile with a shovel or a hoe. Alternatively, you can also work the compost solids into your garden beds.[10]


Part 3

Using Compost Tea​


  1. Step 1 Use the tea within 36 hours.
    1
    Use the tea within 36 hours. The beneficial microbes in the tea will not survive for more than a few days. Because of their short life span, it's important to use the tea when it's fresh. The sooner you use the tea the better, but don't keep it around longer than three days.[11]


  2. Step 2 Soak the soil with the tea.
    2
    Soak the soil with the tea. Compost tea can be applied directly to the soil in your garden beds. Transfer the tea to a watering can and apply the tea to the soil around your plants. You can also place the tea in a spray bottle and apply it to the soil that way.[12]
    • For the best results, apply compost tea to the soil two weeks before your plants start to bud.
    • Compost tea is also a great soil addition for young plants and newly transplanted ones.[13]


  3. Step 3 Transfer the tea to a spray bottle to use as a foliar spray.
    3
    Transfer the tea to a spray bottle to use as a foliar spray. A foliar spray is something that gets applied directly to the leaves of a plant. If the tea is very dark, combine it with equal parts water and transfer it to a spray bottle.[14] Add ⅛ teaspoon (0.6 ml) of vegetable oil and shake the mixture.[15] Spray the tea mixture onto leaves in the early morning or late evening.
    • The vegetable oil will help the tea stick to the leaves.
    • Always use diluted tea on young or delicate plants.
    • Don't spray plants with foliar spray in the middle of the day, as the sun can burn the leaves.
 

acespicoli

Well-known member

How to Make Compost Tea​


Primary Image

compost-tea.jpg


Caption

Compost tea tank

Photo Credit

Kiley Jacques

Compost Tea Basics​


Kiley Jacques
February 16, 2024

Print Friendly and PDF

ShareFacebook
Email

For daily wit & wisdom, sign up for the Almanac newsletter.

Email Address


Almanac Garden Planner
Become a better gardener! Discover our new Almanac Garden Planner features for 2024. It’s easy, fun, and free to try!


Body

Ever heard of compost tea? No, it’s not a fancy tea for humans; it’s for garden soil! At its simplest, compost tea is water in which compost has been steeped! It’s a natural liquid fertilizer. Think of compost tea as a health boost (like vitamins for people) to help plants resist pests and diseases.

What is Compost Tea?​

Compost tea is a liquid produced by extracting beneficial microorganisms (microbes)—bacteria, fungi, protozoa, nematodes, and micro arthropods—from compost using a brewing process. A true compost tea contains all of the organisms that were present in the compost before brewing. The brewed water extract should also have soluble nutrients from the compost.

Benefits of Compost Tea​

  • Good tea improves soil health. A healthy soil is less likely to leach nutrients down beyond plant root zones. If soil is nutrient-rich, the need for fertilizer is minimized.
  • Compost tea improves the water retention capacity of soil, which reduces the need for frequent watering.
  • Soil structure is improved with regular applications of compost tea. (Good soil structure is important for nutrient and water retention and accessibility.) The biological components in a soil are what create its structure. For good structure, all organism groups in the food web—bacteria, fungi, protozoa, nematodes, and micro arthropods—need to be present. When you add tea, you add these microbes.
  • Compost tea helps loosen clay soils for air and water to move, and helps sandy soils retain water and nutrients.
  • Plant root growth is stimulated by compost tea applications. Deeper roots retain moisture better and help to reduce runoff.
  • When sprayed onto plants, compost tea adds beneficial microbes to foliage. By occupying leaf surfaces, these organisms prevent potential disease organisms from gaining a foothold.
  • Compost tea combats the negative impact chemical-based pesticides, herbicides, and fertilizers have on beneficial microorganisms.
  • Unlike store-bought fertilizers, tea recipes can be developed and fine-tuned to target specific conditions and plant needs.

How to Make Compost Tea​

You can buy compost tea in stores in powder form (though be sure to test it out first).

Read Next​

Or, you can make your own! Compost tea can be made with or without aeration, and with or without adding supplemental nutrient sources like molasses that feed microbes. For best results, aeration and supplements are recommended, and the right compost is critical.
This sample compost tea recipe is good for vegetable crops:
Materials
5-gallon bucket, filled with water (let it sit for 24 hours to allow chlorine to evaporate)
1 compost tea brewing bag (either purchase one online or make one from a scrap of meshed material such as burlap or row covering, tied with twine—it should be large enough to hold 5 to 6 pounds of dry ingredients)
OPTIONAL: 1 fish tank aerator
OPTIONAL: 1 aquarium thermometer
Ingredients
1 large handful of compost
1 handful of garden soil
2 handfuls of straw
Optional: 3–5 leaves from a healthy plant
1 cup fish hydrolysate (pulverized fish, available at most garden centers)
1 cup seaweed extract (available at most garden centers)
Instructions
  1. Put the first few ingredients ingredients into the tea bag, tie the bag tightly and submerge it in the bucket of water.
  2. Add the fish hydrolysate and seaweed extract liquids directly to the water. OPTIONAL: If you are using an aerator, place the aerator in the bucket and turn it on.
  3. Brew the tea for about 36 hours, monitoring temperature—the optimal temperature is between 68° and 72°F. OPTIONAL: Ideally, use an aquarium thermometer.
  4. Once you are ready to use your compost tea, we like to dilute it to a 3 parts tea to 1 part water ratio before spraying.
  5. Fill a backpack sprayer. Spray early in the morning or late in the evening to avoid burning leaves in the midday sun. If you do NOT have a backpack sprayer, use a spray bottle to mist foliage, or use a watering can to apply tea to the leaves and base of the plant
Note: If you need to water your garden, do this before you add compost tea or you’ll end up diluting/washing off the liquid fertilizer.
Best Practices
Monitor your brewing conditions. With each new batch, take note of the following:
  • Temperature of water during brewing; if you are unable to reach the optimal temperature range, consider buying a small submersible aquarium heater, available at most pet stores.
  • Any microbial foods added to the brew (and quantities); this is helpful information to have should you need to tweak the recipe later.
  • Length of time tea is brewed; if you find your tea is not having the desired effects, you may want to increase the brewing time.
  • The more information you have, the better equipped you will be to make changes to your recipe and/or brewing conditions, if need be.
Tip: Use the tea immediately after brewing; the longer it sits, the less active and effective it will be.
Clean Up
Be sure to clean your equipment and spray tank well between each brew (dirty equipment can breed harmful bacteria). Hydrogen peroxide or ammonia are appropriate cleaning agents.
To learn how to make good compost, watch our video on the perfect compost recipe.

Composting

About The Author

Kiley Jacques​


Kiley Jacques is a senior editor at Green Building Advisor (GBA), a website that is focused on sharing information about designing, building, and remodeling high-performance homes. Read More from Kiley Jacques
 

acespicoli

Well-known member
1710956392552.png

1710956654844.png

1710956685485.png

Current Research

Scientists use insect frass in barley production, proving that it has the potential to be a partial or complete NPK fertilizer substitute.
Link here


High nitrogen insect frass can increase nitrogen availability in the soil and consequently increase plant growth.
Link here


Insect frass can increase plant nitrogen uptake, add organic molecules and microorganisms to the soil, and may increase tolerance to abiotic and biotic stresses due to these additions.
Link here


The positive benefits of mealworm frass, especially its use as fertilizer and a stress tolerance inducer, is mediated by microorganisms and can be affected by the mealworm’s diet.
Link here


Frass amendments to the soil can induce different crop biotic stress responses based on variables in frass production and deposition.
Link here


If any ICers have some info #icfam suppliers appreciate you adding it :huggg:
Have a huge supply of trash fish here...aka invasive species
 

acespicoli

Well-known member

How to Make Worm Tea​


Kimberly Killebrew


The miracle elixir that will infuse your soil with beneficial microbes, prevent and treat plant diseases, ward off pests, improve soil structure, increase your soil's water-holding capacity, and promote the health, strength and yields of your plants!


5 from 13 votes


Prep Time 5 minutes mins
Steeping Time 12 hours hrs
Total Time 12 hours hrs 5 minutes mins


Equipment

  • 5 gallon bucket (larger if doubling/tripling/etc the tea; smaller if making less quantity)
  • Porous material for a compost tea bag (cheese cloth, dish towel, old t-shirt, etc). Optional but will prevent your watering can or spray bottle from clogging when it's time to use the tea. Alternatively you can pour the finished tea through a fine mesh strainer into your watering can.

Ingredients

  • 4 gallons *dechlorinated water (* ideally rain water or well water; if using city water let it sit out for 24 hours and the chlorine will naturally evaporate)
  • 5 to 6 cups worm castings
  • 3 tablespoons molasses

Instructions

  • Fill the bucket with water. Add the worm castings and the molasses. Stir to combine. (If you're using a compost tea bag, place the worm castings in the cloth and tie to secure it shut. Place the bag in the water.) Let the tea steep overnight. It will be a dark brown color. Give it another stir. Remove the compost bag if using (place the contents onto the soil or on your compost pile). Pour some of the worm tea into your water can or spray bottle and dilute with water until it is a light brown color - the color of weak tea.

    Use immediately for best results. The microbes will begin dying off quickly so the sooner you use the compost tea the better while it's most potent.

    Makes 4 gallons worm castings tea.

    NOTE: If you're interested in aerating your worm tea see blog post.


Keyword Vermicompost, Worm Casting Tea, Worm Tea


How to Make Worm Tea​


April 22, 2021 by Kimberly Killebrew · 18 Comments

As an Amazon Associate I earn from qualifying purchases. See my disclosure policy.


229 shares

  • Email

Jump to Recipe
Print Recipe

Super easy to make, Worm Tea is the miracle elixir that will infuse your soil with beneficial microbes, prevent and treat plant diseases, ward off pests, improve soil structure, increase your soil’s water-holding capacity, and promote the health, strength and yields of your plants!


worm casting tea how to make recipe gardening vegetables compost


Incredibly simple and quick to make with visibly impressive results, Worm Tea is a MUST for every organic gardener!


What Is Worm Tea?


Also called worm casting tea, vermicompost tea, or worm compost tea, it is an all-natural liquid fertilizer that is made from steeping worm castings (worm manure) in water. In this way the nutrients in the worm castings are extracted into the water and the resulting “tea” is used for watering and nourishing plants.
Worm castings are created when worms consume and recycle organic matter and food scraps which are then passed through the worm’s body and exit at the end. Worm castings are packed full of healthy microbes and nutrients that have been shown to boost plant health with incredible results.
Why tea? Rather than spread handfuls of worm castings across a large area (not cost effective), worm casting tea is an effective way to “stretch out” the worm castings to cover more area and to allow for easy application (simply water the plants).

Benefits of Worm Tea


A couple of years ago I read about a study that was conducted using worm castings. Researchers at a university in the U.S. placed two rows of plants in a greenhouse. One row of plants were given worm castings, the other row did not. The researchers then released plant pathogens into the greenhouse and stepped away for a couple of weeks. What they observed astounded them: The plants with the worm castings were healthy and thriving. The plants without the worm castings were diseased and dying. These remarkable results have been repeated over and over since:


The National Center for Biotechnology Information (NCBI) states that “soils with low organic matter and microbial activity are conducive to plant root diseases and addition of organic amendments can effectively suppress plant disease.” Worm castings, also known as vermicompost, have been proven to be especially effective in accomplishing this.


More from the NCBI: “Vermicompost enhances soil biodiversity by promoting the beneficial microbes which in turn enhances plant growth directly by production of plant growth-regulating hormones and enzymes and indirectly by controlling plant pathogens, nematodes and other pests, thereby enhancing plant health and minimizing the yield loss….It is found to enhance the beneficial microflora and suppress harmful pathogenic microbes. Due to richness in nutrient availability and microbial activity, vermicomposts increase soil fertility, enhance plant growth and suppress the population of plant pathogens and pests.”


To summarize, worm castings:


  • Infuse and repopulate soil with beneficial microbes
  • Help prevent diseases and pests in both the soil and the plants
  • Help reverse the effects of disease
  • Help restore polluted soil
  • Improve soil structure by aerating it and making it more porous
  • Increase the soil’s water-holding capacity
  • Promote more foliage and larger/thicker stems
  • Increase higher yield

Additionally, worm castings:


  • Have a higher nitrogen, phosphorus and potassium content than other composts
  • In organic farming have consistently yielded the best results compared to all other fertilizers

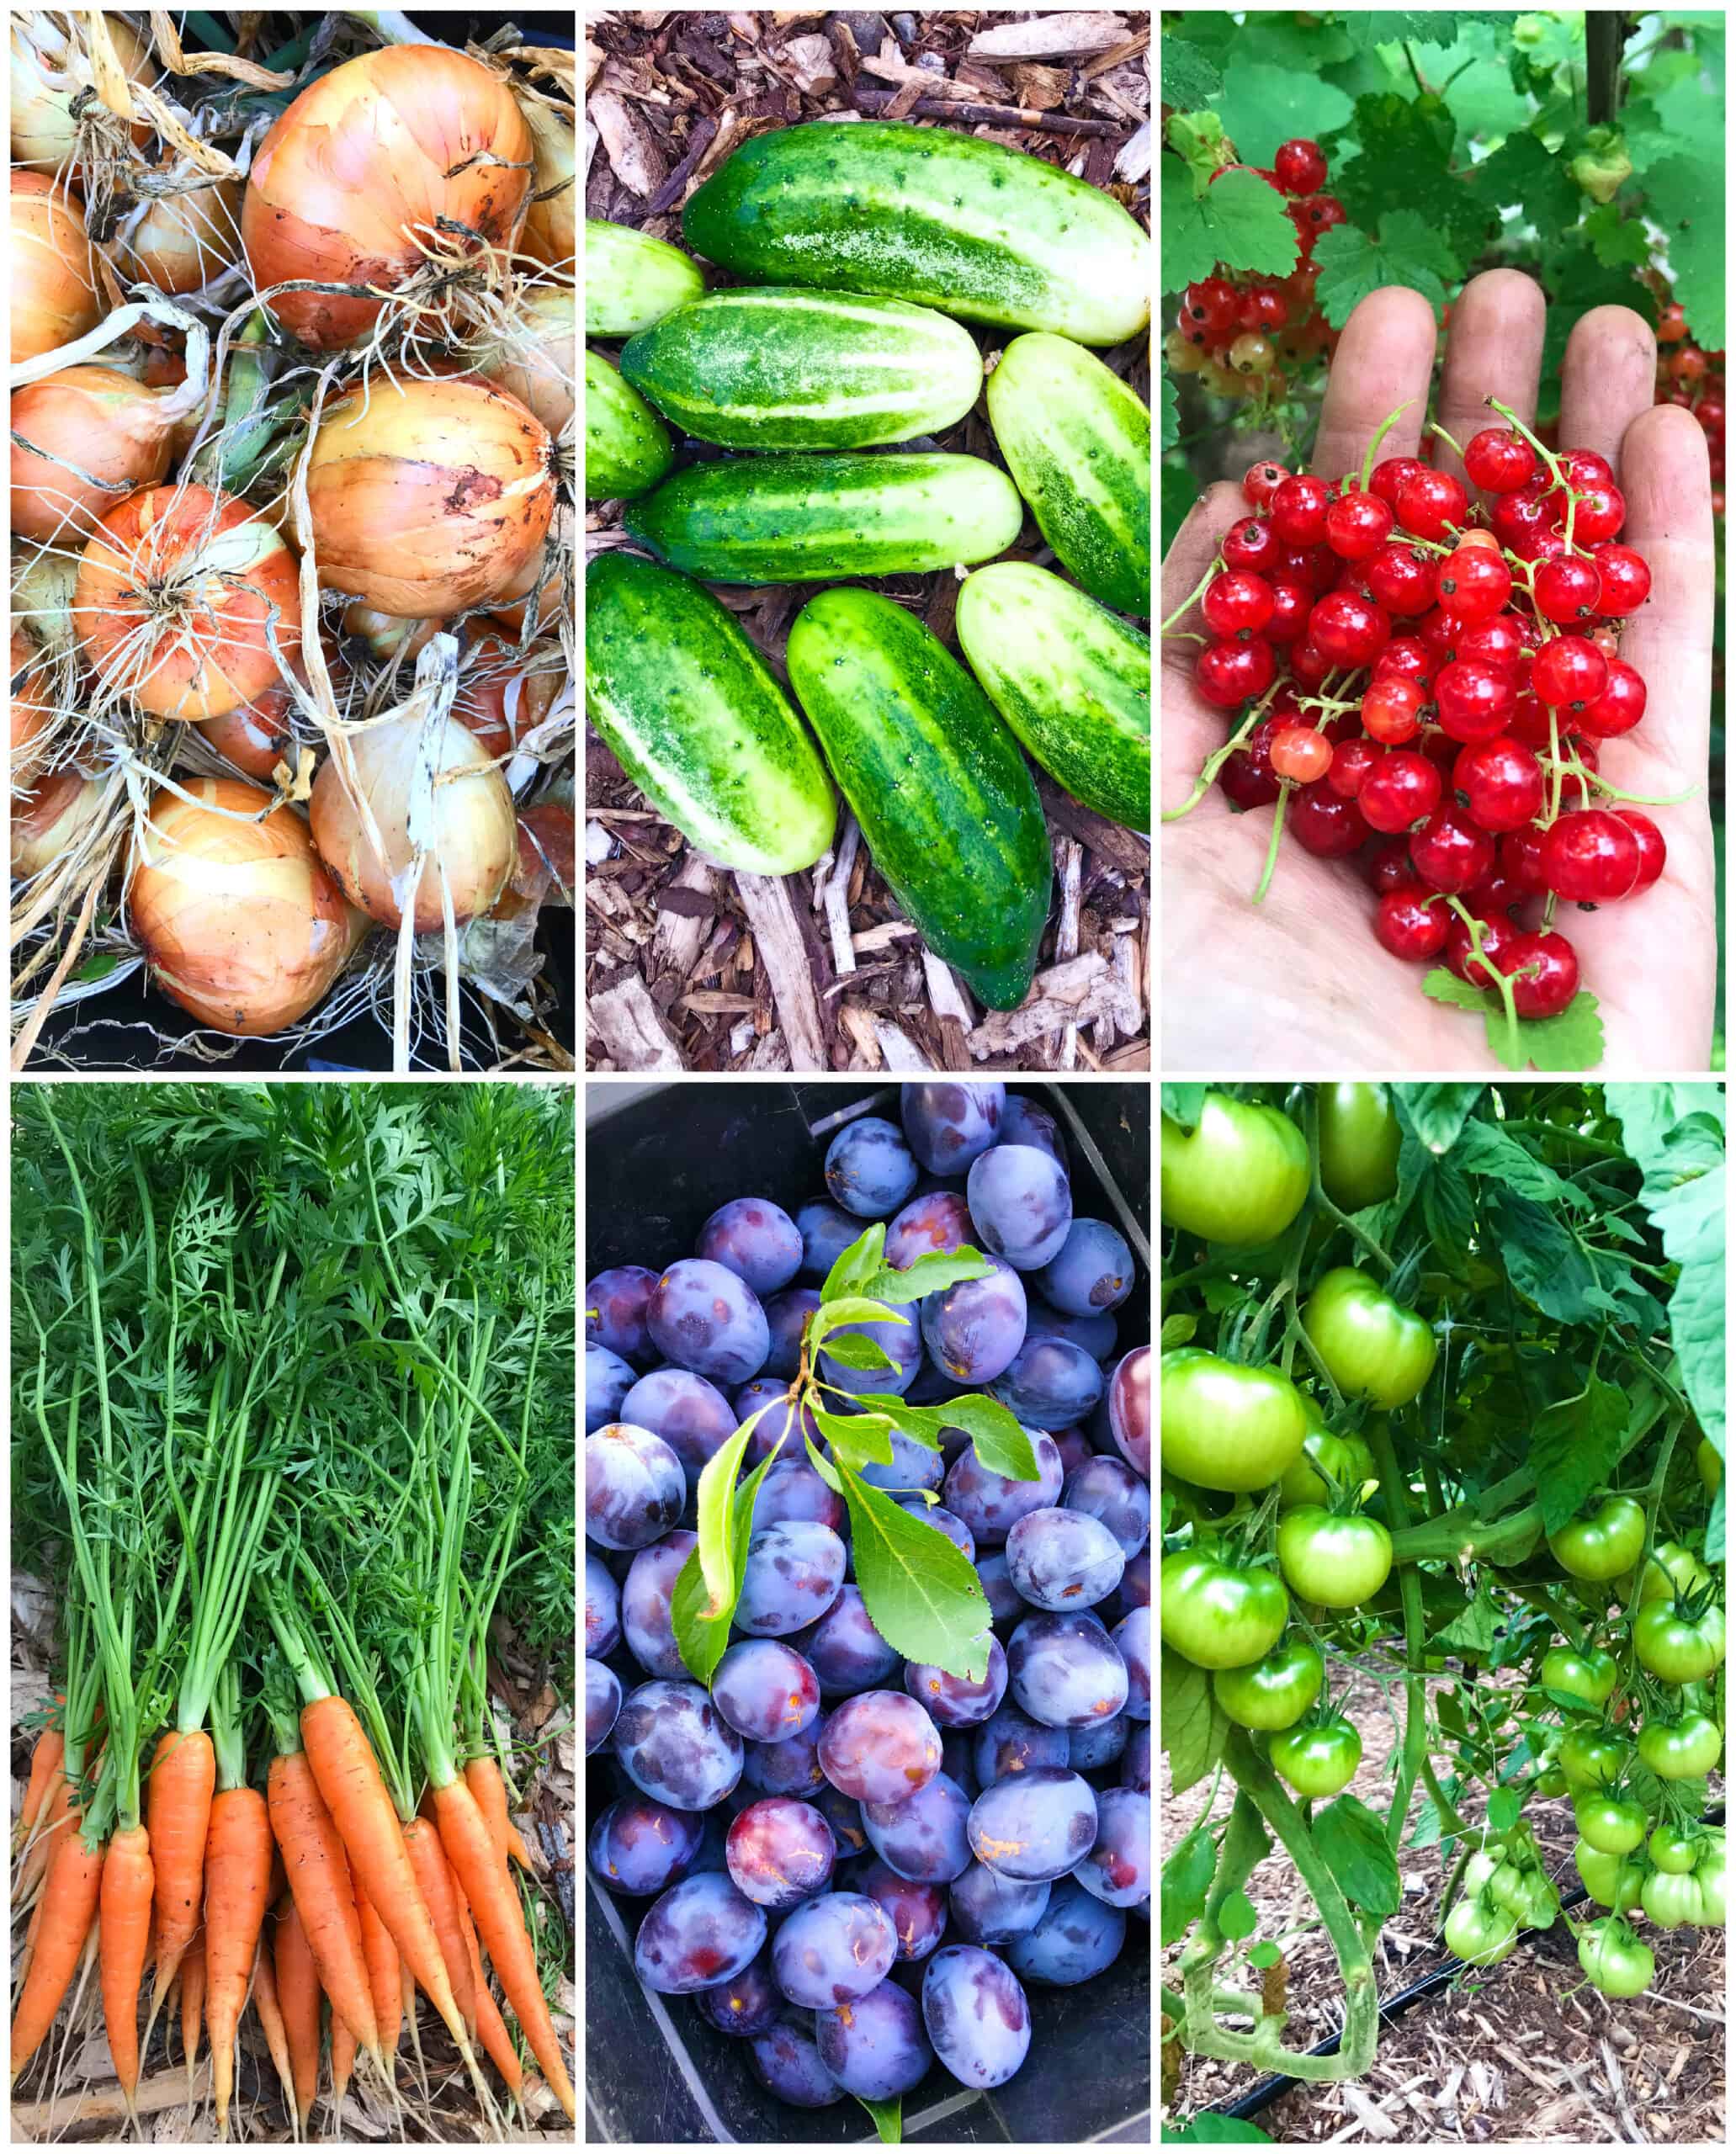
We use a no-till method in our garden and a primary focus is the health of the soil. I regularly make and use worm casting tea for our vegetables, berries, and fruit trees.


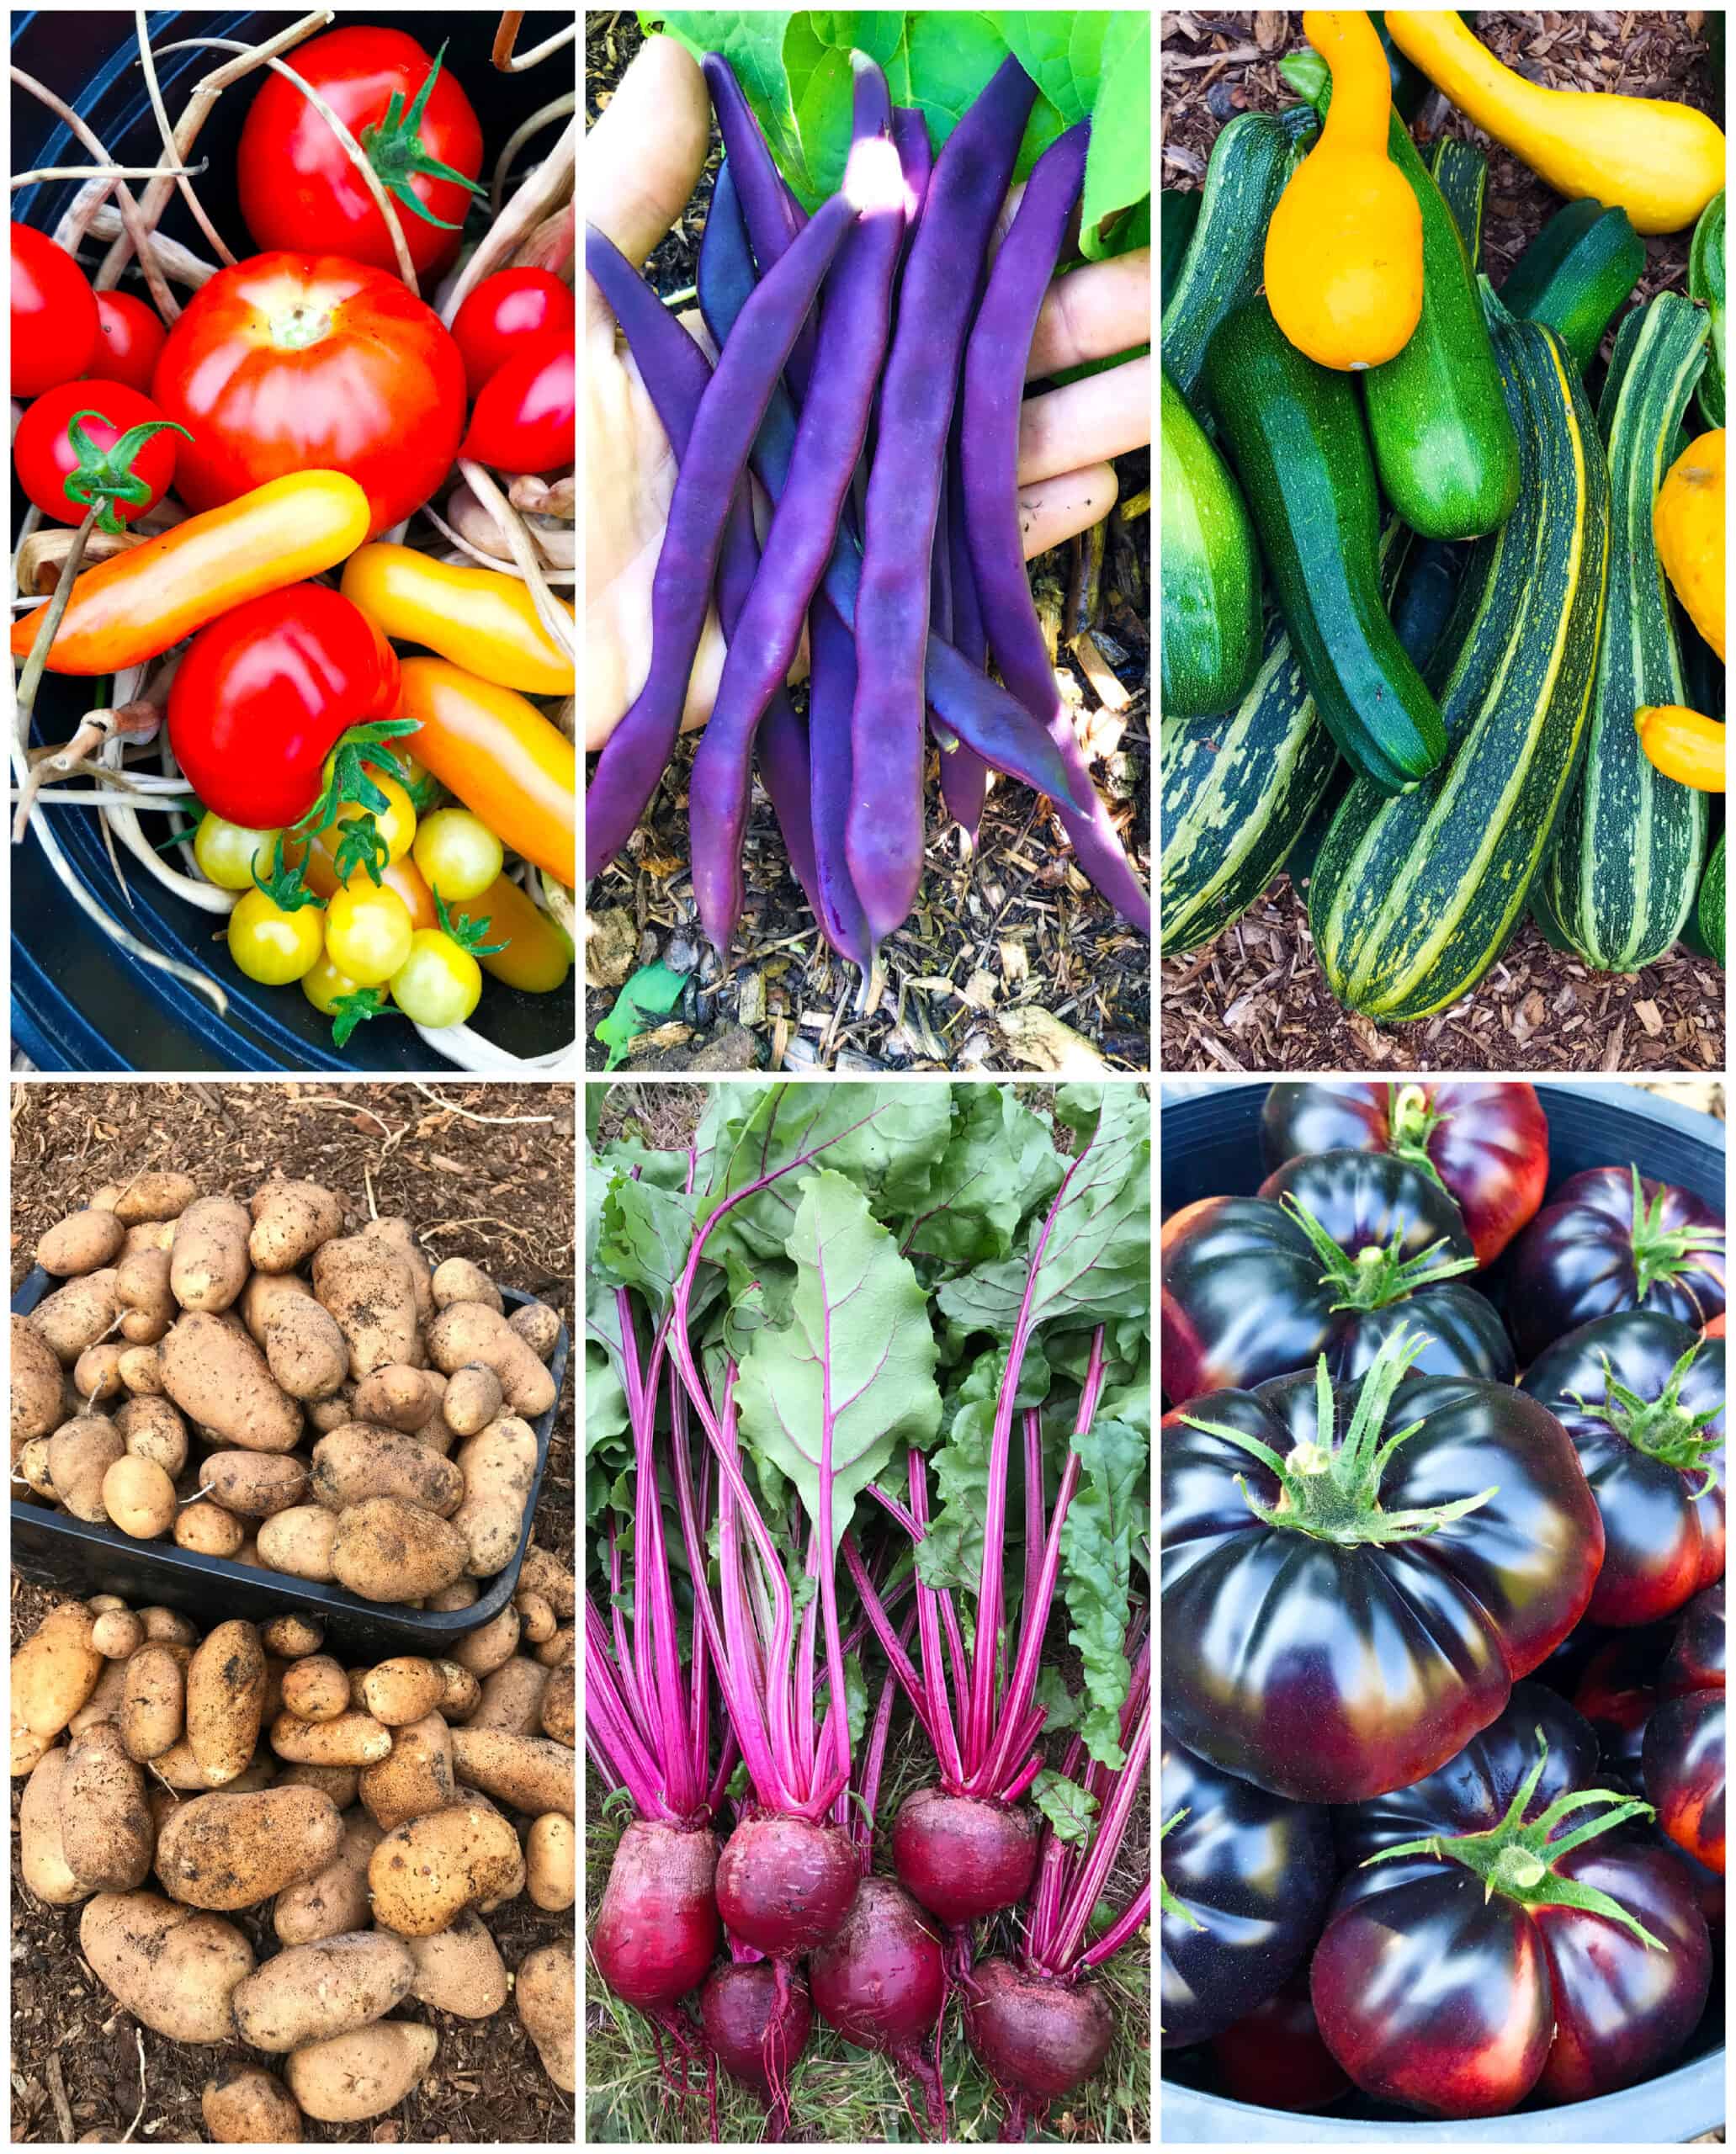
Below are a few pictures from our garden:


vegetables and fruits grown with worm casting tea organic gardening vermicompost


Which Plants Benefit from Worm Casting Tea?


Worm casting tea can be used on any type of plant and everywhere: Flower beds, vegetable gardens, raised beds, potted plants and containers, hanging baskets, house plants, shrubs and trees. It’s also known to make grass greener (brew up several gallons and use a sprayer to apply it all over your lawn.) It is completely natural, organic, and beneficial for all plants.


Worm tea can also be applied to your compost pile to help speed up decomposition.


How Often Should You Use Worm Tea?


As often as you like. There’s really no way to “overdo” it.


To reap the benefits of worm tea you can limit applications to once every 2 weeks for most plants and once a week for vegetables and fruits. If a plant is showing signs of distress of disease, apply more frequently.


Below: Some more pictures from my garden.


vegetables and fruits grown with worm casting tea organic gardening vermicompost


How to Apply Worm Tea


You can use worm casting tea to water the soil or use it as a foliar spray to spray directly onto the plants. The latter is especially effective if the foliage is showing signs of disease.


How Long Does Worm Tea Last?


Worm casting tea does not get better with time. It has living microbes in it and needs to be used up pretty quickly. In cold temperatures it will keep for 3 days before the microbe populations begin to decrease. In warmer temperatures use it within 24-48 hours. Be sure to keep your worm tea out of the sun; store it in a shady area.


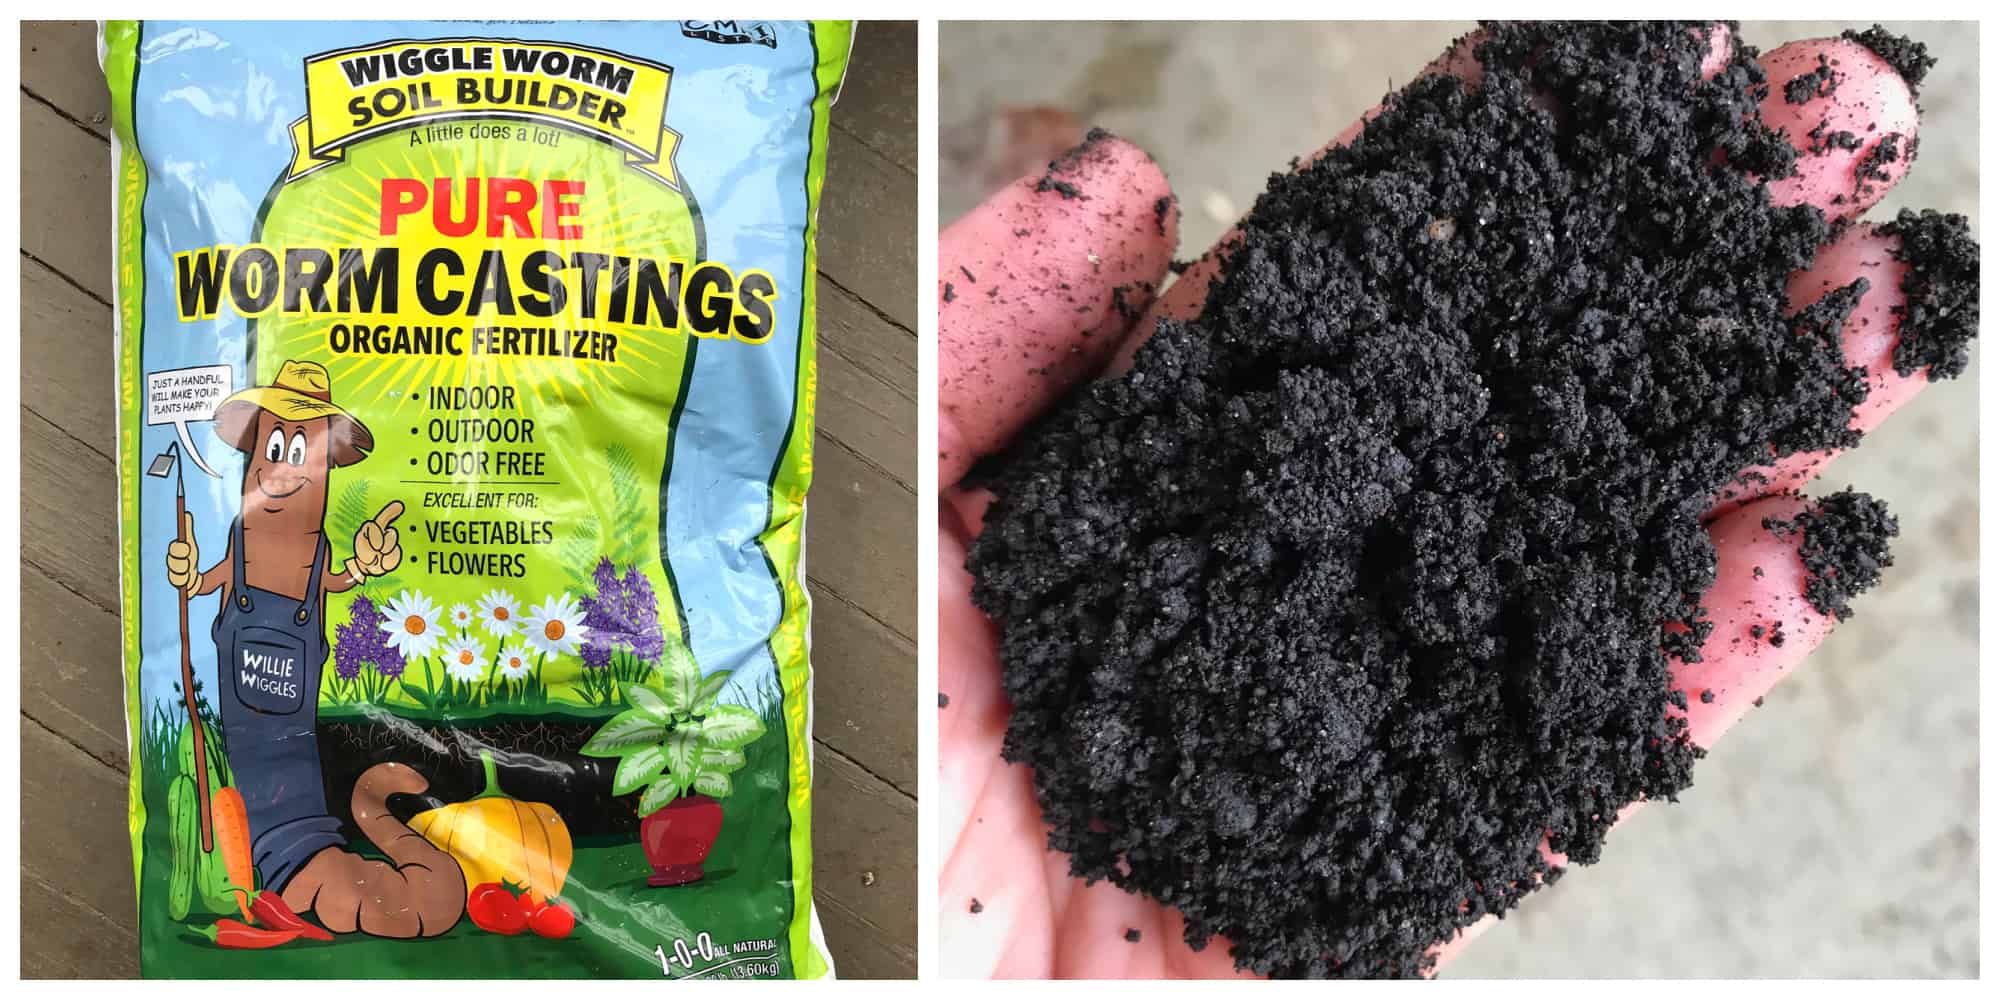
Where to Buy Worm Castings


There are several brands of worm castings you can buy but be careful to look at the ingredients to make sure that what you’re getting is 100% worm castings and not worm castings mixed with soil or other compost.


I’ve been using and am happy with the ones from Wiggle Worm Soil Builder which I have found to be the best value and if you buy it in bulk quantities you get the best deal.


where to buy worm castings


How to Make Worm Tea


Before we get started, just in case there is any doubt: NO, worm tea is NOT for drinking!


We’re making a basic worm tea without any special equipment needed. If you’d like to take it a step further by aerating your tea, we’ll discuss that next.


Equipment Needed:


  • 5 gallon bucket (larger if doubling/tripling/etc the tea; smaller if making less quantity)
  • 4 gallons water (ideally use rain or well water because it has no chlorine; otherwise use city water but let it sit out for 24 hours before proceeding – chlorine is very volatile and will evaporate out on its own)
  • 5 to 6 cups worm castings
  • 3 tablespoons molasses (encourages the growth of healthy microorganisms)
  • Porous material for a compost tea bag (cheese cloth, dish towel, old t-shirt, etc). Optional but will prevent your watering can or spray bottle from clogging when it’s time to use the tea. Alternatively you can pour the finished tea through a fine mesh strainer into your watering can.

Process:


  • Fill the bucket with water. Add the worm castings and the molasses. Stir to combine. (If you’re using a compost tea bag, place the worm castings in the cloth and tie to secure it shut. Place the bag in the water.)
  • Let the tea steep overnight. It will be a dark brown color. Give it another stir. Remove the compost bag if using (place the contents onto the soil or on your compost pile).
  • Pour some of the worm tea into your water can or spray bottle and dilute with water until it is a light brown color – the color of weak tea.
  • Use immediately for best results. The microbes will begin dying off quickly so the sooner you use the compost tea the better while it’s most potent.

Do You Need to Aerate Worm Tea?


Both sugar (molasses) and aeration boost the microbial activity resulting in an increased microbial population. Sugar alone will do that but adding some aeration will increase it further.


If you choose to aerate it you can use a fish tank bubbler to add oxygen while the tea is steeping. Insert the aerator all the way to the bottom of the bucket. Let it aerate for 48-72 hours, stirring occasionally.


To summarize:


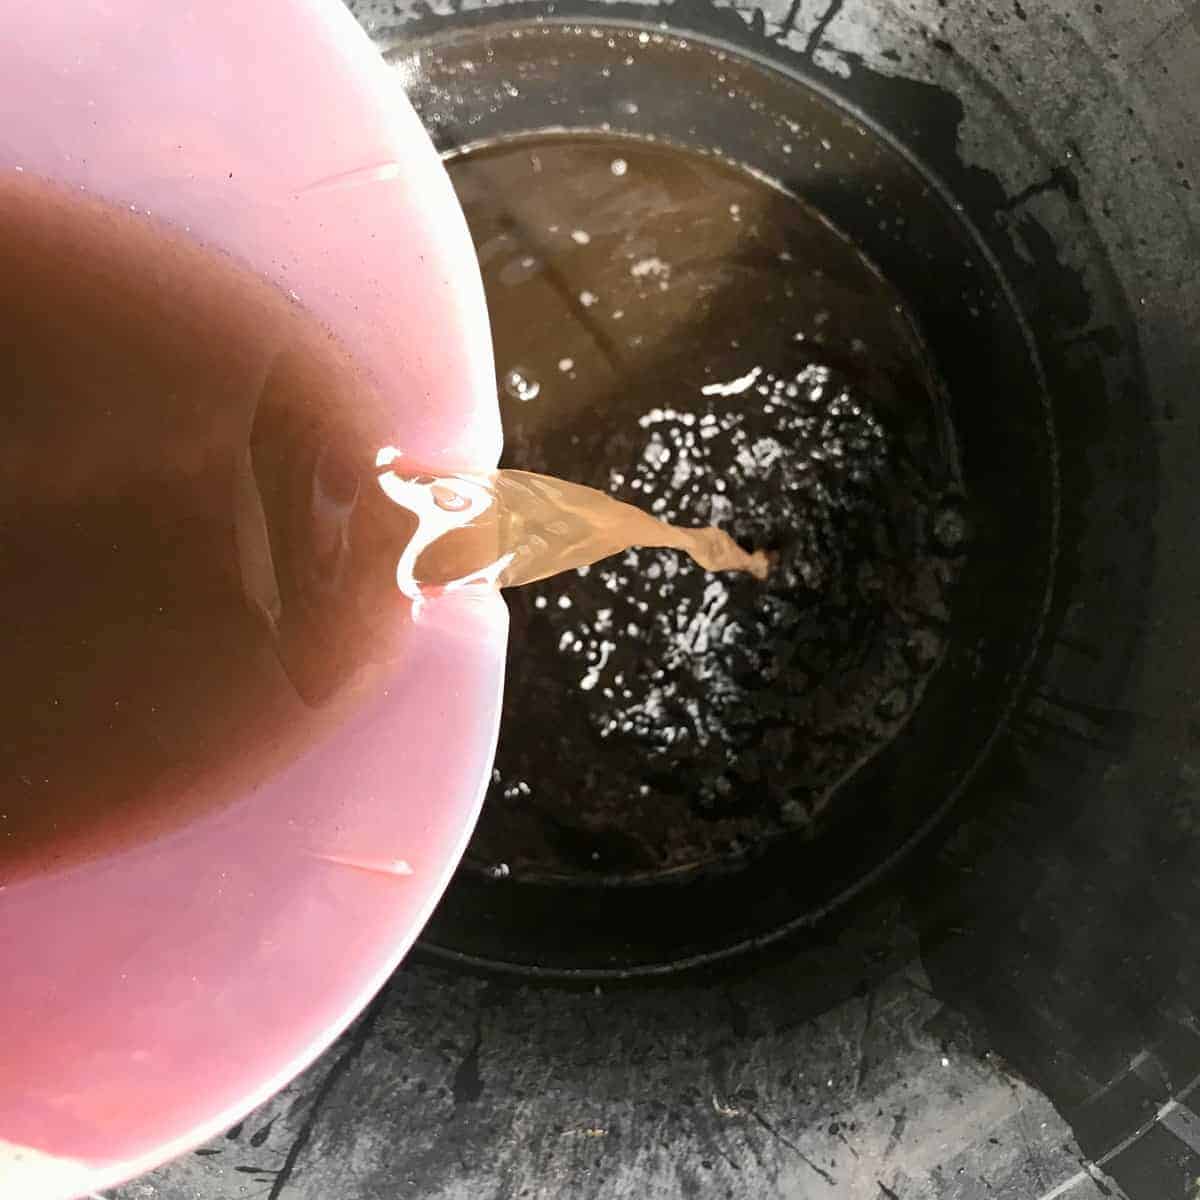
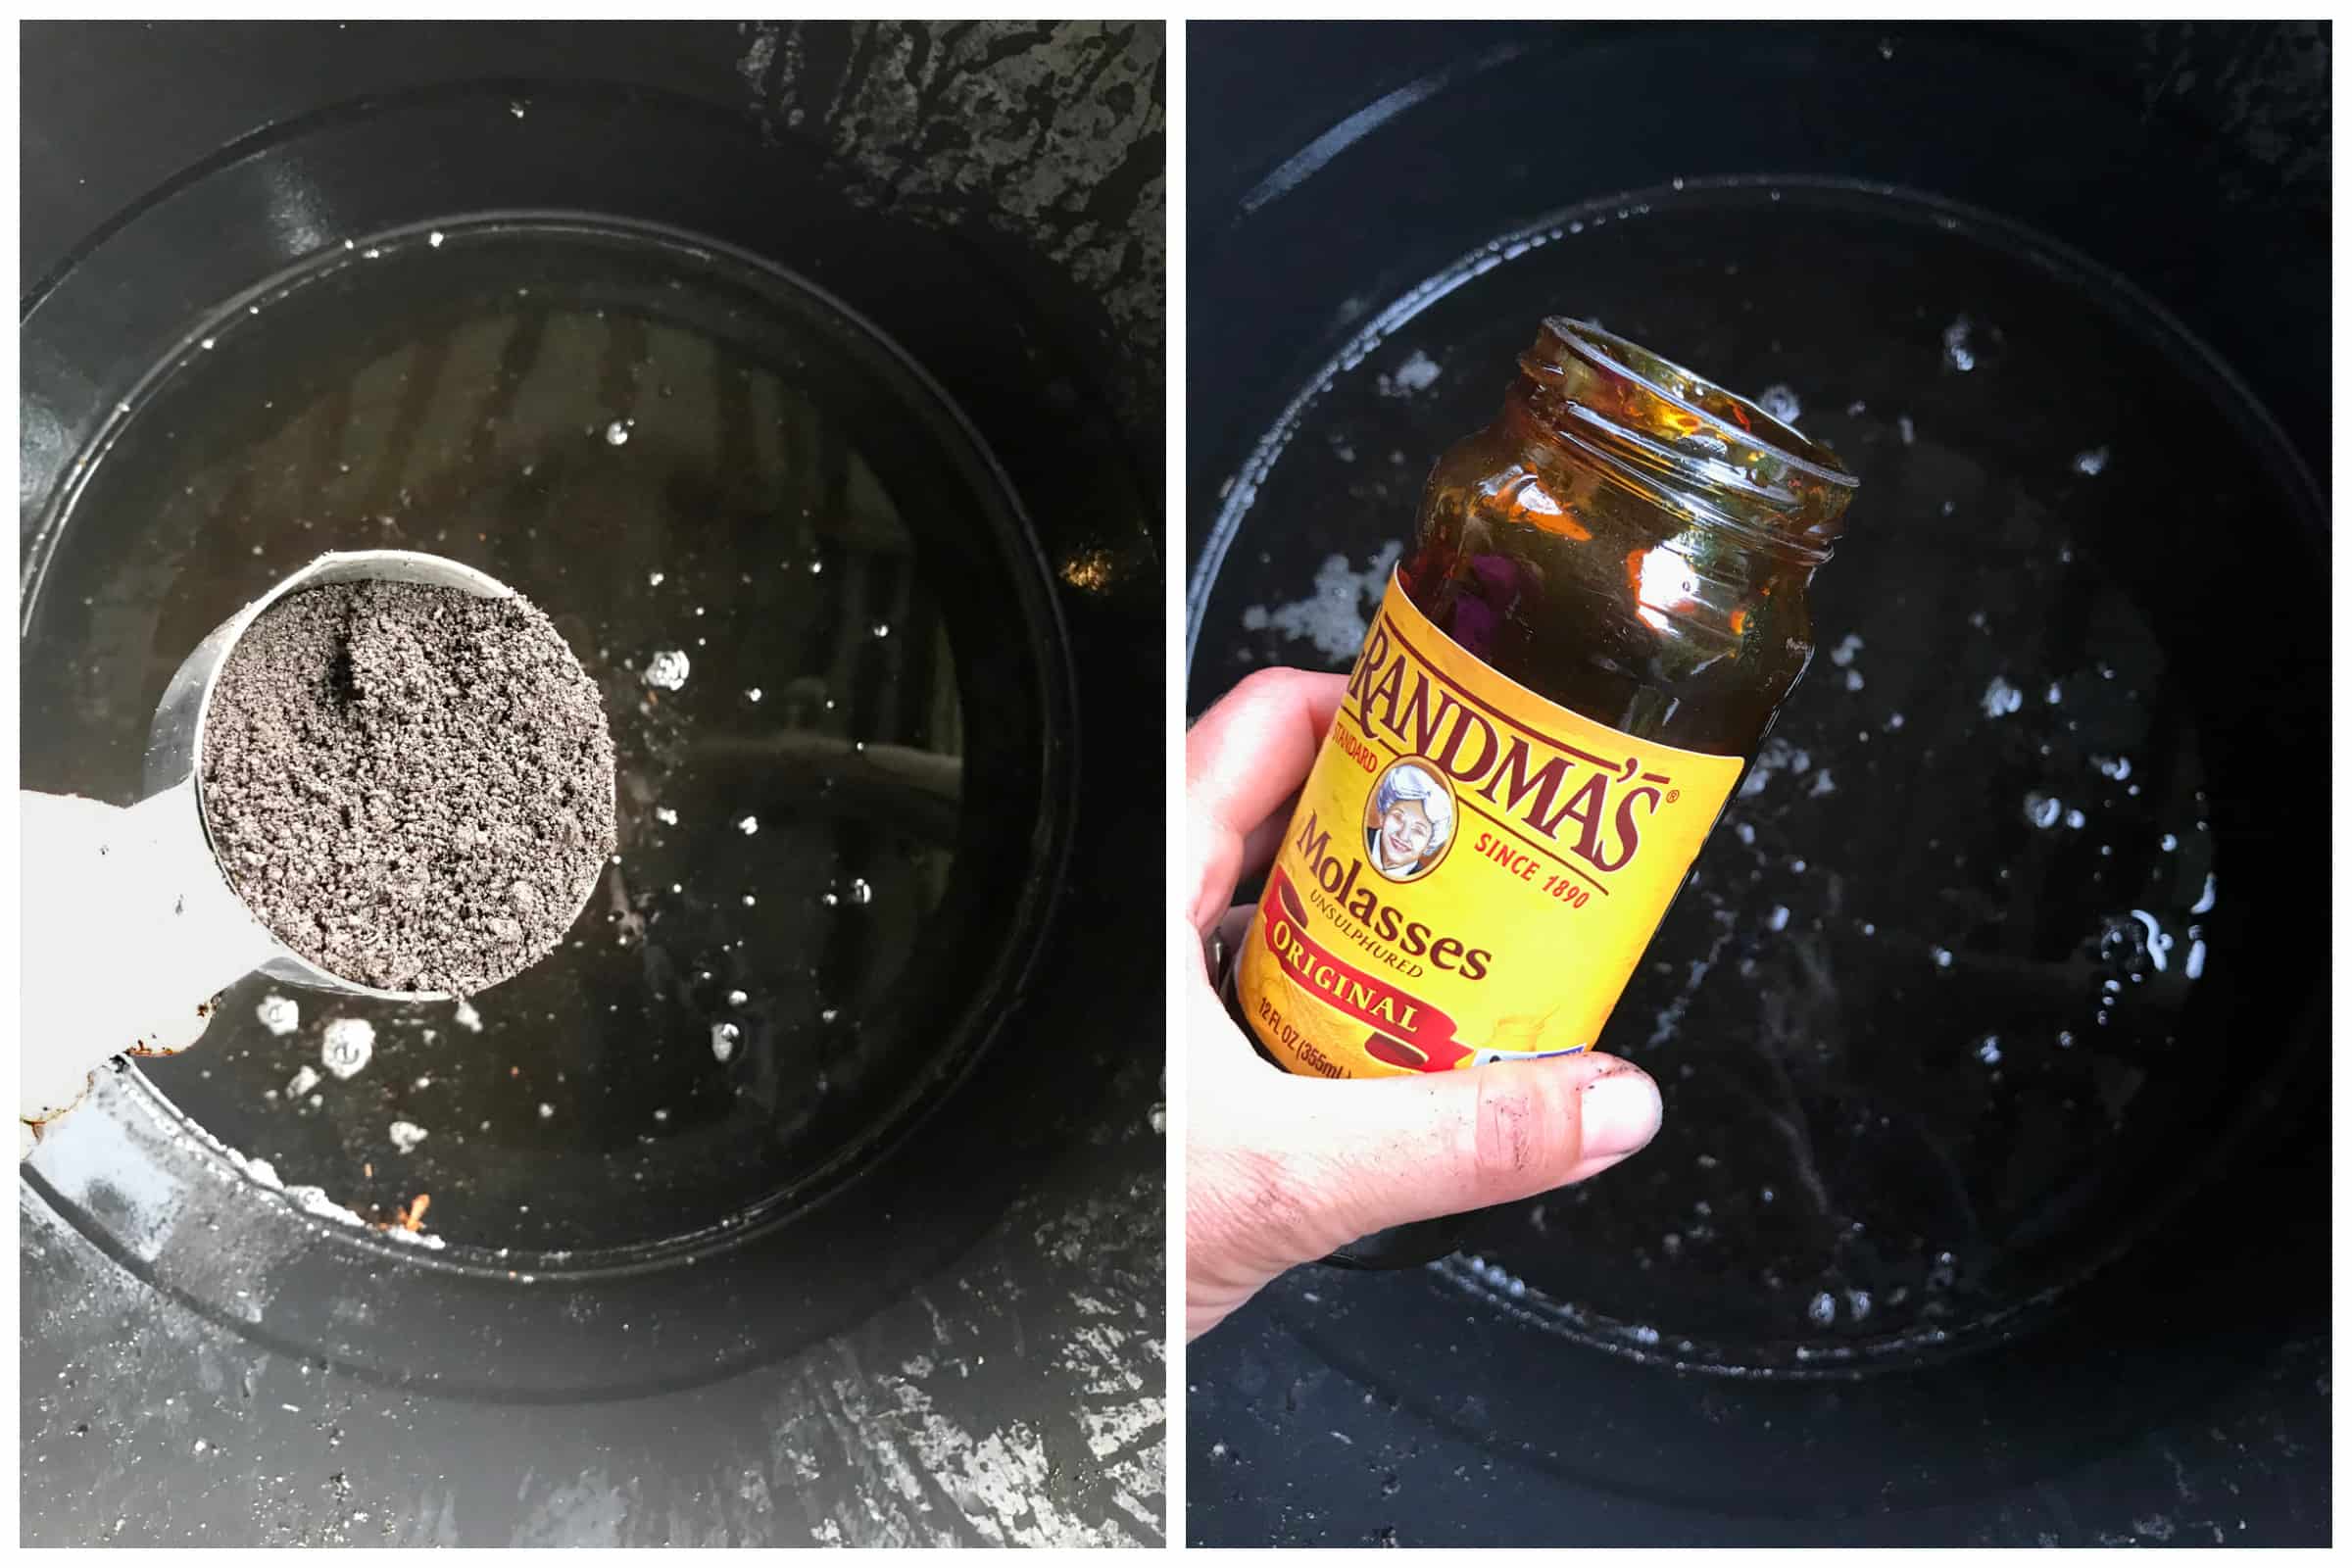
Pour the water into the bucket.


worm casting tea how to make recipe gardening vegetables compost


Add the worm castings and the molasses.


worm casting tea how to make recipe gardening vegetables compost


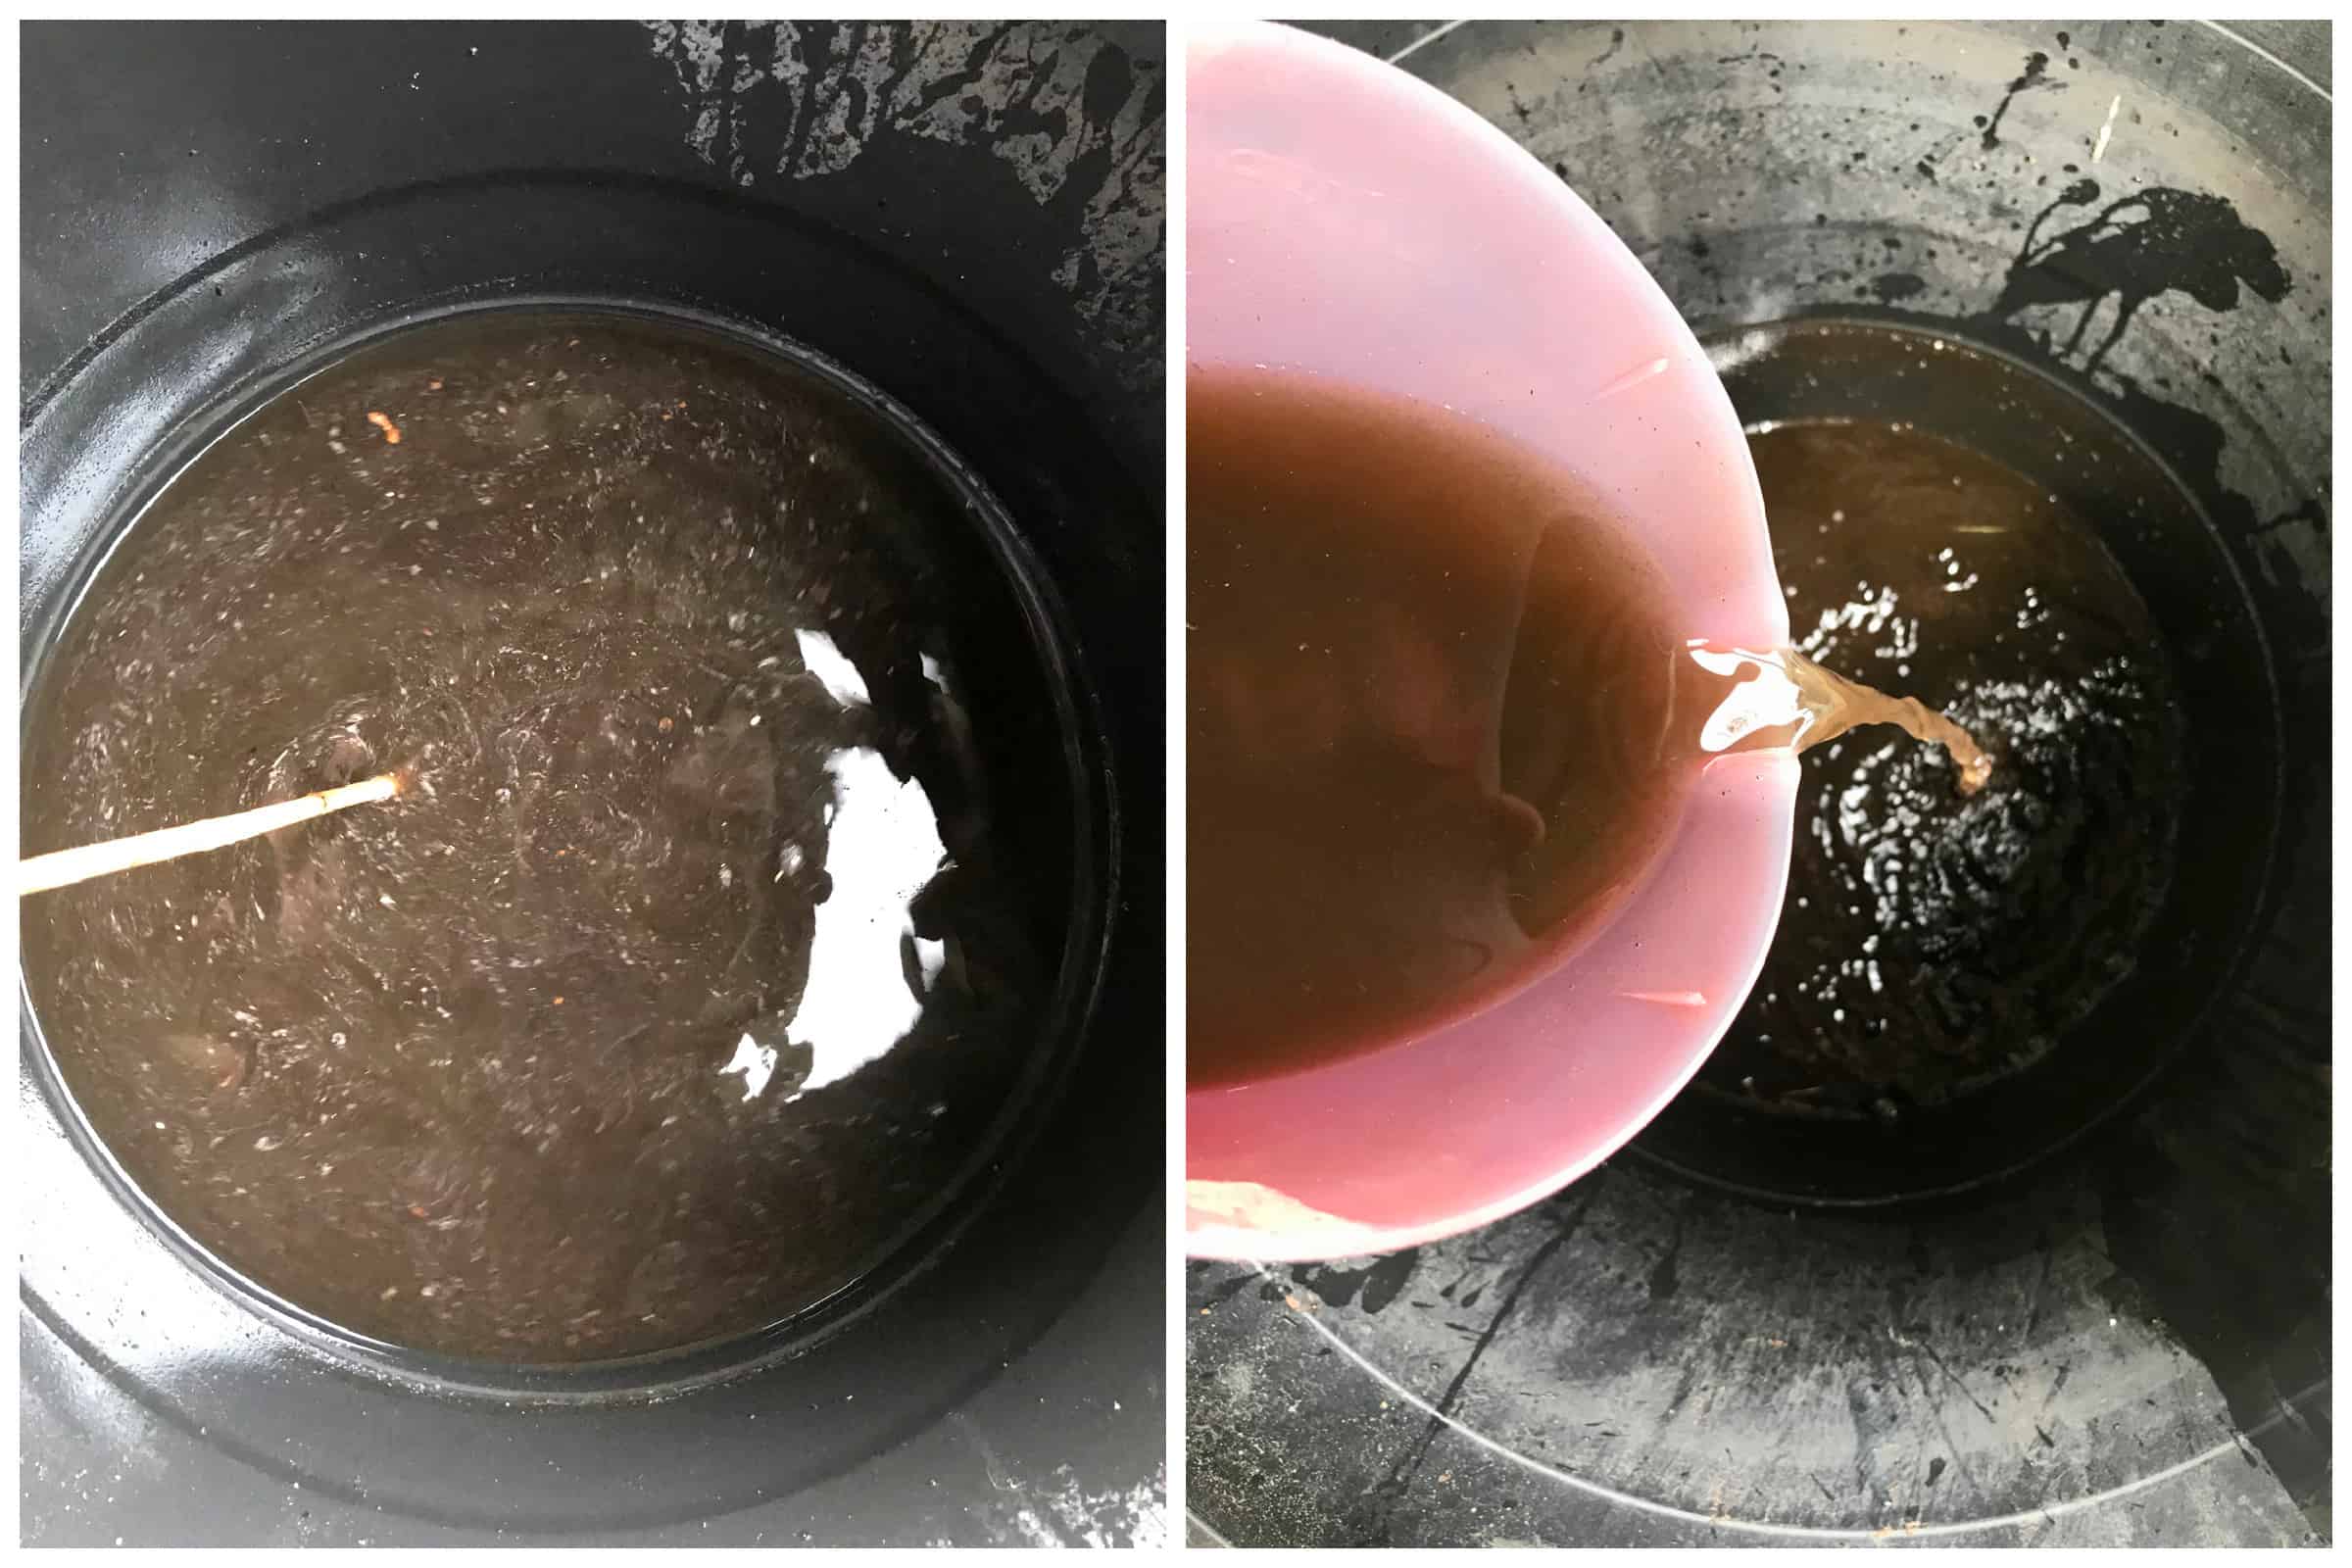
Stir the mixture to combine and let it steep overnight. (See section above on aerating if you’d like to aerate your brew.)


Dilute the worm tea with water until it is a light brown color – the color or weak tea.


Use immediately and use the remaining tea within 24 hours (store in a shady place).


worm casting tea how to make recipe gardening vegetables compost


acespicoli

Well-known member
learned a huge lesson and I should have know better...
36 lbs of fertilizer is way too much for one bale (3 cuft compressed enough for 12 - 5 gal)
3 cubic feet expands to 6.15 cubic feet. fills bags 3/4 (check this again later its fuzzy math)

Small bag of perlite :thinking: in there... might go large next time

males took it better than females...
18 lbs is pushing it... 36 lbs was a fatal mistake for some

Potted Plants: Apply 1.5 teaspoons per 4″ of pot diameter (1.5 tablespoon per 12 inch pot diameter).
Our 5 Gallon Round Breathable Fabric Grow Bags SIZE is 11.75'' x 10.5'' (Dia. x H))

Got me thinking EWC compost then Tomato Tone Tea it woks great bubble overnight in 5gallon
Only thing I dislike about organics is the occasional bug issues and the feed for the compost unknown...
Precooking it in a ovenbag is effective for bugs

Yeah in hind sight I dont know what I was thinking ...36lbs/one bale.... DumAzz:asskick:
 

acespicoli

Well-known member
start over ... any way someone shared this and it looks like a cool thread just started reading it
 

acespicoli

Well-known member

BurnOne


No damn given.​


ICMag Donor
Veteran

Mar 21, 2007 #1


Here are some tried and true recipes for getting started in organic growing. Pick one of the first two soiless mix recipes for your grow medium. Then, choose a nutrient recipe that will work best for what you have available.

Enjoy...

Here are two very good organic soiless mixes...

LC's Mix is great for any stage of growth. You can germ seeds in it, grow mothers in it, root clones in it as well as veg and flower in it.

LC’s Soiless Mix #1:

5 parts Canadian Sphagnum Peat or Coir or Pro-Moss
3 parts perlite
2 parts worm castings or mushroom compost or home made compost
Powdered (NOT PELLETED) dolomite lime @ 2 tablespoons per gallon or 1 cup per cubic foot of the soiless mix.
...Wal-Mart now sells worm castings.

Or, if you use Pro Mix, Sunshine Mix or Fox Farm mixes...

LC's Soiless Mix #2:

6 parts Pro Mix BX or HP / Sunshine Mix (any flavor from #1 up) / Fox Farm Ocean Forest or Light Warrior
2 parts perlite
2 parts earthworm castings
Powdered (NOT PELLETED) dolomite lime @ 2 tablespoons per gallon or 1 cup per cubic foot of the soiless mix.
If you use a 3 qt. saucepan as “parts” in the amounts given above, it equals about 1 cu. ft. of soiless mix and you can just dump in a cup of powdered dolomite lime. The dolomite lime is for Ca. and Mg. not just to adjust the PH of the soil.

But, a "part" can be anything from a tablespoon to a five gallon bucket. Just use the same item for all of the "parts".

Now for the plants organic food source

Choose one of these organic plant food recipes to add to LC's Soiless Mix.

RECIPE #1

If you want to use organic nutrients like Blood meal, Bone meal and Kelp meal...

1 tablespoon Blood meal per gallon or 1/2 cup per cubic foot of soil mix
2 tablespoons Bone meal per gallon or 1 cup per cubic foot of soil mix
1-tablespoon kelp meal per gallon or 1/2 cup per cubic foot of soil mix
or Maxicrop 1-0-4 powdered kelp extract as directed
(OPTIONAL) 1 tablespoon per gallon or 1/2 cup per cubic foot of Jersey Greensand to supplement the K (potasium) in the Kelp Meal and seaweed extract.

Mix all the dry nutrients into the soiless mix well and wet it, but don't soak it. Use Liquid Karma and water @ 1 tbs./gal. Stir and mix it a few times a week for a week or two so the bacteria can get oxygen and break down the nutrients and make it available. And don't let the mix dry out, keep it moist and add water as needed. It'll also have time to get the humic acids in the Liquid Karma going and the dolomite lime will be better able to adjust the pH of a peat based mixture too.

With this recipe, all you need to do is add plain water until harvest.

When I'm working with seeds, I punch a hole in the bottom of 16 ounce cups and fill them with plain LC's Mix. Lightly wet the mix in the cups and germinate one seed in each cup. At the same time I mix enough LC's mix along with the blood/bone/kelp to fill all the 3 gallon flower pots I'm going to use for the grow. After about two weeks, the seedlings and the blood/bone/kelp mix are ready. I transplant the seedlings into the 3 gallon pots and just add water until harvest.
When you go to flower and pull up the males, save the mix in the pots. It is ready to be used again immediately. Just remove the root ball and transplant another seedling into it.

RECIPE #2

If you want to use guano in your soil mix...
Bongaloid's Guano Mix.
Use all these items combined with one gallon of soil mix.

1/3C hi N Guano Mexican Bat Guano or Peruvian Seabird Guano (PSG)
1/2C hi P Guano (Jamaican or Indonesian Bat Guano)
1TBS Kelp Meal
(OPTIONAL) 1TBS Jersey Greensand

RECIPE #3 (My favorite)
If you want to use guano tea and kelp...

Guano Tea and Kelp:

Seedlings less than 1 month old nutrient tea mix


Mix 1 cup earthworm castings into 5 gallons of water to make the tea. Add 5 tsp. Black Strap Molasses.
Use it to water your seedlings with every 2nd or 3rd watering.

Veg mix-

1/3 cup Peruvian Seabird Guano (PSG)
1/3 cup High N Bat Guano (Mexican)
1/3 cup Earth Worm Castings (EWC)

(That makes the "dry mix". You can make all you want and save it to use later.)

Mix with water @ 1 cup of dry mix into 5 gallons of water to make the tea.

To that 5 gallons of tea add:
5 tbs. Maxicrop or Neptune's Harvest liquid seaweed.
5 tsp. Black Strap Molasses

Use it to water with every 3rd watering.

Flowering nute tea mix:

2/3 cup Peruvian Seabird Guano
2/3 cup Earth Worm Castings
2/3 cup High P Guano (Indonesian or Jamaican)

(That makes the "dry mix". You can make all you want and save it to use later.)

Mix with water @ 2 cups of dry mix into 5 gallons of water to make the tea.

To that 5 gallons of tea add:
5 tbs. Maxicrop or Neptune's Harvest liquid seaweed.
5 tsp. Black Strap Molasses
Use it to water with EVERY watering.

You can use queen size knee high nylon stockings for tea bags. 3 pair for a dollar at the dollar store. Tell 'em you use them for paint strainers. Put the recommended tea in the stocking, tie a loop knot in it and hang it in your tea bucket. The tea should look like a mud puddle. Agitate the bag in the water vigorously. An aquarium pump and air stone will dissolve oxygen into the solution and keep the good bacteria (microherd) alive and thriving. Let it bubble a day or two before you use it. If you find you are making too much tea and having to throw it out, use 2 1/2 gallons of water and cut the nute amount by half.


RECIPE #4
Three Little Birds Method
40 gallons used soil
4 cups alfalfa meal
4 cups bone meal
4 cups kelp meal
4 cups powdered dolomite lime
30 pound bag of earthworm castings . . .
That’s the basic recipe . . .
However we also like to use
4 cups of Greensand
4 cups of Rock Phosphate
4 cups of diatomaceous earth


RECIPE #5
Fish and Seaweed (This is sooo easy)
1 capful is 1 TB or 15 ml.

For veg growth…
1 capful 5-1-1 Fish Emulsion
1 capful Neptune's Harvest 0-0-1 Seaweed or Maxicrop liquid
1 gallon H2O

For early flowering…
1 tbs. Neptune’s Harvest 2-3-1 Fish/Seaweed
1 gallon H2O

For mid to late flowering…
1 tbs. Neptune’s Harvest 2-4-1 Fish
1 gallon H2O


And now for some more good tips...

Seed Germination

First, you'll need some LC's Mix
I use Sunleaves Super Starter Plugs. They are pre-moistened. I drop one seed down in the hole. Gently push them to the bottom of the hole. No need to cover the hole.
I use a 5.5" X 5.5" square Kord pot or any 1 to 3 quart nursery pot and fill it full to the top with the LC's Mix. Don't pack it. Dig out enough soil mix to place one plug into one pot of mix about level with the top of the mix in the pot.
Set the seed in the plug in the mix in the pot aside in a 75 to 85 degree well lit space until the seedlings sprout.
Don't water it, sing to it, piss on it or anything else that will kill it with what you may think is kindness.

Listen up, this is important...
When the leaves of the seedlings are about one inch above the top of the plug, push the plug down into the LC's mix until the seedling leaves are just below the top of the pot. Now use some fresh LC's Mix and gently pack it around the stem of the seedling all the way up to the first leaves. When finished, the mix should be level across the top just below the bottom of the leaves a millimeter or two. Not all seeds will sprout at the same time so you will have to do this at different times. If you don't push the plugs down and support the stems with mix, they will fall over and die. If the stems continue to stretch you can push the plugs down further into the mix. These little suckers are robust below the surface of the mix. Don't be afraid of pushing them down gently.
The moisture in the mix should be plenty for several days. Don't let it completely dry out or soak it down with water. Add no nutes to the mix for about two weeks.
Your seedlings can stay in these pots for 2 to 4 weeks and then can be transplanted into a grow medium rich in organic food like blood/bone/kelp.
I hope this helps get you started. It's worked for me many hundreds of times.

Organic pH issues

I hear a lot of people asking or talking about the pH of their organic soil mix or organic nute solution and how they might correct or adjust it. pH in organics is not an issue like it is in synthetic growing.
The best place to settle the pH issues in organics is within the grow medium. A "living" medium rich in humates (humus) is the place to start. Humates and bacteria work to "buffer" the pH of organic mediums and the nutes you pour (or mix) into it.
Humates come from compost, worm castings and bottled humus. If you use a peat based medum, use dolomite lime to raise the pH of the acidic peat. Dolomite should be used in any soil or soiless medium to provide magnesium and calcium. But since we are talking about pH here, I'll mention dolomite lime's pH correction benefits.
A medium of coir has a pH near neutral (or 7.0). But humates are still neded to allow uptake of organic nutrients that are outside a near neutral pH range.
With an active medium rich in humates you can pour in nutes like fish, Earth Juice and guano teas way outside the optimum pH range without worry. The humus and bacteria will allow the nutes to be taken up through the roots, even at such an extreme pH reading.
So throw those pH meters away folks and enjoy the ease and safety of organic gardening.

Chlorine tap water

Just a word of caution for you organic heads out there...
If you are tapped onto a municipal water supply that uses chlorine to kill bacteria in the water, it'll do the same thing to the bacteria (microherd) in your organic food source.
Always bubble your municipal water in an open container (5 gallon bucket) for 24 hours before adding ANYTHING organic to it.

Flushing

There is absolutely no reason to "flush" organic nute solutions from your soil mix. In an organic grow, the plants don't take up the organic nutes (guano, bone, blood or kelp). The bacteria eat the organic nutes and excrete food that the plant can feed off of. So the organic nutes don't need to be flushed because they never enter the plant. And besides, meals like kelp, bone and blood along with worm castings and dolomite can't be flushed from your soil mix anyway. If you use guano and seaweed, try using plain water or worm casting tea for your last watering or two so the plant can use up what's left in the soil. But drowning your soil with water isn't necessary.

Burn1
 

acespicoli

Well-known member

joe fresh


Active member​


Mentor
Veteran

Dec 23, 2011 #1


just thaught i would compile a list of different soil mixes all in one place for everyone to see.


A Good Seed Starting Mix


You want a seed starting mix to retain moisture, yet be well draining. There is little need to add very many nutrients at this point. You can purchase commercial potting soil for this, or you can make up your own soil mix.For starting my own seeds, I use equal parts vermiculite, perlite, and sphagnum peat. I than add 10 percent worm castings. You should add 1 teaspoon of lime for each gallon of soil and mix well. The nitrogen in the worm castings is gentle to the young sprouts, and it is in a form the new plants can use immediately.
To help things out, I wet this soil down with water, first making sure to add 10 ml/gallon Thrive Alive B1 and 10 ml/gallon Maxicrop liquid seaweed. Make sure not to make the mix too wet...the roots need air. The mix is just wet enough when you squeeze a handful and only a few drops come out.


Soil Mixes You Eventually Feed


If you are unsure of the exact needs of your plants, than this is a good soil mix to begin with. It is also good if you are transplanting shortly before flowering, but want to feed your plants through watering once flowering begins. It contains enough organic fertilizers to feed your plants for about two weeks, than you can begin adding a little fertilizer at a time as you water.


bat-guano.jpg

Start with equal parts vermiculite, perlite, and sphagnum peat. To this, add 20-25 percent worm castings. Never use more than 25 percent worm castings in any of your soil mixes.For every gallon of soil add 1 teaspoon of lime and mix everything together well. For each gallon of soil, add 1 tablespoon of bat guano and 1 1/2 tablespoons of kelp meal and mix well. Here I have shown a high phosphorus guano, but if you are still in the vegetative stage, use a high nitrogen guano (like Mexican bat guano). After about two weeks of growth, begin watering with a 50 percent strength nutrient solution.
Keep a close eye on your plants to see if they want more, or need less. As you gain experience and learn the different fertilizer and soil additives, you will be able to mix up your own favorite custom soil mix.


Soil Mixes You Don't
Have to Feed


If you hate mixing up fertilizer each time you water, than this strategy might be for you. Start your seeds in a regular seed starting mix. Than, each time your plant is ready for a bigger container, transplant it into this fertile organic soil mix. If you time it so your last transplant occurs the same time you begin flowering, you should only ever have to give your plants plain water (although I recommend you add Thrive Alive and Maxicrop to your water also).


foxfarm.jpg


Begin this soil mix by adding one bag each of Foxfarm Original, Foxfarm Ocean Forest, and Foxfarm Light Warrior. To this mix, add 1 level cup of Foxfarm Peace of Mind 5-8-4 and mix well. I usually begin my plants in the smallest dixie cups I can find, in my seed starting mix. After that, I transplant into a 6 inch container of this mix. Two or three weeks later, I transplant into a 12 inch container. Finally, right as I switch to flowering, I make my final transplant to the next size container (usually a three gallon one). Most of the nutrients are used up by the time I begin flushing them, so it works out well.


Soilless Mixes for Hydroponics

Sometimes people use soilless mixes in hydroponics. This is especially true for the hand watering method. The idea is to make a mixture that holds moisture as long as regular organic soil mixes would. This is accomplished by using vermiculite, sphagnum peat, or coconut coir, all of which retain water. A good place to start is to use equal parts of each.Another example is the reservoir method. This method is well suited for the use of lava chips as a medium, but a mix of 1 part vermiculite to 5 parts expanded clay pellets works as well. The same mix should work well in other systems, like a drip system, although I have never tried this myself.
A soilless mix heavy in materials that suck up water is perfect for the wick system. An equal mix of perlite and vermiculite works well. A mix of perlite and coconut coir should work equally as well.


LC's method:

LC’s Soiless Mix #1:

5 parts Canadian Spaghnam Peat or Coir or Pro-Moss
3 parts perlite
2 parts wormcastings or mushroom compost or home made compost
Powdered dolomite lime @ 2 tablespoons per gallon or 1 cup per cubic foot of the soiless mix.
...Check the link in my sig line below for cheap earthworm castings. Free shipping to the eastern USA.

Or, if you use Pro Mix or Sunshine Mix...


LC's Soiless Mix #2:

6 parts Pro Mix BX or HP / Sunshine Mix (any flavor from #1 up)
2 parts perlite
2 parts earthworm castings
Powdered dolomite lime @ 2 tablespoons per gallon or 1 cup per cubic foot of the soiless mix.
If you use a 3 qt. saucepan as “parts” in the amounts given above, it equals about 1 cu. ft. of soiless mix and you can just dump in a cup of powdered dolomite lime.

Now for the plants organic food source

RECIPE #1
If you want to use organic nutes like blood, bone and kelp...
Dry Ferts:
1 tablespoon blood meal per gallon or 1/2 cup per cubic foot of soil mix
2 tablespoons bone meal per gallon or 1 cup per cubic foot of soil mix
1-tablespoon kelp meal per gallon or 1/2 cup per cubic foot of soil mix or Maxicrop 1-0-4 powdered kelp extract as directed
1 tablespoon per gallon or 1/2 cup per cubic foot of Jersey Greensand to supplement the K (potasium) in the Kelp Meal and seaweed extract.
Mix all the dry ferts into the soiless mix well and wet it, but don't soak it with Liquid Karma and water @ 1 tbs./gal. Stir and mix it a few times a week for a week or two so the bacteria can get oxygen and break down the bone meal and make it available. And don't let the mix dry out, keep it moist and add water as needed. It'll also have time to get the humic acids in the Liquid Karma going and the dolomite lime will be better able to adjust the pH of a peat based mixture too.


RECIPE #2
If you want to use guano in your soil mix...

Bongaloids guano mix
1/3C hi N guano per gallon
1/2C hi Phos guano per gallon
1TBS Jersey greensand per gallon
1TBS Kelp meal per gallon


RECIPE #3 (My favorite)
If you want to use guano tea and kelp...

Guano Tea and Kelp:

Seedlings less than 1 month old nute tea mix-
5 tbs. Black Strap Molasses
1-cup earthworm castings/5 gallons of water every 3rd watering

Veg mix-
1/3 cup Peruvian Seabird Guano (PSG)
1/3 cup High N Bat Guano (Mexican)
1/3 cup Earth Worm Castings (EWC)
5 tsp. Maxicrop 1-0-4 powdered kelp extract
5 tbs. Liquid Karma
5 tbs. Black Strap Molasses
@ 1-cup mix/5 gallons of water every 3rd watering.

Flowering nute tea mix:
2/3 cup Peruvian Seabird Guano
2/3 cup Earth Worm Castings
2/3 cup High P Guano (Indonesian or Jamaican)
5 tbs. Maxicrop 1-0-4 powdered kelp extract
5 tbs. Black Strap Molasses
@ 2 cups/5 gallons of water EVERY watering.
You can use queen size knee high nylon stockings for tea bags. 3 pair for a dollar at the dollar store. Tell 'em you use them for paint strainers. Put the recommended tea in the stocking, tie a loop knot in it and hang it in your tea bucket. The tea should look like a mud puddle. Agitate the bag in the water vigorously. An aquarium pump and air stone will dissolve oxygen into the solution and keep the good bacteria (microherd) alive and thriving. Let it bubble a day or two before you use it. If you find you are making too much tea and having to throw it out, use 2 1/2 gallons of water and cut the nute amount by half.


RECIPE #4
Fish and Seaweed

For veg growth…
1 capful 5-1-1 Fish Emulsion
1 capful 0-0-1 Maxicrop liquid
1 gallon H2O

For flowering…
1 tbs. Neptune’s Harvest 2-3-1 Fish/Seaweed
1 gallon H2O


RECIPE #5

And finally Pure Blend Pro...
Pure Blend Pro veg formula for hydro/soil and Pure Blend Pro flower formula for Soil. Simply use as directed on the label. It's a stand-alone fertilizer. That means, everything you need is already in there so don't let the guy at the hydro store try to sell you something more.


Growdoc’s Method:

Soil bed, bottom fed, no drainage, top dressed around light switchover

Soil:

100L compost- Plagron Royalty Mix
5L perlite
3L worm castings
120g dried blood meal
80g guano Peru
60g bone meal
40g lime
20g trace element
1 pinch beneficial bacteria

Feed:

7L warm water plus 500ml guano Peru plus 2 pinch beneficial bacteria, mature @ 25C for 2 months

Top dressing:

100L compost
5L worm castings
120g guano Peru
100g seaweed meal
100g bone meal
80g lime
30g trace element
1 pinch beneficial bacteria


Sicco’s Method:

20 plants in 5L pots, trimmed all through life to 1 cola, fed DEGRO in veg (Aldi, cheap, 7,5,5), riverclay available as geranium compost in spring, recommends Jorgkind Grond #6 from Aalsmeer, NL

Soil:

50L compost, inc 10% river clay (acts as a buffer)
25L perlite
20L worm castings
700g Dolokal
40g potassium phosphate

Feed:

20 times, 250ml per plant per watering, start feeding mix just before bloom
over 1st 4 weeks give 2/3 of total feed mix
5th and 6th weeks fed twice per week
last 4 weeks 2 feeds total

fed 20 times in total so 100L feed used

5L water
5g potassium nitrate
5g potassium phosphate
10g guano


shabang’s Method:

Homemade worm castings, avoid feeding worms high N and any strong flavours-garlic, onion, chilli, citrus. Worms will take on what fed so high P and K feeds are possible.

“Classic” mix:

40% worm castings
30% perlite
30% vermiculite

“Soil-less” mix:

3 part coco peat
1 part expanded clay/perlite
1-2 parts worm castings
2% alfalfa meal pellets
1 tablespoon domolic lime per litre

Casting tea:

A large spoon of castings in a nylon stocking in water with a dab of mollases/pinch sugar/spoon of yoghurt for microbes, aerate for 48-72 hrs then feed.

He admits to being lazy himself and just chucking the stocking in his reservoir once a week for auto-feed.

Another in his own words..
Hey man, I've gotten the mix down to the height of simplicity. Put on a good dust mask.

1 bag of fine dry castings, 25 pounds.
1 bag, 8 dry quarts, Scott's perlite
1 bag, 8 dry quarts, Scott's vermiculite
add in a liter to a liter and a half of dolomitic or agri lime and two to three liters of hydrated polymer crystals
Water and plant.

i've gradually changed my media too; no castings in my cloning mix, for better nutrient control and lower N levels. i now use a packaged "seed starting" mix (gen'ly just milled verm and peat) + perlite, watering and misting with a very mild fish emulsion(s)/ molasses/ EJcatalyst/ superthrive solution. i still use plenty of castings in my grow/flower pots, but <50%. base of pro-mix+castings, add organics and minerals. seems like where you've gone for less ingredients, i've gone for more. my dry mix has pro-mix, castings, perl & verm, pelletized fish, bat guanos, PSG, chicken manure, trace minerals, kelp, etc, plus the watered-in component, which includes numerous additional ferts and supplements (not using the mycorhizae, though). i've simplified my procedures but gone toward "diversity" in my mix. the caveat is, ideally this mix needs time to activate, though it works well enough "fresh". castings have the advantage of being already activated, which is why i keep them in there... did you see my description of the new Alaska product below? no mention of chlorine anywhere on the label
icon_e_wink.gif

plus humic acids from leonardite ore, woohoo. the kelp is the usual ascophylum nodosum.


Soma’s Method:


50/50 old/new soil, new soil only for little ones
Canna terra organic soil, adds coco peat, perlite and nutrients (unspecified)

Feed:

AN Iguana juice apparrently although sourced from soft secrets so handfull of salt with this one
Flowering boost with bat guano and wood ash, recommends adding trace elements with guano as high P uses them up
pH balances water to 7

Recommends Preventief for pest control, an enzyme preparation that kills small bugs but not ladybirds.


Bio Henkie’s Method:

Soil beds, 9 plants per sq m, 5% old soil re-used to carry over bacteria, soil matured for at least 3 months before planting- the longer the better, lets worms loose to aerate and fertilise

Soil:

10 ingredients, very vague
Phosphate-“living phosphate”, a granulate from Italy from fermented grape pulp, fast acting plus bone meal, slow acting
Potassium- vinasse, sugar beet remains plus others not specified
Worm castings
Bacterial strains
Compost

Comments from Bio Henkie:

Just-fertilised soil burns plants
Natural (rock?) phosphate does not dissolve readily in soils unless they are too acidic and contains a lot of cadmium which is poisonous and undesirable.
Recommends foliar feeding (carcinogens?) or root feeding with sea weed extract or guano over acidifying water for deficiencies and long flowering varieties
A&B fertilisers disturb biological life and do more harm than good


Kumquat's method:

deluxe potting soil

9 gallons peat moss
3 gallons vermiculite
6 gallons perlite
1 pound blood meal
1 pound bone meal
1 pound green sand
1 pound lime or dolomite lime
1 pound rock phosphate
Pinch of boron (borax is an inexpensive source)

Blend ingredients in a small cement mixer or large barrel with a tight fitting lid that will let you roll it around to mix the contents. If you have to stir the ingredients in an open container, moisten them SLIGHTLY with water to avoid breathing dust as you work. Do not use more than a pinch of boron. It encourages root growth, but its levels can quickly go from helpful to harmful in the soil. Once you get the soil all mixed you can add some manure tea (see recipe below). The lime in this mix helps to neutralize the acidity of the manure tea.

Manure Tea

10 to 15 gallons manure (combine horse, chicken, and cow manure to get a nice balance of nutrients. 5 gallon bucket of chickweed and/or stinging nettles. Water to fill 55 gallon drum. Dump manure(s) in the bottom of the drum. Add chickweed and/or nettles, both of which are rich in trace elements, then fill drum with water. Once a week stir the "tea" and add water to replace any that has evaporated. You'll need a brewing time of at least 3 weeks before using this tea in the potting soil mix.

MR_NATURAL420's method:

perfect potting medium

1 bushel sharp sand
1 bushel clay loam
1 bushel pro-mix or a balanced compost
3 cups epsom salt
3 cups coffee grounds
3 dozen egg shells

Make sure that the pro mix you use has sufficient organic content to ensure adequate drainage. Perlite and vermiculite are good for drainage, but contribute nothing to the organic content. Peat moss or coconut fibers are better. Worm castings and bat guano have good nutrients, but don't help drainage. Making your own compost is best. The sharp sand is heavy for containers, but I'm trying to reproduce an optimal soil, based on the average content of good soil. Unlike other super-soils all the amendments are long term and won't burn delicate babies. Hey, your payin an arm and a leg for that coffee, use it twice. Watch the pH.

Before you plant anything in it, bring it to life by watering with a solution you make by putting the following into twenty gallons of water:

1 can beer (enzymes)
1 cup soap (helps wet soil)
1 cup mouthwash (protects seedlings from damping-off)
1 t instant tea powder
1/2 cup corn syrup
1 T B1
A couple dashes of H2O2 will eliminate Cl in tap water

Aallon's method:

A quick and easy soil mix would require:
# 5 parts soil. Normal commercial potting soil should be fine.
# 5 parts perlite. This enhances aeration of the soil-mix, helps prevent over-watering by increasing drainage and reduces soil compaction. Perlite can be replaced with coarse vermiculite or crushed expanded clay balls (mica, leca, geolite).

Optional:
# 2 parts composted organic matter. This can be normal household compost. If you can find composted worm castings, seaweed or composted manures (chicken, horse) they can also be used for extra kick. Non-composted manures make the soil-mix too 'hot' for the plants and should be avoided.
This is a flowering mix - that is, it is intended for plants or clones that will be flowered. The mix has enough nitrogen to get through a couple of weeks of vegging and the stretch. The grower may need to supplement nitrogen, watch for yellow leaves before 5 weeks of flowering.

The basic mix is

40% castings
30% perlite
30% vermiculite

For each gallon of soil mix, add:

1/4 cup of high N guano
1/2 cup of high P guano
1/4 cup of dolomite lime
1/4 cup of kelp meal

The problem with high nitrogen guano is its variability. Different guanos break down differently and may burn your plants diffferently. The upside is that high N breaks down quickly and is used by the plant immediately, so that the grower can determine how much is too much pretty easily. Burned tips are just pushing the envelope, but a ram's horn leaf curl indicates way too much nitrogen.

Conversely, high phosphorous guano breaks down slowly. It needs to be supplemented early with an organic flowering fertilizer, like EarthJuice bloom.

When the plants are potted, water them in with a mix containing 1 tbsp each of EarthJuice Catalyst and Maxicrop Liquid Seaweed per gallon of water. If the grower uses B'cuzz, then by all means add it as well. Thereafter, use EarthJuice/Maxicrop, every third watering. Make sure that the plants are fed bloom fertilizer until the fourth week of flowering.


Vic's Method:

Super Soil recipes & notes

Super Soil Mix Original Recipe, as it was given to me:
1 Bale sunshine mix #2 or promix
2 L Bone Meal - phosphorus source
1 L Blood Meal - nitrogen source
1 1/3 cups Epsom salts - magnesium source
3-4 cups dolmite lime -calcium source & pH buffering
1 tsp fritted trace elements
1/2 - 1 bag chicken manure (steer, mushroom, etc) - nitrogen & trace elements

Mix thoroughly, moisten, and let sit 1-2 weeks before use.

Revised Recipe, after several failures due to bad manure sources, I now use the following recipe. Results have been excellent and the clones seem to take off right away instead of having a slow growing settling in period:
1 Bale sunshine mix #2 or promix (3.8 cu ft)
8 cups Bone Meal - phosphorus source
4 cups Blood Meal - nitrogen source
1 1/3 cups Epsom salts - magnesium source 3-4 cups dolomite lime -calcium source & pH buffering
1 tsp fritted trace elements
4 cups kelp meal.
9kg (25 lbs) bag pure worm castings

Mix thoroughly, moisten, and let sit 1-2 weeks before use.

Substitutions - The original recipe was a success, but I simply needed to experiment. In addition, sometimes not all ingredients were always available. Therefore, here are some possible additions and/or substitutions:
Blood & Bone Meal - when trying to cut costs Kelp Meal - contains over 62 trace minerals. Good supplement for reducing the manure content to speed availability of soil.
Worm castings - excellent source of micro nutrients.
Bat guano - excellent for top dressing a week into flowering.
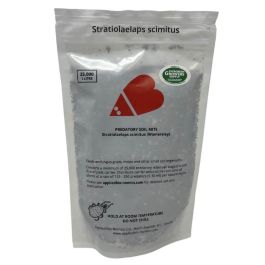
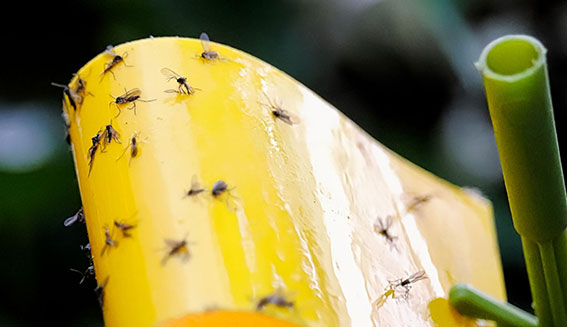
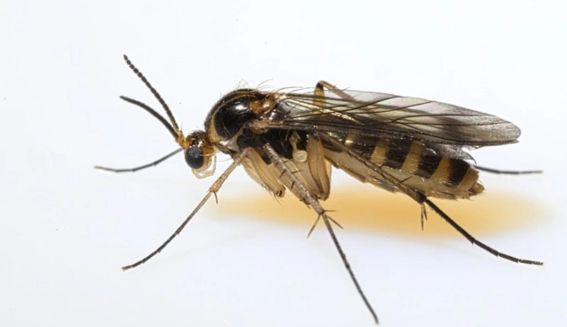
Seabird guano Bugs On a couple of occasions, I've ended up with fungus gnats with this soil mix. They are more of an irritation than anything but may harm weak or young plants. Some have said that putting a layer of sand on top of the soil in the pots stops the gnats from reproducing. Others can get rid of them by doing a soil drench with gnatrol or vectobac (BTI). Personally, I prefer to simply introduce fungus gnat predators (Hypoaspis miles). Once established, they not only control fungus gnats, but also thrips and mites. When there is no insect food available, they survive on dead plant material, so remain even after pests are gone to prevent future infestations. Actually, since they have been introduced, I've had no pest problems in over a year and I don't filter my intake.
Recycling Soil Used soil - Reusing soil has a few downsides such as it makes it easier for diseases, viruses, and pathogens from entering your garden. Also peat based soils break down and become acidic. If you fertilize with chemicals you'll end up with salt buildups that will slow growth. Unless you like to take chances, have a good eye, and a good horticultural understanding, you may be better off with staying with fresh new soils.
That said; I grow strictly organic and I've always reused my soil. I don't sterilize the soil between plantings as my soil is full of microbes and predatory bugs that keep the bad bugs under control.
After each crop, I chop up the soil and root balls with the leaves, stalks, etc and let compost for about 3 months. I then mix it up and add about (for every 50 gallons composted soil)

2 - 3 cups of lime.
1/2 cup epsom salts,
2 liters bone meal,
1 liter blood meal,
1 liter kelp meal,
1 tsp trace elements,
and enough perlite to regain the porosity of the original soil.

I used to add a bag of manure, but I was getting fertilizer burn and so have stopped now. As I've been fine tuning this, the plants just keep getting healthier and I haven't had any real pest problems for quite a while. I know this is a controversial approach and maybe even risky, but it allows me to keep my garden pretty much self contained. I don't attract attention by buying bales of soil every 3 - 4 months year around, or in the disposal of leaves and soil after each crop. It's definitely not for those who want sterile crops and those that use pesticides and chemical ferts. I believe in working with nature, not against it. After several generations, a nutrient imbalance developed which was only solved by leaching the soil thoroughly. My hunch is that one of the micro-nutrients was building to toxic levels. I guess farmers don't get this problem because they have the winter rains to each excess nutrients from their fields.

Anon method:

My mix:
57 L - Mushroom Manure 1.5-1-1.5
28 L - Soil
57 L - Grit
28 L – Vermiculite
2 L – Bone Meal 4-14-0 (Green Valley)
1 L - Blood Meal 12-1.2-1
1 L - Kelp Meal 2-1-2 (Multicrop)
350 ML - Epsom Salts
400 ML - Greensand
500 ML - Rock Phosphate
1 L - Dolomite Lime

Casamere's method:


organic mix

40% composted soil
30% worm castings
20% perlite
10% dolomite, guanos, goodies, etc..

i've also heard good things about "uncle malcolm" brand soil from peaceful valley is good.... if you're mixing organics with chem ferts, the plant will use up what the chem ferts feed it first, then partaking afterwards in the organic nutes. the beauty of organics is it's almost impossible to burn your plants, and the taste is superior to chem. grown plants. i use pure blend 1 - 0.5 -1 for veg and fox farm big bloom 0.8 - 3.0 - 1 for flowering. they're expensive but the plants really like it. sometimes i'll make a tea out of worm castings & guano. peace

High Dog's method:


Organic Pro-mix Recipe

blood meal-1 cup per cubic foot of potting soil.
steamed bone meal-1 cup per cubic foot of potting soil.
rock phosphate--1 cup per cubic foot of potting soil.
fine dolomite lime at the rate of about 1 1/2 cups per cubic foot
kelp meal at about 2/3 cup per cubic foot.
I also like to add plenty of coarse vermiculite.
I use plain potting soil to germinate in and transplant into this mix after about two weeks.
Once transplanted and established, I only give my plants plain water for the duration of the cropping period without suffering any nutrient shortage.

anon method:

6 parts potting soil
2 parts perlite
1 part vermiculite
1 part chicken manure
1 small handfull lime

Plants are watered daily...
Every third watering use fish emulsion 5-1-1 at 1 tbsp. per gallon. Continue this until the second week of the flowering cycle when stretching stops.
Then mix fish emulsion 5-1-1 with alaska more bloom 0-10-10 at a ratio of 1 teaspoon 5-1-1 to two teaspoons 0-10-10. this will give you a 5-21-21 ratio. use this every third watering until the last week and a half of flowering.
For the last week and a half use plain water. right at the beginning of the flower period (sometimes) add a small amount of lime to your water for one watering to counter any acids that may have built up during the vegetative phase. also sometimes i used to substitute the 5-21-21 mix with chemical 10-60-10 (schultzes super bloom) at 1/2 teaspoon per gallon for two waterings at about week 4-5 of flowering. if there is any yellowing before say week 5 1/2 simply use more 5-1-1 and less 0-10-10. this method resulted in hightimes centerfold plants.... very vigorous. in three gallon grow bags NL#5 vege'd for 30 days yield 1 1/2 ozs. of smooth sweet potent smoke. some strains did closer to two ounces per plant. 2x250w MH. 1 plant per 1 1/2 feet sq. bottom line is you really don't need exotic ingredients to grow killer weed. i'm sure that wormcastings etc. will do the trick for you... but don't feel bad if they're not available in your area... or are beyond your budget. this simple mostly organic set-up will give you EXCELLENT results with common, easily obtained cheap ingredients. peace all.


Blaze's method:

Very simple mix that will blow You away if you strive for optimum flavor in your buds.
Most Brewery shops have powdered citric acid, then you need the raw, unprocessed cane sugar(the brown rock sugar that still contains molassis).

1 dry ounce powdered citric acid
1 dry ounce unprocessed cane sugar
500ml's of warm h2o and mix well

Add 5ml's per gallon of res. every res. change.
It drops PH considerably the 1st day or 2 then stabilizes.
Citric acid is a good ph down, but it doesnt last as long as phos. acid.
I feed it to them always and switch to a clearing solution the last 7-10 days of flower.
I have never had buds so tastey and "odoriforous"


Curious George's method


Home-Made Organic Liquid Recipe

I add a few ingredients to my soil in a solution that is comparable to EJ Catalyst. Two weeks before transplanting seedlings into larger pots I mix the soil and add (per gallon of water):
1 tsp Molasses
1 tsp Lipton Iced tea mix(main ingredients: sugar, citric acid)
1 tsp brewers yeast
1 tsp fulvic acid
1/4 tsp humic acid(Gumate)
1 tbsp liquid seaweed.

This concoction will give life to your zillions of thriving soil microbes which will help break down your other soil amendments and/or watered on guano teas. The nutrients in the teas may not break down evenly, but that is the beauty of using organics... the plant uses the nutes as they are broken down. I would never use Milorganite on anything other than ornamental plants, but that is me. I swear by PSG for veg, and Budswel for flowering. I use many different guanos but those are the best(IMO)! BTW, worm casts don't have that much Nitrogen, at least not enough to use them alone for a high metabolism plant like cannabis. For Potassium I use Kelp meal(1-0-2), liquid seaweed(0-0-1) and Greensand(0-0-.1) I don't know how much of the greensand gets broken down by the time the plants are flowering, probably not much, but I use it anyway. Also, the guano's have a bit of P in them also, but not enough to use them by themselves, IMO. It seems that different ingredients break down more rapidly at different PH's, that is why I like to use a bit of peat moss fortified with dolomite lime, so that the medium doesn't have an equal ph throughout... I think it is varied between 5.8- 7.0 throughout the mix, and becomes a little more acidic towards the end of the grow, Phosphorus is more readily available when the medium becomes a bit acidic... this is good considering the plant needs the most phosphorus when it packs on its flowers at the end of it's life. That's been my observation thus far.

The Basic Soilmix:

1 quart perlite (keeps the mix light and helps drainage, does not break down.)
1 quart vermerculite (same as above)
2 quarts wormcastings 1-0-0 (slow release nitrogen, a ton of micronutrients)
1 quart potting soil (regular $2.50 a bag is ok, should be almost black in color, smell like dirt, not rotten. a little sand and verm. or perlite is ok.)
1/4 cup bat guano 10-3-1 (quick release nitrogen and more micros)
1/2 cup horticulture lime or agriculture lime (for PH and also contains calcium)

During flowering, add 1 teaspoon epson salt(magnesium) per gallon of water.Combined with the pour in ferts posted earlier, this would make an excellent mix.

1/3 perlite,
1/3 verm
1/3 castings

Keeping it simple. It’s really up to you and what’s available. Don’t freak when you see the low NPK ratios. The organic ferts have plenty of power. 300 to 400 ppm per watering is max. Any more is overkill. In addition to the above mix, mine contains:
1/2 cup greensand 0-0-1 (soil conditioner, makes things happen that aid in nutrient uptake)
1/2 cup alphalfa meal
7-2-5 General purpose organic fert(rabbit food)
1/2 cup horticulture mulch (slightly acidic, breaks down and becomes food)

The breakdown process is criticle to organic growing. There is a whole other world under the surface. Microorganisms break down organic matter into the basic elements. Opinions differ about how long it takes to get the process started but IMO about a month of being watered and breakdown will be in high gear. Using third generation soil and its tweekin’. You can and should reuse the soil. Add more of the powder ferts and your back in ‘binness. If your soil is alive with micros PH will not be a problem. Watering: In my grow the plants need water about every third day. I don’t water so much that water comes out of the drain holes. I think its wasteful and unnessasary. They get plenty of water though...all they can use. Misting: Everyday,with 6.0 water. I add 1/4 teaspoon of orange oil to a pint of water and the plants love it. The buds get bigger and tighter. Definitely a worthwhile procedure. Plain 6.0 water is OK too. Kinda’ dry where I live.(humidity wise) It may be a misconception that soil is less hassle than hydro. I guess it’s what you get used to. I know hydro rocks, but organics are Powerful. Power to grow Gigantic with organics!!!


MrSoul's method:


organic soils & teas

Soul's Soilless Mix
50% Worm Castings
25% Promix
25% Perlite
Add a cup of PSG and dolomite lime per cubic foot of soil.

Lately I've been happier with a bit less wormcastings:
50% Pro-mix
25% perlite
25% wormcastings
mix in a cup of dolomite lime per cubic foot of soil & wet the mix with an organic tea made from dissolving a cup of PSG in a 5-gallon bucket of water.


Soul's Guano Tea Method


I feed with tea at EVERY watering of my plants & since they're flowered in 2-gallon containers - that's usually every day!

The teas are made by soaking a "tea bag" (got mine at Worm's Way) in a 5-gallon bucket of pH = 6.2 water. Agitate and manipulate the bag a LOT to release as much of the "goodies" as possible - the water looks like it came from a mud puddle when you've got it right. I do one thing I've never heard other growers mention doing - I measure the ppm of my tea. Here are the contents of the tea bag, depending on growth stage:

Vegetative:
1/2 cup each of PSG & worm castings.
1/2 cup of Maxi-Crop liquid seaweed,
2 Tablespoons of Alaska fish emulsion to the water. (I shoot for a ppm = 1000)

Flowering (weeks 0-4)
1/2 cup each of PSG & High Phosphorus bat guano
1/2 cup of Maxi-Crop to the water. (ppm 1250 - 1500 )
Flowering (weeks 4-7)
1/2 cup each High Phosphorus bat guano and worm castings. (shifting ppm from 1500 -> 1000)
Final week of flowering,
many folks choose to use plain, pH-adjusted water for "clearing" but I don't. I haven't noticed any difference between when I have & when I haven't "cleared". This seems reasonable when growing organically - why clear? Clear WHAT? They're living in the medium in which they've evolved for millions of years!

A few other hints:

SOAK the pots thoroughly when watering, then allow them to become "light" when lifted before watering again...the plants LOVE a short drying out period. The amount of time it takes for the plants to dry out is constantly getting SHORTER as they grow...be AWARE! Water BY HAND! At least get an accurate feel for how much the average plant needs by hand-watering before setting up a drip system or whatever.

Transplant you clones into the container you plan to flower them in & veg them until their roots systems are FULLY established before flowering them - this will MINIMIZE stretching...check this out for yourself, it works!

Results From a Facinating Experiment Just In !!!! Posted by Brother Herb I just preformed a little experiment to see what organic nutrients grow the tastiest,best looking ,smelling ect... The experiment involved a few popular strains like Shiva Skunk, Big Bud, White Widow and skunk#1*Hash plant. The organic components that I experimented with were all used the same during the flowering cycle. I tested high P bat&sea bird guano, bone meal, composted steer manure, rock phosphate and high P fish emulsion. Each plant was placed into a three gallon container from a one gallon pot upon forced flowering. Every pot is mixed with commercial " Super Soil " perlite, peat moss and oyster shell. Then the individual special ingrediants were blended in the mix and the plants were planted., I did three of each blend, of each varaiety. The results varaied widely. The guano's produced very nice sticky huge buds but there was a little lacking in the smell dept. The best of the guanos was the Shiva Skunk. All the guanos had a similar base taste thats kind of bland but not that bad. The bone meal did very well. The buds were smellier than the guano and had a slighter earthier taste. The best one was Widow. The resin content hasn't changed much between the same species with different mixes. Next was the rock phosphate, it produed the biggest buds, with the fewest amount leaves and the plants smelled the strongest yet. The Big Bud was the best performer with rock phosphate. The Fish Emulsion pellets preformed the worst out of all my mixes. All varaieties looked and smelled fine but they all had a fishy base taste. I once dropped a dead gold fish into a pot with a flowering plant, the buds tasted like striaght fish! The last of my mixes was Composted Steer Manure and it turned out to be the best. The plants were a little leafy but they had nice buds and smelled out of this world. Every strain smelled better under manure, the Shiva had that grape orange smell going on, the Widow had the sweetest skunkiest smell, Big Bud reeked of mangoes, and the SK#1*Hash plant reminded me of pelling on orange. The best part about manure, I had yet to find out until I cured my weed. WOW, even the best weed in Amsterdam couldnt compare with this tasty stuff. The flavor of the weed would explode in your mouth with every hit . The smell of second hand smoke if so overpowering, it makes you got to have some if your not smoking it already. Does anybody else out there swear by manure for taste like I do? Please feel free to respond with your opinions on what makes weed taste great!


Subcool's method:

6 Bags Roots soil or equivalent high quality supped up grow soil
Note**I am trying a new product made by a local company that contains less fir bark called Harvest Moon
25 pounds Pure Worm Castings
½ cup Azomite trace minerals
2/3 Cup Sweet Lime IE Dolomite
1 Kilo Bone meal / IE 5 Pounds
1 Kilo Blood meal ( I use a bit more bone than Blood in this recipe)
1 Kilo Bat Guano bloom formula preferably Fruit bats
3/4 cup Epson Salts
The Perlite and Coco I happen to have and it will make a better mix but it is not necessary.

So we add water and let it cook in the sunshine. 30 days is best for this concentrate and it can be used to condition soil as detailed in the soil 101 thread. Do Not Put Clones or Seeds in this mix!

I will use this for a full year just adding like 30-50% in the lower potion of the container and plain roots in top portion. As the concentrate gets older I can use more. To re use I just recondition.

Read This!!
***Disclaimer**
This soil is really hot and you cannot plant seedlings or clones directly into it. When I do my final transplant into #10 pots I fill each pot ¾ full with Super soil and the top ¼ I add plain potting soil and stir the top portion. This allows the roots to become used to the soil. After a few days the growth on a transplant is amazing Jill’s Comment was most peoples soil plants don’t grow that fast.

Using this soil it’s not necessary to add nutrients with the exception of bloom maybe once and Sugars to enhance flavor.

Hope that’s helps the final shot is all cleaned up it took me about 30 minutes and cost on products was about 175$
This should last me 3-4 grows.

This recipe originally came from Vic High and over the years I have tweaked it and perfected it to the strains I grow, If there nutrient sensitive I simply cut the mix more.
With plants that need more I simply top dress the plants at week 3 of 12/12 with the concentrate


Randomuk420's method:

40% worm castings
5% greensand
30% perlite and vermiculite mix
1% azomite aka bentonite clay
the rest is either pure sphagnum moss or a wood/peat/sphagnum mix.


I use a modified Cali Super soil.
I don't care for Peat Moss ( Sorry Canada!)
I use Earthgro 1881 composted cow manure,50 lbs. as the base.
I don't know where they bag this stuff, but it is CHOCK FULL of crumbly Mica Schist.(read trace element rich)
25 lbs. EGrow potting soil
30% Pearlite
5lbs Bone Meal
5 lbs. pure Kelp
2lbs.Sulfate Potash Magnesia
3lbs. Blood meal
3 lbs. Cotton Seed Meal
2lb. hand-ground pumice (Lava Rock)
Dolomite Lime to neutral
Rainwater

This is composted for a month, then Red Earthworms added so the whole thing ends up being Castings! Nothing else really needed - the NL took to it like a NFL star to steroids! They were rootbound in a 10" pot under Flouros in a month!

1 bale 3.8cu feet Promix BX
4 lbs Peruvian Seabird Guano 11-13-3
10 lbs worm casing

Mix well, pot your girls and water well with 4 gals of Alaskan Fish ferts (5-1-1) This mix will take your plants through their veg cycle with only ph adjusted water added, (6.5ph), when dry. During flowering I water 3-4 times with a tea made from Idonesian Bat guano, (0-13-0), 3tbsps/gal of water.


Mr.Muggles's method:

1 part vermiculite to 3 parts pro-mix is what I use for my medium.
 

acespicoli

Well-known member
1712057880135.png


Stratiolaelaps scimitus (formerly Hypoaspis miles)


is a small (0.5 mm) light brown mite that lives in the top 1⁄2 inch (13 mm) layer of soil. As a natural predator of fungus gnat pupae and of the snail parasite Riccardoella limacum it is used by gardeners and snail breeders for biological pest control. Stratiolaelaps scimitus is also commonly used by reptile, amphibian and invertebrate keepers as a preventative or reactive measure against grain mites and reptile mites. Whereas most mite treatments are based on synthetic chemicals, predatory mites are used as a biological method of preventing and curing mite infestations.[1]

Stratiolaelaps scimitus and the similar species, S. aculiefer are soil-dwelling, predatory mites. Stratiolaelaps mites feed on fungus gnats, springtails, thrips pupae, and other small insects in the soil. The mite is 0.5 mm (1⁄50 in) long and light-brown in color. It inhabits the top 1⁄2 inch (13 mm) layer of soil. Both nymphs and adults feed on soil-inhabiting pests, consuming up to 5 prey per day. They may survive by feeding on algae and/or plant debris when insects are unavailable. Both males and females are present, but males are smaller and rarely seen.

Stratiolaelaps is well adapted to moist conditions in greenhouses in a variety of growing media, but does not tolerate standing water. Hypoaspis is currently used in greenhouses for control of fungus gnats. It feeds on fungus gnat eggs and small larvae and is most effective when applied before fungus gnat populations become established or when populations are low. It has been successfully used in bedding plant production, potted plants, and poinsettia stock plants. Stratiolaelaps will also attack thrips pupae in the soil, but cannot be relied on alone for thrips control in a commercial greenhouse. It may, however, enhance biological control when used in conjunction with predators feeding on thrips on the foliage. In small-scale experiments this mite reduced emergence of adult thrips to about 30% of that in controls.


Reproduction​

Stratiolaelaps scimitus reproduces both sexually and asexually, with unfertilized females producing only males, while fertilized females produce both males and females. The eggs are layed in soil. Males are smaller than the females and each female can lay up to three oval eggs per day. The eggs hatch in one to three days producing a six-legged larvae that grows into an eight-leg nymph.Time from egg to an adult is dependent on temperature, ranging from 10 to 34 days, with warmer temperatures producing quicker maturation.[2]
1712058132416.png

Target Pests: Fungus gnats (Bradysia spp.), Western flower thrips (Frankliniella occidentalis), Root Aphids, Mites
Description: Stratiolaelaps (Hypoaspis) is a native species of soil-dwelling mite, which feeds on small insects and mites (e.g. springtails, root mealybug crawlers, and spider mites). Adults are tan in color, less than 1 mm long (1/20th in.) and move rapidly over the soil surface. They live, eat, and reproduce in the soil medium and walkways on the greenhouse floor.
Use in Biological Control: Stratiolaelaps are used primarily to control young larvae of fungus gnats in the soil or planting media. They also help control soil stages of thrips and may account for up to 30% of thrips control. They do not control shore flies or moth flies, but will feed on other soil organisms, such as springtails and root mealybugs. They have been used successfully in bedding and potted plant production, seedling and cutting propagation, and poinsettia stock. Stratiolaelaps adapt well to the various growth media and capillary mats used in plant production, but do not survive freezing or flooding conditions.
Life Cycle: The complete life cycle takes about 18 days at 68°F (20°C). The sex ratio is an equal 1:1, females to males. Eggs hatch in 2-3 days into young nymphs, which are also fierce predators that consume eggs and small larvae. Each adult Stratiolaelaps will consume 1-5 prey per day. It can also survive as a scavenger in the absence of pests, feeding on algae and plant debris. Populations will naturally fluctuate throughout the growing season.
For Best Results: Do not mix predators into the growth media before potting plants because they do not survive. Apply Stratiolaelaps shortly within the first few weeks of planting and before fungus gnat levels reach more than 20 adults per trap, per week. To control high numbers of fungus gnats, use of Stratiolaelaps can be integrated with insect parasitic nematodes, which control the larval stage of fungus gnats.
Release Rates: Stratiolaelaps is most effective when applied before fungus gnat populations become established or when numbers are still low (below 10 per trap, per week). Two applications of Stratiolaelaps per crop cycle are usually sufficient if used early in the season. The second application should be made 2-3 weeks after the first.
Soil Culture: Apply 5 Stratiolaelaps per square foot to the soil at the time of planting (repeat in 2-3 weeks). Be sure to treat wet, exposed areas of soil where fungus gnats are likely to breed.
Sawdust Bag or Rockwool Culture: Apply 5 Stratiolaelaps per square foot, or 250,000 per acre. Apply 1 tsp. per every 2nd bag or rockwool slab (repeat in 2-3 weeks).
Pot Culture: Apply 1 liter bottle of Stratiolaelaps (25,000 ea.) per 2,000 square feet of bench area. Treat the floor of the greenhouse weekly if it provides wet conditions for fungus gnats to breed, and occasionally treat the perimeter of the greenhouse. It is not necessary to apply mites to every flat of bedding plants if applications are done early, at a full rate, to allow them time to spread to all flats. Mites can also be applied to propagation media before striking cuttings.
 
Last edited:

acespicoli

Well-known member
I think that this coud be well integrated into my system thx to @flylowgethigh for sharing it :huggg:


thailer


Active member​


I switched over from fabric bags to SIPs a couple years ago and have never looked back. Keeper cuts that were yielding 140 grams per plant suddenly increased to 230-250 grams, the resin content was greasier and increased as well. The plants vegged a lot faster and plant health increased. I had spent quite a while researching online different SIP designs and settled on making something of my own that was inspired by the hempy buckets here that used perlite. Other designs use the peat moss as the wick and i do not want the soil getting super soggy to prevent wet feet, it leaches nutrients into the water, and the peat moss itself doesn’t have as good of wicking capabilities as perlite, meaning water can not travel upwards as fast as it can if it were perlite.


picture.php


So some things to consider before building this system.
If you want to use hand water soluble fertilizers, this really isn’t the system for you because the reservoir will collect the run off nutrients. Try a blumat system. This is water only to keep it clean and there’s no way to leach the system the way i built it. I don’t really need to or haven’t as of yet.
You can’t transplant out of it easily.
It can be boring because all you do is fill up water and make clones.

So I made SIPs you can hand water first by pouring water down a PVC tube and the plants eventually started sucking the water out the SIP daily. I was hoping to get a few days in between but the plants were growing great!! I was able to fill up the SIP before the soil got dry and it worked, but i wanted more so next design incorporated hydro tubing connecting the SIPs to a reservoir the size of a garbage can. This way I don’t have to squeeze in the room to water the ones in the back and they all are able to be filled up from outside the room. Moses Wellfleet has been running the hand watered design for a while now and loves it!

It worked great and i was able to go 3 weeks from transplanting a young small plant before it drank up water but once they are established plants, they will drink, drink, drink. You can add a garden hose or RO system to fill up the trash can if you want a completely hands off approach to growing. I did notice that growth rates did go down a little when i switched over to the SIPs on irrigation which keep the water reservoir inside the SIP at a constant height versus the hand watered SIP which the level goes down as the plant consumes the water. To keep the growth rates going, be sure to fill up the tote completely with premoistened soil so it doesn’t get lower settling as it gets wetter because every inch counts in this case as air decreases the further down you go int he soil. see below.


What makes a good container soil mix
https://ucanr.edu/blogs/blogcore/postdetail.cfm?postnum=29331

water and air porosity
https://ucanr.edu/blogs/blogcore/postdetail.cfm?postnum=29390

how much air and water
https://ucanr.edu/blogs/blogcore/postdetail.cfm?postnum=29450

effects on root diseases like rot
https://ucanr.edu/blogs/blogcore/postdetail.cfm?postnum=29510

effects of soil settling, salt and drought on root rot
https://ucanr.edu/blogs/blogcore/postdetail.cfm?postnum=29579

when to irrigate/how to determine when to water and how much
https://ucanr.edu/blogs/blogcore/postdetail.cfm?postnum=29674
https://ucanr.edu/blogs/blogcore/postdetail.cfm?postnum=29691

cation exchange capacity
https://ucanr.edu/blogs/blogcore/postdetail.cfm?postnum=29697

so basically the deeper the pot, the more air closer to the surface. if the soil is shallow and wide, its just not the same as the identical amount in a deeper pot. so the soil in the SIPs is wide and shallow and i want to add more soil while creating depth to grow these large trees indoors.


Last edited: Dec 1, 2020

Bigger Britches For My Ladies (2021-current)
Thai's Blooper Reel ~ 2018-2021
petard2.gif


Some days you eat the bear; other days the bear...well...he eats you.


Like Quote Reply

Report


  • Like
Reactions: rindindoo, Shua1991, Jellyfish and 13 others


[IMG alt="thailer"]https://www.icmag.com/data/avatars/m/471/471851.jpg?1649695615[/IMG]


thailer


Active member​


So I will try to explain how the connected system works first and once you understand, you can really design with anything if you don’t want to use totes. You can use smaller 5 gallon buckets doubled up so the bottom stays in the same place and you can pull the top bucket out and move it from veg to bloom or in a better spot. You can put this outdoors and make a guerilla grow if you can pump water from a stream. Seriously the possibilities are endless.

picture.php


So the water level is determined by the level of water that is in the control box by a float valve if it and the SIPs were level to the floor. If you pick up the control box, it will raise the level of water inside every SIP till it reached the same height as the water that is inside the control box. I suggest playing around with this before adding the soil to make sure the level is correct and you have an air gap between the water table and the soil. More on that later tho. The reservoir garbage can is raised up to increase the water pressure. The shut off valves let you unhook a SIP to take out of the room. You should also put a shut off valve between the reservoir and the control box as well but not included in pic.

I was told by some growers who have this system set up already that you can not put more than six SIPs on one control box and i think that is due to the speed the water can service each SIP. as it fills up, the first SIP gets topped off till it is full and then it will fill up the second SIP and down the line but if the plants are drinking heavily or the sun is hot evaporating the soil, then the last SIP can get very little water. I have seen people put more on there so feel free to play around but you can set up multiple control boxes to run off of one reservoir as long as the water can keep up with amount of SIPs you want serviced.

Whew! I hope that made sense!


Bigger Britches For My Ladies (2021-current)
Thai's Blooper Reel ~ 2018-2021
petard2.gif


Some days you eat the bear; other days the bear...well...he eats you.


Like Quote Reply

Report


  • Like
Reactions: BigGPop, newbert, q3corn and 2 others


thailer


Active member​


Single line design is better for smaller rooms because the line kinks sometimes if there’s not enough room.


picture.php


IF you have a bigger wider room and want to put a lot of sips on one line, try a loop so the line ends and starts at the control bucket.


So to make a hand watered and an auto top off SIP, here’s what you do!

First you’ll need to buy a tough tote that are sold at most stores. They’re usually black bottom with yellow lid and say they are stackable and can hold lots of weight. These things are durable and they won’t bow out so you can drag them around without breaking them. Plus the plastic isn’t brittle and softer to make the holes.

Now for the hand watered design you’ll want to measure 3.5” above the bottom and that is where the top of the hole should be when you drill. This is the overflow hole that water will come out of if you add too much and it determines how much water you can put in there.


picture.php


For the irrigation SIPs you want to measure so the bulk head has enough room to remain flat so it seals properly but still stays as low as possible to the bottom. The point of this is so the hole is covered with water and keeps full so air bubbles don’t get down clogging the line.

Hand watered design

picture.php


Bigger Britches For My Ladies (2021-current)
Thai's Blooper Reel ~ 2018-2021
petard2.gif


Some days you eat the bear; other days the bear...well...he eats you.


Like Quote Reply

Report


  • Like
Reactions: Jellyfish, Elcrazychicken, PDX Dopesmoker and 4 others


thailer


Active member​


Screw in the screen to keep perlite out of the hole and cover with drain cover or nylon.


picture.php


picture.php


The get 4” wide perforated drainage pipe and create a similar shape inside the SIP. cover ends with old socks or more drain cover so perlite doesn’t get inside. Then back fill with perlite. Shown below is the hand watered design but the irrigation one looks the same except it doesn’t have a PVC pipe 2” coming out of the corner to put water down into the reservoir without creating leaching. Hint: add perlite AFTER you put the pipe down because if it gets any soil or perlite inside of the pipe, it won’t work. Probably could put drain pipe cover on it too. If you’re doing the irrigation design, you don’t need the pvc pipe.

picture.php


picture.php


Inside pic of the control box


picture.php


Bigger Britches For My Ladies (2021-current)
Thai's Blooper Reel ~ 2018-2021
petard2.gif


Some days you eat the bear; other days the bear...well...he eats you.


Like Quote Reply

Report


  • Like
Reactions: Bio boy, Douglas.Curtis, CannaRed and 2 others


thailer


Active member​


Pic of one dumped upside down to look at the roots

picture.php


picture.php


picture.php


Roots grow right down into the water table and anchor the plant while thinner roots line the perlite bed and create a mat thick. Its so simple. Now this setup provides about 15 gallons of soil and can support most plants grown indoors but if you like to grow big giant plants and don’t want to be hindered by root bound growth, I’m going to increase the soil and redesign the SIPs a third time so i can grow big giant plants easier than what i can do now.


picture.php


So i think i've figured out the best design to make the SIPs operate better to support larger plants that need stakes. i think i am gonna double up the totes so the bottom tote contains the reservoir and some sort of support for the tote above that is set inside the bottom tote that will hold the soil. this will give me 13-15 inches of soil where currently i am around 10". but its not just about getting more soil depth to hold up stakes; it also increases oxygen to the root zone. my theory is the difference between the hand watered design and the irrigation line design is the wet dry cycle the hand watered sips get which influences transpiration, osmosis at the root zone which increases fertilizer ppm as the soil drys when the plant sucks the water dry from the soil, while the auto top off sips constantly have the same water level.

at the root zone there is root pressure and cohesion tension theory which is how water/fertilizer enters the roots and then move up the plant and into the atmosphere. root pressure can only make water travel through the roots so far and isn't as big of influence in transpiration as cohesion tension theory. cohesion tension theory can make water travel despite gravity up tall plants because water is a polar molecule and i like to imagine it like a magnet toy train. the H20 connects to the h20 below that and so on and so on so it creates this chain. as the plant transpires and releases humidity into the air, each water molecule that is evaporated on the leaf surface, will pull up the following h20 molecule below it on the chain. this video explains it a lot better than me


so the plant itself acts like a wick system which is the basis of how the SIP works too. you can see how the pressure to release into the air increases as the water rises up and out of the stomata.


SPAC+%3D+soil-plant-atmosphere+continuum+A+plant+is+a+Living+Wick..jpg


so this all starts at the soil level with the root zone being influenced by the amount of water/oxygen to the root zone. the soil can't be over saturated or the plant won't transpire. so that moves me on to my next topic about the depth of the original SIP and why i want to add more soil depth.
 

acespicoli

Well-known member

Impact of Different Growing Substrates on Growth, Yield and Cannabinoid Content of Two Cannabis sativa L. Genotypes in a Pot Culture


Horticulturae 2020, 6(4), 62; https://doi.org/10.3390/horticulturae6040062


Abstract​

The impacts of different growing substrate compositions, consisting of peat (PM), peat substituted with 30% green fibre (G30) and coco coir fibre (CC) growth media, were investigated in regard to the plant height, biomass and floral yield, biomass nitrogen (N) content, root growth, and cannabidiol content (CBD/A) of two phytocannabinoid-rich cannabis genotypes in an indoor pot cultivation system. Genotypes and substrate treatment combinations were randomly allocated to 36 plants according to a Latin square design. The results showed a higher total plant height for PM (39.96 cm), followed by G30 (35.28 cm), and the lowest in CC (31.54 cm). The N content of leaves indicated the highest values for plants grown in G30 (52.24 g kg DW−1), followed by PM (46.75 g kg DW−1) and a significantly lower content for CC (37.00 g kg DW−1). Root length density (RLD) increased by 40% (PM) and 50% (G30), compared to CC treatments, with no significant differences in root dry weight. Both genotypes, Kanada (KAN) and 0.2x, reacted in a genotype-specific manner. KAN indicated a reduced floral yield of plants grown in G30 (4.94 g plant−1) and CC (3.84 g plant−1) compared to PM (8.56 g plant−1). 0.2x indicated stable high floral yields of 9.19 g plant−1 (G30) to 7.90 g plant−1 (CC). Leaf DW increased in PM (5.78 g plant−1) and G30 (5.66 g plant−1) compared to CC (3.30 g plant−1), while CBD/A content remained constant. Due to a higher biomass yield, the CBD/A yield of flowers (549.66 mg plant−1) and leaves (224.16 mg plant−1) revealed 0.2x as an interesting genotype for indoor pot cultivation in a peat-based substrate substituted with 30% green fibres. Overall, the demand for organic green fibres to partly replace fractionated peat showed a genotype-specific option for a homogeneous plant development, with comparable high biomass yields and stable cannabinoid contents compared to a peat containing standard substrate.
Keywords:
Cannabis sativa L.; indoor cultivation; growing substrates; nitrogen content; biomass yield; root growth; cannabinoids

5. Conclusions​

The results of this study showed that different substrate compositions, namely coco coir fibres (CC), standard peat-based media (PM) and peat substituted with 30% of green fibres (G30), had significant impacts on the growth, biomass yields, root development and nitrogen (N) tissue content of C. sativa after harvest. The use of CC as a growing media indicated a reduction in total plant height, leaf N content, leaf DW yields and root length density (RLD) compared to PM and G30 growing media. Both phytocannabinoid-rich cannabis genotypes reacted in a genotype-specific manner on flower yields. Whereas KAN had the highest floral yield when grown in PM, 0.2x showed no significant differences, with higher yields grown in G30 and CC compared to KAN. A limiting effect on the CBD/A content enacted by the different substrates could not be confirmed. The impact of different substrate compositions on the growth, development and cannabinoid content of C. sativa is a major issue when considering cannabis’ use as a botanical therapeutic, ideally with a fixed dosage of active compound, with a small range of variation. It can be concluded that the use of organic green fibres to partly replace the fractionated peat showed a genotype-specific option for constant plant development, a comparable high biomass yield and a stable cannabinoid content, compared to a peat containing standard substrate.
 

acespicoli

Well-known member

Soil-less Mixes for Vegetable Seedling Production​


by Eric Sideman, PhD
MOFGA’s Organic Crop Specialist Emeritus
Farmers developed soil-less mixes for use in containers for seedlings because field soil does not work well. Soil alone is heavy and poorly aerated. It tends to become waterlogged and sticky when wet. Then it shrinks when it dries, pulls away from the container edges and turns into a little brick, which is difficult for plant roots to penetrate. Furthermore, field soil may be a source of diseases that slow growth and kill seedlings.
An ideal soil mix will:
  • be dense enough to hold up the seedling
  • retain moisture
  • be porous enough so that excess water drains and the mix remains aerated
  • be free of weed seeds and plant pathogens
  • have low salinity (1 to 2 mmhos)
  • have a pH 6.5
  • have adequate amounts of nutrients available
Most commercial mixes on the market do not meet organic standards because they contain synthetic sources of nutrients. Basically, they are mixes of peat, perlite, vermiculite, a wetting agent, lime and chemical salts of the major nutrients. Some commercial mixes do meet organic standards. They too use peat, but instead of synthetic chemicals the organic mixes rely on compost, natural rock powders and organic sources of nutrients. Johnny’s Selected Seeds and Fedco both carry approved seed starting mixes. For contact information about other commercial mixes available in Maine, call the MOFGA office at (207) 568-4142.
Many growers make their own mixes. Common ingredients for the major portion of mixes include peat, sand, vermiculite, perlite, compost and lime. Below are the basic characteristics of each of these. When designing a mix, growers look at what they need from each ingredient with regard to moisture holding capacity, aeration, nutrients, etc and then determine proportions that work.
Here are the major characteristics of these ingredients:
Peat
  • high moisture holding capacity
  • low pH (compensate with limestone by adding 2 to 3% by weight at least five days before planting)
  • very little to no nutrients
  • Questionably renewable resource. The Canadian peat industry claims that they are harvesting peat from bogs at a rate no higher than it grows. Still, some growers will substitute coir (coconut fibers) or leaf mold. The coconut fibers have their own environmental issue since they have to be shipped long distances. And, if you use coir make sure it is pesticide free.
Sand
  • increases density for greater support
  • improves aeration
  • contains no nutrients
Vermiculite
  • good water holding capacity
  • improves aeration
  • neutral pH and good buffering capacity
  • high cation exchange capacity (CEC)
  • sterile
  • contains some magnesium and potassium
Perlite
  • greatly improves aeration
  • neutral pH but no buffering capacity
  • no CEC
  • no nutrients
  • sterile
Compost
  • good source of plant nutrients
  • good moisture holding capacity
  • high CEC
  • becomes waterlogged easily
Compost for a potting soil should be the best compost. It must be mature, with a proper C:N ratio, be low in salts that would interfere with seed germination and be porous. An optimum analysis for compost, which can be obtained by sending samples to the University of Maine Soils Lab, should be:
pH: 6-6.5
salt: 1-3 mmhos
C:N: 15-25:1
bulk density: 10-30 lb/ft3
NO3 – (nitrate nitrogen): > 500 ppm
NH4 + (ammonium nitrogen): < 100 ppm
Here are some recipes. I suggest that you try your own based on these and the information above, and try it before you do any large plantings. The advantage of commercial mixes is that they are consistent, and the disadvantage of homemade mixes is that they often are not dependably consistent.

Recipe #1​

5 gal. compost
5 gal. black peat
5 gal. brown peat
5 gal. perlite
1 cup blood meal
1 cup greensand
1 cup rock phosphate

Recipe #2​

5 gal. garden topsoil
5 gal. compost
2 gal. brown peat
2 gal. vermiculite
2 cups bone meal
1/2 cup perlite
1 cup blood meal

Recipe #3​

5 gal. brown peat
5 gal. black peat
5 gal. compost
5 gal. sand
1 cup greensand
1 cup colloidal phosphate
1 to 2 cups crab meal

Recipe #4​

5 gal. black peat
5 gal. brown peat
1.5 gal. sand
1/2 cup lime
1 cup blood meal
1 cup rock phosphate
1 cup greensand
1.5 gal. garden soil

NOTE: All of these mixes have concentrated sources of nitrogen, e.g., blood meal or crab meal. You can substitute alfalfa meal (not pellets which mold) or soy bean meal. You can also make any of these mixes without that and provide the needed nitrogen in periodic watering with compost tea or fish emulsion.
1. When using blood meal be aware that when it first gets wet and starts to decompose, it gives off ammonia that can kill plant roots. I suggest that you wet the potting soil about a week before you plant into it and make sure it stays aerated during that week.
2. When using topsoil you may want to “sterilize” it because of potential plant pathogens. This can be done on a small scale in your home oven. Bake it at 350oF for 45 minutes or until the soil is about 180o F for 30 minutes. This should kill the pathogens and yet leave enough of the soil microbes alive.
3. Black peat is a more humified peat that is sometime referred to as peat humus. It is not often found in commercial markets, but if you look for the darkest peat with short stems it will do fine. True black peat cannot be used alone because it becomes slimy and muddy when wet. I have heard from one grower who when it became impossible to find the black peat that they just dropped it from the mix and increased the amount of compost a bit.
 

acespicoli

Well-known member

Best Potting Mix Recipes
for Container Vegetable Gardening​

Can you use potting mix for vegetables? What about Miracle-Gro? As I've previously addressed, potting mix is not the same as soil. Does that mean potting mix is unnatural or somehow bad for garden vegetables? Do you need organic potting mix for vegetables? What's the best potting mix for indoor plants?

A well structured potting mix will be relatively light and friable. It will have good drainage, allowing for proper aeration of plant roots. But it also holds water, preventing plants from drying out on hot summer days. It should also be stable, maintaining a healthy growing structure all season, or even into subsequent seasons.


Video: Best Homemade Seed Starting Potting Mix
Test / Review - Miracle-Gro, Espoma, Organic DIY​

Stop overpaying for seed starting mixes! Learn how to make a DIY seed starting mix that's better than retail.

How to Make the Best Potting Mix​

What's the best potting mix for indoor plants?​

If you're trying to figure what special sauce is needed for making the "best" potting mix, then I have a little secret for you: There isn't one. There are countless recipes for potting mixes. Many of them can work quite well. But there is no single "best." In fact some mixes might be so specialized that they'll work rather well for some kind of plants while performing very poorly with others.

Fortunately, it's not hard to create a simple well-rounded potting mix that's flexible enough to grow just about any vegetable in your garden. When looking at a "potting" mix you are looking at a variety of components that each have their own unique physical characteristics. Water retention, drainage, pore spacing, wicking capability, resistance to decomposition. These are all things that must be considered.

Plants growing in a container have very limited access to moisture. Often their root systems span only a few inches of area. Add to this the extreme temperature fluctuations that occur in above ground containers and you have a recipe for water stress!

To keep up, the potting mix medium needs to provide consistent moisture. Additives like peat moss or vermiculite retain lots of water, ensuring your plant stays hydrated. Thus, they have been used by the horticultural industry with great success for decades. But they may be prone to compaction or lack good pore spacing.

Pores or small air gaps in a potting mix allow a plant's root to access oxygen which the plant needs during respiration. So wood bark or perlite are commonly included to provide the needed aeration. These physical characteristics must be balanced out before going to the next step of pH adjustment and fertilization.

The Larger Particle Size of Potting Mix Make It More Porous Than Silty Top Soils Which Increases Aeration

The larger particle size of potting mix increase aeration allowing for healthier plant roots during wet conditions.

Structural Attributes of Potting Mix​

Potting mix (and in-ground soil) components can be grouped into 3 basic categories:
1) Inorganic Matter (silicates)
2) Organic Matter (humus)
3) Organic Matter (decaying)

INORGANIC (NON-CARBON BASED) MATTER is not prone to bacterial breakdown and decomposition. Particle size could range from small (sand / perlite) to much larger particles (pumice / expanded clay / growstones). Inclusion of inorganics may provide a source of trace minerals. But most often, inorganic components are selected for their physical properties. They may prevent compaction, improve drainage, improve aeration and even help to retain nutrients.

HUMIC ORGANIC (CARBON-BASED) MATTER has already gone through its initial stages of degradation. The remaining material has reached a point of relative stability. Humus often provides the bulk of potting mixes. It does not lose volume as fast as decaying matter. And since it is stable, it does not tie up nitrogen, causing nitrogen draft.

DECAYING ORGANIC MATTER is the primary source of nutrients in conventional, in-ground soil. Examples include kitchen scraps, grass clippings and leaves. From such matter we get, traditional compost and vermi-compost (from worms). Composts could be incorporated into a container. However, the required volume will alter the structure of your potting mix. Attention should be given to the effects on drainage, aeration and water retention. Many container gardeners avoid using compost in pots. If you are wanting to include it, vermi-compost is the best candidate and has been shown to work well.

In contrast, organic fertilizers are more potent than compost and can be more easily included in a container mix. Examples include: dried blood, bone meal, kelp, fish emulsion and guano. These require a smaller amount and will not significantly impact the physical characteristics of your mix.


Organic Matter (humus):​

Peat Moss
Coir
PEAT MOSS [ SPHAGNUM ] - biodegradable, mechanically harvested from wetlands. Water retaining additive for soil or potting mix. It is derived from peat formed by decomposed sphagnum moss. The top layer of living sphagnum moss is removed. The underlying sphagnum peat, which is dead material, is then harvested. Colors will progress from light to dark to black as it decomposes. It is acidic with a pH 3.5 to 4, but may be balanced with limestone before being sold to the customer. Repels water if allowed to dry out. Too much peat moss can lead to soil compaction.

COIR [ COCO ] - biodegradable, industry by-product. Water retaining additive for soil or potting mix. Derived from coconut fibers, it resembles peat moss but is more granular and void of twigs or sticks. The pH ranges from 5.5 to 6.8, with higher potassium, sodium, and chlorine levels. Coir does not break down as quickly peat, but may be more expensive, depending on where you live. It has greater water retention and doesn't repel water like peat can. When fertilizing you may need to use less potassium and more nitrogen. Also, purchase only low-salt coir products to minimize risk of salt damage.

COMPOSTED PINE BARK - biodegradable, industry by-product. Additive for soil or potting mix. Pine bark can increase drainage and improve aeration by increasing air space. Composted pine bark is slightly acidic with a pH often ranging from 5.0 to 6.5. Being partly composted, it has already begun to break down and stabilize. Pine bark is a good choice due to its high lignin content. Lignin takes longer to decompose. In contrast, the inner wood of a tree contains higher levels of cellulose, which breaks down quickly and depletes nitrogen in the process. You may still need extra nitrogen supplementation with pine bark, but it is a viable additive for mixes. It can be very cost effective too, depending on local availability. Use only dark, shredded bark, free of dyes. I recommend pine, 1/8" to 1/2" pieces.

Inorganic Matter (silicates):​

Perlite
Vermiculite
PERLITE - non-degradable, mined volcanic glass (SiO2) which is super heated and expanded. Perlite is a very common additive for soil or potting mix to enhance drainage & aeration. Used more often with containers, perlite is produced from volcanic rock that is heated and expanded into a hard, lightweight, white material. It is sterile and pH-neutral. Adding perlite results in tiny air tunnels for water and air to flow freely to plant roots. It is much lighter than sand and the preferred solution for drainage in container gardening. Perlite can hold from three to four times its weight in water without getting soggy.

VERMICULITE -non-degradable, mined aluminum-iron magnesium silicate. Added to soil or potting mix because of its water retaining properties (220 to 325% by weight). The pH is basically neutral (7.0) but it contains carbonate compounds, which can result in alkaline characteristics. So a typical pH in water can range from 6 to 9. Particles are flaky & can break into smaller pieces if the soil is mixed too much or handled roughly, leading to compaction. Mel's Mix is a common raised bed formulation which uses 1/3 vermiculite.

SAND -non-degradable, available as feldspathic sand or silica sand. Sand is not commonly used in retail potting mixes. Although some DIY mixes might call for sand in their recipe, sand does not perform as well as perlite when it comes to aeration and moisture retention. Particle size will make a difference. Regardless though, sand is much heavier, and will greatly increase the weight of your container. This is useful for top heavy plantings that are prone to being knocked over in strong winds. Rather than resorting to sand, I simply select larger containers that have a wider more stable base.

Sample Potting Mix Recipe Ideas​

DIY Potting Mix Recipe for Seed Starting Vegetables

My organic DIY potting mix recipe for vegetables outperformed Miracle-Gro seed starting mix.

Seed Starting Potting Mix Recipes for Seedlings​

  • High Absorption Seed Starting Mix:
  • 1 part Perlite
  • 4 parts Vermiculite
  • 15 parts Coir / Coco
NOTES: A simple effective potting mix recipe is to use 75% Peat Moss + 20% Vermiculite + 5% Perlite. It is easy to rehydrate in the event that it completely dries out. This mix is especially good for a sterile potting mix that will be used indoors. This infertile mix requires you to also add fertilizers. Otherwise, you can water with a liquid fertilizer once seeds have germinated.

  • High Aeration Seed Starting Mix:
  • 1 part Perlite
  • 1 part Vermiculite
  • 1 part Peat Moss
NOTES: This recipe is perfect for starting seeds indoors, as it provides a light, fluffy medium that allows for good drainage and aeration. This mix also requires you to also add fertilizers or water with a liquid fertilizer after seed germination.

  • Compost-based Seed Starting Mix:
  • 1 part Perlite
  • 1 part Vermiculite
  • 1 part Screened Compost
NOTES: This recipe is great for starting seedlings as the compost provides natural nutrients that can help give seedlings a healthy start. However because composts can vary greatly from batch to batch, there may be some variability in your results. Also, this mix is not sterile. It may contain weed seeds or even pathogens.
To ensure that the potting mix is sterile so that no diseases or pests are introduce, you can sterilize your potting mix. To sterilize the mix, heat screen compost in an oven at 180°F (82°C) for 30 minutes or until it reaches an internal temperature of 160°F (71°C). This is only needed for seed starting mixes and only works in relatively small batches. Be aware that it might stink up your kitchen!

DIY Potting Mix Recipes for Container Gardening​

  • Mel's Mix:
  • 1 part Peat Moss
  • 1 part Vermiculite
  • 1 part Compost
NOTES: Surprisingly, I've tested Mel's Mix outdoors in a self-watering 5 gallon bucket planter and had good results. To make Mel's Mix you simply need 33% Peat Moss + 33% Vermiculite + 33% Compost. Because this contains compost, you will not need to add any fertilizers or additional nutrients. Be careful with compost though. I used a screen homemade compost that had a significant amount of woody products.

  • Vermicompost-based Potting Mix:
  • 2 parts Vermicompost
  • 1 part Perlite or Vermiculite
  • 1 part Coconut Coir or Peat Moss
  • 1/2 cup Dolomite Lime per 5 gallons of mix
NOTES: Vermicompost is a nutrient-rich organic fertilizer made from worm castings, and it can help provide essential nutrients to your plants. This recipe is suitable for a wide range of plants. The specific ratios of each ingredient may vary depending on the needs of the plants being grown and the specific conditions in which they will be grown

  • Peat-based Mix:
  • 70-80% Peat Moss
  • 10-20% Perlite
  • 10% Vermiculite
NOTES: This soilless potting mix recipe is commonly used for a wide range of plants and is suitable for both indoor and outdoor gardening. You can add either an organic or a slow-release fertilizer, to help ensure optimal growth and plant health through the growing season.

Potting Mix Recipes for Professional Nursery Plants​

  • Bark-based Mix:
  • 50-70% Pine or Fir Bark
  • 20-30% Peat Moss
  • 10-20% Perlite
NOTES: Tree barks can make excellent substrate in potting mixes. They are also a good way to cut down on costs. The specific ratios of each ingredient may vary depending on the needs of the plants being grown and the specific conditions in which they will be grown. In addition to adding a slow-release fertilizer, some plants may benefit from the addition of dolomitic lime for pH adjustment.

  • Bark & Sand Potting Mix:
  • 2 parts Pine Bark Fines
  • 1 part Coarse Sand
  • 1 part Vermiculite
  • 1/2 cup Dolomite Lime per 5 gallons of mix
NOTES: By adding sand to this potting mix, the containers are extra heavy. This is useful for taller plants which can become top heavy and might easily blow over during wind storms. Add a slow-release fertilizer to nourish plants.

  • Coir-based Mix:
  • 80-90% Coir
  • 10-20% Perlite
NOTES: This is a very simple two ingredient potting mix. It's important to source coir that has been properly flushed of salts. In addition to fertilizer, some growers will also buffer the coir by soaking it in a solution of Cal-Mag.

The Best Soil For Growing Food in Containers​

Can You Use Potting Mix for Vegetables?​

Many growers might understand that they need a good potting mix for growing indoor plants. They may even understand that potting mix works best for outdoor container gardening. But "gardening" might simply mean making nice floral and ornamental plant arrangements. It doesn't necessarily mean growing plants you intend to eat.

Can you use potting mix for vegetables grown for food? Yes! Absolutely. This is especially imperative for vegetables grown in a container garden. The components used in a quality potting mix can yield much better results than simply using native soil. Some people are amazed when they first discover how large and healthy their vegetable plants can get in just a basic pot filled with fertile potting mix.

Pepper & Watermelon Plants Grown in Potting Mix in SIP Raised Bed

All of my wicking beds are filled with potting mix which supports large productive harvests!
If you select a large enough container, you can enjoy a bountiful harvest of vegetables all season long. The improved drainage characteristics will keep your plants healthy even during extended periods of rainfall. But during droughts, your potting mix can also hold enough water to keep your plants hydrated. Of course, a self-watering reservoir can help even further to ensure water doesn't run out.

Is Potting Mix Bad for Plants You Will Eat?​

Some people have the mistaken idea that potting mix is somehow "bad" for plants that will be eaten. Cautious gardeners think seriously about plants grown for food production. Nobody wants to eat something that will be harmful in some way. Are vegetables grown in potting mix ok to eat?

Generally speaking, yes they are. In fact, vegetables grown in containers filled with potting mix may even be SAFER than ones grown in the ground. In many urban areas, residents have concerns over toxic contaminants in their soil, especially heavy metals like lead. Container gardening with potting mix allows a gardener to import uncontaminated growing medium which is safely isolated from the native soil.

I don't want to breed paranoia here. But the idea is that potting mixes are not inherently bad or unsafe. They are typically comprised of safe components that are not toxic or contaminated. It's common to see things like peat moss, coir, perlite and composted forest products. You can even look up the retail bags that you intend to purchase to ensure they've been tested for low levels of heavy metals.

What Company Owns Miracle-Gro?​

IS MIRACLE-GRO OWNED BY MONSANTO? The first thing you need to know about Miracle-Gro, is that it is NOT Monsanto. Lots of gardeners (and the public in general) strongly oppose Monsanto and everything the company stood for. Although Monsanto was purchased by Bayer in 2018, people still throw around the word Monsanto like it's a derogatory term. That's all well and good, but what does this have to do with Miracle-Gro? Nothing. Monsanto does not own Miracle-Gro. The Miracle-Gro brand is owned by ScottsMiracle-Gro.

The primary link between ScottsMiracle-Gro and Monsanto deals with Roundup, a non-selective herbicide sold to consumers. Monsanto had owned the rights to glyphosate (the active ingredient in Roundup) and ScottsMiracle-Gro was licensed to market and distribute that product. Many gardeners have bitter disdain for Monsanto and they don't support the use of Roundup. I share those sentiments. If this applies to you, then you can avoid buying Roundup or any other herbicides.

SHOULD YOU BOYCOTT MIRACLE-GRO? Just because ScottsMiracle-Gro sells Roundup, does that mean you should avoid the entire company and everything it sells? You may choose to do so. But what are you truly accomplishing? And do you also boycott any brick and mortar stores that sell Roundup? I can find the product on store shelves at Ace Hardware, Lowes and Home Depot. Should I blacklist those stores for the greater good? The choice is yours, but don't feel compelled to push your views on others out of some misplaced safety concerns.

Is Miracle-Gro Potting Mix OK for Vegetables?​

As discussed already, Miracle-Gro is simply a brand. It's not a single product. Even within the scope of potting mixes, there is the normal Miracle-Gro potting mix and also the Moisture Control version. These mixes may vary slightly depending on the region where they were produced and sold. Those common mix formulations are not organic. That being said, there's no real reason to avoid growing your food in them, if you want to use them.

HEAVY METALS: Take, for example, concerns over heavy metal contamination. Some overzealous gardeners turn their noses up at the entire Miracle-Gro product line. They use fear mongering to imply that the potting mix is full of industrial chemicals and is unsafe. But you can look up the chemical analysis for yourself. The Miracle-Gro Moisture Control Potting Mix (0698-0052) has been shown to contain 21 ppm of lead. Is that good? Is it bad? Well according to the University of Maryland Extension when "gardening in soil with total lead levels 50 ppm to 400 ppm," "all vegetable and fruit crops can be safely grown." The MG potting mix is at a mere 5% of that upper threshold. So certainly from the lead perspective it's quite safe!

IS MIRACLE-GRO INCOMPATIBLE WITH ORGANIC GARDENING? It's true that many Miracle-Gro products do not conform to organic standards due to the use of synthetic fertilizers. However the Miracle-Gro product line also includes ORGANIC products. You can even find a list of many Miracle-Gro products which are OMRI listed and formally approved for organic gardening. This means there are viable product options for staunch organic gardeners.

Large Healthy Pepper Plants Grown in Miracle-Gro Potting Mix

These healthy pepper plants were extremely productive with the help of some Miracle-Gro potting mix.

Do You Need Organic Potting Mix for Vegetables?​

Although home gardeners are rightly wary of heavy metals and other toxic contaminants in their soil, many go even further. It's common to see plenty of opposition against synthetic fertilizers. Such nutrient inputs may be referred to as "chemical" fertilizers as a way of disparaging them. Some gardeners insist that you need to go "organic" for any plants that you intend to eat.

Organic agriculture has plenty of benefits. I strongly support it from the perspective of using less pesticides or herbicides. Certainly those are chemicals that we don't need to be consuming as humans. But from a nutrients standpoint, synthetic fertilizers are not inherently bad or toxic in some way. This is best exemplified by the decades of research into hydroponic and aeroponic gardening. Most often, those production systems allow you to safely grow vegetables without any soil what-so-ever.

Hydroponic Lettuce Grown with Synthetic Nutrient Solution

Hydroponic lettuce grown in synthetic nutrient solution tastes delicious & is healthy to eat.
Really, the decision to use an organic potting mix is a matter or personal preference. You shouldn't need to worry about heavy metal or toxic contaminants. Pesticides and herbicide usage is not a concern. It's primarily a matter of what source of nutrients you prefer.

The majority of my nutrient inputs are organic. But I don't have some morbid fear that a synthetic fertilizer will pollute my vegetable crops. Interestingly, even Miracle-Gro offers an organic version of their potting mix targeted specifically at home gardeners who are trying to be purists. I think the stuff is over-priced. But it's certainly an option if you're looking for an "organic" retail potting mix.

More importantly, be sure you are using some sort of a potting mix in your containers. It doesn't have to be organic. But if you want your vegetables and other plants to grow strong and healthy, then they need some sort of potting mix. Don't use a top soil, bagged manure or anything that gets soupy when mixed with water. The larger particle sizes of a potting mix will go a long way in promoting plant health
 

acespicoli

Well-known member
Recipes for Growing Media
These recipes come from a variety of sources and present a wide range of options for working with organically acceptable materials. Because the sources are diverse, units of measurement are also different. When the origin of a recipe is known, or further details and recommendations are known, they have been provided. Note that several recipes are intended for use with Ladbrooke "soil blockers." Soil blockers are hand tools designed to form free-standing blocks of potting soil, which serve as a substitute for peat pots, seedling flats, etc. The system has been popular among small-scale producers. One source of soil blockers is:
Peaceful Valley Farm Supply
P.O. Box 2209
Grass Valley, CA 95945
(530) 272-4769.
The first recipe shown is a classic soil-based formula; the second is a soilless recipe based on the Cornell Mix concept.
Classic soil-based mix
  • 1/3 mature compost or leaf mold, screened
  • 1/3 garden topsoil
  • 1/3 sharp sand
Note: This mix is heavier than modern peat mixes, but still has good drainage. Compost promotes a healthy soil mix that can reduce root diseases. Vermiculite or perlite can be used instead of sand. Organic fertilizer can be added to this base.
Organic substitute for Cornell Mix
  • 1/2 cubic yard sphagnum peat
  • 1/2 cubic yard vermiculite
  • 10 pounds bone meal
  • 5 pounds ground limestone
  • 5 pounds blood meal
The following four recipes were found in the MarchApril 1989 issue of the Ozark Organic Growers Association Newsletter. The formulas are credited to the Farm and Garden Project at the University of California, Santa Cruz.
Seedling mix for Styrofoam seedling flats
  • 2 parts compost
  • 2 parts peat moss
  • 1 part vermiculite, pre-wet
Sowing mix
  • 5 parts compost
  • 4 parts soil
  • 1 to 2 parts sand
  • 1 to 2 parts leaf mold, if available
  • 1 part peat moss, pre-wet and sifted.
Note: All ingredients are sifted through a 1/4-inch screen. For every shovelful of peat, add two tablespoons of lime to offset the acidity.
Prick-out mix for growing seedlings to transplant size
  • 6 parts compost
  • 3 parts soil
  • 1 to 2 parts sand
  • 1 to 2 parts aged manure
  • 1 part peat moss, pre-wet and sifted
  • 1 to 2 parts leaf mold, if available
  • 1 6-inch pot bone meal
Special potting mix
  • 1 wheelbarrow-load sifted soil
  • 1 wheelbarrow-load aged manure
  • 1 wheelbarrow-load sifted old flat mix
  • 5 shovelfuls sifted peat
  • 2 4-inch pots bone meal
  • 2 4-inch pots trace mineral powder
  • 2 4-inch pots blood meal
The following recipes are taken from John Jeavons's How to Grow More Vegetables, Ten Speed Press, Berkeley, CA.
Classic planting mix
One part each by weight:
  • compost (sifted, if possible)
  • sharp sand
  • turf loam (made by composting sections of turf grass grown in good soil)
Note: the mixture should be placed in growing flats on top of a 1/8-inch layer of oak leaf mold to provide drainage. Crushed eggshells should be placed between the leaf mold and compost for calcium-loving plants like cabbages and carnations.
Simple soil flat mix
Equal parts by volume:
  • compost
  • bed soil (saved from a biointensive production bed during double-digging process)
The next three formulas are credited to the 1992 NOFA-NY Organic Farm Certification Standards.
Classic formula for horticultural potting mix
  • 1/3 mature compost or leaf mold, sieved
  • 1/3 fine garden loam
  • 1/3 coarse sand (builder's sand)
Sterile peat-lite mix
  • 1/2 cubic yards shredded sphagnum peat moss
  • 1/2 cubic yards horticultural vermiculite
  • 5 pounds dried blood (12% N)
  • 10 pounds steamed bone meal
  • 5 pounds ground limestone
Recipe for soil blocks
  • 20 quarts black peat with 1/2 cup lime
  • 20 quarts sand or calcined clay
  • 20 quarts regular peat with 1 cup of greensand, 1 cup of colloidal phosphate, and 1 cup blood meal
  • 10 quarts soil
  • 10 quarts compost
Note: all bulk ingredients should be sifted through a 1/2-inch screen.
The following four recipes are credited to Eliot Coleman. The first was published in the Winter 1994 issue of NOFA-NJ Organic News, in an article by Emily Brown-Rosen. The remaining three are adapted from Coleman's book The New Organic Grower (see Appendix 2).
Organic potting mix
  • 1 part sphagnum peat
  • 1 part peat humus (short fiber)
  • 1 part compost
  • 1 part sharp sand (builder's)
To every 80 quarts of this add:
  • 1 cup greensand
  • 1 cup colloidal phosphate
  • 1 1/2 to 2 cups crab meal, or blood meal
  • 1/2 cup lime
Blocking mix recipe
  • 3 buckets (standard 10-quart bucket) brown peat
  • 1/2 cup lime (mix well)
  • 2 buckets coarse sand or perlite
  • 3 cups base fertilizer (blood meal, colloidal phosphate, and greensand mixed together in equal parts)
  • 1 bucket soil
  • 2 buckets compost
Mix all ingredients together thoroughly. Coleman does not sterilize potting soils; he believes that damp-off and similar seedling problems are the result of overwatering, lack of air movement, not enough sun, over-fertilization, and other cultural mistakes.
Blocking mix recipe for larger quantities
  • 30 units brown peat
  • 1/8 unit lime
  • 20 units coarse sand or perlite
  • 3/4 unit base fertilizer (blood meal, colloidal phosphate, and greensand mixed together in equal parts)
  • 10 units soil
  • 20 units compost
Mini-block recipe
  • 16 parts brown peat
  • 1/4 part colloidal phosphate
  • 1/4 part greensand
  • 4 parts compost (well decomposed)
Note: If greensand is unavailable, leave it out. Do not substitute a dried seaweed product in this mix.
The next recipe and details come from John Greenier, of Stoughton, Wisconsin. They were published in the January 1996 issue of Growing for Market.
Seedling mix for soil blocks or seedling flats
  • 2 3-gallon. buckets sphagnum peat moss
  • 1/4 cup lime
  • 1 1/2 cups fertility mix
  • 2 cups colloidal (rock) phosphate
  • 2 cups greensand
  • 2 cups blood meal
  • 1/2 cup bone meal
  • 1/4 cup kelp meal
  • 1 1/2 buckets vermiculite
  • 1 1/2 buckets compost
Directions for mixing:
  1. Add peat to cement mixer or mixing barrel.
  2. Spread the lime and fertility mix over the peat.
  3. Mix these ingredients thoroughly.
  4. Add the compost and vermiculite and mix well again. When done, examine the distribution of vermiculite to ensure that it has been mixed in evenly.
Note that all bulk ingredients should be screened through 1/4-inch hardware cloth. Well matured, manure-based compost should be used (avoid poultry manure and wood-chip bedding).
The next two recipes were published in the September 1990 issue of Greenhouse Manager in an article entitled "Recipes for Success in Media Mixes," by Kathy Z. Peppler.
Growing mix for packs
  • 40% topsoil
  • 40% Canadian-type Michigan peat
  • 20% perlite
  • 5 pounds lime per cubic yard
  • 3 pounds dolomitic lime per cubic yard
Note: The topsoil and peat are sterilized early in the fall, then brought indoors to be blended with the other ingredients and stored inside.
Growing mixes for pots and baskets
  • 30% topsoil
  • 60% peat
  • 10% perlite
  • 5 pounds lime per cubic yard
  • 3 pounds dolomitic lime per cubic yard
Note: The handling of this pot mix is the same as for pack mix.
The following recipes and instructions are from a workshop entitled "Getting Started in Organic Market Gardening," which was offered as part of the March 2001 "Organic University" program sponsored by Midwest Organic and Sustainable Education Services (MOSES) in conjunction with its Upper Midwest Organic Conference. The first is credited to Tricia Bross Luna Circle Farm, Gays Mills, WI; the second is credited to Steve Pincus, Tipi Produce, Madison, WI.
Luna Circle recipe
  • 2 buckets black peat (1 bucket = 8 quarts)
  • 1/2 bucket compost
  • Fertility mixture:
    • 1 cup greensand
    • 1 cup rock phosphate
    • 1 cup kelp meal
    • 2 buckets sphagnum peat moss
    • 1 bucket sand
    • 1 bucket vermiculite
Directions for mixing:
  • Screen the peat and the compost and combine with the fertility mix.
  • Mix well.
  • Add the sphagnum, sand, and vermiculite.
  • Mix well again.
Tipi Produce recipe
  • 2 bales sphagnum peat moss (3.8 or 4.0 cubic foot bales)
  • 1 bag coarse vermiculite (4.0 cubic foot bags)
  • 1 bag coarse perlite (4.0 cubic foot bags)
  • 6 quarts of a fertilizing mixture comprised of:
    • 15 parts steamed bone meal
    • 10 parts kelp meal
    • 10 parts blood meal
    • 5 to 10 parts dolomitic limestone (80 to 90 mesh)
Note: This mix works well in small and medium plug trays and 1020 flats for growing lettuce, onions, leeks, peppers, tomatoes, melons, squash, cucumbers, and many flowers. When repotting small plugs into larger cells, add about 1/3 by volume of old leaf mold or compost and more fertilizing mixture. Continue to fertilize twice per week with soluble fish and seaweed fertilizer.
The following three recipes are adapted from a subchapter entitled "Using compost for container crops and potting mixes" in On-Farm Composting Handbook, by Robert Rynk, (ed.). 1992. PublicationNRAES-54. Northeast Regional AgriculturalEngineering Service, Cornell Cooperative Extension,Ithaca, NY. 186 p.
Vegetable transplant recipe
Equal parts by volume of:
  • compost
  • peat moss
  • perlite or vermiculite
Bedding plant recipe
  • 25% compost
  • 50% peat moss
  • 25% perlite or vermiculite
Container mix for herbaceous and woody ornamentals
Equal parts by volume of:
  • compost
  • coarse sand
  • peat moss or milled pine bark
The following two simple recipes came from Mark Feedman, a practitioner of the Biodynamic-French Intensive system. The first mix was used with great success while doing development work in the Dominican Republic; the second is an adaptation used later in New Mexico.
Dominican Republic mix
Equal parts:
  • fine loam soil
  • sharp horticultural sand
  • well-finished leaf mold
New Mexico mix
  • 2 parts well-finished compost
  • 2 parts good topsoil
  • 1 part leaf mold
The remaining recipes in this appendix are of uncertain origin, but were published in earlier versions of ATTRA's Organic Potting Mixes.
Recipe #1
  • 50 to 75% sphagnum peat moss
  • 25 to 50% vermiculite
  • 5 pounds ground limestone per cubic yard of mix
Recipe #2
  • 6 gallons sphagnum peat moss
  • 1/4 cup lime
  • 4 1/2 gallons vermiculite
  • 4 1/2 gallons compost
  • 1 1/2 cups fertility mix made of:
  • 2 cups colloidal (rock) phosphate
  • 2 cups greensand
  • 1/2 cup bone meal
  • 1/4 cup kelp meal
Recipe #3
  • 10 gallons sifted two-year-old leaf mold
  • 10 gallons sifted compost
  • 5 to 10 gallons sphagnum peat moss
  • 5 gallons perlite
  • 5 gallons coarse river sand
  • 2 cups blood meal
  • 6 cups bone meal
Recipe #4
  • 40 quarts sphagnum peat moss
  • 20 quarts sharp sand
  • 10 quarts topsoil
  • 10 quarts mature compost
  • 4 ounces ground limestone
  • 8 ounces blood meal (contains 10% nitrogen)
  • 8 ounces rock phosphate (contains 3% phosphorus)
  • 8 ounces wood ashes (contains 10% potassium)
Recipe #5
  • 9 quarts compost
  • 1 cup greensand
  • 3 quarts garden soil
  • 1/2 cup blood meal
  • 3 quarts sharp sand
  • 1/2 cup bone meal
  • 3 quarts vermiculite
Recipe #6
  • 1 part peat
  • 1 part bone meal
  • 1 part perlite
  • 1 part compost (or leaf mold)
  • 1 part worm castings (optional)
Recipe #7
  • 2 parts vermiculite
  • 3 parts peat
  • 2 parts perlite
  • 2 parts cow manure
  • 3 parts topsoil
  • 1/2 part bone meal
Recipe #8
  • 15 quarts screened black peat
  • 15 quarts brown peat
  • 17 quarts coarse sand
  • 14 quarts screened leaf compost
  • 3 ounces pulverized limestone
  • 9 ounces greensand
  • 3/4 cup dried blood
  • 3 ounces alfalfa meal
  • 3 ounces colloidal phosphate
  • 9 ounces pulverized bone meal
Recipe #9
  • 10 pounds compost
  • 30 pounds sphagnum peat moss
  • 60 pounds white sand
  • 8 pounds calcium carbonate
  • 4 pounds soft rock phosphate
  • 2 pounds sawdust
Recipe #10
  • 70 pounds white sand
  • 25 pounds sphagnum peat moss
  • 5 pounds chicken manure
  • 8 pounds calcium carbonate
  • 4 pounds soft rock phosphate
NCAT would like to acknowledge OMRI staff members Cindy Douglas, Brian Baker, and Emily Brown-Rosen for their assistance in reviewing the original draft of this publication.
By Georrge Kuepper
NCAT Agriculture Specialist
and Kevin Everett, Program Intern
September 2004 ©NCAT
Reviewed October 2010
Paul Williams, Editor
IP112
Slot #61
Version 102810
 

acespicoli

Well-known member

Potting Media and Plant Propagation​


This article outlines basic recipes for potting media and research on organic transplant production.
Download Save for later Print Purchase
  • Share

Updated:
August 28, 2012

Skip to the end of the images gallery

Potting Media and Plant Propagation


Skip to the beginning of the images gallery


Potting mixes should support developing seedlings. Most potting mixes are soilless to avoid soilborne diseases and promote good drainage. A mix of peat moss, vermiculite or perlite, and compost or organic fertilizers can provide a suitable environment with sufficient water-holding capacity, nutrient content, and aeration for plant growth and development. However, because organic nutrients are supplied slowly over time, meeting seedling nutrient needs can be difficult.

Commercial Mixes​

Numerous commercial mixes are available for organic growers. Make sure you know what the ingredients are in a commercial mix and check to see if it is listed by the Organic Materials Review Institute (OMRI). It should state "OMRI listed" on the packaging. If not, check the OMRI website to see if it is listed. It is always best to call your certifier to ensure that using the mix will not compromise your certification. Many commercial mixes contain wetting agents to facilitate water absorption by peat moss. Synthetic wetting agents are not allowed under organic production standards.
Depending on the certifier, a producer can also request that the certifier review a specific product/ media. OMRI has not reviewed all products. For example, Pennsylvania Certified Organic (PCO) has an internal materials review and publishes a list of materials that they have reviewed and approved. Members of PCO can request a review of any product free of charge. To prevent delays in your certification, be sure to have material input preapproved by a certifier.

Test Your Mix Before You Use It​

If you are unfamiliar with your mix or have received a new batch, perform a greenhouse soil test. Mixes made with compost can be high in salts, which can inhibit germination. To test your mix, send it to a reputable lab for greenhouse testing. Remember, this is different from a soil test. For example, Penn State's Ag Analytical Services Lab has a "Greenhouse Soilless Media" test that will analyze your media's pH, soluble salt (electrical conductivity), and nutrient content. Media sent in as a soil sample is tested differently and results will not make sense.
Premium potting mixes tested with the saturated paste method recommended for greenhouse media will have a pH between 5.5 and 6.5, soluble salts between 1.5 and 3 mmhos/cm, nitrate nitrogen (NO3) levels between 75 and 150 mg/L, phosphorus (P) levels between 5 and 20 mg/L, potassium (K) between 150 and 300 mg/L, calcium between 100 and 200 mg/L, and magnesium between 50 and 100 mg/L, with sodium contents falling below 160 mg/L (Warncke 1995).
Consider pretesting your potting mix by doing your own greenhouse bioassay. To do a bioassay, grow cress, oats, beans, lettuce, or another fast-growing crop with a high germination rate in your soil mix. If there is a problem with the mix, you will see it in reduced germination or poor seedling growth (see sidebar). You may also compare your new mix to a mix that you are satisfied with.
Recently, handheld EC (electrical conductivity) meters have become more popular and available at reasonable prices. See Saline Soils and Plant Growth (Sanchez 2010) for more information on how to test for salts using an EC meter.

How to Avoid the Effects of High Salt Levels or Herbicide Residue Steps​

  1. Fill a flat with potting mix.
  2. Count out 25 seeds of cress, lettuce, or other fast-germinating crop.
  3. Seed flat.
  4. Wait 5-7 days.
  5. Count number of seedlings. If less than the legal germination rate (for lettuce, 80 percent), you may want to test your media for salts.
Lettuce seeded - different potting mixes
Lettuce seeded in potting mix with high salts (right) exhibited slowed and reduced germination rates.

Making Your Own Mix​

Even when making your own potting media, it is still important to ensure that the individual components of the media are specifically approved for certified organic production (see sidebar, next page). If you are purchasing compost to add to your homemade potting mix, most certifiers will require this compost to be reviewed (e.g., PCO requires an ingredient list from the source and a compost log in cases when the raw manure restriction is applicable). Fertility amendments, peat, coir, and other components must also be approved. Check for the OMRI label and talk with your certifier.
When you first start making your own potting mix, it's a good idea to try several different recipes that have worked for other growers and compare how they do on your own farm. A list of common potting mix recipes is provided at the end of this fact sheet.
Many organic potting mixes contain compost, which can provide many benefits. Compost adds organic matter to the mix and supports diverse microbial populations that can suppress soilborne-disease causing organisms (Klein and Hammer 2006). Microbes break down organic material, releasing plant-available nutrients that are slowly available for your seedlings.
However, growers have increasingly reported problems with compost-based mixes. This may be because they rely on microbial release of nutrients, which may occur too slowly to meet plant needs.
A recent study compared 20 organic potting mixes (Leonard and Rangarajan 2007). They found that transplants grown in potting mixes that contained blood meal or alfalfa meal in addition to compost were significantly larger. This was probably in response to ammonium nitrogen (N) levels two to three times higher than that of mixes without either compost or blood meal amendments. It may be a good idea to use a mix with a more readily available N form, like blood meal or feather meal, in addition to compost. Blood meal seems to stimulate microbes and increase nutrient availability from compost.
If you use compost, make sure you are using high-quality compost at the right stage of maturity. Unfinished compost may release volatile organic acids that can negatively affect seedling growth and development (Grubinger 1999). One classic method of evaluating compost readiness is by smell. Finished compost has a sweet smell. Anaerobic, sour, or putrid smells are suspicious. If your nose detects an off smell, turn the pile and let it heat again before you consider using it in a mix (Klein and Hammer 2006).
Problems with compost-based mixes often occur during early season transplant production. This may be because the mix is too cold, especially overnight when greenhouse temperatures drop. Lettuce seeded in potting mix with high salts (right) exhibited slowed and reduced germination rates.
Compost supports an active biological system. Microbial activity is linked to temperature and will not release nutrients if temperatures are cold and do not support their activity. To alleviate this problem, many growers provide bottom heat to their transplants.

Supplemental Fertility​

Potting Mixes - nutrient levels
Commercial organic potting mixes to right with lower nutrient levels can result in stunted and nutrient stressed plants without supplemental fertilization.
If, after all possible precautions, your transplants are stressed due to nutrient-deficient media, you may need to use supplemental fertilizers such as fish emulsion. Organic sources of supplemental fertilizer include fish emulsion, soluble fish powder, kelp extracts, worm casting or compost tea, or other OMRI-approved products; see Using Organic Nutrient Sources (Sanchez and Richard 2009). These fertilizers can be applied to the soil by fertigation or foliar spray. Be careful with supplemental fertility. If you produce transplants in an area that is later used for in-ground production, leached fish emulsion or other products can build up soil nutrients to levels exceeding crop needs.

Seedling Mixes for Starting Transplants​

The following list was adapted from M. Wander in Organic Potting Mix Basics (2010).

Potting Mix--Quiet Creek CSA​

  • Compost (pasteurized) 1½ buckets
  • Vermiculite ¾ bucket
  • Perlite ¾ bucket
  • Peat ¾ bucket
  • Greensand 1 scoop
  • Dried Blood 1 scoop
  • Bonemeal ½ scoop
  • Lime ½ scoop
  • Rock phosphate ½ scoop
*scoop is a 1-lb butter dish, bucket is a 5-gallon bucket

Seed Mix--Standard Soilless​

  • 50-75 percent sphagnum peat
  • 25-50 percent vermiculite
  • 5 lbs of ground or superfine dolomitic lime per cubic yard of mix
  • Blood meal, rock phosphate, and greensand at 5-10 lbs per cubic yard

Soilless Potting Mix​

  • 1 part compost
  • 1 part vermiculite
  • 1 part peat moss
  • Screened with ¼-inch screen to mix together
  • Per 1 gallon mix add:
    • 0.6 oz blood meal (17.01 grams)
    • 0.4 oz clay phosphate (11.34 grams)
    • 0.4 oz greensand (11.34 grams)

Organic Potting Mix​

  • 1 part sphagnum peat
  • 1 part peat humus (short fiber)
  • 1 part compost
  • 1 part sharp sand (builder's)
  • To every 80 quarts of this add:
    • 1 cup greensand
    • 1 cup colloidal phosphate
    • 1½-2 cups crabmeal or blood meal
    • ½ cup lime

Soil Block Mix​

  • 3 buckets (standard 10-quart bucket) brown peat
  • ½ cup lime (mix well)
  • 2 buckets coarse sand or perlite
  • 3 cups base fertilizer (blood meal, colloidal phosphate, and greensand mixed together in equal parts)
  • 1 bucket soil
  • 2 buckets compost

Seedling Mix for Soil Blocks or Seedling Flats​

  • 2 3-gal. buckets sphagnum peat moss
  • ¼ cup lime
  • 1½ cups fertility mix (below)
  • 1½ buckets vermiculite
  • 1½ buckets compost

Fertility mix​

  • 2 cups colloidal (rock) phosphate
  • 2 cups greensand
  • 2 cups blood meal
  • ½ cup bone meal
  • ¼ cup kelp meal

Directions for mixing​

  1. Add peat to cement mixer or mixing barrel.
  2. Spread the lime and fertility mix over the peat.
  3. Mix these ingredients thoroughly.
  4. Add the compost and vermiculite and mix well again.
  5. When done, examine the distribution of vermiculite to ensure that it has been mixed in evenly.
Note that all bulk ingredients should be screened through ¼-inch hardware cloth. Well-matured, manure based compost should be used (avoid poultry manure and woodchip bedding).

Organic Standards for Compost​

The National Organic Program (NOP) is very explicit about compost preparation. Compost piles must maintain a temperature between 131 and 170°F for at least 3 days in a static or enclosed vessel system, or at least 15 days in a windrow system, with at least five turnings. Unless these criteria are met, the resulting product is not--in the eyes of the National Organic Program--considered compost. Rather, it is simply a pile of raw materials. If one of those raw materials is manure, it can make a big difference in how it may be used in crop production.
Raw livestock manure can carry pathogens that pose a danger to human health. According to the NOP's rules, raw manure can be applied at will to crops not intended for human consumption, cannot be applied to a crop within 120 days of harvest if the edible portion has direct soil contact, and cannot be applied to a crop within 90 days of harvest when the edible portions have contact with the soil.

References​

Grubinger, V. P. Potting Mixes for Organic Growers. Brattleboro: University of Vermont Extension, 2007.
------. Sustainable Vegetable Production from Start up to Market. Ithaca: National Resource Agricultural Engineering Service (NRAES), 1999.
Klein, J., and K. Hammer. "Compost-based potting mixes require different management for transplants." Growing for Market (February 2006).
Leonard, B., and A. Rangarajan. Organic Transplant Media and Tomato Performance 2007. Ithaca: Department of Horticulture, Cornell University, 2007.
Pennsylvania Certified Organic. "PCO Guidance on Manure, Compost, and Compost Tea Products." 2010.
Sanchez, E. Saline Soils and Plant Growth. University Park: Penn State Extension, 2010.
Sanchez, E., and T. L. Richard. Using Organic Nutrient Sources. University Park: Penn State Extension, 2009.
Wander, M. Organic Potting Mix Basics. eXtension.org, 2010.
Warncke, D. "Recommended Test Procedures for Greenhouse Growth Media." In J. Thomas Sims and A. Wolf, eds., Recommended Soil Testing Procedures for the Northeastern United States, 76-82. Northeast Regional Bulletin #493. Newark: Agricultural Experiment Station, University of Delaware, 1995.
Prepared by S. Tianna DuPont, former sustainable agriculture educator, Penn State Extension. Reviewed by Elsa Sanchez, Penn State Horticultural Systems Management, and Debra Brubaker, Pennsylvania Certified Organic.
This publication was supported in part by funding from the Beginning Farmer and Rancher Development Program of the National Institute of Food and Agriculture, USDA, Grant #2009-49400-0586
 

flylowgethigh

Non-growing Lurker
ICMag Donor
I think that this coud be well integrated into my system thx to @flylowgethigh for sharing it :huggg:


thailer


Active member​


I switched over from fabric bags to SIPs a couple years ago and have never looked back. Keeper cuts that were yielding 140 grams per plant suddenly increased to 230-250 grams, the resin content was greasier and increased as well. The plants vegged a lot faster and plant health increased. I had spent quite a while researching online different SIP designs and settled on making something of my own that was inspired by the hempy buckets here that used perlite. Other designs use the peat moss as the wick and i do not want the soil getting super soggy to prevent wet feet, it leaches nutrients into the water, and the peat moss itself doesn’t have as good of wicking capabilities as perlite, meaning water can not travel upwards as fast as it can if it were perlite.


picture.php


So some things to consider before building this system.
If you want to use hand water soluble fertilizers, this really isn’t the system for you because the reservoir will collect the run off nutrients. Try a blumat system. This is water only to keep it clean and there’s no way to leach the system the way i built it. I don’t really need to or haven’t as of yet.
You can’t transplant out of it easily.
It can be boring because all you do is fill up water and make clones.

So I made SIPs you can hand water first by pouring water down a PVC tube and the plants eventually started sucking the water out the SIP daily. I was hoping to get a few days in between but the plants were growing great!! I was able to fill up the SIP before the soil got dry and it worked, but i wanted more so next design incorporated hydro tubing connecting the SIPs to a reservoir the size of a garbage can. This way I don’t have to squeeze in the room to water the ones in the back and they all are able to be filled up from outside the room. Moses Wellfleet has been running the hand watered design for a while now and loves it!

It worked great and i was able to go 3 weeks from transplanting a young small plant before it drank up water but once they are established plants, they will drink, drink, drink. You can add a garden hose or RO system to fill up the trash can if you want a completely hands off approach to growing. I did notice that growth rates did go down a little when i switched over to the SIPs on irrigation which keep the water reservoir inside the SIP at a constant height versus the hand watered SIP which the level goes down as the plant consumes the water. To keep the growth rates going, be sure to fill up the tote completely with premoistened soil so it doesn’t get lower settling as it gets wetter because every inch counts in this case as air decreases the further down you go int he soil. see below.


What makes a good container soil mix
https://ucanr.edu/blogs/blogcore/postdetail.cfm?postnum=29331

water and air porosity
https://ucanr.edu/blogs/blogcore/postdetail.cfm?postnum=29390

how much air and water
https://ucanr.edu/blogs/blogcore/postdetail.cfm?postnum=29450

effects on root diseases like rot
https://ucanr.edu/blogs/blogcore/postdetail.cfm?postnum=29510

effects of soil settling, salt and drought on root rot
https://ucanr.edu/blogs/blogcore/postdetail.cfm?postnum=29579

when to irrigate/how to determine when to water and how much
https://ucanr.edu/blogs/blogcore/postdetail.cfm?postnum=29674
https://ucanr.edu/blogs/blogcore/postdetail.cfm?postnum=29691

cation exchange capacity
https://ucanr.edu/blogs/blogcore/postdetail.cfm?postnum=29697

so basically the deeper the pot, the more air closer to the surface. if the soil is shallow and wide, its just not the same as the identical amount in a deeper pot. so the soil in the SIPs is wide and shallow and i want to add more soil while creating depth to grow these large trees indoors.


Last edited: Dec 1, 2020

Bigger Britches For My Ladies (2021-current)
Thai's Blooper Reel ~ 2018-2021
petard2.gif


Some days you eat the bear; other days the bear...well...he eats you.


Like Quote Reply

Report


Reactions: rindindoo, Shua1991, Jellyfish and 13 others


[IMG alt="thailer"]https://www.icmag.com/data/avatars/m/471/471851.jpg?1649695615[/IMG]


thailer


Active member​


So I will try to explain how the connected system works first and once you understand, you can really design with anything if you don’t want to use totes. You can use smaller 5 gallon buckets doubled up so the bottom stays in the same place and you can pull the top bucket out and move it from veg to bloom or in a better spot. You can put this outdoors and make a guerilla grow if you can pump water from a stream. Seriously the possibilities are endless.

picture.php


So the water level is determined by the level of water that is in the control box by a float valve if it and the SIPs were level to the floor. If you pick up the control box, it will raise the level of water inside every SIP till it reached the same height as the water that is inside the control box. I suggest playing around with this before adding the soil to make sure the level is correct and you have an air gap between the water table and the soil. More on that later tho. The reservoir garbage can is raised up to increase the water pressure. The shut off valves let you unhook a SIP to take out of the room. You should also put a shut off valve between the reservoir and the control box as well but not included in pic.

I was told by some growers who have this system set up already that you can not put more than six SIPs on one control box and i think that is due to the speed the water can service each SIP. as it fills up, the first SIP gets topped off till it is full and then it will fill up the second SIP and down the line but if the plants are drinking heavily or the sun is hot evaporating the soil, then the last SIP can get very little water. I have seen people put more on there so feel free to play around but you can set up multiple control boxes to run off of one reservoir as long as the water can keep up with amount of SIPs you want serviced.

Whew! I hope that made sense!


Bigger Britches For My Ladies (2021-current)
Thai's Blooper Reel ~ 2018-2021
petard2.gif


Some days you eat the bear; other days the bear...well...he eats you.


Like Quote Reply

Report


Reactions: BigGPop, newbert, q3corn and 2 others


thailer


Active member​


Single line design is better for smaller rooms because the line kinks sometimes if there’s not enough room.


picture.php


IF you have a bigger wider room and want to put a lot of sips on one line, try a loop so the line ends and starts at the control bucket.


So to make a hand watered and an auto top off SIP, here’s what you do!

First you’ll need to buy a tough tote that are sold at most stores. They’re usually black bottom with yellow lid and say they are stackable and can hold lots of weight. These things are durable and they won’t bow out so you can drag them around without breaking them. Plus the plastic isn’t brittle and softer to make the holes.

Now for the hand watered design you’ll want to measure 3.5” above the bottom and that is where the top of the hole should be when you drill. This is the overflow hole that water will come out of if you add too much and it determines how much water you can put in there.


picture.php


For the irrigation SIPs you want to measure so the bulk head has enough room to remain flat so it seals properly but still stays as low as possible to the bottom. The point of this is so the hole is covered with water and keeps full so air bubbles don’t get down clogging the line.

Hand watered design

picture.php


Bigger Britches For My Ladies (2021-current)
Thai's Blooper Reel ~ 2018-2021
petard2.gif


Some days you eat the bear; other days the bear...well...he eats you.


Like Quote Reply

Report


Reactions: Jellyfish, Elcrazychicken, PDX Dopesmoker and 4 others


thailer


Active member​


Screw in the screen to keep perlite out of the hole and cover with drain cover or nylon.


picture.php


picture.php


The get 4” wide perforated drainage pipe and create a similar shape inside the SIP. cover ends with old socks or more drain cover so perlite doesn’t get inside. Then back fill with perlite. Shown below is the hand watered design but the irrigation one looks the same except it doesn’t have a PVC pipe 2” coming out of the corner to put water down into the reservoir without creating leaching. Hint: add perlite AFTER you put the pipe down because if it gets any soil or perlite inside of the pipe, it won’t work. Probably could put drain pipe cover on it too. If you’re doing the irrigation design, you don’t need the pvc pipe.

picture.php


picture.php


Inside pic of the control box


picture.php


Bigger Britches For My Ladies (2021-current)
Thai's Blooper Reel ~ 2018-2021
petard2.gif


Some days you eat the bear; other days the bear...well...he eats you.


Like Quote Reply

Report


Reactions: Bio boy, Douglas.Curtis, CannaRed and 2 others


thailer


Active member​


Pic of one dumped upside down to look at the roots

picture.php


picture.php


picture.php


Roots grow right down into the water table and anchor the plant while thinner roots line the perlite bed and create a mat thick. Its so simple. Now this setup provides about 15 gallons of soil and can support most plants grown indoors but if you like to grow big giant plants and don’t want to be hindered by root bound growth, I’m going to increase the soil and redesign the SIPs a third time so i can grow big giant plants easier than what i can do now.


picture.php


So i think i've figured out the best design to make the SIPs operate better to support larger plants that need stakes. i think i am gonna double up the totes so the bottom tote contains the reservoir and some sort of support for the tote above that is set inside the bottom tote that will hold the soil. this will give me 13-15 inches of soil where currently i am around 10". but its not just about getting more soil depth to hold up stakes; it also increases oxygen to the root zone. my theory is the difference between the hand watered design and the irrigation line design is the wet dry cycle the hand watered sips get which influences transpiration, osmosis at the root zone which increases fertilizer ppm as the soil drys when the plant sucks the water dry from the soil, while the auto top off sips constantly have the same water level.

at the root zone there is root pressure and cohesion tension theory which is how water/fertilizer enters the roots and then move up the plant and into the atmosphere. root pressure can only make water travel through the roots so far and isn't as big of influence in transpiration as cohesion tension theory. cohesion tension theory can make water travel despite gravity up tall plants because water is a polar molecule and i like to imagine it like a magnet toy train. the H20 connects to the h20 below that and so on and so on so it creates this chain. as the plant transpires and releases humidity into the air, each water molecule that is evaporated on the leaf surface, will pull up the following h20 molecule below it on the chain. this video explains it a lot better than me


so the plant itself acts like a wick system which is the basis of how the SIP works too. you can see how the pressure to release into the air increases as the water rises up and out of the stomata.


SPAC+%3D+soil-plant-atmosphere+continuum+A+plant+is+a+Living+Wick..jpg


so this all starts at the soil level with the root zone being influenced by the amount of water/oxygen to the root zone. the soil can't be over saturated or the plant won't transpire. so that moves me on to my next topic about the depth of the original SIP and why i want to add more soil depth.

My system is 4 tubs with perlite beds wet via a waterline level, controlled by my waterfall bucket. The bags sit on the beds about 2” to 3” above the waterline. The soil sucks up the moisture and it gets into the tent air via leaf transpiration. I put a lot of effort into keeping the water reservoir at 73*F or so, and pH at 6.4 or so. I also oxygenate the water. The reservoir needs about a gallon of water per plant per day, so the system is always flowing water from the reservoir to the leaves and out the tent exit fans.

A moist 10 gallon bag of soil is all I care to lift when it comes time to clear out from the last run. Each plant gets a 2’ x 2’ area, and 10 gallons is enough soil for that. My tubs are 30 gallon trash cans that I modified to make shorter and add the sip plumbing from the control bucket.

I have a cork between the inner and outer chambers of my waterfall control bucket, that lets the tubs drain into the pump so I can drain out the water, say to get rid of nutes that wash down when top watering in feed. The removed water is still odorless because the system is flowing and not stagnant.
 

acespicoli

Well-known member
1712663855720.png


Fungus Gnats​


Home > Pests > Fungus Gnats

Diptera: Sciaridae​

Description​

Adult fungus gnats are little black flies about 1/8 inch in length, and larvae or maggots have a shiny black head and elongated, whitish to transparent body with 1/4 inch in length.
Adults are mostly appearing whenever you water your plants, and their presence is considered a nuisance. Adult fungus gnats do not damage plants but their larvae feed on roots, stunting plant growth and causing foliage to yellow and wilt.

Life Cycle​

Fungus gnats develop through four stages- egg, larva, pupa, and adult. Adults live about one week, during which time each female deposits 100 to 150 eggs. They are laid near the stems of plants, and they hatch within 4 days. The larvae feed for about two weeks and then pupate. After 3 to 7 days in the pupal stage, adults emerge.

Life-Cycle-32.jpg

fungus-gnat-1.jpg

Damage​

The larvae inflict extensive damage on seedlings by feeding on roots. Plant symptoms that can indicate fungus gnats are sudden wilting, loss of vigor, poor growth, and yellowing. With severe infestations, a considerable portion of the plant may be lost.

Advice for Fungus Gnat​

Vinegar trap: Place a few teaspoons of apple cider vinegar or red wine, and a few drops of dish soap in a bowl, and stir them. Set your bowl in an area where adult gnats are prevalent. They are attracted to it, fall into it, and die.

  • Top-dress the soil with two inches of sand so that fungus gnats cannot lay eggs on the soil.
  • Remove the top inch of potting soil and replace it with new, sterile potting soil. This will remove fungus gnat eggs and larvae.


1712664401508.png


This is the triple threat treatment for gnats bt, nema, fogger
On mixing new batch of "soil" best to use bt and make tea for first water and resting soil for ammonification
Then add nematodes later always good to fog between grows or on noticing fliers
 
Top