What's new
  • ICMag with help from Phlizon, Landrace Warden and The Vault is running a NEW contest for Christmas! You can check it here. Prizes are: full spectrum led light, seeds & forum premium access. Come join in!

DIY Organic Potting Mix's for Grass - Ace Spicoli

acespicoli

Well-known member
May try this as comparison with epsoma tomato tone boosting the K in the NPK with some langbenite
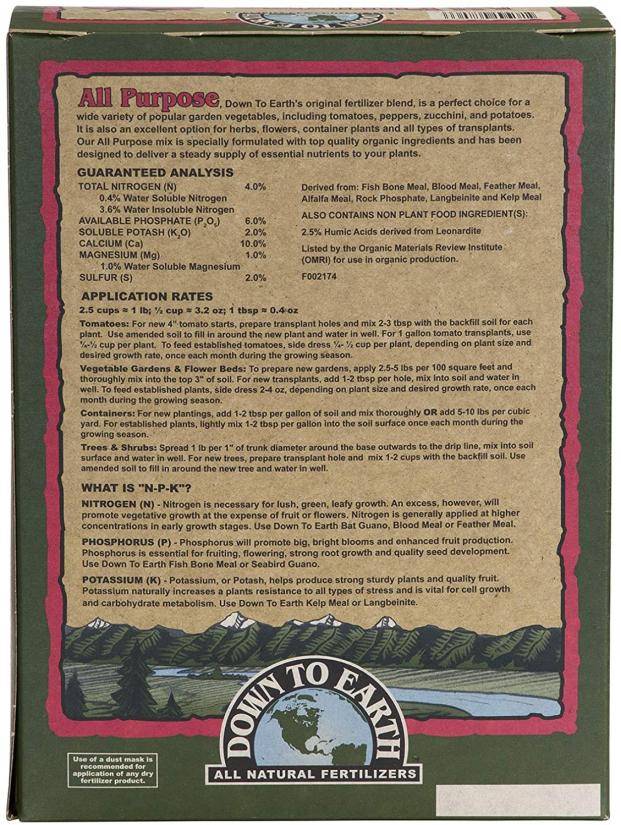

All Purpose 4-6-2

All Purpose 4-6-2 Available in 4 sizes
1LB Box, 5LB Box, 25LB Bag, 50LB

TOTAL NITROGEN (N) 4.0%
0.4% Water Soluble Nitrogen
3.6% Water Insoluble Nitrogen
AVAILABLE PHOSPHATE (P2O5) 6.0%
SOLUBLE POTASH (K2O) 2.0%
CALCIUM (Ca) 10.0%
MAGNESIUM (Mg) 1.0%
SULFUR (S) 2.0%

Derived from:
Fish Bone Meal, Blood Meal, Feather Meal, Alfalfa Meal, Rock Phosphate, Langbeinite and Kelp Meal

ALSO CONTAINS NON-PLANT FOOD INGREDIENT(S):
2.5% Humic Acids derived from Leonardite
Listed by the Organic Materials Review Institute (OMRI) for use in organic production.


Listed by the Organic Materials Review Institute for use in organic production.

Building up the brix:
As a measurement of the sugar content in the sap, brix is an important indicator of both a healthy plant and a flavorful, nutrient-dense crop. Here’s how to boost the brix to grow the best of the best.

The best organic farmers often boast about growing nutrient-dense, high-brix plants. But brix is still a foreign concept to many indoor growers. Brix is a measurement of the sugar content in the sap, expressed as a percentage. Generally speaking, the higher the brix, the healthier the plant. In fact, some organic gardeners claim that if you can achieve a brix level of 12% or higher, sucking insects won’t even recognize the plant as food! Furthermore, there is a direct proportional relationship between brix and the quality of the finished produce. High-brix plants are healthier, tastier and higher in nutrients than low-brix plants, and brix offers an objective measurement of how well your plants are doing. So if you want to consistently grow the best of the best, taking regular brix readings will help you reach your goal.

Brix measurements are taken with the aid of a brix refractometer. The more sugars and dissolved solids in a sap sample, the more the mixture bends the light that passes through it. A brix refractometer reads how much the light bends (refracts), and displays the results as a percentage of sugars in the sap. And it’s easy to use—just take a leaf sample, roll it into a ball and squeeze a couple of drops onto the glass slide of the refractometer. Then look through the hand-held device towards a light source, and read the brix number on a graduated scale. If you want an even more accurate measurement, digital refractometers are also available.
The more efficiently your plants take up water and nutrients, the higher the brix. Since organic biostimulants improve the uptake of minerals, the judicious use of additives such as amino acids, humic and fulvic acids, and seaweed extracts can help improve brix. The proper balance of minerals in the nutrient solution can also have a positive effect, particularly the potassium-to-nitrate ratio. Here are some suggestions for improving the brix of your favorite crops.

Increase the Potassium-to-nitrate Ratio
Taking a brix measurement is standard operating procedure for hydroponic crop advisors in Europe. For example, if a leaf sample in a hydroponic tomato greenhouse shows low brix, often the first thing the consultant will recommend is raising the potassium-to-nitrate ratio until the brix reaches the target level. That way, nutrient problems can be avoided before the first signs of deficiency appear. Once visual nutrient deficiencies appear, the plant is already suffering and may not ever be able to reach its true genetic potential. Taking brix readings and making adjustments will help prevent problems before they happen.

Excessive nitrates burn carbohydrates and reduce brix. In fact, nearly 30% of the energy of photosynthesis is used just to assimilate the nitrates. So to ensure high brix, don’t give plants more nitrates than they need. Excessive nitrates produce large cells with thin cell walls, making them a target for pests and diseases. And since the sugars are burned to produce more top growth, root growth can become restricted and fruit and flower production can be delayed. A brix refractometer can show the signs of excess nitrates before it’s too late.

If nitrates are adequate but brix is still too low, it may be beneficial to increase the potassium levels. Potassium is a catalyst for carbohydrate metabolism, helping to increase brix. A grower has three choices for increasing the potassium-to-nitrate ratio: lower the nitrates, increase the potassium or do a little of both. Once you find the sweet spot, no pun intended, the brix should start to improve.

Use Humic and Fulvic Acids
Humic and fulvic acids are intermediate chelators, helping plants take up important trace elements. Since trace elements activate enzymes in the plant, the plant is able to do more chemical reactions per second, resulting in higher brix. Iron uptake is especially important. In nature, humic and fulvic acids hold onto iron ions like a claw and make them more available to the plant. Iron is a catalyst for chlorophyll synthesis, the green pigment in plants that actually manufactures sugars during photosynthesis. In fact, if iron availability is at optimal levels, plant genes will be activated to produce more chloroplasts to hold the extra chlorophyll, turning the plant into a more efficient sugar-making machine. The result? Higher brix.

Fulvic acid can be used as a foliar spray. The fulvic acid molecules transport the iron and other trace elements through the cell membranes, and release them inside the cell where they are needed the most. The carbon skeletons can then be metabolized by the plant. For best results, use a natural surfactant such as yucca extracts when using fulvic acid as a foliar feed. The surfactant prevents water from beading up on the waxy leaf surfaces, so the foliar spray spreads out in a thin film for better absorption by the leaf. Better absorption of iron results in higher brix.

Use Amino Acid Blends
Amino acids are also intermediate chelators, improving the uptake of minerals. In particular, amino acids improve the uptake of calcium. Certain amino acids stimulate root cells to open up calcium ion channels, allowing calcium to be taken up many times faster than simple osmosis. Calcium strengthens the stems and vascular system of the plant, allowing water and minerals to be taken up more efficiently. The more efficiently water and minerals are assimilated by the plant, the higher the brix.

I discovered the relationship between amino acids and brix when growing romaine lettuce one summer in an outdoor NFT system. I had just purchased my first brix refractometer, and I was taking brix tests on everything I could get my hands on and comparing the readings with brix charts. Brix charts indicate quality, either low, medium or premium quality, depending on how high the brix is. After I started using amino acids in my nutrient solution, the brix in the leaf tissue of my lettuce was off the charts. In fact, the brix level was so far above premium quality that statistically I’d have to create a new category for it. Every store and every restaurant that tasted the produce bought it at 20% above premium cost. We also went through three hard frosts without losing a single leaf. I found out later that for every 1% increase in brix, there is a half-degree lower freezing temperature. So the improved calcium uptake provided by the amino acid blend resulted in higher brix, better flavors, longer shelf life and higher sales prices.

Use Seaweed Extracts
Seaweed extracts also have a positive effect on brix. Seaweed extracts include mannitol, a natural sugar that chelates micronutrients and makes them more available to the plant. Seaweed extracts are also loaded with natural plant growth hormones that stimulate cell division. When used at the root zone, seaweed extracts stimulate cell division of root cells, resulting in more lateral root growth and greater root mass. Improved root growth creates more surface area for the uptake of water and minerals, further improving the brix of the plant. Seaweed extracts are synergistic with other organic biostimulants, so using a combination of additives is better than using any single additive alone.

Remember, plant growth is part of a complex system with many variables, so don’t expect a magic bullet to increase your brix overnight. Instead, use your refractometer along with other management tools in your garden. Light levels, air flow, pH, electrical conductivity and nutrient balance all affect brix in one way or another, and continuous improvement is the goal. I suggest you start by testing the brix of your healthiest, most productive plants and using the reading as a gold standard. Then take small steps to see if you can raise the brix in subsequent crops. As your brix goes up, you will soon see the relationship between brix and quality, and you will better enjoy the fruits of your labors.
 
Last edited:

acespicoli

Well-known member
TWEAK NOTES FEEDING MAINTAINING PH IN SOIL: 2021
~~~~~~~~~~~~~~~~~~
Humic acid is a group of molecules that bind to, and help plant roots receive, water and nutrients. High humic acid levels can dramatically increase yields. Humic acid deficiency can prevent farmers and gardeners from growing crops with optimum nutrition.
~~~~~~~~~~~~~~~~~~

Thorvin Icelandic Geothermal Kelp is excellent for a range of applications from custom blends (e.g. seed start mix) to value‐add blended fertilizers.
  • Add as inoculant at 5-10 lbs. per cubic yard.
  • Mix in with final compost at 25-50 lbs. per cubic yard.
  • Include in fertilizer blends as a trace mineral value-add ingredient at ½ to 2% of the mix.
Like all Thorvin fertilizer ingredients, this product is valued for its complex trace mineral and phytonutrient profile. It is harvested sustainably from the mineral‐rich waters of a pristine Icelandic fjord and then carefully dried and handled to preserve biological values.

Powder or Granules

Made from dried and ground Ascophyllum nodosum seaweed, Organic Kelp Meal is an excellent source of micronutrients and beneficial plant growth promoters. Contains over 60 naturally-chelated minerals and essential elements that the fast-growing sea plant absorbs from the cold, nutrient-rich waters of the North Atlantic.
~~~~~~~~~~~~~~~~~~
Fish Bone Meal 4-12-0 is a marine-based alternative to traditional terrestrial bone meal options and is a great source of organic phosphorus and calcium.

As one of the three big nutrients for plants, phosphorous plays a role in both root and bloom development, which helps produce high-quality fruit and flowers. Phosphorus helps plants take to new soil by boosting root development. Strong root development means plants will grow faster and be healthier because they can absorb more water and nutrients from the soil. You will have larger carrots and potatoes, and flowers will produce bigger blossoms.

DTE Fish Bone Meal 4-12-0 also contains a small amount of organic nitrogen and is an ideal fertilizer for new garden beds, perennials and bulbs.
~~~~~~~~~~~~~~~~~~
Langbeinite 0-0-22 is a naturally mined crystalline mineral that supplies the water-soluble sulfate form of three vital plant nutrients: potassium, magnesium and sulfurs. It’s maximum chlorine content is less than 3.0 percent, minimizing the potential for fertilizer “burn,” and it’s neutral pH does not alter soil activity.

Potassium contributes strongly to overall plant health by regulating internal processes. Since potassium makes up part of the fluid of the plant, it is found throughout plant tissue, meaning plants need a strong source of potassium as they grow. Potassium deficiencies lead to weak stalks and immature roots, leaving the plant susceptible to insects.

DTE Langbeinite 0-0-22 is widely used on sensitive vegetables and fruit crops that require high fertilization rates but do not tolerate high levels of chlorine or soluble salts. This standard grade langbeinite has a typical SGN of 95 and is an excellent source of readily available sulfur, potassium and magnesium.
~~~~~~~~~~~~~~~~~~

Chelated iron fertilizers, in which the iron is combined with an organic chemical called a chelate that helps keep the iron in a plant-available form, are most appropriate for application to the soil. Fertilizing high pH soils with non-chelated iron fertilizers such as ferrous sulfate (FeSO4.2H2O) is not recommended because this iron will not be available to plants.
 
Last edited:

acespicoli

Well-known member
cicadas = free Chitin
Chitin is a good inducer of plant defense mechanisms for controlling diseases.[SUP][22][/SUP] It has potential for use as a soil fertilizer or conditioner to improve fertility and plant resilience that may enhance crop yields.[SUP][23][24]

chitin.jpg
[/SUP]
A close-up of the wing of a leafhopper; the wing is composed of chitin.


Also if any of the eggs survive and cicidas eat my cannabis roots id be - Chitin :D
 

acespicoli

Well-known member
All natural soil, require all natural water sources
Nice thread started by: @blondie
:joint:


https://pubs.usgs. gov/wsp/1535g/report.pdf (report link broken on purpose worth a copy and paste
 
Last edited:

acespicoli

Well-known member
Occurrence of glauconitic siltstone in the Serra da Saudade ridge, in the Alto Paranaíba region, Minas Gerais, Brazil.
Greensand

1662692563327.png

The green color of greensand is due to variable amounts of the mineral glauconite, an iron potassium silicate with very low weathering resistance; as a result, greensand tends to be weak and friable. It is a common ingredient as a source of potassium in organic gardening and farming fertilisers. Greensand glauconite is used as a water softener for its chemical-exchange properties. Greensand coated with manganese oxide (called manganese greensand) is used in well water treatment systems to remove dissolved (reduced) iron and manganese with the addition of an oxidant, usually potassium permanganate, under controlled pH conditions.[14] It is also used as a type of rock for stone walls in areas where greensand is common.

In Roman times in Britain, coarse grits derived from the lower greensand were used to line the inner surface of mortars (grinding bowls) produced in Oxfordshire pottery kilns.[15]

Recently, glauconitic greensand has become a popular organic soil amendment. The porous properties of glauconite greensand allows for the absorption of water and minerals, making irrigation and nutrient delivery much more efficient (see soil conditioner).[citation needed] Greensand can be used to absorb excess water in clay-rich soils and to prevent water loss in sandy soils.
1662692801483.png


Best coffee I ever had
Sul de Minas is known for its chocolaty nutty, round flavor.
Picture of greensand above is most likely why they consistently produce the best coffee in the world


Jersey Greensand, so-called from its only known place of origin, New Jersey, was deposited millions of years ago when the Garden State was still under water. It is mined primarily for water purification purposes but increasingly more and more people in agriculture and horticulture are requesting it for the soil.

Benefits from Greensand are for the most part unexplainable. If you brought some into an ag science lab and asked for an analysis, they would most likely tell you the product is worthless. However, numerous greenhouse trials show that there is a lot more to it than what you would read on a lab report. Organic growers have, for years, extolled the virtues of Greensand without really knowing how or why it has improved their crops.

One possible explanation is mineralization. Studies have shown that mineralizing soil can improve the taste, color, nutritional value and health of various plants as well as the overall health of the soil. Mineralization also improves soil life by increasing populations of certain bacteria that can slowly dissolve insoluble mineral nutrients. Those bacteria eventually cycle themselves into organic matter that further increases populations of many other varieties of beneficial microorganisms.

This naturally occurring iron-potassium silicate (also called glauconite) has the consistency of sand but is able to absorb 10 times more moisture, making it an exceptional soil conditioner for pastures, forage fields, lawns, orchards, small fruits, vegetables and greenhouse potting mixes. Greensand contains potassium, iron, magnesium, calcium and phosphorus plus as many as 30 other trace minerals.

Glauconite has the chemical formula (K,Na)(Fe,Al,Mg)2(Si,Al)4O10(OH)2
 
Last edited:

Vandenberg

Well-known member
Get some Organic Do It Yourself potting mix recipes here

Cold Processed Hydrolyzed Fish and some Kelp is a classic standard soil imput that will easily stand and deliver for a new grower. :)

This thread has tons of information tucked into it, above are some icmag post links with a little bit more.
I am hoping this post steers folks in the right direction when first starting out with the cultivation of organic Cannabis.
These soil recipes around here will hopefully help one to get it right the first time and everytime, ideally :)

Vandenberg :)
 
Last edited:

acespicoli

Well-known member
Does oyster shell lower pH?


Oyster shell can be used as an alternative to lime. Both are composed of calcium carbonate, which is an alkali, and therefore raises the pH of the soil, increasing the plant's ability to take up other micronutrients such as zinc, iron and manganese.Mar 6, 2021


Composted Oyster Shell as Lime Fertilizer
Is More Effective Than Fresh Oyster Shell
Young Han L EE ,3 Shah Md. Asraful I SLAM ,1 Sun Joo H ONG ,1 Kye Man C HO ,4
Renukaradhya K. M ATH ,1 Jae Young H EO ,3 Hoon K IM ,5 and Han Dae Y UN1;2;y
1Division of Applied Life Science (BK21 Program), Gyeongsang National University,
Chinju 660-701, Republic of Korea
2Research Institute of Agriculture and Life Science, Gyeongsang National University,
Chinju 660-701, Republic of Korea
3Division of Plant Environmental Research, Gyeongsangnam-do Agricultural Research and Extension Service,
Chinju 660-360, Republic of Korea
4Department of Food Science, Jinju National University, Chinju 660-758, Republic of Korea
5Department of Agricultural Chemistry, Sunchon National University, Suncheon 540-742, Republic of Korea
Received August 31, 2009; Accepted April 9, 2010; Online Publication, August 7, 2010
[doi:10.1271/bbb.90642]


Physio-chemical changes in oyster shell were exam-
ined, and fresh and composted oyster shell meals were
compared as lime fertilizers in soybean cultivation.
Structural changes in oyster shell were observed by
AFM and FE-SEM. We found that grains of the oyster
shell surface became smoother and smaller over time.
FT-IR analysis indicated the degradation of a chitin-
like compound of oyster shell. In chemical analysis,
pH (12:3 0:24), electrical conductivity (4:1 0:24
dS m1), and alkaline powder (53:3 1:12%) were
highest in commercial lime. Besides, pH was higher in
composted oyster shell meal (9:9 0:53) than in fresh
oyster shell meal (8:4 0:32). The highest organic
matter (1:1 0:08%), NaCl (0:54 0:03%), and mois-
ture (15:1 1:95%) contents were found in fresh oyster
shell meal. A significant higher yield of soybean
(1.33 t ha1) was obtained by applying composted oyster
shell meal (a 21% higher yield than with fresh oyster
shell meal). Thus composting of oyster shell increases
the utility of oyster shell as a liming material for crop
cultivation.


Due to the presence of strong concentration
gradients in a thin layer of solution in which crystal-
lization of oyster shell occurs, multiple layers of crystals
may be formed once time, and thin membranes and
bands of organic matrix are commonly observed in the
transitional zone bordering the prismatic region, with
the membranes showing a very fine oriented network
pattern. 7) Various biominerals, such as the exoskeletons
of crustaceans and the nacreous layer of seashells, also
contain chitin. 8)


Key words: oyster shell; structural changes; chemical
properties; liming materials; soybean yield

https://www.tandfonline.com/doi/pdf/10.1271/bbb.90642
 

St. Phatty

Active member

acespicoli

Well-known member
This is a oldie but goodie so here ya go! An old gardening resource
since the price has risen on peat and coco
Save some leaves and grass and make this awesome seed starting mix and compost ammendment


Making Leaf Mold​


Create a soil-enriching mulch with shredded leaves (I use my bagging mower)​


By Kathy LaLiberte
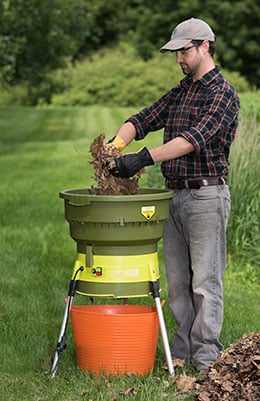
Electric leaf shredder
Our Leaf Mulcher shreds the leaves into small pieces that decompose quickly, releasing the nutrients perfect for mulching perennial beds, adding organic matter to your vegetable garden or tossing on the compost pile.
In Britain, leaf mold is the connoisseur's choice for mulching perennial gardens. It's easy to see why this cocoa brown, sweet-smelling, moisture-retentive mulch is so popular. In the U.S., few gardeners even know what it is. That's probably because the only way to get leaf mold is to make it yourself.
Leaf mold is nothing more than partially decomposed leaves that are somewhere along the continuum between shredded leaves and humus. If you wonder what it looks like, next time you're in the woods, just kneel down and push away a small area of dry leaves. Underneath, you'll reveal a layer of leaf mold — a crumbly brown material with a pleasant, earthy scent.

The Benefits of Leaf Mold​

Leaf mold has several great attributes. The first is that it can hold up to 500 percent of its own weight in water. Besides helping retain moisture in the soil by reducing evaporation, leaf mold also absorbs rainwater to reduce runoff, and in hot weather, it helps cool roots and foliage.
Most leaves are slightly acidic when they fall, with a pH below 6. However, as the leaves break down into leaf mold, the pH goes up into more a neutral range. Leaf mold will not correct pH problems, but will have a moderating effect.
Over time, yearly applications of leaf mold mulch can significantly improve the quality of your soil. The result will be better water-holding capacity, a more friable texture, and an increase in beneficial soil life. Though leaves are not high in nitrogen, phosphorus and potassium, tree roots mine calcium, magnesium and many other trace minerals from the soil and your garden will also benefit from these nutrients.

From Leaf to Leaf Mold​

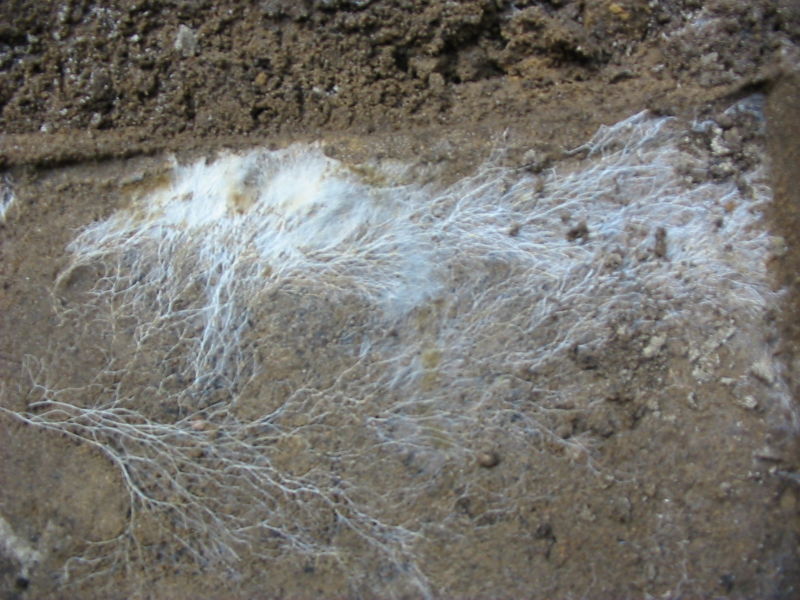
Unlike making regular compost, making leaf mold is a "cold" composting process. The decomposition is done primarily by fungi, rather than bacteria, and it is considerably slower. The rate of decomposition is largely determined by four key factors.
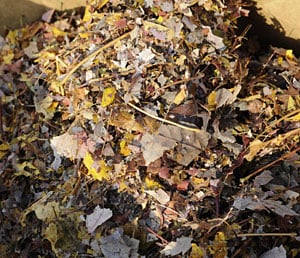
Shredded leaves


A bag of shredded leaves, ready for composting.
  1. First is the type of leaves in your pile. Some leaves, such as oak and holly, are higher in lignin (cellulose) than others, and therefore take much longer to break down. Combining different types of leaves, like a mixed salad, is a good way to balance lignin content and also improve the quality of the finished product.
  2. Moisture is another factor to keep in mind. Remember that fungi are doing the work, and they need a moist environment. An unattended pile of dry leaves could take three years or more to break down. Keep the pile covered and moist (not wet), and you may have ready-to-use leaf mold in a year.
  3. Another consideration is nitrogen. Freshly fallen leaves have a carbon-to-nitrogen ratio in the range of 30 to 1, which is ideal for quick decomposition. Old leaves, including those that have been on the ground for just a few weeks, will have already lost most of their nitrogen content. If you can gather fresh leaves and get the process underway, there will still be a good amount of nitrogen to speed up the initial decomposition.
  4. Size of the leaves. The easiest way to make leaf mold is to just rake your leaves into a big pile and let the pile sit there for two or three years. If you aren't quite that patient or you don't have enough room for three giant leaf piles, you'll need to shred them. Leaves break down much more quickly if they're shredded, largely because it increases the amount of surface area, which makes it easier for fungi to do their work. Shredding the leaves also prevents them from packing together into stacks that repel moisture and seal out air. It also makes it easier to fit a large quantity of leaves into a relatively small space.
The simplest way to shred leaves is to run over them with the lawn mower a few times and then rake them up. You can also rake the leaves and run them through a leaf shredder. Or use a hand-held leaf vacuum with a shredding capability.

Assembling Your Leaf Mold Pile​

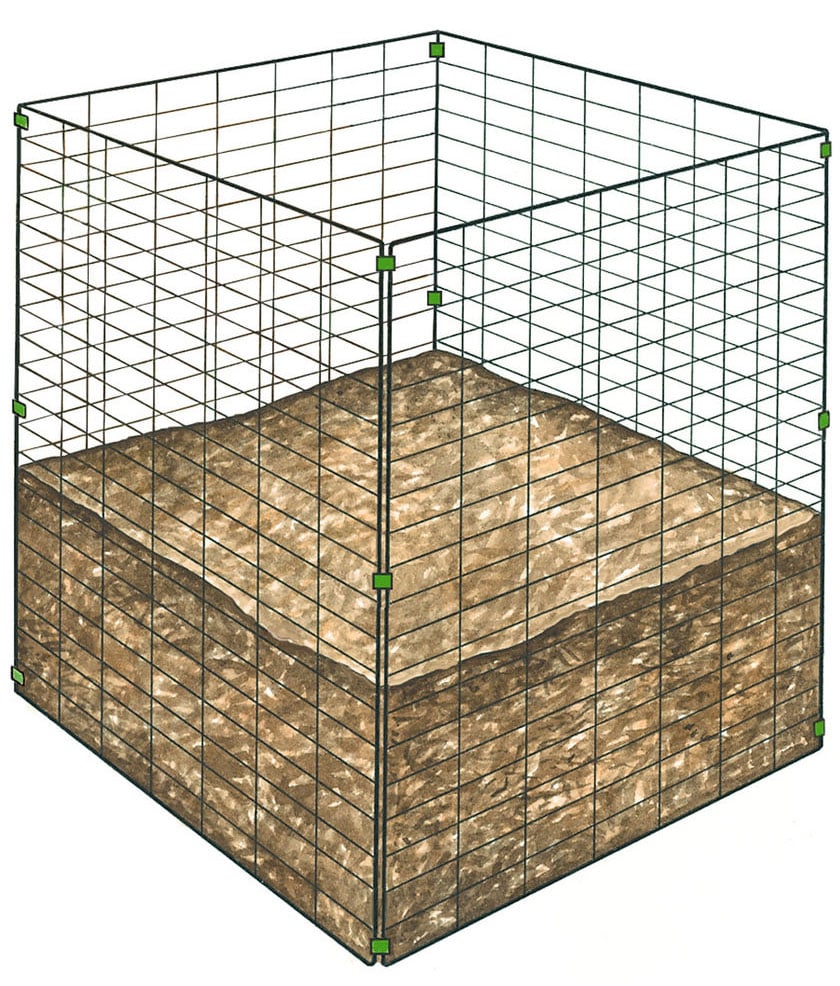
Wire bin for compost This wire bin holds 16 cubic feet (102 dry gallons) of leaves, grass clippings and garden scraps,
A leaf pile needs to be fairly substantial in size, in order to retain enough moisture and heat to get finished leaf mold within 12 months. Six feet square and five feet high seems to be an ideal size. It takes about 25 trash bags full of leaves to make a pile this large.
A second option is to pile the leaves into a wood or wire enclosure. Again, 4 or 5 feet square is ideal. Wet the pile thoroughly and cover it with a tarp. Check the moisture level several times during the year. It should be like a well-wrung sponge. If you live in a dry climate, you might want to line the enclosure with cardboard or plastic to help retain moisture. If you have a minute when you're checking the moisture content, use a fork to stir the leaves and incorporate a little fresh oxygen.
Another easy, yet very effective way to make leaf mold, is to pack the leaves into black trash bags. If the leaves are fresh and shredded, just moisten them, close up the bag, and poke a few holes in the sides of the bag. If the leaves are whole or dry, moisten them well and add a shovelful of garden soil, compost or manure. Then just stash the bags out of the way for a year or two.

How to Use Leaf Mold​

Leaf mold is ready to use when it's soft and crumbly. Distribute it around your perennials, vegetable plants (shrubs, too if you have a lot of it), no more than about 3 inches thick. Because leaf mold retains so much moisture, be sure to keep it several inches back from the crown or base of the plant. This will help prevent pest and disease problems.
You can also incorporate leaf mold right into the soil. Unlike raw leaves, it will not steal nitrogen from the plants around it, so it’s safe to use in vegetable gardens and around annual flowers. You can also add it to new garden beds, use it instead of peat moss to lighten the soil in containers, use it to enhance the soil in a shade garden, or to improve any soil that’s too sandy or too heavy.
Someday, gardeners here in the States may catch on to the value of leaf mold. Leaves are certainly an abundant natural resource in most parts of the country. For now, they’re still free for the taking, so don't delay. Grab a rake and start making your own super-premium, extra-fancy leaf-mold mulch.
Last updated: 12/08/2022
1680661421388.png

Run it thru a screen 1/4" for plants and finer screens for seedlings you can stack screens for finer product
1680663046124.png

1680663073606.png

1680663093994.png

1.5.2 Composting process and curing
Many composting feedstocks carry microorganisms that are pathogenic to plants
and/or humans. Fortunately, pathogens and weed seeds are destroyed by the high
temperatures achieved during the sanitization stage (e.g., pasteurization, PFRP) of
composting (Neher et al., 2015). Therefore, properly prepared compost not only de-
livers the potential to suppress plant pathogens in the soil but also delivers few to no
new pathogens to the plant environment.
Because numerous beneficial microorganisms contribute to biological control of
plant diseases, the question becomes whether such organisms consistently colonize
composts after peak heating. Chances of this happening are poor in large windrow or
pile composting systems in which temperatures typically persist above 40C (104F)
for prolonged periods after sanitation. Most biocontrol agents cannot grow or sur-
vive long-term in these temperatures, except for spores of Bacillus spp. Conversely,
colonization is rapid when postsanitation temperatures are maintained below 35C
(95F), especially at soil temperatures of 25C (77F) or lower. Bacterial biocon-
trol agents such as Pseudomonas spp. colonize the substrate fully in one to 2 days
to establish general suppression. This does not occur, however, when the moisture
content of the compost is below 30% on a weight basis. Dry composts become
dusty and fungi become the principal colonizers. Some of these are nuisance fungi
that delay or even inhibit plant growth. Therefore, it is important to manage mois-
ture content during peak heating as well as during curing of compost to enhance the
potential for natural colonization by the beneficial microflora during the process.
Although most compost that is used in container media (predominantly made
from bark, sawdust, etc.) is made in tall windrows/piles, these products still offer
ideal opportunities for inoculation with specific biocontrol strains for use in green-
house and nursery crops, as long as moisture and temperature regimes are managed
appropriately.
The situation can be quite different for small windrow composting systems that
are turned frequently, especially when the moisture content of the compost is main-
tained above 45%. These composts, especially those high in microbial activity such
as manure composts, are much more likely to be colonized by a great diversity of
biocontrol agents as the compost matures.
1680664378935.png

Go get paid to rake up your neighbors leaves ;) or pick the bagged leaves up off the curb 🤷‍♂️
 
Last edited:

Creeperpark

Well-known member
Mentor
Veteran
I just use my lawn mower to shred all my leaves to a fine powder. The trick is to drop your mower on a low setting and shred the leaves on concrete. You can't do it on the grass it has to be on concrete. When the leaves are shredded finely I take a snow shovel and scoop them up and put them in the composter.
 

acespicoli

Well-known member
I just use my lawn mower to shred all my leaves to a fine powder. The trick is to drop your mower on a low setting and shred the leaves on concrete. You can't do it on the grass it has to be on concrete. When the leaves are shredded finely I take a snow shovel and scoop them up and put them in the composter.
Usually just ride over the pile, I will have to try this next time.
I can definitely imagine it gets it to a much finer size your way.
Only problem is I have gravel, so will try it on low over the forest floor
In the woods you also get alot of tree seed sprouting so thats just a added source of nutrient

Seems like my peat moss price has tripled overnight
Well from post #1 - Bale Peat Moss (im using 1/3 bale) - 3.8cu ft $10 - INSANE

So yeah im looking for alternatives not only is leaf compost practically free
its more friendly for the environment.
Other option may be sawdust and pine shavings straw animal bedding - anything you can source for free
Requirement is high humus/carbon

Decomposition of dead plant material causes complex organic compounds to be slowly oxidized (lignin-like humus) or to decompose into simpler forms (sugars and amino sugars, and aliphatic and phenolic organic acids), which are further transformed into microbial biomass (microbial humus) or reorganized, and further oxidized, into humic assemblages (fulvic acids and humic acids), which bind to clay minerals and metal hydroxides. The ability of plants to absorb humic substances with their roots and metabolize them has been long debated. There is now a consensus that humus functions hormonally rather than simply nutritionally in plant physiology.[38][39]
1680702361063.png

That fungi in the leaf mold gives the mix a nice texture
I used to use the peat to cut the compost so it was not too high a percent of the mix

1680703392386.png

My favorite mix was coarse vermiculite, peat (equal parts) the some compost but not too hot and tomato tone
Im rethinking it the cost is high but maybe not prohibitive, local stuff is always good
Leaf compost is 30:1 carbon/nitrogen so its pretty awesome all by its self
You know the trick is to get the leaf as soon as it falls keeps all the nutes in there ;)
Not sure what it is about the fibrous struture of the fungi that makes it so special ?
Maybe its this - CO2 emissions during fungal growth, life cycle analysis results still showed the viability of mycelium as a carbon sink material
 
Last edited:

acespicoli

Well-known member

acespicoli

Well-known member
Neem repels insects. Neem Oil coats insect bodies, smothers them, and kills adults. Neem also has in it a compound called azadirachtin that inhibits the insect's ability to reproduce. Neem seed meal can be added to the soil as an insect deterrent and also as a fertilizer -organic


Down To Earth’s Neem Seed Meal 6-1-2 is an excellent all natural fertilizer for enriching garden and agricultural soils and encouraging optimum plant development. Cold pressed from the seeds of the fast growing Neem Tree (Azadirachta indica), it is also referred to as neem cake. DTE Neem Seed Meal 6-1-2 can be mixed into soils or potting media, used as a top dress around established plants or steeped to make a potent liquid solution.

1681393860297.png


Cover of Neem

Neem: A Tree For Solving Global Problems.​

Show details

Search term
Clear input
< PrevNext >

5Effects on Insects​

The growing accumulation of experience demonstrates that neem products work by intervening at several stages of an insect's life. The ingredients from this tree approximate the shape and structure of hormones vital to the lives of insects (not to mention some other invertebrates and even some microbes). The bodies of these insects absorb the neem compounds as if they were the real hormones, but this only blocks their endocrine systems. The resulting deep-seated behavioral and physiological aberrations leave the insects so confused in brain and body that they cannot reproduce and their populations plummet.
Increasingly, approaches of this kind are seen as desirable methods of pest control: pests don't have to be killed instantly if their populations can be incapacitated in ways that are harmless to people and the planet as a whole. In the 1990s this is particularly important: many synthetic pesticides are being withdrawn, few replacements are being registered, and rising numbers of insects are developing resistance to the shrinking number of remaining chemical controls.
The precise effects of the various neem-tree extracts on a given insect species are often difficult to pinpoint. Neem's complexity of ingredients and its mixed modes of action vastly complicate clarification. Moreover, the studies to date are hard to compare because they have used differing test insects, dosages, and formulations. Further, the materials used in various tests have often been handled and stored differently, taken from differing parts of the tree, or produced under different environmental conditions.
But, for all the uncertainty over details, various neem extracts are known to act on various insects in the following ways:
  • Disrupting or inhibiting the development of eggs, larvae, or pupae;
  • Blocking the molting of larvae or nymphs;
  • Disrupting mating and sexual communication;
  • Repelling larvae and adults;
  • Deterring females from laying eggs;
  • Sterilizing adults;
  • Poisoning larvae and adults;
  • Deterring feeding;
  • Blocking the ability to "swallow" (that is, reducing the motility of the gut);
  • Sending metamorphosis awry at various stages; and
  • Inhibiting the formation of chitin.1
As noted earlier, neem extracts have proved as potent as many commercially available synthetic pesticides. They are effective against dozens of species of insects at concentrations in the parts-per-million range. At present, it can be said that repellency is probably the weakest effect, except in some locust and grasshopper species. Antifeedant activity (although interesting and potentially extremely valuable) is probably of limited significance; its effects are short-lived, and highly variable. Blocking the larvae from molting is likely to be neem's most important quality. Eventually, this larvicidal activity will be used to kill off many pest species.
Go to:

INSECTS AFFECTED​

By 1990, researchers had shown that neem extracts could influence almost 200 insect species. These included many that are resistant to, or inherently difficult to control with, conventional pesticides: sweet potato whitefly, green peach aphid, western floral thrips, diamondback moth, and several leafminers, for instance.
In general, it can be said that neem products are medium- to broad-spectrum pesticides of plant-eating (phytophagous) insects. They affect members of most, if not all, orders of insects, including those discussed below.

Orthoptera​

In Orthoptera (such as grasshoppers, crickets, locusts), the antifeedant effect seems especially important. A number of species refuse to feed on neem-treated plants for several days, sometimes several weeks. Recently, a new effect, which converts the desert locust from the gregarious swarming form into its nonmarauding solitary form, has been discovered.
As a test of neem's ability to repel insects, entomologist Thyril Ladd dipped a glass rod into dilute neem extract and wrote the letters N and M on a soybean leaf

Figure

As a test of neem's ability to repel insects, entomologist Thyril Ladd dipped a glass rod into dilute neem extract and wrote the letters "N" and "M" on a soybean leaf. He then exposed the leaf to the Japanese beetle, a pest renowned for a voracious appetite (more...)

Homoptera​

Aphids, leafhoppers, psyllids, whiteflies, scale insects, and other homopterous pests are sensitive to neem products to varying degrees. For instance, nymphs of leafhoppers and planthoppers show considerable antifeedant and growth-regulating effects. However, scale insects (especially soft scale), are little affected. Phloem feeders, such as aphids, are in general not good candidates for neem used systemically (see earlier). In some cases, the host plant may influence the degree of control; this seems to apply to some whiteflies, which are affected on some crops but not on others.
Neem derivatives may also influence the ability of homopterous insects to carry and transmit certain viruses. It has been shown, for example, that low doses keep the green rice leafhopper from infecting rice fields with tungro virus. The cause is uncertain but seems to be only partly owing to neem killing the insects or modifying their feeding behavior.

Thysanoptera​

Neem is very effective on thrips larvae, which occur in the soil. However, once the adult thrips and related pests have taken up residence on the plants themselves, they are less sensitive to neem extracts. Oily formulations have shown some success in exploratory trials (perhaps because the oil coated and suffocated these minute creatures).
InsectEffects
Insects Affected by Neem Products
Neem is known to affect more than 200 species of insects. Here we present brief information on a sampling of them to show the range of effects and the range of species affected.
InsectEffects
Mediterranean fruit flyDisrupts growth, toxic
Oriental fruit flyArrests pupae development, retards growth, toxic to larvae
Face flyRetards growth, toxic
Horn flyRepels, retards growth, disrupts growth
WhiteflyRepels, retards growth, inhibits feeding
HouseflyInhibits feeding, disrupts molting, repels
Sorghum shoot flyInhibits feeding
Yellow-fever mosquitoKills larvae, disrupts molting
House mosquitoToxic to larvae
FleaRetards growth, repels, inhibits feeding, disrupts growth, eggs fail to hatch
Head liceKills, very sensitive to neem oil—traditional use in Asia
Spotted cucumber beetleRetards growth, inhibits feeding
Mexican bean beetleRetards growth, inhibits feeding, disrupts molting
Colorado potato beetleEggs fail to hatch, larvae fail to molt with azadirachtin levels as low as .3 ppm, inhibits feeding
Flea beetleInhibits feeding
Khapra beetleInhibits feeding, disrupts molting, toxic to larvae
Confused flour beetleInhibits feeding, disrupts molting, toxic to larvae
Japanese beetleRepels, retards growth, inhibits feeding, disrupts growth
Red flour beetleInhibits feeding, toxic
American cockroachReduces fecundity and molts, reduces number of fertile eggs
Bean aphidReduces fecundity, disrupts molting
Rice gall midgeToxic
Western thripsRetards growth
Diamondback mothStrongly suppresses larvae and pupae, retards growth, inhibits feeding
Webbing clothes mothInhibits feeding, disrupts molting
Gypsy mothRetards growth, inhibits feeding, disrupts growth
Corn earwormRetards growth, inhibits feeding, disrupts molting
Pink bollwormRetards growth, inhibits feeding
Fall armywormRetards growth, repels adults, inhibits feeding, disrupts molting, toxic to larvae
Tobacco budwormInhibits feeding
Tobacco hornwormInhibits feeding, disrupts growth, toxic
Cabbage looperInhibits feeding
LeafminerRetards growth, inhibits feeding, disrupts molting, toxic
Serpentine leafminerHigh pupal mortality, retards growth, inhibits feeding, disrupts molting, toxic to larvae
Brown planthopperInhibits feeding, repellent, disrupts growth, mating failures and sterility
Green leafhopperInhibits feeding
Migratory locustStops feeding, converts gregarious nymphs into solitary forms, reduces fitness, adults cannot fly
House cricketDisrupts molting
Large milkweed bugToxic, disrupts growth
Mealy bugsRepels, inhibits feeding
Milkweed bugDifficulty in escaping the "skin" of the last molt, disrupts molting
Fire antInhibits feeding, disrupts growth
Boll weevilInhibits feeding
Cowpea weevilInhibits feeding, toxic
Rice weevilInhibits feeding, disrupts growth, toxic
��

Coleoptera​

The larvae of all kinds of beetles—especially those of phytophagous coccinellids (Mexican bean beetle and cucumber beetle, for example) and chrysomelids (Colorado potato beetle and others)—are also sensitive to neem products. They refuse to feed on neem-treated plants, they grow slowly, and some (such as the soft-skinned larvae of the Colorado potato beetle) are killed on contact

Lepidoptera​

From numerous field trials (notably on various moths), it appears that larvae of most lepidopterous pests are highly sensitive to neem. Indeed, it seems likely that armyworms, fruit borers, corn borers, and related pests will become the main targets of neem products in the near future. Neem blocks them from feeding, although this effect is usually less important than the disruption of growth it causes.

Diptera​

Many species of dipterous insects—fruit fly, face fly, botfly, horn fly, and housefly, for example—are targets for neem products. Mosquitoes, too, are a possibility.

Hymenoptera​

The freely feeding and caterpillar-like larvae of sawflies are target insects as well. In this group, neem's antifeedant and growth regulatory effects are both important.

Heteroptera​

The "true" bugs—including many pests such as the rice bug, the green vegetable bug, and the East African coffee bug that suck juices from crops and trees—are affected by neem products. Neem's systemic qualities affect their feeding behavior and disrupt their growth and development.
Go to:

EXAMPLES​

As discussed, neem's effects vary with different insects. Some effects on a small selection of major pests are summarized below.

Desert Locust​

Recent laboratory research has shown that neem oil causes "solitarization" of gregarious locust nymphs.2 After exposure to doses equal to a mere 2.5 liters per hectare, the juveniles fail to form the massive, moving, marauding plagues that are so destructive of crops and trees. Although alive, they became solitary, lethargic, almost motionless, and thus extremely susceptible to predators such as birds. Neem affects grasshopper nymphs similarly.
This discovery differs from earlier ones on locusts. Those first approaches used alcoholic extracts and were aimed at disrupting metamorphosis or at stopping adult locusts from feeding on crops. The new approach uses neem oil enriched with azadirachtin to prevent locusts from developing into their migratory swarms. It apparently blocks the formation of the hormones and the pheromones needed to maintain the yellow-and-black gregarious form, which plagues arid Africa and the Middle East. In an interesting aside, it has been shown that neem oil destroys their antennae, even when applied to the abdomen.
Neem trees grow well throughout the locust zones of Africa and the Middle East, and thus, in principle at least, the means to control the plagues could be locally produced.

Cockroach​

Neem kills young cockroaches and inhibits the adults from laying eggs. Baits impregnated with a commercial preparation of neem-seed extract proved to retard the growth of oriental, brown-banded, and German cockroaches.3 First-instar nymphs of all three species failed to develop, and all died within 10 weeks. Last-instar nymphs exhibited retarded growth, and half of them died within 9 weeks. After 24 weeks, only 2 out of the 10 surviving German-cockroach nymphs had reached adulthood.
In a "taste test," American cockroach adults preferred neem-treated pellets over untreated ones, but neem-treated milk cartons repelled them.4

Brown Planthopper​

Neem cake (the residue left after oil has been removed from the kernel) has proved so successful that Philippine farmers are already using it on a trial basis against the brown planthopper (and other rice pests).5 Neem oil is being employed as well. Five applications of a 25 percent neem-oil emulsion sprayed with an ultra-low-volume applicator is said to protect rice crops against this increasingly severe scourge. It has been estimated that one neem tree provides enough ingredients to protect a hectare of rice. This use alone exemplifies the economic importance of further developing the neem tree for pest control.6

Stored-Product Insects​

Neem shows considerable potential for controlling pests of stored products. This is one of the oldest uses in Asia, and the literature contains many references to its benefits. In the traditional practice, neem leaves are mixed with grain kept in storage for 3-6 months. The ingredients responsible for keeping out the stored-grain pests are not yet identified—but they work well.
In this connection, repellency seems of primary importance. For instance, treating jute sacks with neem oil or neem extracts prevents pests—in particular, weevils (Sitophilus species) and flour beetles (Tribolium species)—from penetrating for several months. For this use, the degradation problem caused by sunlight is less of a concern because the products are mostly away from the sunlight, inside jars or other containers.
Neem oil is an extremely effective and cheap protection for stored beans, cowpeas, and other legumes. It keeps them free of bruchidbeetle infestations for at least 6 months, regardless of whether the beans were infested before treatment or not.7 This process may be unsuited for use in large-scale food stores, but it is potentially valuable for household use and for protecting seeds being held for planting. The treatment in no way inhibits the capacity of the seeds to germinate.
Neem has also been used in India to protect stored roots as well as tubers against the potato moth. Small amounts of neem powder are said to extend the storage life of potatoes 3 months.

Armyworm​

Azadirachtin has proved an effective prophylactic against armyworms at extremely low concentrations—a mere 10 mg per hectare.8
Left row: untreated white cabbage, badly damaged by diamondback moth (and aphids)

Figure

Left row: untreated white cabbage, badly damaged by diamondback moth (and aphids). Right row: cabbage treated with aqueous neem-seed-kernel extract is largely undamaged. On the diamondback moth, neem exerts a combination of effects: it repels, it deters (more...)
For instance, it inhibits the fall armyworm, one of the most devastating pests of food crops in the western hemisphere. It has, however, been found necessary to treat the crop before the insects arrive. If this is done, they "march right on past the fields," but once they have taken up residence, it is harder to get them to move on.

Colorado Potato Beetle​

In advanced trials in the United States, neem extracts have controlled the Colorado potato beetle.9 This is a significant pest in North America and Europe that is becoming increasingly resistant to broad-spectrum insecticides.
In experiments in Virginia, for example, neem-seed extracts (at relatively low concentrations of 0.4 percent, 0.8 percent, and 1.2 percent) were tested in potato fields both with and without the synergist piperonyl butoxide (PBO). All treatments significantly lowered the potato beetle populations and raised potato yields; however, the extracts containing PBO were the most effective. The sprayings were most effective when the larvae were young, and were best when conducted as soon as the eggs hatched.10

Leafminers​

When birch trees were sprayed to control the birch leafminer (Fenusa pusilla), neem extract seemed to perform as well as the registered commercial pesticide Diazinon®. It was, however, slower acting, and the insects continued to damage trees before they died. This leafminer is a serious pest in parts of North America, often browning the crowns of entire forests.
The U.S. Environmental Protection Agency has approved a neemseed-extract formulation for use on leafminers. This commercial product, now available almost nationwide, is expected to be especially useful against those leafminers that attack horticultural crops. Added to the soil, neem compounds enter the roots and move up into the crop's leaves so that leafminers munching on the leaves get their molting-hormone jammed, and they end up fatally trapped inside their own juvenile skins.

European Corn Borer​

The European corn borer, a highly adaptable pest of corn and other crops, was introduced to North America in 1917 and subsequently slashed Canada's corn yields in half. Today, it infests 40 million acres of corn in the United States each year, and in just an average year American farmers spend an estimated $400 million on chemicals to fight it.
Laboratory tests using neem products on this corn borer larvae produced 100 percent mortality at 10 ppm azadirachtin; 90 percent mortality at I ppm. Lower concentrations (0.1 ppm azadirachtin) left the larvae apparently unaffected, but the adults that later emerged had grossly altered sex ratios (there were many more males than females) and the few remaining females laid fewer eggs and laid them too late. This combination of effects suggests that azadirachtin could be effective for controlling this terrible pest.11

Mosquitoes​

The larvae of a number of mosquito species (including Aedes and Anopheles) are sensitive to neem. They stop feeding and die within 24 hours after treatment. If neem derivatives are used alone, relatively high concentrations are required to obtain high mortality.12 Nonetheless, the use of simple and cheap neem products seems promising for treating pools and ponds in the towns and villages of developing countries. In one test, crushed neem seeds thrown into pools proved nearly as effective at preventing mosquito breeding as methoprene, a rather expensive pesticide that is usually imported in developing countries.

Aphids​

In the Dominican Republic, water extracts of neem seed proved effective against Aphis gossypii on cucumber and okra and against Lipaphis erysimi on cabbage.13 This was in direct-contact sprays.
As noted earlier, neem extracts applied in a systemic manner (that is, within plants) usually have little effect on aphids. Apparently, this is because aphids feed only on the phloem tissues, where, for some unknown reason, neem materials accumulate least.

Fruit Flies​

Fruit flies (including the notorious medfly) are among the most serious horticultural pests. They cause millions of dollars in damage to fruits, and their very presence in the tropics is keeping dozens of delicious fruits from becoming major items of international trade. But, at least in experiments, the medfly is proving susceptible to neem. This insect pupates underground, and in trials in Hawaii, spraying dilute neem solution under fruit trees resulted in 100 percent control.14
More important, the neem materials were compatible with the biological-control organisms (braconid wasps) used to control fruit flies. When neem was applied to soil at levels that completely inhibited the pest from emerging from pupation, the parasites developing in these pupae emerged and exhibited normal life spans and reproductive rates. Thus, neem is compatible with biological control of fruit flies. Diazinon ®, the current soil treatment for fruit flies, kills not only fruit flies but their internal parasites as well.15

Gypsy Moth​

The U.S. Environmental Protection Agency has approved a neemseed-extract formulation for use on gypsy moth, a pest that is ravaging forests in parts of North America. In laboratory trials, a commercial neem formulation (Margosan-O®) produced 100 percent kill at very low concentrations (0.2 liters per hectare). After 25 days, the larvae were shrivelled, had stopped eating, and were dying. Field tests are in progress.

Horn Flies​

Ground-up neem seed and stabilized neem extracts can prevent horn flies from breeding in cattle manure. In recent U.S. Department of Agriculture trials in Kerrville, Texas, cattle were fed a diet containing these neem materials in the feed. The animals readily consumed feed containing 0.1-1 percent ground neem seed. The neem compounds passed through the digestive tract and into the manure where they kept the fly larvae from developing.16

Blowflies​

In Australia neem products have been tested against blowflies on sheep. The larvae of these pests penetrate and burrow under the skin of sheep. They are a major economic burden to Australia's farmers because many of the sheep die. In the tests, azadirachtin kept blowflies from "striking" (that is, laying their eggs on sheep).17
As a result of the excitement this discovery engendered, 1,000 hectares of neem have been planted in Queensland at a cost of more than $4 million. At least one Australian company has been established to produce and distribute neem products to sheep farmers.
Go to:

Footnotes​

1
Chitin is the material comprising the insect's exoskeleton. Stopping the formation of a new "skin" for the next stage in its development is one way that azadirachtin acts to regulate the growth of an insect.
2
Schmutterer and Freres, 1990.
3
The baits were lab-chow pellets laced with Margosan-O at 0.5 ml per pellet.
4
Adler and Uebel, 1985.
5
Saxena et al., 1984; von der Heyde et al., 1984.
6
Information from R.C. Saxena.
7
The amount of oil used was 2-3 ml per kg of beans. Neem oil shows a strong ovicidal effect in bean-seed beetles (bruchids), but its sterilizing and other influences may also be important in controlling these pests, which constitute a major problem when storing beans of many types (Zehrer, 1984).
8
Information from J. Klocke.
9
The statements here are based largely on research at Virginia Polytechnic Institute and State University, but generally similar results have been found in various parts of the United States and Canada.
10
Lange and Feuerhake, 1984.
11
Arnason et al., 1985.
12
This seems to be particularly true in the case of the yellow-fever mosquito, Aedes aegypti.
13
Information from H. Schmutterer.
14
Information from J.D. Stark. The neem formulation (Margosan-O¬) proved less effective than Diazinon® but at low levels (10 ppm azadirachtin in the soil) provided excellent control for the flies.
15
Information from J.D. Stark.
16
Information from J.A. Miller.
17
Information from M.J. Rice.


Copyright © National Academy of Sciences.
Bookshelf ID: NBK234642

1681394284700.png

Moghul painting illustrating a man burning neem leaves near a river where biting insects would be present
(© Dr Sarah Moore)
 
Last edited:

acespicoli

Well-known member
1681418798794.png
linked ^^^
1681419169719.png


Fungus Gnat Control​


Fungus_Gnats_2048x2048.png

Adult fungus gnats thrive in moist warm soils and grow mediums, they do not damage plants but are a seen as a nuisance in greenhouses and indoor grows. However, the fungus gnat larval, which look like small white caterpillars with a black head in the soil damage roots and stunt growth, particularly in seedlings and young plants. A wilting droopy plant may not indicate a lack of water, but rather root damage by fungus gnat. They are usually found in wet, over-watered soils or grow mediums.

What works best for Fungus Gnat control?...​

Most of the fungus gnat’s life is spent in a developmental stage such as Larva or pupa in the soil, so the most effective control is to target these stages rather than attempting to control the short-lived flying adults. Adults can be trapped using homemade traps or pheromone lure/trap.
Nematodes such as Steinernema feltiae and predatory mite Hypoaspis miles are both predators that attack the fungus gnat larvae in the soil. Both predators are very popular with experienced growers as a preventative measure. Both because of their low cost and effectiveness. High infestations will require multiple releases.
Monitor your growing area for presence of adult fungus gnats using yellow sticky traps or Gnat stix traps. Mosquito Bits can be used similarly to control and/or suppress fungus gnat populations.
For high infestations Steinernema feltiae, Hypoaspis miles (aka Stratiolaelaps scrimitis) and Dalotia coriaria (rove beetle) will co-exist and may all be released together.
Steinernema feltiae: Fungus gnat larvae, Root Aphids, Leaf Miners, Shore Flies, and Thrips.

Stratiolaelaps scimitus:
Fungus Gnat Larvae, Thrips, Sciarid Flies, Shore Flies, Root Aphids, Springtails, Root Mealybugs and Poultry Mites.

Dalotia coriaria:
Fungus Gnats, Shore Fly, Thrips, Springtails, and Root Aphids.
 
Last edited:

X15

Well-known member
I just use my lawn mower to shred all my leaves to a fine powder. The trick is to drop your mower on a low setting and shred the leaves on concrete. You can't do it on the grass it has to be on concrete. When the leaves are shredded finely I take a snow shovel and scoop them up and put them in the composter.
I like this. When I use to be at the golf course I would do experiments with leaf mulch and mowers all the time. It’s probably the single Best input for the type of soil we growers like to use.
Something I started doing instead of using the mower or leaf shredder… is to get a large burlap sack (gunny sack), a Zip type or string, and all the leaves you can fit in the sack (surprisingly a large amount). Just pack the sack and wait a few days… as the leaves dry out you can walk on the bag crushing the leaves to the consistency you want… can even screen the size you want as you empty the sack. Shake the dust from the sack over your worm bin or compost and watch the fungi do their thing in no time.
 

acespicoli

Well-known member

What is a Waxworm?​

image-wax-worms.jpg

Wax worms are the larval stage of the greater wax moth, Galleria mellonella. Despite their name, greater wax moths are only about 3/4" in length (although some can reach a maximum of 1” long). They are nondescript moths with segmented bodies that are colored either white, tan, gray or brown. Waxworms are much softer than other feeder insects, such as mealworms, and must be treated more gently. Because wax worms are so soft, they're a great alternative for younger – or elder – reptiles that may need a bit more help in chewing and digesting their food.
The body of the waxworm has 13 segments: the head, 3 thoracic segments and 9 abdominal segments, along with 6 legs. Interestingly, their body is different from some of the most popular feeder species due to their “prolegs,” which are four pairs of extremities – similar to legs – distributed across their many segments. There is one pair of prolegs each for abdominal segments 3-6.
The importance of these unique structures is the presence of the “claspers" on their bases. Claspers are muscular pads that hold the larvae mobilized, allowing it to hold onto any given surface it may be walking across. Interestingly, waxworm tails also have a clasper (located on the 13th segment)! This insect's entire body is covered in stiff hairs, also referred to as “bristles,” along with rows of spiracles (small openings) on either side of the body.
Surprisingly, wax worms have no lungs! But what does that have to do with anything? Well, the aforementioned spiracles take the place of the lungs, taking in oxygen from the surrounding environment and allowing them to be distributed throughout the waxworm via bodily fluids.
As we mentioned previously, waxworms, just like all moths and especially their relative feeder insects, silkworms, produce silk. Their silk is essential to their life cycle because they produce it as webbing for two important purposes — being the provision of a surface over which larvae can walk and being used as the material to construct a cocoon around the larvae as they develop into their pupal form. They produce this silk using a gland underneath their head and expel it through small structures known as “spinnerets.”
Another unique thing about wax worms is their affinity to beehives. The adults lay up to 300 eggs in the crevices of beehives at a time. When in large groups, waxworms can overtake even the most formidable colony of bees. Beehives provide the perfect growing environment for developing waxworms because they are generally a consistent temperature of 86 degrees Fahrenheit.
You might be wondering, "What do wax worms eat when they grow in the beehives?" The larvae feed on pollen, honey, beeswax and even the carcasses of fallen bees found in the honeycombs. Unfortunately, this does not leave the hive in great condition – to reach these nutrients, the wax worms have to burrow into the honeycombs and compromise the structural integrity of the hive. They also tend to leave large masses of webs and other debris inside the hive, making it an unsuitable living space for any bees left inside.
Apart from feeding reptiles, scientists are finding some incredible applications for this destructive behavior. It is now widely known that waxworms are voracious feeders with a particularly strange diet – plastic! Researchers have found that wax worms are capable of eating up to 92mg of plastic overnight, making them a potentially vital tool in reducing plastic pollution worldwide.

Life Cycle of the Waxworm​

Just like all moths, waxworms undergo complete metamorphosis. This means that they have four distinct life stages, each of the first three dissimilar to adulthood. In each stage, the waxworm is quite sensitive to environmental factors, with an emphasis on temperature (the ideal temperature for them is around 82-86 degrees Fahrenheit). Because they live within the combs of a beehive in their early stages, they tend to rely quite heavily on ventilation and light availability, as well. The life cycle of the waxworm is as follows:

Egg​

Female wax moths lay their eggs immediately following mating and continue to do so over 5 days. Depending on the temperature, a female moth may produce between 300-600 eggs. She will lay her eggs in large batches, with a preference for dark, hidden areas. After 3-5 days, the eggs will hatch (given the temperature remains between 84 to 95 degrees Fahrenheit). If conditions are less than ideal, this hatching period may extend to a maximum of 35 days (this is most likely to happen with temperatures around 64 degrees Fahrenheit).

Larva​

Once the hundreds of eggs have hatched, the larvae immediately begin to burrow into the comb, lining their tunnels with silk. Unfortunately, this is a highly damaging process and leaves the hive in poor condition. In warm conditions, the larvae can fully develop in as little as 20 days, while cooler temperatures may extend this period for as long as 5 months. Once they are ready to transition into their pupal stage, they construct a silk cocoon over a 2-3 day period. If there are a large number of waxworms, the hardening of the wax cocoons can fuse the combs together – an irreparable form of damage to the hive.

Pupa​

Inside the cocoon, the pupa is white to yellow in color and darkens to brown toward the end of pupation. In optimal conditions, the pupa can hatch within 3-8 days, while cooler temperatures will delay hatching for up to 2 months.

Adult​

Like silk moths, adults live for only a short period – and this duration depends heavily on the sex of the moth. Females live significantly shorter than males, at an average of 12 days, whereas males persist for a maximum of 21 days. During this time, neither of them feed, and instead focus only on mating and reproducing.

Where Are Wax Worms From?​

Wax worms naturally appear nearly everywhere around the world. They are found in Europe, North America, Russia and Turkey. In Australia, though, they are an introduced species. In all of these places, they can be found living near and within beehives.

Raising Wax Worms​

Can bearded dragons eat wax worms? Or, what about crested or leopard geckos? Yes, waxworms are very nutritious for all of these reptiles! Because they offer many health benefits to your pet reptile, you should start raising wax worms yourself! With the right equipment, waxworms can be quite easy to raise. Below are some guidelines on how to get started:

1. Setting up the Perfect Housing​

Now, don’t be paranoid when you are arranging the housing for your wax worms. Yes, they can eat plastic, but a thick enough container can hold them inside. You can use a glass, metal or hard plastic container to keep these buggers in. You can store about 50 waxworms in as little as a 1 gallon jar or a roomy 5 gallon tank (for breeding, you can add 75-100 waxworms per 100 grams of bedding). When choosing your container, just avoid getting a material that is too soft, such as soft or thin plastic, cardboard or wood – these are all materials that wax worms can easily chew through.

2. Layer the Substrate​

Here’s where you can get creative. You can make a dual-purpose waxworm bedding that will provide them with comfort and warmth while also feeding them. The first ingredient should be either bran, uncooked oatmeal or wheat germ. Cover about an inch deep of the entire base of your mixing container with this substance. Remember how the wax worms prefer to live in beehives? That comes into play here because you'll need to add enough honey to the substance to make this a crumbly, thick paste – not so much that it is dripping honey. If you want to save money here, you can replace 90% of the required honey with corn syrup, although this will be a less nutritious food source. Let the bedding dry completely and add it to the waxworm container, up to an inch deep. Drop in some crumpled wax paper or cups of egg cartons to give the waxworms a place to spin their cocoons. Finally, cover the container with cheesecloth.

3. Maintenance​

Now, all you have to do is keep the container in a dark, well-ventilated area (you can cover the container with a paper bag to avoid disturbing the airflow) and maintain a temperature between 82-90 degrees Fahrenheit. Simply make sure to remove dead larvae and pupae over time to keep the population healthy and happy.
Wax worms are some of the most interesting insects presently known to man. Their uses range from silk production and breaking down plastic to nourishing your favorite reptile (as long as you don’t feed too much of this fatty snack). Keeping a colony of waxworms can be a rewarding experience as well; just make sure to follow the above guidelines to keep them all happy, healthy and highly nutritious for your lizard or turtle.


Rearing nematodes: Do-it-yourself guide​


Heidi Wollaeger, Michigan State University Extension, and Fred Warner, MSU Diagnostic Services, Department of Plant, Soil and Microbial Sciences - October 28, 2013

Rearing nematodes in wax worms may be a cheaper source to provide fungus gnat and shore fly control in the greenhouse.

Species of entomopathogenic nematodes, or round worms, have been shown to be beneficial for controlling many types of greenhouse pests, including fungus gnats, shore flies, and some control of western flower thrips. In the nursery, nematodes can provide some control of root weevils, wireworms, cutworms, and spotty control of Japanese beetle grubs. In the same manner that these nematodes invade their soil-borne hosts, nematodes can be bred in Galleria mellonella wax worms. Rearing them yourself can save you money and prevent repeat ordering with your supplier.
What you will need:
  • 2 and 3.5-inch Petri dishes
  • Filter paper
  • G. mellonella wax worms from your local bait and tackle shop
  • De-ionized water or boiled tap water
  • Aquarium with bubbler or numerous shallow live culture flasks
  • Microscope
Numerous species of entomopathogenic nematodes can be reared with Galleria wax worms, including Heterorhabditis bacteriophora, Steinernema carpocapsae, Steinernema feltiae and Steinernema riobrave. First, place five live wax worms in a Petri dish with approximately 100 live nematodes, or 20 nematodes per host worm, with a few drops (0.5 mL) of de-ionized or boiled tap water. The juvenile nematodes will enter and infect insects through their natural openings. Endosymbiotic bacteria carried within the nematodes are released after they penetrate their hosts. Toxins produced by the bacteria cause blood poisoning of the insects usually resulting in their death within 72 hours. The nematodes consume the bacteria and complete one to three generations before they emerge from the dead insects seeking other hosts.
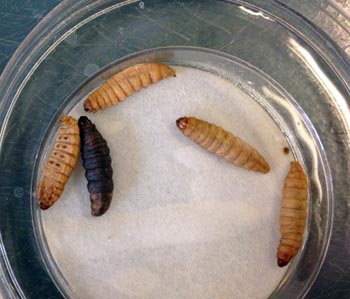
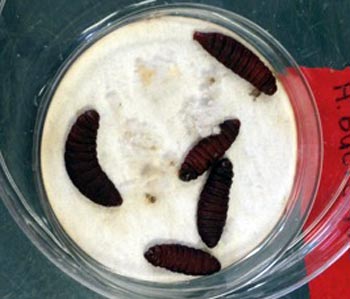
Store Petri dishes for six days in a dark place at room temperature. After six days, check worms for infection. The cadavers of the wax worms successfully infected will appear beige to dark red, depending on the species of nematode used for infection (Photos 1-2).

Wax worms
Wax worms

Photos 1-2. (Left) Wax worms post-infection from S. carpocapsae. Successfully infected wax worms will be beige in color. (Right) Wax worms post-infection from H. bacteriophora. Successfully infected wax worms will appear brick red. Photo credit: Heidi Wollaeger, MSU Extension. Special thanks to MSU’s Matt Grieship and Joe Tourtios for specimens.​

Upon successful infection, place Petri dish containing nematodes, worms and filter paper within another larger Petri dish. Fill the outer Petri dish halfway with de-ionized or boiled tap water and cover with an opaque lid for three weeks. Infective juvenile nematodes will emerge from the host and swim into the water within one to three weeks. Verify that the nematodes are still alive – wiggling and swimming – under a dissecting microscope. Dead nematodes will be straight and still.
Add solution that contains nematodes to a live culture flask, a shallow dish or an aquarium with an air bubbler. Nematodes can be stored in darkness in a container that provides a sufficient amount of air to nematodes by using shallow containers or an air bubbler for approximately one month.
Michigan State University Extension recommends that a minimum of a half of a million nematodes be applied to every square meter in the greenhouse to provide fungus gnat and shore fly larvae control. In the nursery or field, concentrations should be at least double of that in the greenhouse. A mixture of species of nematodes may prove to be beneficial since nematodes of different species are more effective on some greenhouse pests than others. S. feltiae infects fungus gnat larvae while S. carpocapsae infects shore fly larvae.
To learn more about the nematode lifecycle and how to apply them in the greenhouse or the nursery, visit the University of Massachusetts biological control websites: Biological Control: Using Beneficial Nematodes and Beneficial Nematodes.


Common fixes for organic soil pests
 

Latest posts

Latest posts

Top