What's new
  • As of today ICMag has his own Discord server. In this Discord server you can chat, talk with eachother, listen to music, share stories and pictures...and much more. Join now and let's grow together! Join ICMag Discord here! More details in this thread here: here.

DIY Organic Potting Mix's for Grass - Ace Spicoli

acespicoli

Well-known member
Anyone have any experience with this ?
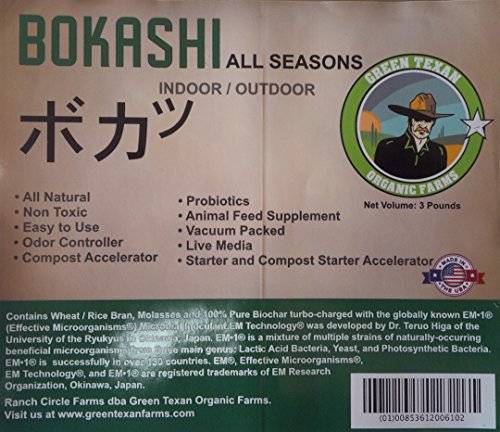


One trademarked product was originally (c. 1985) marketed as EM-1 Microbial Inoculant.[5] Such EM blends include:[6]

Lactic acid bacteria: Lactobacillus casei
Photosynthetic bacteria: Rhodopseudomonas palustris
Yeast: Saccharomyces cerevisiae
Others: beneficial microorganisms that exist naturally in the environment may thrive in the mixture.
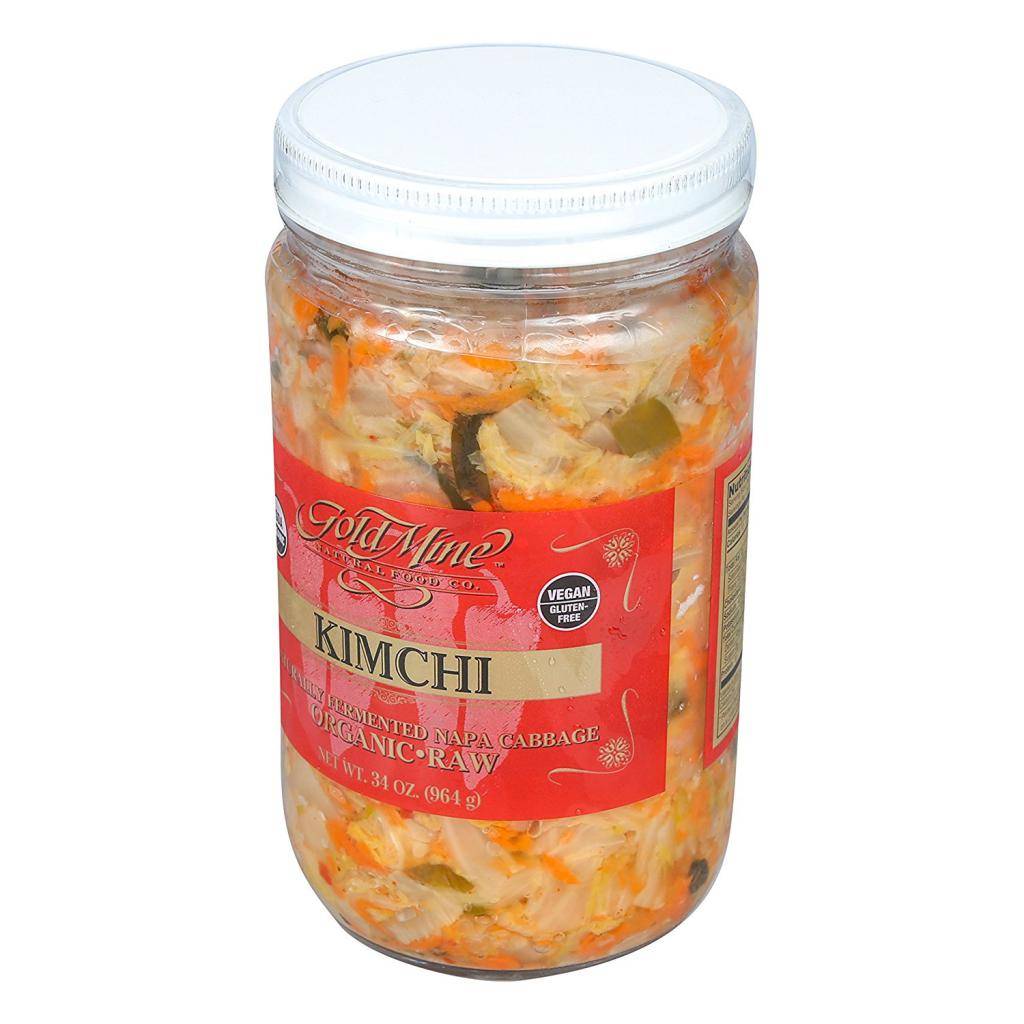


The microorganisms present in kimchi are: Bacillus mycoides, B. pseudomycoides, B. subtilis, Lactobacillus brevis, Lb. curvatus, Lb. parabrevis, Lb. pentosus, Lb. plantarum, Lb. sakei, Lb. spicheri, Lactococcus carnosum, Lc. gelidum, Lc. lactis, Leuconostoc carnosum, Ln. citreum, Ln. gasicomitatum, Ln. gelidum, Ln. holzapfelii, Ln. inhae, Ln. kimchii, Ln. lactis, Ln. mesenteroides, Serratia marcescens., Weissella cibaria, W. confusa, W. kandleri, W. koreensis, and W. soli.

Mustard Leaf Kimchi
POSTED ON DECEMBER 30, 2016 BY AUSTIN

After perusing the Korean market’s fresh vegetable aisle, I found some mustard greens, which resemble green kale. A common type of kimchi, mustard leaf (gat) kimchi (???) is made from these deep green, pungent leaves which carry similar spicy notes of which their seeds are well-known.

After a two-hour salt brining, these hearty leaves didn’t wilt much.
Print
Mustard Green Kimchi
Prep time: 2 hours 15 mins Fermentation time: 4-5 days
Yield: just under 1qt

Ingredients
1 bunch fresh mustard greens
2 quarts/liters filtered water
6 Tablespoons (90ml) fine sea salt
8 oz (by volume) "Make-ahead kimchi paste", OR (remaining ingredients)
5 scallions (green onions)
1 Tbsp./15ml tamari (gluten free soy sauce)
2 Tbsp./30ml by volume /1 ounce by weight (15g) red pepper powder
1¾ ounces by weight (50g) ginger
2.5 ounces by weight (75g) garlic, peeled
Instructions
Mix Brine & Soak Veg
Dissolve 6 tablespoons sea salt into 2 quarts/liters of water.
Rinse dirt off leaves. Add leaves to brine and submerge using a plate or weight. Let them sit in brine 2 hours.
Make Paste
Peel garlic and clean any dirt off ginger. Chop both roughly.
Cut stems off scallions, and slice them (white and green parts) into ½ inch (1 cm) pieces.
Add ginger, garlic, and scallions to work bowl of a food processor, along with red pepper powder and tamari.
Start the food processor, and mix together until a thick paste forms and it "rolls" together when the machine is running. You may need to scrape down the sides of the bowl once or twice. You may also need a little extra tamari to get the right texture.
Pack and Ferment
Drain greens.
Cut greens into 1 to 2-inch pieces. Cut the larger leaves lengthwise as needed (down the spine) so the pieces are about 2-inches square. Use the stems as well as the leaves.
While wearing gloves, coat the greens with paste.
Pack into a wide-mouth quart-sized glass jar or crock.
Add any residual paste to jar/crock.
Cover with a plastic lid or plate, and weigh down so that the contents stay under the brine.
If using smaller (quart) jars, find a weight such as a small glass jar (filled with water) that closely fits inside the diameter of the jar. Add to jar.
Cover jar(s) with a cloth and rubber band to keep flies out. Alternately, add airlock to top of jar.
Ferment for 4-5 days. Transfer to refrigerator to slow fermentation. Flavors will continue to develop. Enjoy within 1 month.

Homemade Kimchi Paste
Prep Time 5 minutes
Total Time 5 minutes
Ingredients
1/2 cup gochujangyong gochugaru Korean red pepper powder
1/4 cup water + 1 tablespoon extra
1/4 cup fish sauce
2 tablespoons rice vinegar
1 tablespoon sugar
1 teaspoon kosher salt
1 teaspoon sesame oil
1 teaspoon sesame seeds
Instructions
In a medium bowl, combine all ingredients and mix well.



A kombucha culture is a symbiotic culture of bacteria and yeast (SCOBY), similar to mother of vinegar, containing one or more species each of bacteria and yeasts, which form a zoogleal mat[23] known as a "mother."[1] The cultures may contain one or more of the yeasts Saccharomyces cerevisiae, Brettanomyces bruxellensis, Candida stellata, Schizosaccharomyces pombe, and Zygosaccharomyces bailii.[24]

The bacterial component of kombucha comprises several species, almost always including Gluconacetobacter xylinus (G. xylinus, formerly Acetobacter xylinum), which ferments alcohols produced by the yeasts into acetic and other acids, increasing the acidity and limiting ethanol content.[citation needed] The population of bacteria and yeasts found to produce acetic acid has been reported to increase for the first 4 days of fermentation, decreasing thereafter.[citation needed] G. xylinus has been shown to produce microbial cellulose, and is reportedly responsible for most or all of the physical structure of the "mother", which may have been selectively encouraged over time for firmer (denser) and more robust cultures by brewers.[25][non-primary source needed]

The mixed, presumably symbiotic culture has been further described as being lichenous, in accord with the reported presence of the known lichenous natural product usnic acid, though as of 2015, no report appears indicating the standard cyanobacterial species of lichens in association with kombucha fungal components.[19]
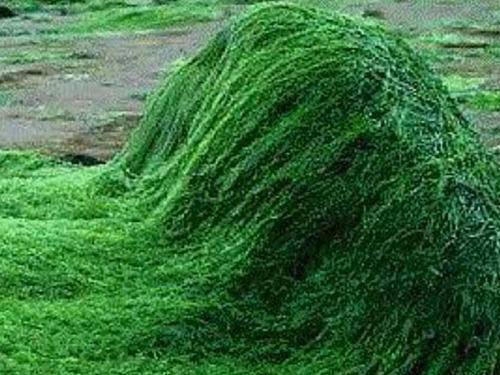


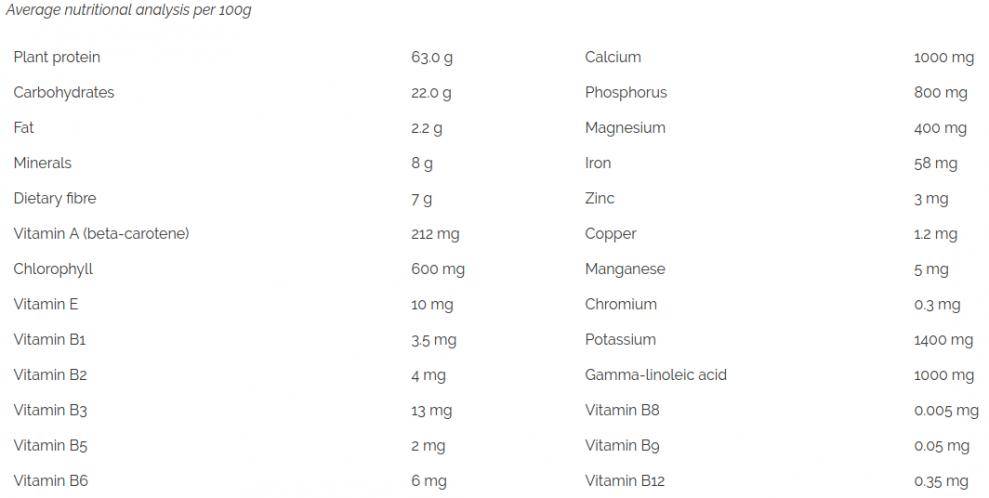
Spirulina represents a biomass of cyanobacteria that can be consumed by humans and other animals. There are two species, Arthrospira platensis and Arthrospira maxima
 
Last edited:

acespicoli

Well-known member
The capacity to blunder slightly is the real marvel of DNA.
Without this special attribute,
we would still be anaerobic bacteria and there would be no music.


-Lewis Thomas
 

acespicoli

Well-known member
Now thats alot of stuff


Ancient Forest is a natural product consisting of 100% pure forest humus. It is derived from thousands of years of naturally decomposed forest litter that contains a wide spectrum of organic compounds. An incredibly high diversity of microorganisms, with more than 35,000 species of bacteria and over 5,000 species of fungi, make Ancient Forest an ideal amendment for gardening and potting soils. Ancient Forest also aids in the retention of water and nutrients; creating stable, long lasting soil for your garden. The immense biological activity also makes Ancient Forest the ideal inoculum for actively aerated compost teas.
 

acespicoli

Well-known member
Just wanted to post a update as its been a learning experience for me.
I never want to say I know it all and basically come here to share what I have
and get advice from more experienced growers.
Share what we learn together for the benefit of everyone on the forum.

I stopped using anything but BPA free food safe plastics HDPE #2, etc
Also grow bags are only untreated burlap jute or hemp
Distilled, Reverse Osmosis, or rain water is preferred when available

( google " FDA Recycled Plastics in Food Packaging " for more information on HDPE )


This is the 5 gallon size run about 1.25$ per bag with shipping

Latest simple soiless organic indoor mix


[url='https://www.icmag.com/ic/picture.php?albumid=70564&pictureid=1935435']


picture.php
[/url]


With the the natural control for fruit flies available from amazon

Environmental Factor 4003242 1 x 5 Million Beneficial Nematodes

Monthly feeding is required tomato tone tea and fertilizer under 5 gallon bags on top of saucers
 
Last edited:

acespicoli

Well-known member
I have had better results in a soil peat vermiculite mix than just vermiculite and peat and here's why,
the only problem comes in with use indoors and unsterilized soil you end up with all kinds of unwanted insects
the solution is to sterilize your field soil and introduce just the beneficial microbes you want.
Also just the addition of predatory nematodes and lady bugs to a grow tent has proved efficient in removing pests

picture.php


picture.php
 
Last edited:

acespicoli

Well-known member
Fine tuning the nutes in your mix

Interestingly Blood and Bone Meal are good together (cotton seed ash or bat guano for K)
Vegan purposes Fish and Kelp Meal are also good together

May require use of browsers zoom feature :/

picture.php
 
Last edited:

acespicoli

Well-known member
Best safety practices for handling fungi
While culturing indigenous fungi may often be safe, it can be important
to take precautions when handling these organisms, because humans
can be adversely affected by contact with fungal spores and the
mycotoxins that fungi can produce. This is especially important for
children, the elderly, immunologically compromised individuals, and
people who have allergies, asthma, sinusitis, and similar respiratory
problems. Take the following precautions when gathering spores,
mixing ingredients, and applying a fungi-based soil amendment.
Wash your hands thoroughly with soap and water before and after
handling fungal materials. Do not touch your mouth, nose, or eyes
when handling fungi; do not use your hands to smoke or eat.
Work with fungi in an open-air environment, never in small, enclosed
rooms.
Wear disposable gloves when handling fungi, and throw them
out when done. Do not use your bare hands to handle fungal
materials if you have a cut or open wound.
Wear eye protection and a disposable N95 respirator mask when
handling fungi.
Do not move tools and other supplies that have been in contact with
fungi to other areas of the farm or home unless they have been
washed with soap and water.
 

acespicoli

Well-known member
Collecting microorganisms from the environment

When is the best time to collect microorganisms?
Microorganisms (microbes) may be cultured at any time
of the year; however, avoid wet, rainy seasons. Excessive
moisture in the environment promotes growth of fungi
that are less desirable for the intended uses.
How time-consuming is it to collect these
microbes?
The collection process takes approximately 4–5 days in
cooler weather (about 68°F, 20°C) and 3–4 days under
warmer conditions (> 68°F, 20°C).
Where are the best places to collect
microorganisms?
Beneficial microbes are highly concentrated under undisturbed
forests or other vegetated areas. Combining
microbes collected from multiple sites will likely result
in a more robust culture.

What collection supplies will I need?

Collection materials are relatively inexpensive and readily obtainable.
• a small wooden box, 12 x 12 x 4 inches deep, preferably
made of cedar
• steamed white rice
• white paper towels, enough to cover the wooden box
• two to four large rubber bands
• a sheet of clear plastic, large enough to completely
cover the wooden box
• 1?4-inch mesh wire screen large enough to completely
cover the wooden box.

How are collection supplies assembled?

Fill the wooden box with 3 inches of steamed rice.
Cover the box with white paper towel, being careful
not to let the towel touch the rice. There should
be an inch or so of air space between the rice the paper
towel. Use rubber bands around the top of the box to
secure the paper towel in place.
Cover the top of the box with wire screen to
prevent animals from tampering with the rice. Top the
wire with a sheet of clear plastic to protect the box from
rain, and place it under trees or in another secluded area.
The box should not be in direct sunlight.
Partially bury the box in the soil . It should
be buried at least 2 inches deep for best results.
Cover the box with fallen leaves from the harvest location.
Anchor the plastic sheet on all sides with
small rocks to prevent it from being dislodged by wind.
Leave the box undisturbed for a minimum of 4–5
days. After that time, check to see whether the moist rice
is covered with white mold. If mold growth is sparse,
re-cover the box and wait an additional 2–3 days before
re-checking. If the mold is a color other than white (other
colors indicate growth of less effective fungi) or if rain
has entered the box, the contents should be discarded
and the process repeated.

Culturing the microorganisms

Once the desired microbes have been collected, the next
step is to increase their numbers.
What materials are necessary for culturing?
The basic supplies for microbe culturing are
• a clean clay pot (hard-fired, glazed, or terra cotta)
• a wooden spoon
• white paper towels
• rubber bands
• a large clear bowl, big enough to hold contents of rice
mixture
• a small food scale
• a straw mat
• a shovel
• a composting thermometer
• raw, granulated brown sugar
• wheat mill run* or, if available, mushroom growth
medium waste.

*Wheat mill run (WMR), also called “wheat midds” or
“middlings,” is the materials remaining after flour, or
semolina, is extracted from wheat or durum during milling.
WMR generally includes ground screenings from
cleaning; remnant particles of bran, germ, and flour; and
other offal from the milling process.

How are the materials assembled to cultivate microbes?

1) Weigh and record the weight of the large bowl.
2) Use the wooden spoon to move the molded rice from
the wooden box into the bowl. Weigh the
filled bowl and calculate the weight of the rice mass
by subtracting the weight of the empty bowl from the
filled bowl.
3) Gradually add an amount of granulated brown sugar
equal to the weight of the rice mass. Handknead
the sugar and rice until the material has the
consistency of gooey molasses. Protective
gloves are suggested.
4) Fill the clean clay pot two-thirds full with the rice/
sugar mixture. Cover it with paper
towel secured in place with rubber bands.
5) Store the pot in a cool area away from direct sunlight
for 7 days. This will allow the mixture to ferment.
6) Working in a shaded area, add a small
amount of water to the fermented rice mixture in
a 1:500 ratio. Then, slowly blend in wheat mill run
(or used mushroom medium) until mixture is of
semi-moist but not wet consistency (roughly 65–70%
moisture) .
7) Place a mound of the mixture on a soil surface and
cover it with the straw mat or leaves, protecting it from
sunlight. Allow the microbes to propagate
for 7 days. Periodically examine the external surface
of the pile for white mold growth, monitor internal
temperature of the pile with a composting thermometer
so as not to exceed 122°F (50°C), and turn the
pile with a shovel (a minimum of three to four times
during the week) to keep fermentation temperatures
from getting too high.
8) When the fermentation process is finished, internal
temperature will stabilize, indicating cultivation is
finished. Your culture of naturally occurring microorganisms
is now ready for use

Application

What do I do with the fermented mixture?
Dilute the final product (1 to 1 by volume) with soil and
incorporate this mixture into the surface soil as a topdressing
for crop production, or add it to your compost
pile. This biological soil amendment is expected to enhance
soil microorganism activity.
picture.php

picture.php
 
Last edited:

acespicoli

Well-known member
latest news - no soil mix indoor / outdoor potted plants

keep it simple recipe
1/2 vermiculite ((Mg,Fe2+,Fe3+)3[(Al,Si)4O10](OH)2·4H2O) - (CEC) at 100–150
1/2 peat moss (CEC) of 100-200
tomato tone (feather meal, poultry manure, bone meal, alfalfa meal, greensand, sulfate of potash, and gypsum also contains 1% leonardite and bene microbes)


note: wetting peat moss is not a issue with coarse vermiculite added
this mix will readily and evenly absorb water

Soil Preparation:

  • Single plants: Mix 3 tablespoons of Tomato-tone into the soil when planting.
  • For Potted Plants: 2 cups of Tomato-tone per cubic foot of soil (1.5 tbsp. of Tomato-tone for every 1 qt. of soil).
Feeding
  • Single Plants : 3 tablespoons per plant.
  • Potted Plants: Apply 1.5 teaspoons per 4 inch of pot diameter (1.5 tablespoon per 12 inch pot diameter).

produces great - its a minimalist mix thats effective


Pros of Peat Moss:

  • Free of weed seeds, pests and pathogens.
  • Can absorb up to 20 times its weight in water.
  • Contains beneficial microorganisms.
  • Acidic pH (a "pro" in my opinion because you can add highly alkaline amendments to it).
  • Contains a variety of elements, especially sulfur, which helps with proper terpene expression.
  • Excellent habitat for beneficial microorganisms.
  • Harvested in North America, which reduces the fossil fuel impact to get it to the United States.
  • Holds 10x to 20x its dry weight in water.
  • Better C:N ratio than coco coir.
  • Cation exchange capacity (CEC) of 100-200.

blumat low pressure water system and saucers for plants with airpots fabric containers


if this article was helpful please feel free to add your experience and tweaks
 
Last edited:

djav59

Member
References

References

I see no references listed for this diagram .

I am uncertain of this as I have observed various strains seem to be preferential in their growth pattern to container size,ie. I placed Thai seedling in two different containers one 20 gal. fabric one in 10 gallon plastic pot the one in plastic is finishing somewhat smaller but faster the one in fabric is larger but slower also these are 2 different phenos, but I observe same behavior with cloned ones thus far.
 

djav59

Member
Tuning the soil for an outdoor grow is an arduous task at times especially if you live in a region where soil is poor in nutrients.
You can put a lot of money into it and still get minimal results .
I like your aspect of local sourcing and a KISS principle of soil building it is DIY, but sometimes a prepared commercial mix is only sure road to success.
 

djav59

Member
OOps I see this is indoor grow section All i can say is stay away from sand for indoors it is too heavy and dense.
 

acespicoli

Well-known member
Rearing nematodes: Do-it-yourself guide (copied from MSU links hopefully disabled google it if you need application instructions great guide)


Heidi Wollaeger, and Fred Warner, MSU Diagnostic Services, Department of Plant, Soil and Microbial Sciences - October 28, 2013

Rearing nematodes in wax worms may be a cheaper source to provide fungus gnat and shore fly control in the greenhouse.
Species of entomopathogenic nematodes, or round worms, have been shown to be beneficial for controlling many types of greenhouse pests, including fungus gnats, shore flies, and some control of western flower thrips. In the nursery, nematodes can provide some control of root weevils, wireworms, cutworms, and spotty control of Japanese beetle grubs. In the same manner that these nematodes invade their soil-borne hosts, nematodes can be bred in Galleria mellonella wax worms. Rearing them yourself can save you money and prevent repeat ordering with your supplier.
What you will need:

  • 2 and 3.5-inch Petri dishes
  • Filter paper
  • G. mellonella wax worms from your local bait and tackle shop
  • De-ionized water or boiled tap water
  • Aquarium with bubbler or numerous shallow live culture flasks
  • Microscope
Numerous species of entomopathogenic nematodes can be reared with Galleria wax worms, including Heterorhabditis bacteriophora, Steinernema carpocapsae, Steinernema feltiae and Steinernema riobrave. First, place five live wax worms in a Petri dish with approximately 100 live nematodes, or 20 nematodes per host worm, with a few drops (0.5 mL) of de-ionized or boiled tap water. The juvenile nematodes will enter and infect insects through their natural openings. Endosymbiotic bacteria carried within the nematodes are released after they penetrate their hosts. Toxins produced by the bacteria cause blood poisoning of the insects usually resulting in their death within 72 hours. The nematodes consume the bacteria and complete one to three generations before they emerge from the dead insects seeking other hosts.
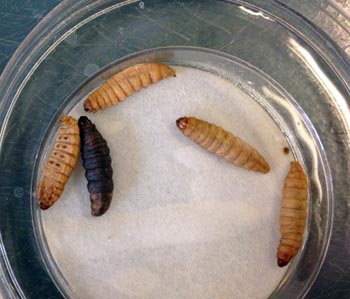
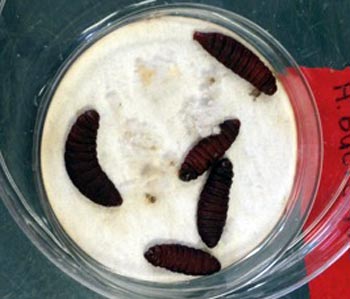
Store Petri dishes for six days in a dark place at room temperature. After six days, check worms for infection. The cadavers of the wax worms successfully infected will appear beige to dark red, depending on the species of nematode used for infection (Photos 1-2).
10-28WaxWorms1HEIDI.jpg
10-28WaxWorms2HEIDI.jpg

Photos 1-2. (Left) Wax worms post-infection from S. carpocapsae. Successfully infected wax worms will be beige in color. (Right) Wax worms post-infection from H. bacteriophora.Successfully infected wax worms will appear brick red. Photo credit: Heidi Wollaeger, MSU Extension. Special thanks to MSU’s Matt Grieship and Joe Tourtios for specimens.


Upon successful infection, place Petri dish containing nematodes, worms and filter paper within another larger Petri dish. Fill the outer Petri dish halfway with de-ionized or boiled tap water and cover with an opaque lid for three weeks. Infective juvenile nematodes will emerge from the host and swim into the water within one to three weeks. Verify that the nematodes are still alive – wiggling and swimming – under a dissecting microscope. Dead nematodes will be straight and still.
Add solution that contains nematodes to a live culture flask, a shallow dish or an aquarium with an air bubbler. Nematodes can be stored in darkness in a container that provides a sufficient amount of air to nematodes by using shallow containers or an air bubbler for approximately one month.
Michigan State University Extension recommends that a minimum of a half of a million nematodes be applied to every square meter in the greenhouse to provide fungus gnat and shore fly larvae control. In the nursery or field, concentrations should be at least double of that in the greenhouse. A mixture of species of nematodes may prove to be beneficial since nematodes of different species are more effective on some greenhouse pests than others. S. feltiae infects fungus gnat larvae while S. carpocapsae infects shore fly larvae.
To learn more about the nematode lifecycle and how to apply them in the greenhouse or the nursery, visit the University of Massachusetts biological control websites: Biological Control: Using Beneficial Nematodes and Beneficial Nematodes.

This article was published by Michigan State University Extension. For more information, visit extension. msu. edu. To have a digest of information delivered straight to your email inbox, visit extension. msu.
 

Latest posts

Latest posts

Top