What's new
  • As of today ICMag has his own Discord server. In this Discord server you can chat, talk with eachother, listen to music, share stories and pictures...and much more. Join now and let's grow together! Join ICMag Discord here! More details in this thread here: here.

Blumat auto watering

Jhhnn

Active member
Veteran
Im in a 5 x 5 tent so lining the whole room isnt an option for me. Big totes under the pots would work, possibly a 4 x 4 tray with a bit of a smaller res.

Overflow containment is more manageable w/ hydro- there's only so much water to start with. The same is true for a hand filled reservoir using plain water & organic soil. The blumat pressure regulator or automatic reservoir filling from the tap adds a new layer of issues that must be taken into account.

A person could use a timer, float switch & solenoid valve to limit delivery to the reservoir, as well.
 

rives

Inveterate Tinkerer
Mentor
ICMag Donor
Veteran
I use a flood and drain tray in my 4x4 tent, and keep the combined volume in the reservoirs less than what the tray will hold. The tray will hold @ 28 gallons with a reasonable safety margin, so it works pretty well. There are lots of options, but I prefer to err on the side of dead reliable - I had a line blow off of my F&D system in the attic about 30 years ago when we had a baby-sitter watching the kids. It's a little difficult to come up with a plausible explanation for water pouring through the ceiling on a clear summer day.....
 

heady blunts

prescription blunts
Veteran
ya avoid the pressure reducer hooked right to the tap unless you've got drains or some kind of fancy fail safe pump situation.

bmac some of those tents' bottom liners are waterproof I think. depending on the way yours is built it may have a containment solution ready to go.
 

Bmac1

Well-known member
Veteran
My tent does have a liner in the bottom but I wouldnt rely on it to stop much. I think a 4x4 tray in the 5x5 would be the ticket when I decide to try these out.
 

dr-dank

Member
well, 9 BMs turned up last night.

Oddly, it seems success is marked by a big old round of nothing happening. ;)

No leaks from any fittings, and the cones seemed rewarding precise and consistent in their behavior. That is, they all acted and adjusted the same, and their is direct relationship between knob and drip rate.

This morning I checked in and, nothing to see. Drain pan is empty, but plants still feel heavy. I believe this means working but only time will tell.

Best regards.


One last thought. Plants on an angle, as in my setup as needed for drainage due to a warped platform. Obviously you should arrange such that the sensor is downstream from the emitter if the plant is angled else risk run away.

The pic, or it did not happen:
 

Attachments

  • bm_1.jpg
    bm_1.jpg
    71.4 KB · Views: 26
Last edited:

SecondAttempt

Active member
I guess I'm lucky/I check my plants more than most... I just have dollar store "oil drain pans" under each smart pot. When they run away I catch them before they outrun the pan.
 

Jhhnn

Active member
Veteran
I guess I'm lucky/I check my plants more than most... I just have dollar store "oil drain pans" under each smart pot. When they run away I catch them before they outrun the pan.

Vigilance is one answer- I'm not the best at that sometimes. I know it & try to compensate with the setup.
 

dr-dank

Member
Well, I've done it. Read all 274 pages.

An an update:
1. I updated my inline filter suggestion (a few pages back) and have one on order. I think that foreign matter is as likely as air bubbles. Or maybe its just all the plastic drilling I did to get the res system working?

2. Have lived with the system for 3 days now. Has been working well, minus some stupid moves on my part.

After the first day i opened all the valves ~ 1 arrow and had some runaway draining 1/2 the res. Re-calibrated by manual water and and going far easier now.

I moved a plant and put a hard pinch in the 8mm to 3mm T supply. This went to 3/32 t that fed two plants, which then got a bit dry. I have since rotated the 8mm Ts so be vertical so if the line presses against the tray there is less chance of a pinch.

I have been topping of the res and adding .5ml/G bleach, the latter every 3 days, and so far ppm/ph are holding well.

Beginning to see the top of coco drying out while the pot remains heavy. That sight is a bit hard to get used to, but I think I can handle it. The plants don't mind. Perhaps I can ditch the mosquito dunks I soak in panty hose in my supply water. Given the filter sack I don't think the bits will clog but if not needed I can ditch happily.

Thanks again for the great idea and support!
 

Jhhnn

Active member
Veteran
Well, I've done it. Read all 274 pages.

An an update:
1. I updated my inline filter suggestion (a few pages back) and have one on order. I think that foreign matter is as likely as air bubbles. Or maybe its just all the plastic drilling I did to get the res system working?

2. Have lived with the system for 3 days now. Has been working well, minus some stupid moves on my part.

After the first day i opened all the valves ~ 1 arrow and had some runaway draining 1/2 the res. Re-calibrated by manual water and and going far easier now.

I moved a plant and put a hard pinch in the 8mm to 3mm T supply. This went to 3/32 t that fed two plants, which then got a bit dry. I have since rotated the 8mm Ts so be vertical so if the line presses against the tray there is less chance of a pinch.

I have been topping of the res and adding .5ml/G bleach, the latter every 3 days, and so far ppm/ph are holding well.

Beginning to see the top of coco drying out while the pot remains heavy. That sight is a bit hard to get used to, but I think I can handle it. The plants don't mind. Perhaps I can ditch the mosquito dunks I soak in panty hose in my supply water. Given the filter sack I don't think the bits will clog but if not needed I can ditch happily.

Thanks again for the great idea and support!

I use a long neck sprinkler type watering can for teas & gnatrol. 3 cups of liquid per 5 gal fabric pot soaks the surface, the blumats shut down, then come back on when they need to. No issues of overwatering in a fast draining medium.
 
ive been using the blumats for a bit now I have just drained my end line tonight and it smelt like farts does anyone know why ? the water in the res is clear thanks
 

dr-dank

Member
ive been using the blumats for a bit now I have just drained my end line tonight and it smelt like farts does anyone know why ? the water in the res is clear thanks

Farts as in sulfur? That sounds like something living in there of an anaerobic nature. As in root rot.

I assume you are dtw.

I am new to having a res and BM, so take or leave. I did read this whole thread, and have stayed in a holiday inn.. You did not provide many details so apologies if some does not apply:

1. Only chem salts. Using organics promotes microherd and all that entails. Top water manually any such additives.
2. I suggest a dead/sterile res. I'm using bleach at .5ml gallon every 4 days. So far so good. Other options are h202 (hydrogen peroxide), or dutch master "the zone". Some use sm-90, others state it can clog.
3. Light proof the res and keep as cool as possible. Perhaps add frozen water bottles.. My res sits in the closet and get to 85+. Sucks. So far no issues.
4. Add an airline/stone. I am bubbling my res. Warning: experienced users warn may not be needed and can add air bubbles to the system. Other reports using bare line makes big bubbles that are less an issue.
5. Drain the res and sanitize it now, and perhaps periodically. Many here state they do only add back and don't have to drain. I planned to drain mine 1 x a week, but that is a lot of RO water and nutes to throw out just because. I am adding about 1G a day to the lower and plan to monitor water quality and do a change as needed. I check ppm and ph as well as smell using my drain.

If you do clean the res you would not want to leave the BMs watering as they could feed it to the plants. In theory you could heavily hand water so the BMs shut off, but that is risky. Don't soak the BM themselves in bleach. Running a weak bleach through the feeder hose should be OK. Bleach and h202 can degrade rubber and plastic so go weak and then flush after with nute/water before replacing the spikes.

HTHs
 
Last edited:

dr-dank

Member
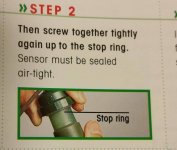
sensor cap torque: How tight is tight enough?

sensor cap torque: How tight is tight enough?

I don't recall the topic of torque and how much folks tighten down the sensor cap.

When I assembled mine I just tightened them to what seemed a reasonable amount, fearing I might strip/pop the threads as they are plastic.

I did not realize the manual states to screw down to the marking line.

Maybe its just me getting old, but I found that required a fair bit of effort (tested on a dry/spare spike, so aside from slight lubrication of water should be the same for a wet spike). I used to lift weight and am not small boned, so I was a bit surprised here.

The other day I tried to turn a spike to redirect the drip discharge at a more central location. I was lucky to realize it was the cap and not the spike body that was turning.

As cap tightness has an impact on vacuum leak, or not, I would think this is a critical parameter that is perhaps worth checking if you have problems.

Also curious if anyone has had a case of over tighten and if so, what failed? Do the threads just release allowing you to try again, albeit now weaker from the flexing?.

I will post a pic from the manual.

Regards
 

Attachments

  • bm_cap.jpg
    bm_cap.jpg
    47.1 KB · Views: 22
Last edited:

rives

Inveterate Tinkerer
Mentor
ICMag Donor
Veteran
You want them snug, very snug. Can't help more than that.

I have tightened them to the point where the threads jumped over one another and it didn't strip the threads off, but I don't have a clue how many times you can get away with that. I still cringe when tightening them, but haven't figured out a way to get a torque wrench on them. Tight, but not too tight.....
 

LostInEthereal

Active member
Well thanks for pointing that out in the instructions dr-dank. I just assembled a couple of these and wondered about this, but don't recall seeing it in the thread and certainly don't remember that picture from the instructions booklet.

I have over the last couple of nights during hand-watering finished the plumbing of the Blumats. I have it setup for ten, but I only plan to run 9 at a time, and easily expandable to 12 as is. I checked pressure at the drain valve and it seems okay, the top of the water in the 5gal res is maybe only 2ft above lowest point in the main feed line (elevated to top lip of flood tray about even with soil). Not ideal but I'll be setting up a pressurized system after this first harvest.

I only went for two plants at the moment, my thirstiest and largest plants. Both in coco/perlite mixtures. I know there's some debate on the exact methodology, at least as far as coco is concerned, but I watered to heavy run-off. I packed the holes with as much pure coco as I could while watering and inserting/removing the cone per rives tip. I then opened up to stream, closed off to a hanging drop and tightened one full arrow. These again are coco/perlite mixture in plastic pots, the rest will be in straight coco in smart pots so we'll see how it goes.
 

rives

Inveterate Tinkerer
Mentor
ICMag Donor
Veteran
I checked pressure at the drain valve and it seems okay, the top of the water in the 5gal res is maybe only 2ft above lowest point in the main feed line (elevated to top lip of flood tray about even with soil). Not ideal but I'll be setting up a pressurized system after this first harvest.

The measurement that you are concerned with is the net elevation from the reservoir water surface to the valve on the Blumat, not the lowest point of the feed line - going lower than the Blumat and then coming back up zeros out any pressure gain.

Good luck, keep us posted!
 

LostInEthereal

Active member
Oh that make sense rives, though in this case they happen to be about the same height.

Well everything has been setup and running for a few hours and looking good. I couldn't take a very detailed peak (lights off atm), but I did see a slight moist spot on coco surface right underneath BM tube on the closest pot. I'm off for work, so fingers crossed it all works.
 

Jhhnn

Active member
Veteran
Made up manifolds today on 1x2's. Boiling water makes the 8mm stuff so much nicer to work with. I blunted the ends of the 8d nails on the grinder, pre-drilled 7/64" holes, pounded them in from the backside, attached 6" of 3mm tubing to each. Every outlet has its own tube/plug, for convenience. The 8mm tubing is attached to the board with a staple gun. I'll run the much easier to manage 3mm tubing from there to each pot.

https://www.icmag.com/ic/picture.php?albumid=52773&pictureid=1458109
 

LostInEthereal

Active member
That looks nice and tidy there Jhhnn.

Well a little update of my own. After nearly 36 hours since the initial setup and the 2 Blumats are doing great. Pots are maybe a bit lighter than I like, but I'll wait another day to make adjustments if necessary. Went ahead and installed them in 2 more plants, now my flowering tent has fully automated watering! Badass. :biggrin:

Thanks for all the help guys, it felt a lot like home-work reading through this entire thread but it was worth it. I felt rather clueless at first but like a regular pro by the end (minus all that pesky real world experience ;))
 

Jhhnn

Active member
Veteran
That looks nice and tidy there Jhhnn.

Well a little update of my own. After nearly 36 hours since the initial setup and the 2 Blumats are doing great. Pots are maybe a bit lighter than I like, but I'll wait another day to make adjustments if necessary. Went ahead and installed them in 2 more plants, now my flowering tent has fully automated watering! Badass. :biggrin:

Thanks for all the help guys, it felt a lot like home-work reading through this entire thread but it was worth it. I felt rather clueless at first but like a regular pro by the end (minus all that pesky real world experience ;))

Thanks for that. I find the stiff & curly 8mm poly tubing difficult to set up & manage, the short pieces of 3mm tubing as furnished in the kit not making that any better. Once the manifolds are fixed on opposite sides of the room then setting up the 8mm stuff is finished. Once & done. The 3mm stuff is nice & limp, so longer lengths of it should be easy to deal with. It drapes very nicely so kinks should be easily avoided. Thinking about it a wee bit more, the outlets now point down rather than out horizontally to help with that.

That's the plan, anyway.

If they work as well for you as they have so far for me then you'll be very pleased. It's a sweet system.
 

Hottish

Active member
Manifold

Manifold

I run a 3/4inch line to my manifold thought the lid of my 100L barrel ,, if any line leaks it will drain back into the barrel ,

The top 4mm line on the manifold running back through the lid breaks the vacuum when the pump stops.


Latest posts

Latest posts

Top