What's new
  • As of today ICMag has his own Discord server. In this Discord server you can chat, talk with eachother, listen to music, share stories and pictures...and much more. Join now and let's grow together! Join ICMag Discord here! More details in this thread here: here.

3000W SCROG inspired by the "Doc"

whazzup

Member
Veteran
I would start lowering the lights instead of boosting them. That's a bit more efficient, now you are increasing all the spill you already have even further by increasing the power and taking more distance, thus spilling more without improving your light levels. At 100% I would not go any closer than 70 cm, at 1150W 90 cm.

How is your climate doing?
 

LEDNewbie

Active member
Veteran
I would start lowering the lights instead of boosting them. That's a bit more efficient, now you are increasing all the spill you already have even further by increasing the power and taking more distance, thus spilling more without improving your light levels. At 100% I would not go any closer than 70 cm, at 1150W 90 cm.

How is your climate doing?

Sorry, what is "spill"

I have my exaust fan turn on at 82 degrees and turn off at 77 degrees canopy temperature. Takes about 15-20 minutes to go from 77-82, and then 4 minutes to cool it back down. Co2 is set at 950ppm and humidity averages about 50%. Humidity is a little higher right before exaust fan kicks on and lower right as it shuts off

I always thought more wattage is better? Your saying to stick with 1000W and lower them to 27-30 inches?
 

LEDNewbie

Active member
Veteran
oh, and I would really recommend you build a white foil curtain in front of your crop, that will save you such a shitload of light you can not imagine. If you want to get close to a gram per watt for your first grow then I would only use 2x1000W on that size ;)

I just calculated a room for someone with a 3x8 NFT table in a 5x10 room. Having the (2x600W) lamps like you have he had only 650 umol average on the plants. Adding the reflection foil at the sides at the height of where the light hits the side increased that to 1000 umol! A simple strip of foil can make the difference between 0,6 gr/W and 1 gr/W!

I wish I could but then that "foil" would be blocking my circulating fans. How would I get air movement to my plants then??
 
I wish I could but then that "foil" would be blocking my circulating fans. How would I get air movement to my plants then??
Wall mounted fans! I am going to be hanging my wall fan from the ceiling on a piece of plywood.
Sorry, what is "spill"

I have my exaust fan turn on at 82 degrees and turn off at 77 degrees canopy temperature. Takes about 15-20 minutes to go from 77-82, and then 4 minutes to cool it back down. Co2 is set at 950ppm and humidity averages about 50%. Humidity is a little higher right before exaust fan kicks on and lower right as it shuts off

I always thought more wattage is better? Your saying to stick with 1000W and lower them to 27-30 inches?
Spill refers to the light that is being wasted outside of the canopy.

How fast do you go through your 50# tank of CO2?
oh, and I would really recommend you build a white foil curtain in front of your crop, that will save you such a shitload of light you can not imagine. If you want to get close to a gram per watt for your first grow then I would only use 2x1000W on that size ;)

I just calculated a room for someone with a 3x8 NFT table in a 5x10 room. Having the (2x600W) lamps like you have he had only 650 umol average on the plants. Adding the reflection foil at the sides at the height of where the light hits the side increased that to 1000 umol! A simple strip of foil can make the difference between 0,6 gr/W and 1 gr/W!
So my space is going to be 11.5x7ft, with a canopy of 9.2x4.6ft. centered in the long wall, and against one wall. I think you're going to tell me to find a way to hang some panda film around the sides of the canopy, yes?
 

whazzup

Member
Veteran
For optimal cooling you only take a strip of about 2,5-3 ft high and hang that from where the light hits the side and down to the bottom of your canopy - you can even take a bit of distance. You can still cool from underneath and at the sides, as you clearly do not have not a big climate problem. The top is completely open and so is the bottom. Even with a lux meter of course you can measure the difference.

Spilling, wasting light is a crime and is also a waste of good CO2 :D

If you hang your lights higher they will spread over a bigger surface. So switching to 1150 and hanging them higher gives the plants exactly the same light and warms up the rest of the room. That means it will warm up quicker and you have to vent faster. Getting the lamps a bit closer will have the effect of increasing the intensity as you do not spread it over such a big part of the floor. The room will even get a bit cooler as the plant will cool themselves down by evaporation, thus helping to keep the climate right. So the time between vents should increase while having more light on your plants.

If you don't use the extra shield I promise you that you are going to be sorry ;)
 

LEDNewbie

Active member
Veteran
For optimal cooling you only take a strip of about 2,5-3 ft high and hang that from where the light hits the side and down to the bottom of your canopy - you can even take a bit of distance. You can still cool from underneath and at the sides, as you clearly do not have not a big climate problem. The top is completely open and so is the bottom. Even with a lux meter of course you can measure the difference.

Spilling, wasting light is a crime and is also a waste of good CO2 :D

If you hang your lights higher they will spread over a bigger surface. So switching to 1150 and hanging them higher gives the plants exactly the same light and warms up the rest of the room. That means it will warm up quicker and you have to vent faster. Getting the lamps a bit closer will have the effect of increasing the intensity as you do not spread it over such a big part of the floor. The room will even get a bit cooler as the plant will cool themselves down by evaporation, thus helping to keep the climate right. So the time between vents should increase while having more light on your plants.

If you don't use the extra shield I promise you that you are going to be sorry ;)

Thanks Whazzup, I will try and figure out a way of getting some reflective paneling on that side. Going to be doing some cloning tonight or tomorrow so I am 100% focused on that task at hand. Once thats done then I'll focus my energy towards figuring something out for not "spilling" anymore light than I have to:biggrin:
 
What method of cloning do you use? I have to finish my aerocloner tomorrow so I can take some clones. I've been using direct soil cloning thus far, with about 50% success, at best. Not bad, but overly time consuming due to loss rate / having to take plenty of extras...

This is the type of fan I would suggest. You can wall mount them, but what my friend suggested and what I am going to do is mount them to a piece of plywood, prolly 18" square, and use eyehooks and pulley's to suspend it from the ceiling. This makes it so we can adjust the angle it sits at super easily, and also get it out from overhead if needed.
http://www.greners.com/i/fans-venti...cillating-fans/ecoplus-wall-mount-fan-18.html
 

LEDNewbie

Active member
Veteran
What method of cloning do you use? I have to finish my aerocloner tomorrow so I can take some clones. I've been using direct soil cloning thus far, with about 50% success, at best. Not bad, but overly time consuming due to loss rate / having to take plenty of extras...

This is the type of fan I would suggest. You can wall mount them, but what my friend suggested and what I am going to do is mount them to a piece of plywood, prolly 18" square, and use eyehooks and pulley's to suspend it from the ceiling. This makes it so we can adjust the angle it sits at super easily, and also get it out from overhead if needed.
http://www.greners.com/i/fans-venti...cillating-fans/ecoplus-wall-mount-fan-18.html
this will be my first attempt at cloning, will be going into soil.... Keeping fingers crossed that I get survivors:biggrin:

After this weekend I'll get serious about looking at ways of getting that extra reflective wall up. Not sure if it's doable but I will give it shot!:tiphat:
 

DrFever

Active member
Veteran
LED what you need to do is know actual canopy temp of your plants?
and maintaining that as close as possible having fans blow over that area as well onto plants not so much as leafs start cutting into one another.
i grow with old school magnetic ballests 1k and always keep my lights 18 - 26 " above plants raising them and lowering them in as per what i want if plants are short and bushy i raise lights to stretch plant. opposite if there to stretched out
When i usually hit flowering stage i lower lights as to combat stretch phase as well crop all stems that appear to be stretching more then others .
your lights are in sink or running paralel to each other and against a wall which has 2 walls on the side don't worry about the front part as all light is being sent down and sideways crossing each 1 k
So if anything the side walls are most important and back wall.
light does not bend its comes from the source out in straight lines and way you got lights set there going down and sideways crossing each other line of site the little amount of light being difused out the front is nothing really to worry about
 

LEDNewbie

Active member
Veteran
Thanks Doc....

I lowered lights last night to 29" and set them back to 1000W like Whazzup recommended. I'll probably let plants grow into lights until they are 27" under lights and then maintain the lights so they stay at 27" from top of canopy.

I have a few stems on each plant that need supercropping as they are growing taller than the rest.

haven't feed the girls since Sunday and will probably wait one more day in a effort to try and help get moisture out of the totes. So tomorrow they will most likely get 850ppm of flower nutes. Slowly increasing nutes to around 1200ppm in the next week or two
 

high life 45

Seen your Member?
Veteran
I gotta say, these Gavita's are CRAZY BRITE!!!!!! Even with my expensive Oakley Sun glasses on, after 2 hours in the room last night my eyes hurt and my face felt sun burned!!! Going to have to invest in some Method 7 sun glasses to see if they will help?

On with the pics

Get the resistance plus if you do. I have both and I wouldnt buy the resistance again....You might also look into welding glasses, or glass blowing glasses.

Things are looking good in there!
 

LEDNewbie

Active member
Veteran
Get the resistance plus if you do. I have both and I wouldnt buy the resistance again....You might also look into welding glasses, or glass blowing glasses.

Things are looking good in there!

Thanks for the tip, will do. Gotta save some $$$ first. Too much money going out and not enough coming in:laughing:
 

whazzup

Member
Veteran
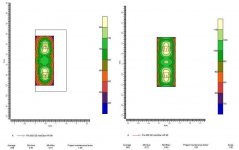
Let me show you the difference in light when you add shields.

Here you see a NFT tabel in a 150x300 tent, with and without reflective walls around them, under just 2x pro 600.
attachment.php

Mind you the scale is different on both diagrams. That's a huge difference
 

Attachments

  • screens versus no screens.jpg
    screens versus no screens.jpg
    31.5 KB · Views: 29

LEDNewbie

Active member
Veteran
That definitely is a crazy difference!!!

As of right now I have to be allot better than your first diagram considering I have 3 walls with reflective material and that diagram has no walls with reflective material.....


I am still going to study and see if there is a way of get a removable reflective wall on the 4th side. Going to be tough with my setup but I will study long and hard:thank you:
 

whazzup

Member
Veteran
First diagram has one wall and 2 walls close (30 cm distance from table)

Second diagram has area enclosed.

It's not that hard. One small wood beam hanging on a few chains, tack the foil to that and on the bottom part similar to keep it straight. Open the curtain by raising the lower beam, really simple.

If you wish you can do it in separate elements.
 

DrFever

Active member
Veteran
IMO as a old school magnetic ballest user and in all honesty could never see myself purchasing a gavita i am very curious on the cost of one of them.
To my understanding being very high freq you just can't put a reg bulb in it which they would prob work ???? but light would not put out anywhere close and failures increase.So they got you hooked into buying there bulb how sweet huh???
now looking at there reflector again IMO its junk i am very curious on how deep the bulb sits in the mogel in it and how wide it is
Cause really my 20.00 cheap ass reflector i can bend it into a U giving me direct light point source of 8" but again it doesn;t give me the spread i want
one brand new ballest bulb reflector costs me 175.00 1000 watts
how much really is the Gavita 1000.00 / 1500 ????
Dam for that price i would have 5000 watts @ 1000.00 spending or or 8000 watts @ 1500 and can guarntee you would kill that 1 k gavita

Problem i see with Gavita is a stupid ass reflector for one and is there a glass in there ???
what a great way to lose more efficiency ??? if there is
now i can run my open ended 1k as close as 12" from tops but in reality if its 12" or 28" from tops there getting pretty much same intensity 1k's do not lose there intensity like 600's or less wattage as it goes higher So 18 - 28" from tops is pretty much ideal for 1k
Very curious to Gavitas recomended height to run them ????

I might have to send LED a new ballest and a hordilux superblue and maybe do a real comparison Cause so far in reality Gavita has shown me nothing to impressive that a 200.00 dollar ballast wouldn't duplicate
 

LEDNewbie

Active member
Veteran
No glass on Gavita's Doc and I only paid $450 for my 1000W Gavita's. Thats bulb, ballast and reflector!!!

From my understanding even thought the Gavita reflector is sooo tiny its supposed to have some of the best reflective quality's of all reflectors out there....? I guess we shall see:biggrin:


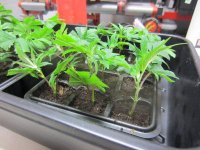
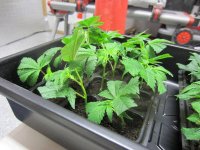
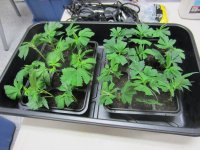
So I did some cloning yesterday, my first time ever, I think it went ok:dance013:

Did a little experiment, took 12 cuttings from my girls in flower(9 days into flower). And took 12 cuttings from my girls in veg... Was told by a friend that cuttings CAN NOT be taken from plants already in flower. I'd like to try and prove him worng!!!:laughing: That is if any of my cuttings survive!!!:moon: LOL!!!!
 

Attachments

  • IMG_0965.jpg
    IMG_0965.jpg
    73.5 KB · Views: 37
  • IMG_0966.jpg
    IMG_0966.jpg
    71.1 KB · Views: 29
  • IMG_0967.jpg
    IMG_0967.jpg
    74.6 KB · Views: 27
  • IMG_0969.jpg
    IMG_0969.jpg
    46.2 KB · Views: 26

catalyte

Active member
Veteran
clones totally CAN be taken from plants as far as 3 weeks into flower... but not any longer than that....
 
Whazzup - THANK YOU for the info. I will putting my hoods 'in the corner' and then having 2 pull down screens to cover the other 2 side. 1x2's or 2x2's and a couple small pulley's and cleats and I'll be in business.
I gotta say, these Gavita's are CRAZY BRITE!!!!!! Even with my expensive Oakley Sun glasses on, after 2 hours in the room last night my eyes hurt and my face felt sun burned!!! Going to have to invest in some Method 7 sun glasses to see if they will help?
Oh man. I was in the same boat my first run, using Oakley's vs real glasses. I now use shade 5 welding goggles, or am very very careful to avoid looking at the hoods. Depending on what I'm doing, as it is a bit hard to see in the shade with the welding goggles.
clones totally CAN be taken from plants as far as 3 weeks into flower... but not any longer than that....
Even longer, but the success rate drops off badly. First 3 weeks in flower = good to go.

LED - Cloning process looks good. What soil did you use?
 
Top