What's new
  • ICMag with help from Landrace Warden and The Vault is running a NEW contest in November! You can check it here. Prizes are seeds & forum premium access. Come join in!

10 min $10 DIY aerated compost tea ACT brewer

MedResearcher

Member
Veteran
The drain I was referring to is the one on the induction tank, not the actual exit where the tea leaves nor the airlift exit. The design is exactly like MMs 12 gal set up.

Bottom of induction tank, to a 90 degree bend. Straight pipe, with 2 Ts. First T is air lift, 2nd T is air intake. After the 2nd T is a ball valve where tea pours out for use.

So the compost can compact in the 90 degree bend, which is really bad because it stops the airlift, and also stops the air from even bubbling up into the tank at all. The water sits completely stagnant.

Mr^^
 

MatrixMan

New member
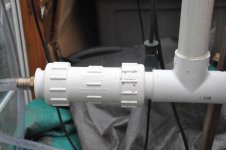
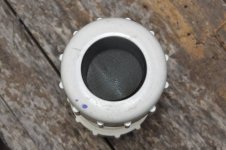
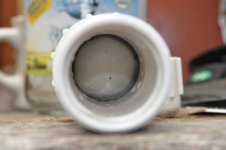
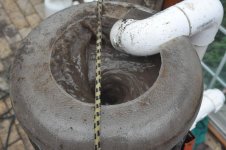
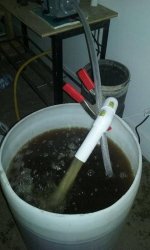
Finally finished my 6 gallon brewer, lots of trial and error. Thought i'd post and see what you guys think. Using 1/2 inch pvc, eco 5, incorporated my own diffuser using 250 micron stainless still mesh inside a 1/2 compression fitting, no leaks and seems to be working well but I don't have a DO meter so who knows. Want to eventually get a bigger tank but for now this is working wonders in my garden.Thanks microbeman for all the invaluable information! Using homemade vermicompost, organic gem fish hydrolysate and kelp along with golden barrel molasses.

On another note, microbeman, if you could possibly give me some input about a few questions I have about kelp and fish hydrolysate?
1. By the end of the brew, should you still be able to smell the fish? I put about 2 teaspoons in 5 gallons and at about 24 hours I can still smell the fish, wondering if this is normal.
2. On your website, you say that kelp meal can inhibit microbial and fungal activity for about the first 24hrs, but then when you talk about brewing for a fungal brew at the bottom of your page it says to only brew for roughly 18-24hrs. If you would explain this concept further that would be fantastic!

Much love.
 

Attachments

  • DSC_0654.jpg
    DSC_0654.jpg
    60.2 KB · Views: 27
  • DSC_0656.jpg
    DSC_0656.jpg
    34.3 KB · Views: 38
  • DSC_0662.jpg
    DSC_0662.jpg
    46.4 KB · Views: 32
  • DSC_0670.jpg
    DSC_0670.jpg
    37 KB · Views: 33
  • DSC_0665.jpg
    DSC_0665.jpg
    56 KB · Views: 41

Microbeman

The Logical Gardener
ICMag Donor
Veteran
Finally finished my 6 gallon brewer, lots of trial and error. Thought i'd post and see what you guys think. Using 1/2 inch pvc, eco 5, incorporated my own diffuser using 250 micron stainless still mesh inside a 1/2 compression fitting, no leaks and seems to be working well but I don't have a DO meter so who knows. Want to eventually get a bigger tank but for now this is working wonders in my garden.Thanks microbeman for all the invaluable information! Using homemade vermicompost, organic gem fish hydrolysate and kelp along with golden barrel molasses.

On another note, microbeman, if you could possibly give me some input about a few questions I have about kelp and fish hydrolysate?
1. By the end of the brew, should you still be able to smell the fish? I put about 2 teaspoons in 5 gallons and at about 24 hours I can still smell the fish, wondering if this is normal.
2. On your website, you say that kelp meal can inhibit microbial and fungal activity for about the first 24hrs, but then when you talk about brewing for a fungal brew at the bottom of your page it says to only brew for roughly 18-24hrs. If you would explain this concept further that would be fantastic!

Much love.

It sounds from your text that you used 1/2 inch PVC but we can see that is not the case. You mean just for the diffuser.

I rarely recommend brewing for only 24 hours. You should ideally smell very little of the food stock used.

On your website, you say that kelp meal can inhibit microbial and fungal activity for about the first 24hrs

I actually have never said exactly this although many people have quoted me as stating this. I can see that it can be misconstrued to say this though, so I better correct it.

What I mean to say is that some time after 24 hours, whatever it is in kelpmeal which seems to inhibit the microbial division and growth dissipates. I have observed more microbial activity kicking in up to 48 hours when using kelpmeal.

There is no specific time that this may occur and I'm really unsure of the value of using kelpmeal as a foodstock in ACT. Also bear in mind that no 2 'brews' are identical. These days I normally use kelpmeal in a botanical tea with alfalfameal.

There are growers who have sworn by my original recipes, so I've left the kelpmeal in but stress small amounts.

If you do wish to create a highly fungal brew, assuming fungi exists in your compost, then yes, it usually grows out rapidly in 18 to 24 hours (or even less). Black strap molasses is a perfect feedstock for this and combined with Organic Gem fish hydrolysate all the better.

One thing I've learned as time goes by and I see more, is that the complex recipes are not necessary to extract and multiply the three basic microbial groups. Better to have diversely constructed compost or vermicompost.

Looks like a nice job on your machine.
 

MatrixMan

New member
Amazing! Thank you Tim, much appreciated response. Sorry, that was a typo, I used 1.5 inch pvc for the whole thing including the diffuser. The diffuser pictured is a one inch compression fitting I was originally using as a prototype since I had it laying around.
 

heady blunts

prescription blunts
Veteran
nice brewer matrix!

MR I've never used that type of intake manifold so I don't have enough personal experience to give you any engineering advice.

without a pic my best suggestion would be to screen your compost to 1/4 or 1/2 inch to avoid any large twigs or whatnot that may be jamming in the plumbing.

you can always bag the compost and hang it inside the vessel, but I do prefer the clean up on a free suspension design.
 

Microbeman

The Logical Gardener
ICMag Donor
Veteran
The drain I was referring to is the one on the induction tank, not the actual exit where the tea leaves nor the airlift exit. The design is exactly like MMs 12 gal set up.

Bottom of induction tank, to a 90 degree bend. Straight pipe, with 2 Ts. First T is air lift, 2nd T is air intake. After the 2nd T is a ball valve where tea pours out for use.

So the compost can compact in the 90 degree bend, which is really bad because it stops the airlift, and also stops the air from even bubbling up into the tank at all. The water sits completely stagnant.

Mr^^
As Heady said a photo would help. Perhaps your shut off valve is too far from the air input. Air input stem too long? Tees not butted together? Male fitting in tank drain?
 

MedResearcher

Member
Veteran
Thanks for the responses, appreciate it. I screened my inputs this time, and so far so good. I think the inputs were the main culprit. First cheaper castings, then cheaper compost. Cheap is nice, but both of these products have a lot of sand, rocks, sticks in them.

So gonna keep screening, and upgrade to some better castings and compost, see if that resolves it. If not, ill post a picture of the design see if it raises any red flags.

Thanks again,
Mr^^
 
Is the updated image on page 1 the final design, or did it ever get changed again?

Building brewer myself (finally!) in 55 gallon size - Picked up the elemental 1744, biggest commercial pump they had. Grabbed a length of 1.5" PVC and an elbow (may go opt for a 45* and a length of pipe to get a swirling action going too rather than a straight down splash)

Just been a little confused as to how I hook up the air line. The pump came with a manifold that holds 12 smaller lines. Should I make/buy a manifold to feed 4 lines to the PVC per the revised design? Or even a single 3/8" tube straight to the PVC?

Just pumping air to the base of the pipe causes water to rise? I feel like I'm missing something here.
 

heady blunts

prescription blunts
Veteran
hey smokin.

I've got a new bigger brewer but I haven't taken any pics. I'll snap some in a couple days.

I use a single airline. I got a 3/8" brass nipple and screwed it into the PVC.

it sounds like you found a pretty badass pump, but if you find the flow is not as strong as you'd like you may want to try a slightly narrower tube for the rise. I'm using 1.25" tube for the rise, and 1.5" for the manifold.

instead of the floating bottom like in the first post, i used 3 tee pieces to create a standing foot. it also functions to reduce dead spots by spreading out the points of intake.

make sure you find a good way to secure the riser pipe. keeping it steady and straight up and down will improve the efficiency of the air lift drastically.

good luck! keep us posted with questions and updates!
 

Microbeman

The Logical Gardener
ICMag Donor
Veteran
You should be using 1.25" PVC pipe throughout. If you use thin walled 1.25: (class 160 or 200 ASTM) your ID will be 1.5".

I do not know where using 1.5" PVC ever wandered into the picture. If you reduce your riser pipe ID all you will accomplish is reduce your flow, as mentioned in experiments I did, outlined in one of the CT threads.

Do not use the brass nipple which came with the pump, as is mentioned numerous times in one or both of the CT threads and is outlined here; http://www.microbeorganics.com/#So_You_Wanna_Build_A_Compost_Tea_Brewer

All of these pumps come with a little threaded brass fitting for screwing into the air output. DO NOT USE THESE! Put them in your parts drawer. These constrict the air and reduce your CFM by at least 20%. Rather, find tubing which slides over the nipple into which the threads are tapped. In the case of the Eco Plus 5 and the Hailea, 5/8ths inside diameter works. Slide the air tubing over and secure with a gear clamp. The Eco Plus has a very short nipple so I score the metal with a couple of swipes with a hacksaw to create barbs for the tubing to grip. You can find tubing at a building supply like Home Depot or Rona in Canada. I use the braided reinforced stuff which does not kink. Always try to keep your pump at or above the surface of the water so it does not siphon back if the power fails.

It is this site where all this information comes from. 5/8" ID is what you want.

Some of this stuff is even mentioned on the page before this one.

If you want details, I understand you can buy plans and video from the airlift brewer patent holder.
 

heady blunts

prescription blunts
Veteran
:yeahthats

as i said in the OP, everyone should read microbeorganics.com in its entirety. it is very well organized and IMO it's the ultimate resource when it comes to brewing aerated compost teas.

this thread was created with much respect and reverence to that site and the gracious permission of Tim Wilson.

we can help you make a decent DIY home brewer, but it cannot compare to the testing and engineering that went into the professional models.

however, if you're running a small garden, and you're predisposed to DIY, and you already own a decent air pump, a simple airlift can be constructed relatively cheaply and it will augment your pump's ability to maintain the high levels of dissolved oxygen needed to culture the desired microbes.

if you're running a small garden but you're NOT predisposed to DIY, check out the mini microbulator! at $100 it's nearly the same price as putting on together yourself, plus you don't have to run around looking for all the pieces or do any engineering whatsoever.

MM thanks for the anchored link, i had forgotten that tip about the brass nipples! i'll have to look carefully at my pump and see if i can follow that recommendation.
 
I didn't have much time to do research before making a trip to the hardware store last night - we got there 5 minutes before they shut the doors for the night. I just thought that the 1.5" PVC "looked about right" so I grabbed it.

I'm confused a little, it was stated that smaller pipe will only decrease flow. I didn't see much stated about the size of the pipe needed anywhere I looked. It was just stated that smaller pipes decrease flow, I would assume a 1/4" larger pipe will only slightly increase the flow?

I dunno though, I just got back from riding trails on the quads all day and my head is still a little rattled. Not trying to come off as argumentative, I have no problem spending $10 on some more PVC, I just don't know if I actually need the 1.25 instead.
 

Microbeman

The Logical Gardener
ICMag Donor
Veteran
I didn't have much time to do research before making a trip to the hardware store last night - we got there 5 minutes before they shut the doors for the night. I just thought that the 1.5" PVC "looked about right" so I grabbed it.

I'm confused a little, it was stated that smaller pipe will only decrease flow. I didn't see much stated about the size of the pipe needed anywhere I looked. It was just stated that smaller pipes decrease flow, I would assume a 1/4" larger pipe will only slightly increase the flow?

I dunno though, I just got back from riding trails on the quads all day and my head is still a little rattled. Not trying to come off as argumentative, I have no problem spending $10 on some more PVC, I just don't know if I actually need the 1.25 instead.

It is not that 1.5 won't work. Go ahead and use it...no worries. I only said this in reference to Heady my old pal. (since he reduced from 1.5) BUT OTHERS have been stating 1.5 and I think it accidentally came from me saying what the actual diameter is of thin walled 1.25".
 

Microbeman

The Logical Gardener
ICMag Donor
Veteran
Also; I'm not sure what the flow will be with 1.5. Is it thin walled or schedule 40? What's the ID? I have tried 2 inch and the flow was a dribble. I use 4 inch with my 95 CFM pump :)
 
Last edited:

heady blunts

prescription blunts
Veteran
ya also when i started this thread my limiting factor was those shitty aquarium pumps.

now i've got a badass pump that's way oversized for my application, if i reduce airflow a bit it's still pushing a massive amount of GPH, so NBD i hope!

used sched 40 for the new brewer, btw.
 

Microbeman

The Logical Gardener
ICMag Donor
Veteran
Schedule 40 is okay. We use the thin walled 160 stuff because its easiesr to pull apart time after time, lighter, cheaper, very slight increase in flow. It is better for slotting to make diffusers.
 
It's all good, man! PVC is cheap and I was at the hardware store anyway and picked up 1.25" and put something together out of that. Ended up building a whateveragon on the bottom to help support the rising pipe. Doesn't make a full circle more like a horseshoe, I left both ends open to take in water. I'll end up closing it and drilling holes... just didn't get enough 45* angles to complete it.

About to head to the lake for some boating/fishing, but I'll have pics of it this evening an will have it up and running by tonight brewing a tea. Don't need a teabag, correct? Just free suspension is what I believe I read in this thread.

Hopefully with this, I'll never buy another bottle again.

Gonna have to agree with just buying a mini one tho for smaller gardens - I've spent more than I expected making this work for me. It *should* have been cheaper, but I bought shit I didn't need to put this together.

Ended up building it to fit my 30 gallon barrel rather than 55 gallon barrel. I use about 20 gallons per watering I'm estimating, and want my teas hand-watered as to not run through the water pump impeller, unless someone tells me that's not a concern - but the whole point in using a air lift as opposed to a water pump/waterfall to brew is to avoid the impeller in the water pump, yea? Or is a single pass not an issue? In that case I'll build a second rise pipe to fit my 55 gal drum as well and I can brew teas accordingly and just pump it straight to the plants.
 

Microbeman

The Logical Gardener
ICMag Donor
Veteran
It's all good, man! PVC is cheap and I was at the hardware store anyway and picked up 1.25" and put something together out of that. Ended up building a whateveragon on the bottom to help support the rising pipe. Doesn't make a full circle more like a horseshoe, I left both ends open to take in water. I'll end up closing it and drilling holes... just didn't get enough 45* angles to complete it.

About to head to the lake for some boating/fishing, but I'll have pics of it this evening an will have it up and running by tonight brewing a tea. Don't need a teabag, correct? Just free suspension is what I believe I read in this thread.

Hopefully with this, I'll never buy another bottle again.

Gonna have to agree with just buying a mini one tho for smaller gardens - I've spent more than I expected making this work for me. It *should* have been cheaper, but I bought shit I didn't need to put this together.

Ended up building it to fit my 30 gallon barrel rather than 55 gallon barrel. I use about 20 gallons per watering I'm estimating, and want my teas hand-watered as to not run through the water pump impeller, unless someone tells me that's not a concern - but the whole point in using a air lift as opposed to a water pump/waterfall to brew is to avoid the impeller in the water pump, yea? Or is a single pass not an issue? In that case I'll build a second rise pipe to fit my 55 gal drum as well and I can brew teas accordingly and just pump it straight to the plants.

look at

http://www.microbeorganics.com/#Does_Microbial_Life_Survive_Impeller_Pumps

AND

2/ The Venturi Method: http://www.microbeorganics.com/#So_You_Wanna_Build_A_Compost_Tea_Brewer
 
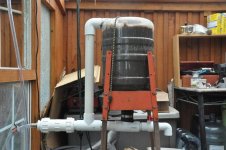
Finally got it up and running, started brewing my first tea around noon. Don't know how much I'm making exactly, somewhere between 15-20 gallons.

2c Seabird Guano
2c Espoma Garden Tone dry mix
2c EWC
10oz black strap

Wasn't going to add the Garden Tone but I didn't use it in my veggie garden this year and I got a big bag of it, so why not?
 

Attachments

  • brewer.jpg
    brewer.jpg
    43.8 KB · Views: 25

xmobotx

ecks moe baw teeks
ICMag Donor
Veteran
looks like a working contraption to me ~whether you finish the "whateveragon" or not

i'd drop the guano & garden tone but; if you're making nutrient teas, the EWC can't hurt
 

Latest posts

Latest posts

Top