What's new
  • Happy Birthday ICMag! Been 20 years since Gypsy Nirvana created the forum! We are celebrating with a 4/20 Giveaway and by launching a new Patreon tier called "420club". You can read more here.
  • Important notice: ICMag's T.O.U. has been updated. Please review it here. For your convenience, it is also available in the main forum menu, under 'Quick Links"!

Red_Greenery's Handyman's DIY Grow Tub

hgl

Active member
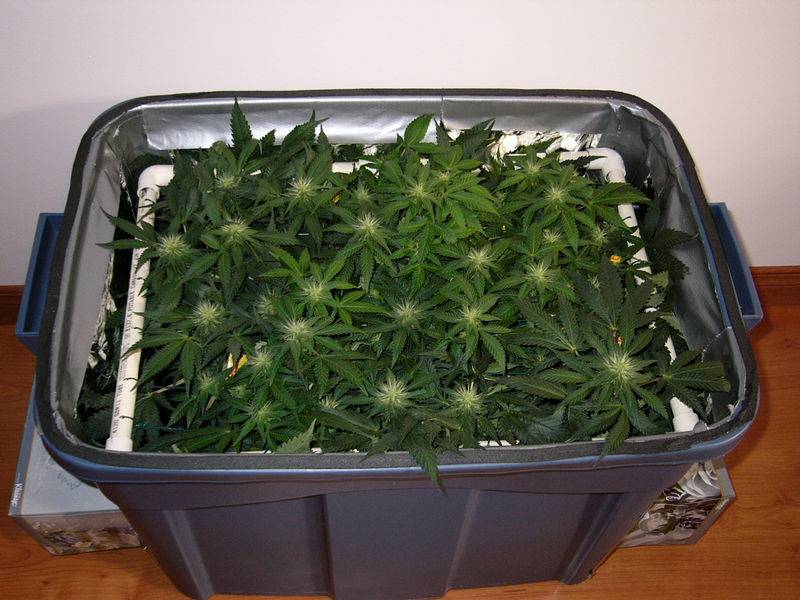
Aaah... those picture are so nice to see again...! lol... I wish I could have a setup like that in my closet...!!!

Keep growing Red ;)

but I have a question... do you have an other grow currently in your rubbermaid or your waiting for your stash to end before starting another?

Cya!
 

Ctcoyote16

New member
I have a question about the main two tubs.

When they are stacked, how do you hold them together?

I mean, you dont just leave it so if one is pushed and falls out of align, it falls over...?

Also, whats the black thing on it? foam? tape?

That keeps main crease lightproof?

Thanks

EDIT:

To power your computer fans, did you just attatch them to an extension cable?
 
Last edited:

Trev

Active member
you need a 12volt transformer dealio to power pc fans., econolight sells a 35 dollar 150 hps system haha. for my old tubs i put small hinges on the back connecting the two tubs.. so i could just flip the other tub over on the ground and do my work with the plants.. also put some weather stripping on the top of the bottom tub rim and it will be lightproof

look close and you can see the hinges in this pic.


a peak inside.. haha.


miss the rubbermaid days, good memories..
 

Trev

Active member
definetly gunna resurect this old grow!! thanks for asing those questions haha you've turned me back into a rubbermaid man.
 
G

Guest

Hey POMH, I'm happy that you like my SCROG methods. Have you tried to do one yet? SCROG is great for managing plant height and it really maximixes your yield too.

Hiya Ctcoyote16 The tubs are just stacked together, no tricks. I put neoprene weather stripping on the top edge of both tubs. You can see it as a black strip in the picture. The weather stripping acts as a light seal.

My fans are AC powered from Radio Shack and are wired up with old appliance cords. I have also used DC fans from stripped computers. These need 12 Volt DC power. I use old calculator or phone power adapters. If you look around your house and check out the power adapters, about 1/2 are 12 volt DC.


Hey Trev - Nice Tub!!!

Are you still growing in the Rubbermaids or have you moved on to a larger cab? That hinge is really innovative. Too bad I can't use it because my scrubber is mounted on the top box. I have to lift the hole contraption off to get at the plants.


Last edited:

duggy

Member
Red G--lovely, lovely!

do you veg and flower in the same box? how long you vegging before switching to 12-12? Morgan Fairchild?

duggy :smoker:
 

Ctcoyote16

New member
would a 250 W HPS hanging from the top be too much for a setup like this?

Can I even get by using one?

Thanks

EDIT:

Or would this work better?

http://cgi.ebay.com/High-Efficiency...ryZ42225QQssPageNameZWDVWQQrdZ1QQcmdZViewItem

70_1_b.JPG


150 W HPS
 
Last edited:
G

Guest

Hey Duggy - Yeah, I have a one box setup here. I'm using 18/6 lighting for veg and I switch to 12/12 usually around day 30. I varies a bit depending on the plant. I repot and put the screen on and wait until the screen is nearly full before going to 12/12. I guess you don't remember Jon Lovit's compulsive liar on SNL?

Hi Ctcoyote16 - This size rubbermaid works best with a bunch of CFL's or low wattage HPS. A 150 W HPS in my growbox would have 60 w/sqft. Most of the HPS designs are for for 50w/sqft for flowering. Your 250HPS is better suited for a wardrobe cabinet and a 150HPS for cabinets under 30". If you want to go with a HPS lighting in a rubbermaid or small cabinet, the ventilation is more difficult to get working well. Because the light produces mostly radiant heat, more ventilation is needed in a smaller the box. Typically 1 cfm per watt for an open bulb, .3 CFM per watt with a ventilated hood or cooltube.

Nimby installed a pyrex plate and made an external hood on top of the box. I've seen several versions of that design working well as ones using cooltubes.

Hey SatGhost - welcome to the lodge. What are you growing in?
 
Last edited:

Ctcoyote16

New member
Alrighty.

I successfully installed a fan in the bottom tub. One fault, however, is that it is not light proofed. (meaning light will escape it).

Any tricks on how I can conceal this whole grow while still trying to allow fresh air to my plants? Ex: I could just throw a huge leather curtain over the entire thing, but that would disrupt airflow.

Also, for my exhaust fan, I attatched it to a homemade scrubber. Its a coffe tin with no lid or base. One one end is a grille, on the other is the fan. Inside will go the carbon. Problem is, I dont know how to mount this in the top tub. Suggestions? I already tried hanging it from the top, and it was difficult enough. I cant imagine how much harder it would be when my light is hanging there.

Also, Where should I mount my power strip? inside?

Lastly, I never painted either tub. I know that when unpainted, the tubs easily grow. when I apply mylar or an emergency blanket, will it prevent this glow, or do I need to uninstall everytihng after it is built and paint it?

Remember, this is all about stealth.

Thanks
 
G

Guest

Hi CtCoyote16,

Are you following my design? I don't have any fans in the bottom tub. The only fan is in the top tub with the lights. The lighting section is separated from the grow chamber with a sheet of acrylic. This allows almost all the heat to be removed from the growbox with an unrestricted fan.

The scrubber is hooked up externally using ducting and is vented from the top of the grow chamber to remove the remaining small bit of heat that will rise to the top of the chamber.

If you put a fan in the bottom box, it will be blowing air into the box and pressurizing it. Any air leaks will carry the smell of the plants out as well. My whole system sucks, meaning it uses negative pressure. Some pics of your build would help?

These boxes glow a bit with the emergency blanket. Painting a couple of coats of black paint covered with white will prevent the glowing. I run my operation out of a closet in a spare bedroom. I keep the closet door closed and can lock the bedroom door. I have also hung a curtain on the rod in the closet for further stealth. There's little or no light leakage with the curtain up.

Now there are several holes in the box for intakes and exhausts that are major light leaks. I take a Kleenex box and paint the inside flat black and tape it over the intakes. The white plastic ducts glow a bit too. I plan to change over to aluminum some day. A lot of guys use black PVC elbows for light traps. These work fine, just make sure to calculate the right sizes before installing. It's easy to undersize the intakes and not get enough air flow.

I would hook up the scrubber externally using ducting. You can always mount the scrubber to the top box using ducttape. There's only enough room for the plants inside the growbox.


Ctcoyote16

New member
Sorry for the Off Topic;

Does anyone else not see pistures on this site?

Not only do I not see pictures, but I dont see buttons like "New Thread", etc...

The only pics I can see are if theyre hosted like how I hosted mine on teh previous page.
 

Ctcoyote16

New member
Alrighty then,

Than I guess my first step will be to remove the intake fan, and scren a kleenex box over the hole. Im guessing this acts similar to a 90* elbow?

That leaves me with:


Mounting Exhaust Fan / scrubber
Buying and Mounting Light
Lightproofing the entire thing
Setting up a Power Strip inside
Buying a new timer with a Grounded Plug
Buying Seeds
 
G

Guest

Yeah, I'd pull the intake fan. Usually they don't provide much to the overall airflow either and the right sized intakes are the way to go.

I use Kleenex boxes for light traps. You can use anything you want as long as the it bounces the light around without blocking up the air flow. I paint the inside flat black to suck up some of the light too. I also tape a flap inside the box to deflect the light.

Also all my wiring is external to the box. I'll drill a hole and pull the wires outside of the rubbermaid. I wire to an extension cord or DC adapter. I just put a powerbar on the floor of the closet and plug everthing in. I have a two prong timer with no ground. Lights and DC power adapters are usually two wire.

I'd sure like to see some pics of your box when you get it put together.

RG
 

Ctcoyote16

New member
Well, one problem is that the HPS will have a grounded plug (I am almost 99% sure).

However, I decided I want to put the kleenex box on the inside of the tub. Last night I tried that, and it worked perfect. However, as you would expect, some space was lost. Instead, I will now do the same thing, only with a ritz Cracker box. since it is slimmer, the same basic idea is there, but allows fro more room.

Also, the intake is removed, and fow now the coffee tin (scrubber) with exhaust fan attatched to lid is mounted with duct tape. I will need another method of mounting it, however, since when the duct tape heats up the adhesive melts, causeing it to loosen, which results in a fallen scrubber.


Ah, slowly but surely this grow box will be completed...
 
G

Guest

Hey Ctcoyote16 - so you are going with the HPS. What size bulb? CFL's run alot cooler than HPS. You're gonna find it challenging to get the ventilation working right if your duct tape is melting! I've had the tape dry out over a long time but not melt.

What are your box dimensions, light size and fans? I can check it over to see if you've got a good design.
 
G

Guest

Hey guys,

Seein' how the Lodge is pretty quiet, I'll show you a cool growing technique that I've used several times with great success. If you want to make a mother for clones or just want to grow your special plant a second time, Revegging is the way to go.

The method is pretty simple actually, just keep a few leaves or popcorn buds on the plant stalk after harvesting and return the plant to vegetation using 24/7 lighting.

The plant will take a few days under 24/7 lighting before it decides to start growing new leaves. The first leaves are wierd looking single leaves with smooth edges. This is perfectly normal as the regular leaves will start growing next.

Because the rootball of the plant is already developed, the speed that the plant grows back is phenomenal and is much faster than starting over from seeds or even clones.

When I harvest the plant, the soil has been flushed previously for two weeks and only watered with pure water so there is no nutes left in the soil. I water sparingly with lightly fertilized water. The rootball is fully developed to support a small bush so there's no need to soak the soil with only a little puff of leaves on the stalk.

I repot to fresh soil when the plant starts to really come back to life. I also cut the rootball back to the size of hardball, so that the plant has lot's of nice new soil to grow in. Don't worry, this won't hurt the plant one bit.

After repotting, I change my lighting to 18/6 lighting from 24/7. The rest period gives the plant time to develop roots better and the transition from vegetation to flowering is smoother.

The revegged plant will produce a ton of shoots. Don't be afraid to prune the plant to remove excess vegetation. You'll have lot's of shoots for clones from a reveg.


Last edited:

hgl

Active member
:yoinks: :yoinks: :yoinks:

Man... your technique is so well builted. Everything have been looked to reach the perfection :yummy: . Your post are so instructive... I'm learning alot!

I have a question for you! :joint:
I once read that a revegg plant loose his buds quality and that the plant is not as good as the "first"... something like that. Have you seen a difference between the smoke of the first harvest and the one from the revegg?

Cya red! :wave: :joint:

(sorry for my english again... I don't know if I'm well readable)
 
Top