What's new
  • Happy Birthday ICMag! Been 20 years since Gypsy Nirvana created the forum! We are celebrating with a 4/20 Giveaway and by launching a new Patreon tier called "420club". You can read more here.
  • Important notice: ICMag's T.O.U. has been updated. Please review it here. For your convenience, it is also available in the main forum menu, under 'Quick Links"!

Red_Greenery's Handyman's DIY Grow Tub

G

Guest

I should show you guys how I grow my ladies. I'm not actively growing right now but I'm thinking about starting one soon so this will be a good refresher for me as well.

Soil Mix:

I use a basic mix of 2 parts Promix, 1 part Vermiculite and 1 part Perlite. The Promix is a type of potting soil that has a "standard" mix. It's mostly composted material and is very safe for seedlings.

Starting Seedlings:

I use the damp paper towel method to germinate seedlings. The trick to good germination is to find a warm spot. I put the container with the seeds under a blanket on top of the hot water heater. The seeds usually pop in 24-48 hours.

When the seedlings pop, I plant them into 12 oz beercups with holes in the bottom for drainage using the basic soil mix. I put saran wrap over the top of the cup and put the cups back on the hot water heater under a towel.
I check the cups every 12 hours and when the seedlings pop out of the soil,
they get put under the lights.

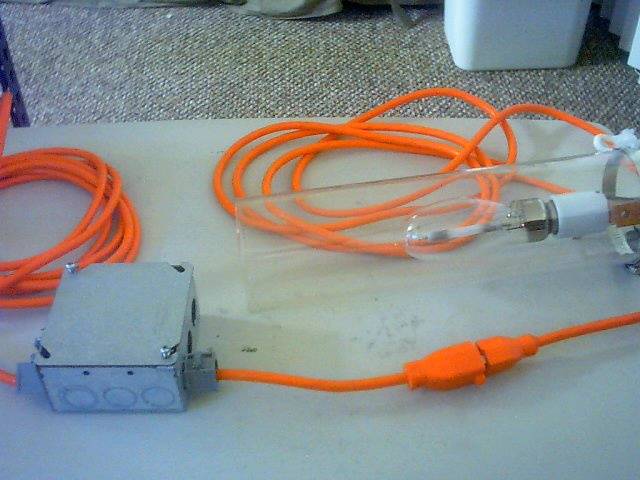
I put the seedlings under 26W CFL's until the first leaves grow out using 24 hour lighting and then under vegetation lights.

Do's and Don'ts
- water only when the beer cup is very light. You want the cup to dry out to promote root development.
- water until it runs out of the cup and let drain
- Don't use fertilized soil for seedlings. Miracle Grow soil is too highly fertilized and will burn your tender seedlings.


watermelon

Member
this a great thread, keep up with the info if you can. its most useful :)

in terms of yeild and manageability, what did you find to be better, 1 or 2 plants in the cab? the idea of only having one plant scares me a bit, as a noob grower im always worried ill kill it by accident and then have to start again.
 

stonerpanda

New member
I can't take it anymore. I'm off to home depot to get some rubbermaids and grow me some 4oz:yoinks: 
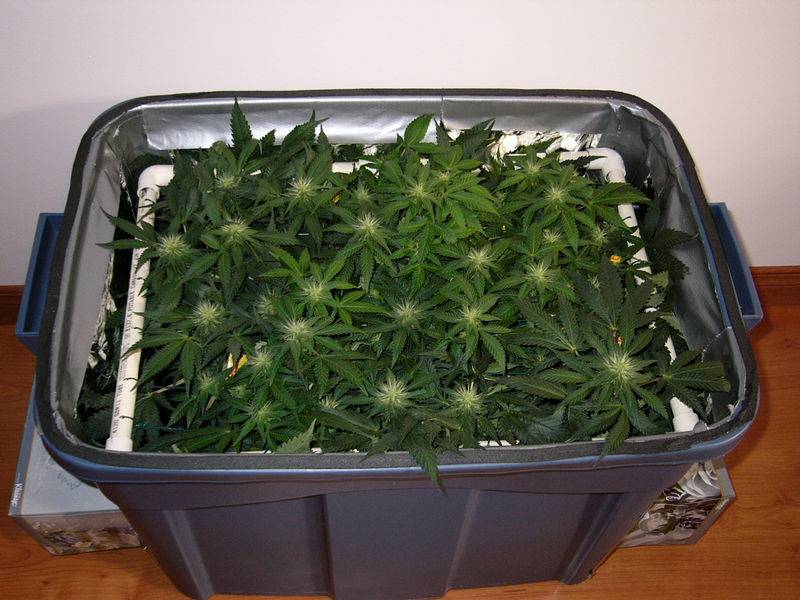
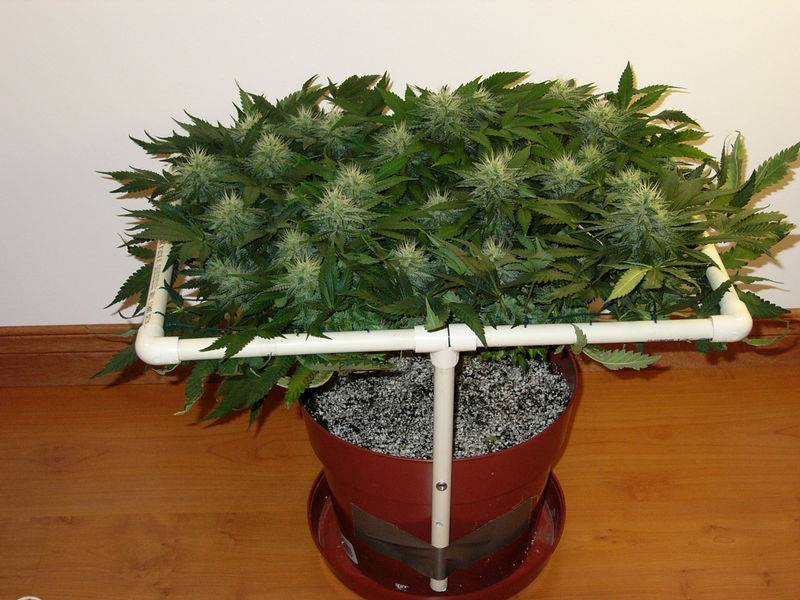
Soil pisses me off though, so I'll be using DWC instead.

And something to ponder: I have a 150W HPS in 4" cool tube at my disposal. Should I use this in place of the fluoros, both at the same time, or leave it out and try only CFLs for the entire grow? I've been using CFLs for all my vegging and I've been impressed so far, so I don't mind going either way. What do you guys think?
 

hgl

Active member
OMG...! I was thinking you were gonne with Overgrow! Its good to see you here man! I just want to say that my first grow was because of your setup... Very stealth and very efficient!

I followed each of your thread on Overgrow and I started a grow following your setup! Your one of them who proves that CFL can be perfect for indoor growing!

This is what come at the end... the result is far less than what I expected but we had some issue that restrain us in our time for growing...!


Anyway... even if we didn't get 10g... this was a fantastic experience for growing and the next indoor grow will be done the way you do!

Cya and don't spot posting update ;)
 
Last edited:

bounty29

Custom User Title
Veteran
That's definitely my favorite carbon scrubber design I've seen so far. Since I've already built my cabinet I think I'll incorporate the design into it. I've built a 2'x2'x4' cabinet out of plywood. I think I'll get two of those smaller sterlite containers and do the same thing with those that you've done, and then either screw the tops of the containers to the roof of the cabinet, or have some other way of suspending them at the top. I'd like to have two of them, one on each side of the cabinet, each with an 84cfm fan. That way, if they both run at 1/3 of their rated speed, due to the backpressure, they'll exchange the air through the scrubber a little over 3 times per minute, which should be good. Hopefully it all works out!
 
Last edited:

bounty29

Custom User Title
Veteran
So do you think using one of those fans, with twice as large an "intake" area for that fan would be better? Would it make the carbon more effective? Less? I'd imagine using two fans and two scrubbers would cause them to work better, but maybe wear out quicker, but I'm not sure exactly. Thank you for your help and inspiration, either way.
 

hgl

Active member
Red_Greenery said:
Hey HGL, it's great to see one of the old crew drop by. I looks like your Blueberry? turned out pretty well. I'd like to see your creation when you get it going.

Nah its not a Blueberry it was a Northernberry.... cross betwen Blueberry and Northern Light... some cheap seed but defenatly my best smoke... I can't imagine some of you guy smoking your extraordinary buds.... the taste must be insane!

Cya! :wave:
 

bounty29

Custom User Title
Veteran
I had looked at that, and wasn't sure if the PC fan would be enough. But I guess as long as the carbon is the same thickness then the fan would be able to pull it through either way. I posted on the DIY carbon scrubber thread...

Alright, what if I were to modify the design a bit, and instead of having a place to fill with the activated carbon "pellet" things, I just make get the one 4" duct, make a 12" screen extension of the 4" duct, and put a cap on that. You can buy rolls of activated carbon air filtering at www.filters-now.com and cut pieces out of that to fit your filter, and just wrap it around and zip tie it in place. It seems like, since that was designed for air to flow through it, that it might not require a centrifugal blower, and could work with some higher power 120mm PC fans.

I was thinking about building a 12" long carbon scrubber, and if I bought one roll for $39.99, I could get 20 sheets that could wrap around my filter. If I had to double wrap it, I could get 10 changes of the filter for $40.00, which seems pretty economical to me.

Any thoughts?

The rolls of carbon are 3/8" thick so I'd double wrap the filter, a foot long filter would have about 176 square inches. I'd have to mount it horizontally inside the cabinet with the fan pulling through. What's the surface area of your filter?
 
Last edited:
G

Guest

Hi everyone, I'm going to get back to putting my methods down. The first thing that you have to do is pick a method of growing and stick with it.

The first choice is to go with either soil or hydroponics. Soil is better suited for small grows and is far easier to get good results with. Hydro is excellent but is more technical, and expensive.

The first thing you need is a good soil recipe. Here is my soil recipe and an explanation of how it works. This soil is for plants not seedlings and will be what you use when repotting out of the beercups.

2 parts Promix
1 part Perlite
1 part Vermiculite

Cannabis needs well draining soil and the roots have to breathe and take in oxygen. Perlite is used to provide drainage. Vermiculite holds water. Both Perlite and Vermiculite are inert (dead stuff) and provide no nutrients to the plant. The Promix is mostly compost which is safe for seedlings because it is but is unfertilized.

Let's add some organic fertilizers and natural stuff.
2 tbsp per gallon - Bone Meal
1 tbsp per gallon - Blood Meal
1 tbsp per gallon - Dolimite Lime

The Bone meal is a slow release source of phosphorus, Blood meal is a slow release source of Nitrogen and Dolomite Lime sweetens the soil as a slow release anti-acid and is a source of Calcium and Magnesium. These organic goodies extend the time until you start using fertilizers.

I put all the dry dusty ingredients into green garbage bag and mix with the bag sealed. I put the bag in a gallon washpail and add the soil mixture until the pail is full. Then I add the organic fertilers. Pretty simple - eh!
 
Last edited:

bounty29

Custom User Title
Veteran
Red_Greenery said:
2 parts Promix
1 part Perlite
1 part Vermiculite

Cannabis needs well draining soil and the roots have to breathe and take in oxygen. Perlite is used to provide drainage. Vermiculite holds water. Both Perlite and Vermiculite are inert (dead stuff) and provide no nutrients to the plant. The Promix is mostly compost which is safe for seedlings because it is but is unfertilized.

Let's add some organic fertilizers and natural stuff.
2 tbsp per gallon - Bone Meal
1 tbsp per gallon - Blood Meal
1 tbsp per gallon - Dolimite Lime

The Bone meal is a slow release source of phosphorus, Blood meal is a slow release source of Nitrogen and Dolomite Lime sweetens the soil as a slow release anti-acid and is a source of calcium. These organic goodies extend the time until you start using fertilizers.

I put all the dry dusty ingredients into green garbage bag and mix with the bag sealed. I put the bag in a gallon washpail and add the soil mixture until the pail is full. Then I add the organic fertilers. Pretty simple - eh!


Alright so let's say I had to make four gallons of your mixture. 2 gallons promix, and 1 gallon each of vermiculite and perlite, pluse... 8tsp bone meal, and 4 each of blood meal and dolimite lime?

And then when you say organic fertilizers that means... you put stuff in the waterings after the plant is growing in the promix-mix?
 
G

Guest

All the organic ingredients are dry powders and I mix them into the soil mix. Both the bood meal and bone meal are slow release fertilizers that add nutrients for the life of the full grow.

As the plant grows it will need more nutrients from the soil. I watch for the first signs of deficiencies and fertilize with alternate waterings of 1/2 strength nutes. I've found that the fertilizers are pretty strong and 1/2 strength is all that the plant nees. I use Shultz 12-15-12 and Fish Emulsion 5-1-1. I recycle 1 gallon windshield wiper fluid containers to mix my nutrients in, both the Shultz and Fish juice are liquids.

When the plant is put into flowering, I run 1/2 strength 12-15-12 for the rest of the grow. With the pH under control, 1/2 strength Shultz 12-15-12 is all the plant needs.

I've found out that over several grows, the plant shows N deficiency first and responds well to the fertilizer. The plant will show Mg deficiency later on. This is due to the pH dropping and locking out Mg. I test the run-off water periodically for pH using a 6.0 to 7.4 aquarium test kit ($5). When the pH drops below 6.5, I add 1 tbsp/gal of Epsom salts to every watering.

The pH will improve and then begin dropping for the second time. When the pH drops below 6.5. I flush the soi with a couple gallons of water and then water with the normal amount with the fertilized water with 1tbsp of epsom salts per gallon.

This soil mixture is great for beginners as it can be flushed out easlily to correct for overfertilization and ph problems due to salt buildup.

My grow method is a hybrid between soil and hydroponics. I load up the soil with organics that will last for about 1/2 the grow. The soil mixture is actually a medium like what the hydro guys use and can be flushed out. When the plant needs nutes, I start adding chemical fertilizers and watch the pH. The hydro guys do the same and change out the nutes when the pH gets out of control. Flushing the soil does the same. I don't correct for problems by overfertilizing.
 
Last edited:
this is a sweet little system u have built greenery!!!

i really love some of these micro grows... its amazing what u can acheive in such a little space...
 
Thanks for the info Mr. Greenery. I used to watch that show all the time when I was a kid.. Is it still on anymore? Anyway - just thought I would give you some props - its a great setup. Just make sure you have a nice lock for the closet door. Someone who opens that might be curious to know what all these rubbermaids hooked up to ducting is for. Aside from that - thats one hell of a lighting/yield setup and the price to produce is incredible. Hats off to you pal. Keep up the good work!
 
G

Guest

Thanks for the kind words guys. I see the old show occaisionally and I haven't seen the same show twice! I thinke the show is out of production now. There must be 150 shows or more cause the program ran for about 15 years.

I'm actually pretty secure. The tubs are tucked into a back bedroom with a lockable door. You can stand in the room and not hear the fan unless you "listen" for it. There's no odour even at peak flowering with the carbon scrubber.

Hey is anyone growing with Rubbermaid tubs? I'd sure like to see some fellow tubbers!
 

duggy

Member
RG--super duper, mistah! your carbon scrubber has knocked my thinking back on track for my own design in progress! thx!

say, how do explain a big humming duct-tape ball with tubes running out if it, in case it's seen? obviously not meant to be seen, but what's the back up story?

"working on my R2D2 halloween costume."

"trying to duplicate that Fleischmann and Pons cold fusion experiment."

"holy shit! what is that? shut the door! shut the door!"
 
G

Guest

Takes a hit and passes it along... Nice to see ya back POMH!

Hey Duggy, long time no see. It's great to see another OG refugee wash up on these friendly shores.

Yeah, that's it, it's my R2D2 costume, yeah, and I'm taking Morgan Fairchild trick or treating, yeah that's the ticket...
 
G

Guest

Hi guys, seeing how it's been pretty quiet in the Lodge, I might as well show ya some more good stuff!

If you're gonna grow in tight spaces, ya better learn to keep the plant under control. MJ grows like a weed if ya give her lots of light and nutes. If ya fill your box early, then you're in for some fun.

SCROG (screen of green) is the best method to control both plant height and to maximize yeild. MJ, will develop growth shoots and branch out to fill all available light. If you bend the plant over (LST) it will make to make more shoots. Cutting the growth tip (FIM) also makes two growth tips. It will also grow more shoots if held against a screen.

I FIM the top of the plant when it has grown 5 - 6 nodes. I prefer FIM to LST because the plant grows evenly. It's your choice.

I put the screen on in late veg and fill the screen to 80%. Tuck all the fan leaves and growth shoots under the screen.

When the screen is 80% full, it goes under 12/12 lighting. The plant growth will take off during early flowering. Tuck and tie everything under the screen until the growth stops. The plant will develop buds and all growth will go to them.

Here is a grow that I did using 8" with screens made from coathangers. I got some plastic coated wire at Home Depot. The screens are about 8" above the pot.


Here is a grow with a reveg of the smaller plant in the above series. I made up a nice screen using PVC pipe. The screen can be lowered from 8" to 6" to get some more space for the buds.

I did a good job tucking and tying and got lots and lots of buds. Too many actually. I found out later that 8 buds per sqft is optimum.


Last edited:

Latest posts

Latest posts

Top