What's new
  • ICMag with help from Landrace Warden and The Vault is running a NEW contest in November! You can check it here. Prizes are seeds & forum premium access. Come join in!

LED FAQ) Building and DIY

jikko77

Active member
chill a bit, will you?

this is what you wrote:

They don't decrease the current being delivered to the cobs, they switch the full current and voltage on and off many times a second, just as if someone was standing at the light switch flicking it on and of as fast as they can, except faster.

this is what i've added:

regarding pwm it is pulsed, it is modulated.
it's a square waveform with a cycle on (usually 5v) and a cycle off (0v), what you do is switching between 5 and 0 v in a certain period of time, with a 100% output we have a steady line on the on cycle, while if we put it to 0 we have a steady line on the off cycle.
the example of someone flickering with the on/off switch get a clear picture of how it work.

the answer wasn't meant to you. but whatever...

then you quoted:

A benefit of the PWM method is that it enables dimming with minimal color shift in the LED output.

it apply to mono with a specific wavelenght not on the cob. period. so this isn't true.

During dimming, the LEDs are still operated at the same voltage and current as during full light output. In addition, lamp life is not affected by dimming, as is sometimes the case with frequently dimmed fluorescent lighting. Rather, dimming LEDs may lengthen the useful life of LEDs, because dimming can reduce operating temperatures inside the light source.

there is the second missinformation.
even this doesn't apply to the cob we are talking about.
and i've just quoted a piece of cree datasheet:

the lamp isn't affected by dimming isn't complitly true.
maybe a vdc signal is less invasive than the pwm one, but the pwm can shorten the cob life:

"The Applications Engineering team at Cree is often asked
whether it is safe to operate Cree XLamp® LEDs with pulsed
currents above the maximum data-sheet rating. This question is
usually asked in the context of legitimate product requirements
such as those posed by emergency-vehicle applications,
specialized stroboscopic illumination and even pulsed
modulation for general-illumination dimming applications.
The short answer is “it depends.” Multiple variables affect both
initial and long-term performance and reliability of an LED.
These include thermal resistance, pulse duration, as well as
current amplitude, frequency and duty cycle."

let me add something else:

I wasn't talking about the PWM signal input used to control the dimmer, I was talking about the PWM signal that comes out of the dimmer that lights the LED COBS eg. a PWM of 36V at 1400mA which pulses on and off many times a second.

I think people here are failing to grasp that dimming LED drivers don't output DC to the LED COBs, they output a PWM at the full 1400mA current, or whatever current the driver is rated at. In other words, if you dim the driver to 50% power, it's still putting out 1400mA, that doesn't change.

thisi s regarding the meanwell driver with "b" inside their name:

the pwm signal come out just from the dim+ and dim-, not the v+ and v-.
those are two separate line. period.
the cob are attached to v+ and v- not on the dim cable. check the dam v+ and v- the do not change, by so much, the voltage output but they change the ampere the cob get!

the voltage on the v+ and v- is it the same, it may change in function of the current and temperature the cob are at.

i think you are failing to gasp how it work.

HLG-240H-C (just to name one) series is a 250W LED A~C/DC LED driver featuring the constant current mode and high voltage output.
...HLG-240H-C is equipped with various function options, such as dimming methodologies, so as to provide the optimal design flexibility for LED lighting system.

in fact:
 

Dion

Active member
chill a bit, will you?

this is what you wrote:


this is what i've added:


the answer wasn't meant to you. but whatever...

then you quoted:


it apply to mono with a specific wavelenght not on the cob. period. so this isn't true.


there is the second missinformation.
even this doesn't apply to the cob we are talking about.
and i've just quoted a piece of cree datasheet:


let me add something else:


thisi s regarding the meanwell driver with "b" inside their name:

the pwm signal come out just from the dim+ and dim-, not the v+ and v-.
those are two separate line. period.
the cob are attached to v+ and v- not on the dim cable. check the dam v+ and v- the do not change, by so much, the voltage output but they change the ampere the cob get!

the voltage on the v+ and v- is it the same, it may change in function of the current and temperature the cob are at.

i think you are failing to gasp how it work.

HLG-240H-C (just to name one) series is a 250W LED A~C/DC LED driver featuring the constant current mode and high voltage output.
...HLG-240H-C is equipped with various function options, such as dimming methodologies, so as to provide the optimal design flexibility for LED lighting system.

in fact:
[URL=https://www.icmag.com/ic/picture.php?albumid=65534&pictureid=1634379&thumb=1]View Image[/url]


he is suggesting that the output of the driver is always max vots and max amps and that dimming the driver(regardless of method) doesnt decrese the current but instead pulses the current, which I think is hogwash.

I have tested myself the 240C1750B MW driver and it puts out steady current dimmed and full blast and with the dim- and dim+ open.


Now unless Arf can show me where in a data sheet it says that it is PWM im not buying, especially seen as the data sheet clearly displays a current range....

anyways
 

jikko77

Active member
he is suggesting that the output of the driver is always max vots and max amps and that dimming the driver(regardless of method) doesnt decrese the current but instead pulses the current, which I think is hogwash.

I have tested myself the 240C1750B MW driver and it puts out steady current dimmed and full blast and with the dim- and dim+ open.


Now unless Arf can show me where in a data sheet it says that it is PWM im not buying, especially seen as the data sheet clearly displays a current range....

anyways

if this is what he meant ... well it's not.

a constant current driver put out a steady current depending on the load attached by definition, while the tension can change.
while on the other hand a constant tension driver do the vice versa, change the current with a steady tension.
 

Arf

Member
if this is what he meant ... well it's not.

a constant current driver put out a steady current depending on the load attached by definition, while the tension can change.
while on the other hand a constant tension driver do the vice versa, change the current with a steady tension.

I don't use meanwell drivers, perhaps they are analog output as Dion claims.

My driver appears to be PWM, I will confirm it on the weekend by putting an electrolytic capacitor across a CXB3590 and seeing if the multimeter voltage reading changes. If the driver is analog the voltage will stay exactly the same, if it's PWM the reading will change.


PWM Dimming
PWM dimming switches the LED on and off at a high rate. The effective IF becomes the time-based average of IF when the LED is on and when it is off. When using the PWM method of LED dimming, the on/off frequency must be faster than the human eye can detect to avoid visible flicker. PWM frequencies of 200 Hz or greater usually avoid flicker problems. Many current PWM LED drivers feature a specialized PWM dimming pin that accepts a wide range of PWM frequencies and amplitudes, allowing a simple interface to external control logic. Often, these LED-dimming driver chips provide several ways to dim an LED.
http://www.digikey.com/en/articles/techzone/2010/apr/how-to-dim-an-led
 

jikko77

Active member
@Arf: is it possible to get a picture of that driver?
if, the only output present on it, has a pwm-like signal it shoulden't be ok to be used with the cob array.
 

Dion

Active member
I don't use meanwell drivers, perhaps they are analog output as Dion claims.

My driver appears to be PWM, I will confirm it on the weekend by putting an electrolytic capacitor across a CXB3590 and seeing if the multimeter voltage reading changes. If the driver is analog the voltage will stay exactly the same, if it's PWM the reading will change.


http://www.digikey.com/en/articles/techzone/2010/apr/how-to-dim-an-led

ok this is starting to make more sense, you are not using a meanie,

what driver are you using buddy?

and as our italian friend said the color of the cob will not be effected by current as they are constant current LEDs not Constant voltage.
also possibly the driver is not suited to COBs?

link? model name? thanks
 

wildgrow

, The Ghost of
Veteran
Ordered the parts and waiting for that slow boat from China.

I tried dealing with Jerry as hes been highly recommended. I got Vivi instead but her customer service was top notch. I asked for quotes on all the parts and she saved me a lot of $ by bundling a bunch of them.

8 3590s
8 Ideal connectors
8 Ideal reflector adapters
8 Kingbrite reflectors

All bundled for $40.60/set

8 predrilled pin heatsinks @ $10.50/each

2 MW 185H-C1400Bs @ $44.50/each

$90 shipping and $26.45 for Paypal

Grand total $614.25!

Looking at about $700 all said and done for what would be a $1200 fixture. Cant beat that with 2 sticks.

Thanks Dion. And thanks to everyone else who has contributed to this and other DIY COB threads. And thanks to growmau5 too. If he didn't collect all the data and put it out in a nice clean package, I don't know if I would have taken the plunge.
 
Ordered the parts and waiting for that slow boat from China.


Thanks Dion. And thanks to everyone else who has contributed to this and other DIY COB threads. And thanks to growmau5 too. If he didn't collect all the data and put it out in a nice clean package, I don't know if I would have taken the plunge.

Doing exactly the same mate, with two different spectrum lamps. Although I got DHL express shipping for that price, 3 days to Europe. See if you can't get Vivi to hurry it up for you. She has, as you stated, been beyond in supporting the inquiry. She threw in free drill holes on the sides for me to mount easier, and even lowered the price of the sinks.

And kudos to the people in bold, especially. Bravo! Can't wait to see more of Growmau5 plans for his containers and amazing light setups and easy to grasp videos.

heatsink price is nice, do you know how many watt of heat they are rate for?

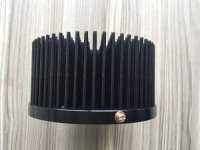
- 8 x pre-drilled heatsink Φ133mm*H70mm(for 50-65W): 9.5usd/pcs;

This is mine :)


Ty ty ty everyone!

Sincerely,
GE :tiphat:
 
Last edited:

wildgrow

, The Ghost of
Veteran
heatsink price is nice, do you know how many watt of heat they are rate for?


50-65w

Doing exactly the same mate, with two different spectrum lamps. Although I got DHL express shipping for that price, 3 days to Europe. See if you can't get Vivi to hurry it up for you. She has, as you stated, been beyond in supporting the inquiry. She threw in free drill holes on the sides for me to mount easier, and even lowered the price of the sinks.


- 8 x pre-drilled heatsink Φ133mm*H70mm(for 50-65W): 9.5usd/pcs;


I wish I knew I could have gotten predrilled side holes too. And at a lower price?
Are you going to have to use longer screws on those holes? The sinks didn't appear to have the flattened sides like the mau5 kits on Cutter do.


They are coming air. Theres a few bits of info that they leave out. (Like the 'official' invoice that gets the order through faster.) According to DHL tracking, the stuff arrives on Monday.

:woohoo:


Thinking of going with slotted aluminum angle to make a possible future expansion on the same frame easy.
 
:woohoo:


Thinking of going with slotted aluminum angle to make a possible future expansion on the same frame easy.

Great minds think alike, doing the same :) Yeah, no flat side but I've attached a picture, not sure if it'll show as I haven't posted any yet :D

Shouldn't be too deep a hole I reckon.. Looks like the dimensions I've got planned!

Woop woop,
GE :tiphat:
 

Attachments

  • heatsink.jpg
    heatsink.jpg
    20 KB · Views: 31

wildgrow

, The Ghost of
Veteran
So that's only 1 hole per side? Will you have to beef up the connection points on the frame(s) to keep them rigid? Speaking of, how are you laying the cobs out?

Sorry about the 20 questions. Its just that we are both building very similar lights. That tells me that we have similar footprints to cover and that we are looking at keeping electrical costs about the same, respectively. Either one of us might have thought about something that the other did not.
 

wildgrow

, The Ghost of
Veteran
picture.php


Heres the layout that Im going to use. Slotted aluminum angle to connect the COBs and C-channel aluminum for the bones (the crosshatched rails).

There are arrows showing how the COBs and rails can be moved outward.

Its not really to scale. The bones will probably be closer together for 2 reasons - 1) its not necessary to have so much space for the drivers, and 2) it will allow 2 more CObs to be spaced evenly in the center rail.

This could eventually be a 12 COB light or have specific diodes added to it.

The other thing Im thinking about is how to wire it. Maybe the 4 corners together and the 4 centers together.
 
Nice looking diagram wildgrow. I like your design. I also like the expansion and versitility aspects. Well done. Now you just have to build it, that's the fun part. I would love to see your finished product.
 

wildgrow

, The Ghost of
Veteran
Thanks Roasty. The layout is much like your avatar panel. Whats the dimensions on that and the space your lighting?

Im psyched to get to building it - cant wait to get that box. I still need to get the aluminum, screws, wire, wagos, etc. So probably like another week before I can start the build.

Ill definitely post a pic here.

I have it in a 5×5 tent, along with a 3 cob vero 29 rig. The avatar pic rig is 28" wide by 14" deep. Spaced between 6 and 8 inches apart. Hope your build goes smoothly. Will be watching for it.
 
So that's only 1 hole per side? Will you have to beef up the connection points on the frame(s) to keep them rigid? Speaking of, how are you laying the cobs out?

Yeah, shouldn't have any room to wander or vibrate. I'm using rubber grommets all over the rig for smooth cable movement and moving the risk of failure due to my own setup to a more (for me) stress free level.

Not really, no. Lumens work out to the right numbers if/when placed like that. Identical to the drawing I have in my head. Only I'll have a single 4000K and a 5000K sitting in the middle, feels right for what I'm doing.

Not keeping it large, doing a single queen to spoil and give my attention. Running it at 700-1050mAh 95% of the time. Soft smooth run to what will hopefully be a very fruit bearing project.

My grow size won't be too large either, but it shall hopefully be splendid! 90x90x180 [cm], ranging from 200-350 LED w high efficiency :)

Adios,
GE :tiphat:
 
Last edited:

wildgrow

, The Ghost of
Veteran
Alright. I asked on your profile, but the info could be helpful to others...

Do you know the screw sizes, both the holder holes and side holes? Guess they all come with them.

On another note - All the heatsinks had bent pins. I took a couple of pics that Ill add to this post tomorrow.

Ask for extra packing material in the bottom of the box.


EDIT: Too much glare in the pics.
 
Top