What's new
  • As of today ICMag has his own Discord server. In this Discord server you can chat, talk with eachother, listen to music, share stories and pictures...and much more. Join now and let's grow together! Join ICMag Discord here! More details in this thread here: here.

First timer, seedling struggling. Damping off?

sinned4g63

Member
TLDR; seedling going into end of week 2 is under developed but otherwise continues to grow. Not sure if I should keep going and progress into vegetation or keep treating as a seedling. Suspect damping off.

Hello everyone! Thanks for checking out my post. Completely new grower here looking for some advice. About 2 weeks ago I started my very first seed for germination upon receiving my new VGrow box. The seeds come from Twenty20 Mendocino and the current one in the box is Devil Fruit (auto).

I sat the seed in a shotglass of water and 14 hours later it sank so I moved it to a paper towel folding in thirds and a small opening in a plastic baggy. I read anywhere from 3 days to 2 weeks for germination so on day 3 I checked in on the seed and it was over an inch long with a well developed taproot and cotyledons. I buried as much as I could leaving the leaves just above the surface.

The box came with coco coir which I hydrated and let drain until it was no more then a very slow drip (fabric bottom pot to work with a wicking system) coming from the bottom and placed into the box while the seed germinated so it had time to continue draining and drying with the fans running. The box has a drip irrigation system in place as well so I have never top watered the plant. I did not continually flush the coco coir outside of the hydration process nor did I buffer it which I am told could be leading to some issues. I used my tap water which comes out testing pH right at 7. I also had to purchase a bigger ac unit to bring my room and box temps down from the mid 80s to the low/mid 70s. Humidity sits a tad low in the mid 50s which I have been addressing with a small humidifier bringing things into the 70s but unfortunately is hard to keep consistent. I have been keeping the humidity dome on in hopes it helps with the cotyledon.

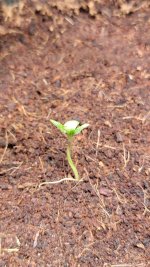
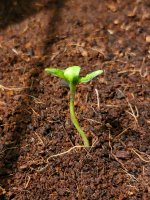
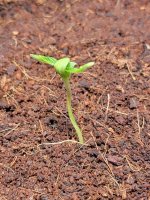
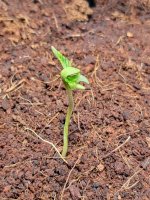
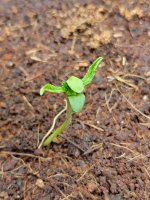
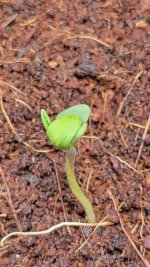
The concern I have is that the seedling looks to be struggling or under developed. The cotyledon leaves never completely opened but the first 2 true leaves have stretched out from in between anyways. They don't appear full or strong. Today checking on it you can see the second set of true leaves have sprouted within the "clamshell". Unfortunately the base of the stem looks to be a bit pale as well. Asking around groups on reddit I have gotten mixed answers from "looks fine, keep rolling with it" to the dreaded damping off or a possible dud seed. I've also heard mixed instructions on the humidity dome at this point especially with damping off being a concern. I can't believe it's a dud seed because it germinated and sprouted like a champ but it's hit a wall. Before I decide to call it quits I'd like to see what you all think.

I'm remaining hopeful things continue to improve but I don't want to waste time on a lost cause. The box I'm using has preprogrammed timers and light intensity for different stages and I still have things on the seedling setting because, even though it has true leaves, they do not look anything like a seedling ready for vegetation. It is my very first and only current plant right now so I want to give it all I've got. However I do also have 9 spare seeds of different types so I don't mind trying again so long as I did all I could for the current one. Thanks if you read this far. Any help is greatly appreciated.
 

Attachments

  • 20240611_122231.jpg
    20240611_122231.jpg
    908.8 KB · Views: 37
  • 20240614_220421.jpg
    20240614_220421.jpg
    1.3 MB · Views: 29
  • 20240616_163333.jpg
    20240616_163333.jpg
    1.4 MB · Views: 41
  • 20240618_214228.jpg
    20240618_214228.jpg
    1.7 MB · Views: 39
  • 20240618_214246.jpg
    20240618_214246.jpg
    1.6 MB · Views: 44
  • 20240618_214326.jpg
    20240618_214326.jpg
    1.3 MB · Views: 32

Creeperpark

Well-known member
Mentor
Veteran
TLDR; seedling going into end of week 2 is under developed but otherwise continues to grow. Not sure if I should keep going and progress into vegetation or keep treating as a seedling. Suspect damping off.

Hello everyone! Thanks for checking out my post. Completely new grower here looking for some advice. About 2 weeks ago I started my very first seed for germination upon receiving my new VGrow box. The seeds come from Twenty20 Mendocino and the current one in the box is Devil Fruit (auto).

I sat the seed in a shotglass of water and 14 hours later it sank so I moved it to a paper towel folding in thirds and a small opening in a plastic baggy. I read anywhere from 3 days to 2 weeks for germination so on day 3 I checked in on the seed and it was over an inch long with a well developed taproot and cotyledons. I buried as much as I could leaving the leaves just above the surface.

The box came with coco coir which I hydrated and let drain until it was no more then a very slow drip (fabric bottom pot to work with a wicking system) coming from the bottom and placed into the box while the seed germinated so it had time to continue draining and drying with the fans running. The box has a drip irrigation system in place as well so I have never top watered the plant. I did not continually flush the coco coir outside of the hydration process nor did I buffer it which I am told could be leading to some issues. I used my tap water which comes out testing pH right at 7. I also had to purchase a bigger ac unit to bring my room and box temps down from the mid 80s to the low/mid 70s. Humidity sits a tad low in the mid 50s which I have been addressing with a small humidifier bringing things into the 70s but unfortunately is hard to keep consistent. I have been keeping the humidity dome on in hopes it helps with the cotyledon.

The concern I have is that the seedling looks to be struggling or under developed. The cotyledon leaves never completely opened but the first 2 true leaves have stretched out from in between anyways. They don't appear full or strong. Today checking on it you can see the second set of true leaves have sprouted within the "clamshell". Unfortunately the base of the stem looks to be a bit pale as well. Asking around groups on reddit I have gotten mixed answers from "looks fine, keep rolling with it" to the dreaded damping off or a possible dud seed. I've also heard mixed instructions on the humidity dome at this point especially with damping off being a concern. I can't believe it's a dud seed because it germinated and sprouted like a champ but it's hit a wall. Before I decide to call it quits I'd like to see what you all think.

I'm remaining hopeful things continue to improve but I don't want to waste time on a lost cause. The box I'm using has preprogrammed timers and light intensity for different stages and I still have things on the seedling setting because, even though it has true leaves, they do not look anything like a seedling ready for vegetation. It is my very first and only current plant right now so I want to give it all I've got. However I do also have 9 spare seeds of different types so I don't mind trying again so long as I did all I could for the current one. Thanks if you read this far. Any help is greatly appreciated.
Hello Friend. If you washed your coco brick properly and started with clean coco. It's time to start a feeding program with a low ec or ppm of fertilizer. What kind of fertilizer are you planning on using? Do you have an EC or TDS and pH meters?

When I start seeds, I use Dixie cups for the best water management by weighing the cups wet and dry. With soilless substrates, I start a low ppm of fertilizer mixed with RO water fortified with a low dose of cal mag. I weigh the cups and if it's time, I water them with low ppm fertilizer mixed with RO water.
 

TanzanianMagic

Well-known member
Veteran
This is how you germinate fresh seeds in coco without problems.

1. Start with bagged coco coir, aimed at cannabis growers.

That's Canna, Plagron, Biobizz. Bagged, because nearly all bagged coco coir is useable straight out of the bag, and a lof of the bricked coco coir needs a buffering agent to flush it first.

2. PH to 6.0 for the entire grow.

That's the pH coco coir buffers to, and what cannabis likes in coco coir. Don't vary from that, and you won't introduce pH swings.

3. Fertilize the soil with a upto 1.1 EC (550 PPM on the 500 scale) of cannabis specific nutrients

That's Canna Coco A+B, etc. Water EC is 0.55, then add 0.45 EC of Canna A+B, and 0.1 EC of Epsom Salt.

And that's enough throughout vegging. 6.0 pH, 1.1 EC of nutrients.

Let the coco dry until it is no longer moist in the morning. Which could take days, even a week. If you have the discipline to do that..., then the bigger the pot you start with, the better. Don't restrict the root system. Bigger rootsystem = more growth and easier nutrient absorption. Let the plant feed itself by growing it's root system.

Also remember that as the medium dries, the nutrient concentration increases, so keep the nutrients at the recommended low concentration above.

4. Germination

Fresh seeds only need to imbibe water until they sink - 12 hours or less.

I like to imbibe them in R/O water, 1% H2O2 and a few grains of raw sugar. This just gets them off to a fast start, and the sugars also feed the mycorrhizal fungi in the coco coir.

Just bury them in the coco coir, 0.5 cm deep, with the pointed side down and bracket side up, covering them lightly with a sidewards motion (no tamping down), to keep them from drying out after they sprout. They're not looking for resistance.
 
Last edited:

sinned4g63

Member
Hello Friend. If you washed your coco brick properly and started with clean coco. It's time to start a feeding program with a low ec or ppm of fertilizer. What kind of fertilizer are you planning on using? Do you have an EC or TDS and pH meters?

When I start seeds, I use Dixie cups for the best water management by weighing the cups wet and dry. With soilless substrates, I start a low ppm of fertilizer mixed with RO water fortified with a low dose of cal mag. I weigh the cups and if it's time, I water them with low ppm fertilizer mixed with RO water.
Hello friend, thank you for replying. I would like to give myself the benefit of the doubt and say that I did rinse it properly, but for the sake of constructive criticism I'll admit I probably could have done a more thorough job. Perhaps use more water to flush it better than I did.. Fertilizer is Vivosuns base nutrient line A and B which came with my kit. I haven't gotten any calmag yet but it's currently in my Amazon cart with more coco coir bricks. The box I got actually walks you through the different steps with videos which instructed to use 1ml of each fert diluted in 1000ml of water (iirc) poured directly into the substrate once at the start of the seedling stage. Otherwise, it said once the taproot had emerged to plant it directly into the substrate/main pot. Since I sort of missed the normal window for this part I ended up having to make about a 2in deep hole and thread the taproot into it as best I could leaving the cotyledon just above the surface. At that point I gently squeezed the sides of the fabric pot to massage the soil and fill it back in, then lightly pack the top layer.

I do have all 3 of those meters, the pH still needs to be calibrated properly but I've been using chemical tests in the meantime. I have been using my tap water because it was a bit unclear on what might be better or worse. I don't mind using RO or distilled water one bit if it'll help, I used to use nothing but RO water on my fish tanks because everything it was missing was re-added with ferts and such. One tank was only shrimp so I had to get familiar with calcium and minerals to make a good TDS for proper molting.

Currently I am not exactly sure where my plant lies between seedling and vegetative so I haven't started any nutes yet as I thought the seedling didn't need any additional. So that initial dose when planting the seedling is all it's gotten.
 

sinned4g63

Member
This is how you germinate fresh seeds in coco without problems.

1. Start with bagged coco coir, aimed at cannabis growers.

That's Canna, Plagron, Biobizz. Bagged, because nearly all bagged coco coir is useable straight out of the bag, and a lof of the bricked coco coir needs a buffering agent to flush it first.

2. PH to 6.0 for the entire grow.

That's the pH coco coir buffers to, and what cannabis likes in coco coir. Don't vary from that, and you won't introduce pH swings.

3. Fertilize the soil with a upto 1.1 EC (550 PPM on the 500 scale) of cannabis specific nutrients

That's Canna Coco A+B, etc. Water EC is 0.55, then add 0.45 EC of Canna A+B, and 0.1 EC of Epsom Salt.

And that's enough throughout vegging. 6.0 pH, 1.1 EC of nutrients.

Let the coco dry until it is no longer moist in the morning. Which could take days, even a week. If you have the discipline to do that..., then the bigger the pot you start with, the better. Don't restrict the root system. Bigger rootsystem = more growth and easier nutrient absorption. Let the plant feed itself by growing it's root system.

Also remember that as the medium dries, the nutrient concentration increases, so keep the nutrients at the recommended low concentration above.

4. Germination

Fresh seeds only need to imbibe water until they sink - 12 hours or less.

I like to imbibe them in R/O water, 1% H2O2 and a few grains of raw sugar. This just gets them off to a fast start, and the sugars also feed the mycorrhizal fungi in the coco coir.

Just bury them in the coco coir, 0.5 cm deep, with the ponted side down and bracked side up, covering them lightly with a sidewards motion (no tamping down), to keep them from drying out after they sprout. They're not looking for resistance.
Those are a lot of new terms for me to learn. o_O I did a lot of that with my fish tanks but, while fish are friends, they are not plants.. lol

New the germination seemed to go great. I saw a few sources say to soak it for 12 hours minimum but absolutely never any longer than 18. Mine actually didn't sink on its own until I gently bumped it with the end of a plastic nute syringe which was right at the 14 hour mark (started 9pm, poked and sank at 11am next day). So far I can tell you, based on the info you listed, I need to address my pH which I did make sure to get supplies for. I did use a brick so I will also need to look into a buffer for my next go around or avoid the brick and get bagged and ready, easy.

Maybe the medium is my current problem.. I have never watered it outside of the drip irrigation schedule programmed into the grow boxes "recipe" which only runs for 5 minutes once a day. Otherwise it's in a fabric pot over a 1.6 gallon reservoir with a wicking system. I can edit the recipe and change the times and intervals the drip irrigation runs but 5 minutes a day seemed pretty minimal so I left it. The elevated heat kept the humidity low as well which has improved, but until recently I have been misting the inside of the box to temporarily bring it up and drop temp slightly. So while the medium never really dried much, it also hasn't been soaked and hopefully in theory means it hasn't been overwatered. Hopefully..
 

TanzanianMagic

Well-known member
Veteran
Those are a lot of new terms for me to learn. o_O I did a lot of that with my fish tanks but, while fish are friends, they are not plants.. lol

New the germination seemed to go great. I saw a few sources say to soak it for 12 hours minimum but absolutely never any longer than 18. Mine actually didn't sink on its own until I gently bumped it with the end of a plastic nute syringe which was right at the 14 hour mark (started 9pm, poked and sank at 11am next day). So far I can tell you, based on the info you listed, I need to address my pH which I did make sure to get supplies for. I did use a brick so I will also need to look into a buffer for my next go around or avoid the brick and get bagged and ready, easy.

Right.

Maybe the medium is my current problem.. I have never watered it outside of the drip irrigation schedule programmed into the grow boxes "recipe" which only runs for 5 minutes once a day. Otherwise it's in a fabric pot over a 1.6 gallon reservoir with a wicking system. I can edit the recipe and change the times and intervals the drip irrigation runs but 5 minutes a day seemed pretty minimal so I left it. The elevated heat kept the humidity low as well which has improved, but until recently I have been misting the inside of the box to temporarily bring it up and drop temp slightly. So while the medium never really dried much, it also hasn't been soaked and hopefully in theory means it hasn't been overwatered. Hopefully..

Another way to water is to thoroughly water once and then wait for the top of the coir to be dry in the morning. That's also better for the developing root system.

People have this obsession with fabric pots, however coco coir doesn't need more aeration. Ordinary plastic pots are fine.
 

sinned4g63

Member
Right.


Another way to water is to thoroughly water once and then wait for the top of the coir to be dry in the morning. That's also better for the developing root system.

People have this obsession with fabric pots, however coco coir doesn't need more aeration. Ordinary plastic pots are fine.
So I did go ahead and order more bricks which showed up this morning, it seemed to be much more available at least on Amazon. But I got 3 bricks for $20 and I know I'll use the others. I also went ahead and got some calmag to buffer with. As for the fabric pot, it was also included with the box setup to work with the wicking system. I could take or leave that part as the drip irrigation setup surely does a better job but while reading into how to buffer the coco coir I saw one article mention letting the pot and medium soak for 8 hours, drying, then soaking again in a freshly prepared solution before drying a second time. The double soak for 8 hours seems a bit extensive but another takeaway from that was to let things thoroughly dry in addition to a better flush.

Talking to my other friend that's started his, he now has a healthy much better looking seedling as of last night. I think I'm going to remove my current "tryling" from the setup and transfer to a small pot as an experiment to see how it turns out and start a new seed and pot setup tonight or tomorrow. If I get things rolling tonight it'll leave me with good timing for the germination and drying the medium going into the weekend.
 

Lester Beans

Frequent Flyer
Veteran
The cheaper the coco the more flushing required. Run some tap water through it until the water runs clear.

I drilled holes in the bottom of a tote and put that tote in another one to collect the runoff from rinsing.

Once the water runs off clear, make a mild nutrient solution, pH that to 6.1 and soak the coco. Plant your seed. Easy peasy.

Your seedling is not damping off but if it was a dome would be the worst way to go. Airflow if key. It just looked like it was reacting to too much light or some environmental deal. No problem it will grow out of it.

Your humidity is fine.

Good luck
 

sinned4g63

Member
The cheaper the coco the more flushing required. Run some tap water through it until the water runs clear.

I drilled holes in the bottom of a tote and put that tote in another one to collect the runoff from rinsing.

Once the water runs off clear, make a mild nutrient solution, pH that to 6.1 and soak the coco. Plant your seed. Easy peasy.

Your seedling is not damping off but if it was a dome would be the worst way to go. Airflow if key. It just looked like it was reacting to too much light or some environmental deal. No problem it will grow out of it.

Your humidity is fine.

Good luck
I did prepare some coco coir buffering with calmag, it's currently drying from the second soak then I'm going to rinse it one more time. I honestly didn't think it was damping off because it looked too "healthy", as of today it has multiple sets of leaves but collectively is no bigger than a half dollar if that. I am going to put it in the better prepared medium and let it keep on keepin on. I will be posting pictures hopefully tonight of it's progress.
 

sinned4g63

Member
The cheaper the coco the more flushing required. Run some tap water through it until the water runs clear.

I drilled holes in the bottom of a tote and put that tote in another one to collect the runoff from rinsing.

Once the water runs off clear, make a mild nutrient solution, pH that to 6.1 and soak the coco. Plant your seed. Easy peasy.

Your seedling is not damping off but if it was a dome would be the worst way to go. Airflow if key. It just looked like it was reacting to too much light or some environmental deal. No problem it will grow out of it.

Your humidity is fine.

Good luck
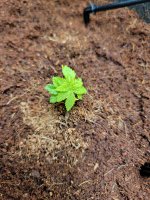
This is as of tonight. Still fairly small and no finger leaves but definitely progress. What do you think? I'm not quite sure if that would be considered veg.

Edit: I was adjusting the drip feed probes before I gave things a very light misting which is why there are water droplets with tiny pieces of dirt on the leaves.
 

Attachments

  • 20240626_213905.jpg
    20240626_213905.jpg
    2.3 MB · Views: 28

TanzanianMagic

Well-known member
Veteran
This is as of tonight. Still fairly small and no finger leaves but definitely progress. What do you think? I'm not quite sure if that would be considered veg.

Edit: I was adjusting the drip feed probes before I gave things a very light misting which is why there are water droplets with tiny pieces of dirt on the leaves.
"So I did go ahead and order more bricks"

Bagged coco coir, specifically for growing cannabis. Canna, Plagron, Biobizz.

Everything else is just playing chemist.


Lester Beans

Frequent Flyer
Veteran
This is as of tonight. Still fairly small and no finger leaves but definitely progress. What do you think? I'm not quite sure if that would be considered veg.

Edit: I was adjusting the drip feed probes before I gave things a very light misting which is why there are water droplets with tiny pieces of dirt on the leaves.
Seems like too much light and not enough nutrients.

Your light may be too close or intense.

Make sure you nutrient solution is ph'd to 6.1.

Water in with 5-600 ppm veg nutrient ph'd to 6.1 and you should see some growth.
 

sinned4g63

Member
"So I did go ahead and order more bricks"

Bagged coco coir, specifically for growing cannabis. Canna, Plagron, Biobizz.

Everything else is just playing chemist.

The closest place for me was about an hour away unfortunately, but I will keep it in mind for the future. The plant is currently doing surprisingly well. I am getting ready to look into some trimming which I will make a separate post on.
 

sinned4g63

Member
Seems like too much light and not enough nutrients.

Your light may be too close or intense.

Make sure you nutrient solution is ph'd to 6.1.

Water in with 5-600 ppm veg nutrient ph'd to 6.1 and you should see some growth.
The light is fixed within the top or lid of the box, the only adjustments I can do are intensity. I did switch to distilled water with nutes added per my recipe at 2ml per each 1000ml added to the reservoir tank. The plant took off thankfully but out more than up so I'm looking into some trimming in the near future.
 

Latest posts

Latest posts

Top