
sinned4g63
New member
TLDR; seedling going into end of week 2 is under developed but otherwise continues to grow. Not sure if I should keep going and progress into vegetation or keep treating as a seedling. Suspect damping off.
Hello everyone! Thanks for checking out my post. Completely new grower here looking for some advice. About 2 weeks ago I started my very first seed for germination upon receiving my new VGrow box. The seeds come from Twenty20 Mendocino and the current one in the box is Devil Fruit (auto).
I sat the seed in a shotglass of water and 14 hours later it sank so I moved it to a paper towel folding in thirds and a small opening in a plastic baggy. I read anywhere from 3 days to 2 weeks for germination so on day 3 I checked in on the seed and it was over an inch long with a well developed taproot and cotyledons. I buried as much as I could leaving the leaves just above the surface.
The box came with coco coir which I hydrated and let drain until it was no more then a very slow drip (fabric bottom pot to work with a wicking system) coming from the bottom and placed into the box while the seed germinated so it had time to continue draining and drying with the fans running. The box has a drip irrigation system in place as well so I have never top watered the plant. I did not continually flush the coco coir outside of the hydration process nor did I buffer it which I am told could be leading to some issues. I used my tap water which comes out testing pH right at 7. I also had to purchase a bigger ac unit to bring my room and box temps down from the mid 80s to the low/mid 70s. Humidity sits a tad low in the mid 50s which I have been addressing with a small humidifier bringing things into the 70s but unfortunately is hard to keep consistent. I have been keeping the humidity dome on in hopes it helps with the cotyledon.
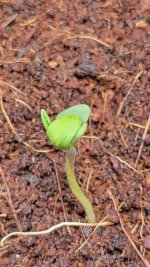
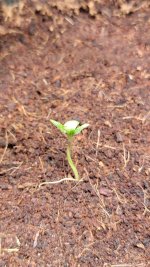
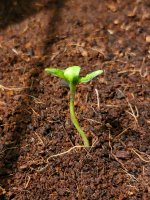
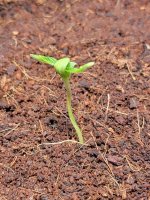
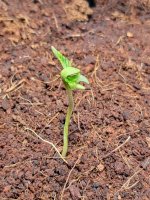
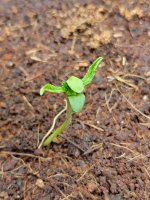
The concern I have is that the seedling looks to be struggling or under developed. The cotyledon leaves never completely opened but the first 2 true leaves have stretched out from in between anyways. They don't appear full or strong. Today checking on it you can see the second set of true leaves have sprouted within the "clamshell". Unfortunately the base of the stem looks to be a bit pale as well. Asking around groups on reddit I have gotten mixed answers from "looks fine, keep rolling with it" to the dreaded damping off or a possible dud seed. I've also heard mixed instructions on the humidity dome at this point especially with damping off being a concern. I can't believe it's a dud seed because it germinated and sprouted like a champ but it's hit a wall. Before I decide to call it quits I'd like to see what you all think.
I'm remaining hopeful things continue to improve but I don't want to waste time on a lost cause. The box I'm using has preprogrammed timers and light intensity for different stages and I still have things on the seedling setting because, even though it has true leaves, they do not look anything like a seedling ready for vegetation. It is my very first and only current plant right now so I want to give it all I've got. However I do also have 9 spare seeds of different types so I don't mind trying again so long as I did all I could for the current one. Thanks if you read this far. Any help is greatly appreciated.
Hello everyone! Thanks for checking out my post. Completely new grower here looking for some advice. About 2 weeks ago I started my very first seed for germination upon receiving my new VGrow box. The seeds come from Twenty20 Mendocino and the current one in the box is Devil Fruit (auto).
I sat the seed in a shotglass of water and 14 hours later it sank so I moved it to a paper towel folding in thirds and a small opening in a plastic baggy. I read anywhere from 3 days to 2 weeks for germination so on day 3 I checked in on the seed and it was over an inch long with a well developed taproot and cotyledons. I buried as much as I could leaving the leaves just above the surface.
The box came with coco coir which I hydrated and let drain until it was no more then a very slow drip (fabric bottom pot to work with a wicking system) coming from the bottom and placed into the box while the seed germinated so it had time to continue draining and drying with the fans running. The box has a drip irrigation system in place as well so I have never top watered the plant. I did not continually flush the coco coir outside of the hydration process nor did I buffer it which I am told could be leading to some issues. I used my tap water which comes out testing pH right at 7. I also had to purchase a bigger ac unit to bring my room and box temps down from the mid 80s to the low/mid 70s. Humidity sits a tad low in the mid 50s which I have been addressing with a small humidifier bringing things into the 70s but unfortunately is hard to keep consistent. I have been keeping the humidity dome on in hopes it helps with the cotyledon.
The concern I have is that the seedling looks to be struggling or under developed. The cotyledon leaves never completely opened but the first 2 true leaves have stretched out from in between anyways. They don't appear full or strong. Today checking on it you can see the second set of true leaves have sprouted within the "clamshell". Unfortunately the base of the stem looks to be a bit pale as well. Asking around groups on reddit I have gotten mixed answers from "looks fine, keep rolling with it" to the dreaded damping off or a possible dud seed. I've also heard mixed instructions on the humidity dome at this point especially with damping off being a concern. I can't believe it's a dud seed because it germinated and sprouted like a champ but it's hit a wall. Before I decide to call it quits I'd like to see what you all think.
I'm remaining hopeful things continue to improve but I don't want to waste time on a lost cause. The box I'm using has preprogrammed timers and light intensity for different stages and I still have things on the seedling setting because, even though it has true leaves, they do not look anything like a seedling ready for vegetation. It is my very first and only current plant right now so I want to give it all I've got. However I do also have 9 spare seeds of different types so I don't mind trying again so long as I did all I could for the current one. Thanks if you read this far. Any help is greatly appreciated.
 I did a lot of that with my fish tanks but, while fish are friends, they are not plants.. lol
