What's new
  • As of today ICMag has his own Discord server. In this Discord server you can chat, talk with eachother, listen to music, share stories and pictures...and much more. Join now and let's grow together! Join ICMag Discord here! More details in this thread here: here.

converting a home security light into a remote ballast grow light (the OG FAQ)

Remote ballasting a security Hps light

Remote ballasting a security Hps light

Hello there to all. They have a sale at princess auto on the 70 hps security light for like $50. I will have to checkout the ones at Rona's like the above mentioned 150 watt. I bought a 600 watter with ballast for $225 from a private deal all new components. It works fine for a Secret Jardin 150 tent as I just flipped the light to flowering cycle with about 25 plants grown from seed. It is about day 7 and I am looking forward to sexing the plants to cull the males to preserve the sensimilla flowers. Nice thread and info on modifying these lamps. Will have to check this out some more. Looking for something like this for a smaller cabinet style grow. Safe and happy growing to all. Cheers
 
Thanks for the reply SugaBear.

I grounded the two taped green wires in the pic. I took everything out popped all the holes in the 4" electrical box. With the cover lid on it doesnt hum very loud. With the lid off, the ballast hums (vibrates?) alot more and needs to be secured better. The Ballast is producing less heat now, but I still think it is too warm. So, I guess a small cpu fan w/ some heatsinks will help to ease my mind. (I will be away for at least 2 days at a time)

I still need an electrical box for the socket though. As of now the socket is mounted to the wood cab. But, I will take your advice and buy another box so I can ground that cord as well.

The temps are way more manageable with this 70w and two 26w CFL's. So I can't join the 150 club right now :wallbash: although during the late fall and winter is another story.
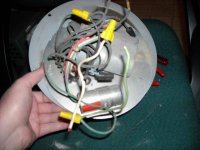
Thanks again.
 

stoned16

Member
I have a philips 400w security light and the balast is right beside the light...What advantages are there to a light being remote balasted??does it make it more efficient or is it because of the heat from the balast??Just wondering why ppl do this and if its worth doing on my lamp...thanks
 

retawgnob

Member
Alright, I got 'em.

Alright, I got 'em.


Let me know what you think? I have a 150w HPS SunSystem grow light and opened her up and she is the type displayed in the original FAQ. I think i will just rewire her, but i will keep a look out at lowes. This particular street lamp i have is caked with dried dirt as it was dropped in mud on its fall to earth. But still, let me kno what you think?
 

bongeyser

New member
I'm maybe a little confused I have a box so the ballast will be far away from the socket you cut the extension cord into 3 pieces male piece for socket,female for ballast then another piece for wall and buy another male plug to actually plug into the wall?
 
Hello there to all. I have finally gotten around to performing this modification to a 70 watt hps security light that I picked up at Princess auto on sale for $50 and it works great. Going to pick up a few more of these and see what they can do. Cheers.
 
Hi there. Yes you have to get an additional male plug end along with the extension cord. Wire the one male plug end to the socket, and wire the female end to the ballast. Then the power end with the additional male end to go to the wall. It works well and safe if you follow the wiring diagram and wrap all connections to insulate the currents. Cheers.
 
Last edited:

ArcticwolfF

New member
HELP!

HELP!

Hey all, looks like you're the ones to talk to! So I got this light from a flea market and have NO clue where to even start. Can this be safely wired to plug into a wall? The guy I bought from said to wire it using the 120 volt wire which I see is clearly labeled but I'm not sure how to wire it and using what? Can I just use a bit of extension cord? Or do I need anything else? I'm new to this whole thing and just want to do this safely. Here are some pics of what I've got. Any suggestions? I would GREATLY appreciate any help!
 

Attachments

  • happy death 138.jpg
    happy death 138.jpg
    50 KB · Views: 47
  • happy death 142.jpg
    happy death 142.jpg
    50.2 KB · Views: 45
  • happy death 140.jpg
    happy death 140.jpg
    33.8 KB · Views: 42
  • happy death 144.jpg
    happy death 144.jpg
    83.3 KB · Views: 42

justanotherbozo

Active member
Veteran
Hey all, looks like you're the ones to talk to! So I got this light from a flea market and have NO clue where to even start. Can this be safely wired to plug into a wall? The guy I bought from said to wire it using the 120 volt wire which I see is clearly labeled but I'm not sure how to wire it and using what? Can I just use a bit of extension cord? Or do I need anything else? I'm new to this whole thing and just want to do this safely. Here are some pics of what I've got. Any suggestions? I would GREATLY appreciate any help!

i think your first step ought to be to force yourself to sit down and actually
read this thread man, and i mean the whole thing.

if you do that, you'll have a pretty good idea what to do, then, if you still
have questions, start a new thread with your questions so you can get the
help you need.
 

3c420

New member
hey Sb i haven't seen you on TY since Og was closed ..u got a new name lol but same old pic ...u still talk to wheelz ?? once i get this digi cam fixed im gonna start a new grow diary .. so keep an eye out bro L8r
 

Bud Hi

Active member
here's one I did back in dec 05.
A piece of alum siding for the shield, mounted on a pipe secured with a u-clamp to raise and lower the light.
also used a double sink, mounted in the top of a dresser, have two pans under that, to catch the water run off.
still using it for veg/starts.
 

Attachments

  • 8376dec_11-05_008[1].jpg
    8376dec_11-05_008[1].jpg
    6.6 KB · Views: 42

Chiya

New member
Sending Rep for Excellent instructions

Sending Rep for Excellent instructions

Hi Sugabear

I got a light exactly like the one Namo420 shows in this thread and using your instructions rewired for remote ballast with out a bit of problems. :woohoo:

I want to thank you for such a great job and Excellent instructions.

Sending Rep your way! :party:
 

jyme

Member
ok.so when i got my 150,my electrician friend wired it to a plug.but i now want to remote ballast it...its a different model than the one shown,suga,maybe u could help heres what it looks like

can i leave it intact. i see yall taking them apart is it necacery to do this.
 

sugabear_II

Active member
Veteran
can i leave it intact. i see yall taking them apart is it necacery to do this.

most people take them apart for one or both of two reasons;

1. move the ballast out of the grow area - the ballast section of the assembly tends to put out alot of heat - by taking it apart and making this item remote you can place it outside of the grow space and not have to worry about exhausting extra heat from it.

2. space - the socket/lamp(bulb)/reflector is pretty small compared to the full assembly - often times taking it apart is the only way to get the lamp nicely into a small setup like a cabinet.

Some other reason...

3. glass absorbs some lumens (up to 10% I have heard it stated)
4. adding your own reflector better suited for the grow space
5. easier cooling of the lamp with a fan
6. if you have a day/night sensor that you want to take out of the circuit (seeing less and less of these lately)

Couple of reason's not too...

1. less complexity - basically you just add a plug to the flood light and your done.
2. safety glass - in the unlikely event that you have catostrophic failure of the lamp (bulb) where the inner arc tube shatters and breaks the outer glass jacket (bulb) a fire could be ignited by the sodium as it oxides rapidly and or is in a very hot state - the safety glass should contain the explosion and prevent a fire.
 
Top