What's new
  • As of today ICMag has his own Discord server. In this Discord server you can chat, talk with eachother, listen to music, share stories and pictures...and much more. Join now and let's grow together! Join ICMag Discord here! More details in this thread here: here.

Anti's MicroStealth Cab Design (Dr. Bud Method)

Anti

Sorcerer's Apprentice
Veteran
Updated Pics... Assembly Part I

Updated Pics... Assembly Part I

Ok. So here's a record of today's progress:

Started by assembling the 2x4 frame w/ 3" screws:


They're not in the shot, but I attached little 1.25" casters to each of the four corners, so this baby rolls. (This also allows a 1" gap for fresh, cool air to get under and therefore inside the cab. See next step.)

Once the base was secure, I cut out the passive intake in the center chamber:


Next, I cut the vent slits on the partition walls:


When this was done, I painted the partition walls white on the side that will be facing into the growroom:


Then I smoked a bowl - :joint: -, let the paint dry to the touch and hit it with a second coat. (Pic is after second coat, i think.)

After that, I was ready to start assembly, starting with the main cab wall, the one the CD shelves will be attached to. For some reason - :joint: - I did not photograph this step. Then I attached one of the partition walls and remembered to get a picture:

:

In order to attach these walls, I'm clamping the board in place and then gluing down and screwing into it from behind. I have not yet mounted the bottom to the 2x4 frames, so I can easily flip the whole cab over for easy access:


After this I attached the other main partition wall, and then the interior partition walls, and finally the central "shelf" area where my carbon scrubber room will be:
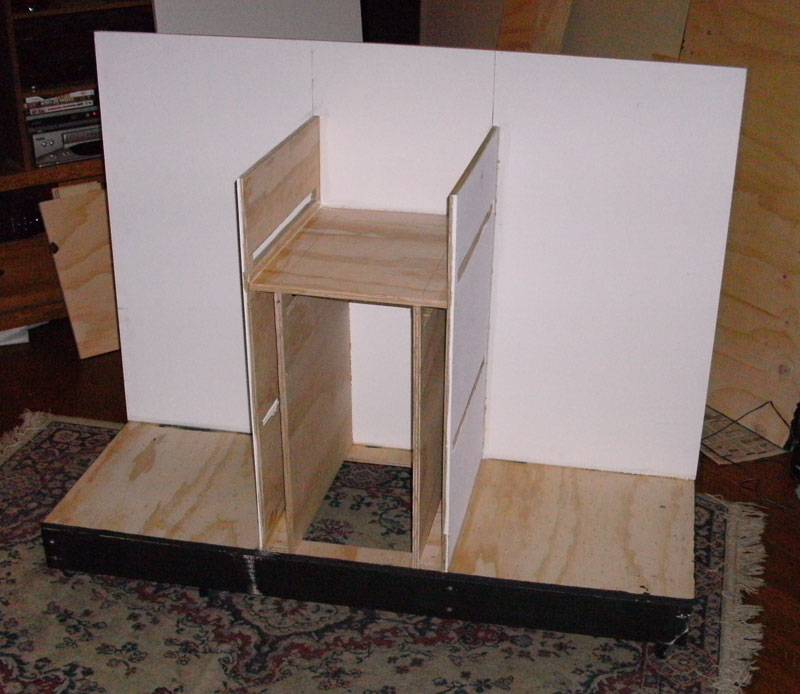


That's it for the day, but not bad work for a guy who doesn't even own a set of tools. (I did buy a jigsaw for this build for $25 and borrowed a friend's cordless drill.)
 
Hey Anti!! very nice build.. hope everything works as planned.. and ill be around to watch some diaries!! :) I started out with two, one square foot chambers. 260 watts total and ran like a champ. I have upgraded now and run 310+ watts in flower and around 150+ for the veg chamber which is now all in a 2'X3' footprint :p
 

Agent-Smith

Member
Looking really great Anti, great job on the build so far! :D Looks more professional than my setup LOL :laugh: Maybe I need to use that designer program you used for my next one :D Can't wait to see it finished, I know it's gonna look Amazing! :smoweed:
 

winkdogg

Member
hi anti, im yet another follower in the drbud style:) i have some white widow and double bubble starting now for my moms ...im going to run 3 in 3 out a week! your build looks just as nice as your desgns! my scetches are quite a bit more raw than yours but my ideas are in my albums! looking forward to following your grow ..i will drop a link when my moms start giving me clone babys!
 

Anti

Sorcerer's Apprentice
Veteran
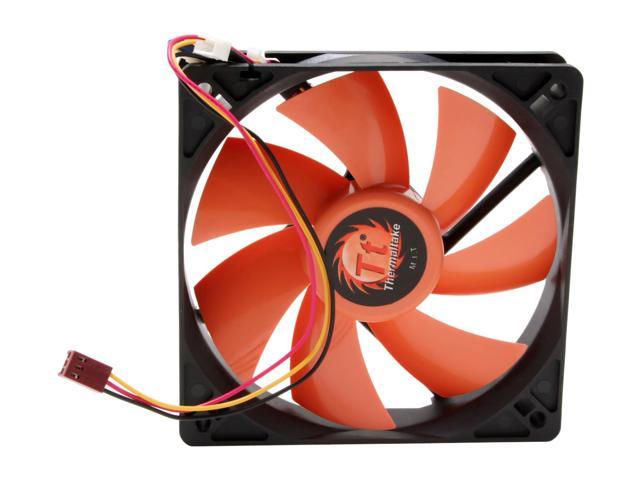
Ok. Had a lot of work the last few days. Very little progress on cab since then. However, I figured out how to get my PC powersupply to work without being plugged into a motherboard. (used a paperclip between the green wire and one of the black ground wires. Now my PSU will fire up without being attached to a PC. :) Simple. It can easily supply the power to my 3 PC fans.

I ended up buying this fan because it comes with a thermo-sensor and manual speed control included for only $10.50 each.

11-999-145-03.jpg

ShowImage.aspx


Now that that's solved, I'm going to spend tonight cutting a backboard for my light sockets and wiring it up. The only thing left to do after that is to put it in the cab, add the roof and the sides and go soil shopping!

I'll try to get some more pics up tonight or tomorrow at the latest. Already worked an 11 hour day so I don't know how long I'll be at this tonight before I give up and chill.

Peace ya'll. Chicken Grease Ya'll.
 

winkdogg

Member
i wish i knew that was a prob ..i know the wiring colors if you need diff voltages:) +12vdc,-12vdc,+-7vdc,+-5vdc... and green to ground/switch...
 

Anti

Sorcerer's Apprentice
Veteran
Updated Pics... Assembly Part II

Updated Pics... Assembly Part II

Brothers! Sisters!

It's been a few days. Without further ado:

Mounted the lights to scrap pieces of 1/2" plywood 17"x4.5". Glass partition butts up against the light board and is held in place by a 17" long piece of 1/2"x1/2" trim. Glass has a 1" x 17" x 10mm thick foam taped around edges of it to (hopefully) minimize drafts between rooms.


Pics of the right side drawer after mounting. Works as well as I'd hoped. Drawer slides are rated at 100 lbs, so I'm optimistic it'll handle all of my ladies with strength to spare.


First a close-up of the wiring of one side of the cab. (All six lights are run in parallel. If one goes out, the others stay on.) Never done this before. Couldn't have been simpler. Bought two $3 nine foot extension cords from the hardware store. They were white, which was a bonus. Each is rated for max load of 2600w, 15A. Each light is like 0.5A or 0.8A so MAX I'm running 5A-6A on this thing at 250ish watts, I think it'll be ok.


LET THERE BE LIGHT!*


* There were two good sized lamps in this room as well as a television on while these pics were taken. Those rooms are BRIGHT. So bright the camera has to make the regular room light look like it's blacked out just to show you detail.

-=-

A couple of views of the exhaust ceiling in progress. Fans unmounted and wires still jumbled on top at the moment. That's a project for tomorrow! (One of the last.)


Whole cab thus far, lights off.


Tomorrow's project: mount fans and run wiring discretely, then find a spot in the drying room to securely mount the PCU.

Once that's done... I just need to clean up and reinforce the actual CD shelves, since I sucked at my first attempt at getting those on in an aesthetically appealing way. (Which is why there are no shots of that stuff yet.) :nanana:

I had hoped to be germing yesterday, but I think I'm only a few days behind that optimistic schedule. Should be sprouting by the weekend.
 

one Q

Quality
Veteran
Good work anti!

If I may. You should, for real, make sure that you get an air filter on that huge intake hole. ESPECIALY if your're drying in there. BUGS! Just measure that space and get a furnace filter,like for your AC/Heat, that fits good. Get a white one that is corrigated NOT A CHEAP BLUE ONE. They'll last ~60 days depending. Once you see what it collects, you;ll NEVER be with out a fresh one on hand.
 

Hydro-Soil

Active member
Veteran
Good work anti!

If I may. You should, for real, make sure that you get an air filter on that huge intake hole. ESPECIALY if your're drying in there. BUGS! Just measure that space and get a furnace filter,like for your AC/Heat, that fits good. Get a white one that is corrigated NOT A CHEAP BLUE ONE. They'll last ~60 days depending. Once you see what it collects, you;ll NEVER be with out a fresh one on hand.

I'll second that. If there's a way you can set it up so the filter can be easily changed, do so. You'll want to change it once a month to every other month, depending on the dust in the air where you live. (It's about once a month where I live)
 

Anti

Sorcerer's Apprentice
Veteran
Good work anti!

If I may. You should, for real, make sure that you get an air filter on that huge intake hole. ESPECIALY if your're drying in there. BUGS! Just measure that space and get a furnace filter,like for your AC/Heat, that fits good. Get a white one that is corrigated NOT A CHEAP BLUE ONE. They'll last ~60 days depending. Once you see what it collects, you;ll NEVER be with out a fresh one on hand.

Sounds good.

Question: I'm not sure they make a filter that's narrow enough to fit. Will they still be effective if you have to cut them to fit? It's a space approximately 10x17, though the hole is only about 8"x15". Any suggestions?
 

Agent-Smith

Member
picture.php


So I was checking out your pic and had a quick question about the fan for the lights. Where does it pull air from? If I'm looking at it correctly, the lights are enclosed by that piece of glass and there is nowhere for the fan to pull air from. If you let air pass the glass then you will be exhausting unfiltered air which isn't good, and if you have iit pull air from the |Filter room it will still pull unfiltered air. I hope you have an answer for that that I'm just not seeing in the pics. :D
 

Anti

Sorcerer's Apprentice
Veteran
picture.php


So I was checking out your pic and had a quick question about the fan for the lights. Where does it pull air from?I hope you have an answer for that that I'm just not seeing in the pics. :D

On the back of the cab there will be a "door" panel. (It's the part you don't see covering the insides in that pic.) There will be a vent cut into that door at the level of the lights for THEIR intake... and then the entire room will exhaust above that area in a different vent. Nice to see you're thinking about it, though. :smile:
 

Anti

Sorcerer's Apprentice
Veteran
Update, ya'll:

I finished up the cab (except for carbon filter. Kinda tapped on cash. Gonna wait til my next paycheck and then get that rolling). I'll have some pics up in a day or two.

Wanted to let ya'll know, I put my beans in some damp coffee filters last night. So.... tomorrow I'll most likely start filling the mom chamber up with seedlings.

I had 4 serious AK47 seeds left from my last grow and about 30 or so "good" bagseeds. I'm germing all the bag seed and all the AK. I don't expect everyone to survive, so all the bagseed is basically just insurance. Also, it'll give me the ability to have a few different strain selections from the beginning. (even though most will be complete mystery strains.)

I'll post pics of the final build and then I'll start a new thread for the actual grow.

Thanks for all of your support and suggestions. Most of them made it into the cab. Hope that helps to maximize it's potential.
 

Bodhi Roach

Member
im not into micro grows, but im glad i read this, it is very impressive and your attention to detail is extra ordinary.

Thanks for the enjoyable read, i subscribed :)
 
Top