What's new
  • ICMag with help from Landrace Warden and The Vault is running a NEW contest in November! You can check it here. Prizes are seeds & forum premium access. Come join in!

<$150 led or 250w MH

floralheart

Active member
Veteran
Thanks floralheart but if you mean 600w HID, you'll have to find another thread to troll. I can't run an ac in this cabinet/location and the ambient temps will be 80*+, not to mention have you ever tried running a 600w HID in a 2'x2'x6 cab? This thread was geared towards a cheap Chinese LED panel or 250w MH in a 1.5x2 cab but evolved into a DIY cob build in a 2x2 so lets just discuss LED grows please.

As per PM with DION, I have settled on (4) CXA3070's with high bins. Now I'm trying to find a cheap solution to run them. If anyone has a link to a driver with specs between 1500ma and 1800ma that can run 50w-70w continuous at 37-39v, please post it for me to review. I linked Dion to this one below and he suggested not buying it because of the plastic housing and costs compared to a meanwell driver. He also mentioned it had the same specs as the one he linked to earlier in this thread but the one he linked was only 50w max, this one is 51-100w but I think I'd rather have the driver turned down, instead of maxed out, not to mention I think I would like to push them in the 55-70w range. Any suggestions appreciated. Thanks!

http://www.aliexpress.com/store/pro...stic-case-power-supply/346689_1403244207.html

I gave you my 2 cents on LED's. If you're not competent enough to understand that post, I wouldn't attempt to build my own light. It's going to fail and burn your house to the ground when you have trouble reading the instructions.
 

Dion

Active member
any news chief?

i tested the 2540s at .88A this wkn Tj was 61c with the passive heatsinks i used


happy days now just waiting for the 1.3A DRIVERS
 

The Dopest

[THC] True Hippie Coonass
Veteran
Still no drivers, though I did get an email that they shipped so I'm just sitting here waiting. My hydroton and coco should be here Thursday and Friday and my meters any day now. Only thing left to order is my nutes, I'm waiting to hear back from a couple sellers now on them so I should be completely ready soon.
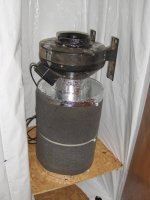
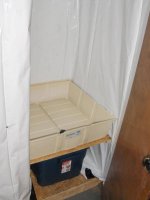
I got some prep work done on the cabinet, had to trim a Botanicare 2x2 tray to fit, added a shelf for it to sit on with room for reservoir below, then got it all plumbed and ready. Also built me a new 12"x18" carbon filter with 25lb of activated carbon in a 2" bed, should cover the stinch well, now I just need to whip up a small one for the mother/veg cabinet and find a fan to push through it.

I'll get pics of the progress later

61@ Tj is not bad for passive, will you be actively cooling them with the larger drivers?

Countdown is on...Who will get their parts first!! :biglaugh:
 

The Dopest

[THC] True Hippie Coonass
Veteran
I gave you my 2 cents on LED's. If you're not competent enough to understand that post, I wouldn't attempt to build my own light. It's going to fail and burn your house to the ground when you have trouble reading the instructions.

This ain't my first rodeo podna but I appreciate the concern. I've rode this horse thousands of times, just not with LEDs. I have worked extensively with high and low voltage electrical situations, both AC and DC but have not done it regularly in 10yrs...I won't burn the house down, I promise. Besides, the grow is 100' from the house.
 

Dion

Active member
the race is on brother! lol i trust urs will arrive 1st

seen as test binning temps are 85c i think the passives will do fine @ 1.3A kinda glad the 1.8s never showed up lol refund is being processed

so u r doing hydro? flood n drain?

oh plz help me with the diy scrubber i cant grow now because i dont trust a diy scrubber to be 10000% effective and the ones to buy wont fit a silent pc fan so the noise will give it away ive seen the tutes bascally the question i have is does it work 1000000000%

any tips to be sure of that?

pm me if u got a link

cheers
 

The Dopest

[THC] True Hippie Coonass
Veteran
I just use the standard tube style on my grows and they absolutely work. The problem with the micro and small mother/veg cabinets is finding a small fan that's quiet enough to push through a filter. As with doing anything yourself, whether it works 1000000000% or not depends on how well you do it. On overgrow, there was a formula that gave you an idea of how many lbs of carbon per sq ft of grow. Since I don't have that formula, I just make it bigger to be safe. The formula discussed how many cfm you would need for the area, how many inches thick the carbon needs to be, etc.

The idea is, you want to create a vacuum in the grow room by either putting the fan inside sucking through the filter and blowing clean air out, or putting the filter outside, sucking untreated air and exhausting fresh air. You want the air in the chamber to be circulated "x" number of times per hour and a filter size to match or be greater than needed. Larger is better because it has less resistance for the air to pass, plus if you ever upgrade your grow your filter will be ready.

I'll do a picture show when I build one for the mother/veg cab. ;)

Edit: here is a link to the standard style I just made a few changes that made it easier for me with the tools I have available.
https://www.icmag.com/ic/showthread.php?p=509470
 

The Dopest

[THC] True Hippie Coonass
Veteran
Here is the filter combo. For this one I used two 12" duct caps for the outside, two 8" duct caps for the inside and a 6" starter duct for the inlet from fan. Fine screen expanded metal wrapped in headliner foam. There is 25lbs of activated carbon packed in here. That's one tip to make it fool proof. No room for movement, if you use the packing on the ends, make sure it is jam packed in there. If there is one small gap, the smell will creep out guaranteed.

Also a pic of the tray I'll be using. I had to trim the sides just a tad for it to fit but talk about maximizing space.:biggrin: I should be able to get (16) 5.5" square pots in there for a perfect perpetual sog. Flood and drain, yes. I put it on a timer and just check the levels in the reserve once a day, before a feeding.
 

Attachments

  • HPIM0227.jpg
    HPIM0227.jpg
    79.8 KB · Views: 40
  • HPIM0220.jpg
    HPIM0220.jpg
    49.3 KB · Views: 32

The Dopest

[THC] True Hippie Coonass
Veteran
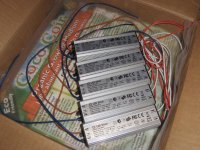
New arrivals today, got the drivers and coco, plus the hydroton(not shown). I'm looking for screws to attach the cob holders and I need to grab some thermal grease. :woohoo:

BTW is it going to matter that these drivers are 34v max? I hope there are no issues.
 

Attachments

  • HPIM0228.jpg
    HPIM0228.jpg
    136.1 KB · Views: 35

Dion

Active member
New arrivals today, got the drivers and coco, plus the hydroton(not shown). I'm looking for screws to attach the cob holders and I need to grab some thermal grease. :woohoo:

BTW is it going to matter that these drivers are 34v max? I hope there are no issues.


you got the ones i linked to you right?

http://www.aliexpress.com/item/Wate...-supply-lighting-transformer/32265565611.html


i dont think so they prob just left the print on the box they are 39v

the last ones i got had the numbers written on in marker as they were customised you can email the seller and ask

do you have a multimeter? that would be the sure way to find out but you have to coonect it up to complete the curcut and see what the meter says( fyi if the volts are indeed too low it wont hurt your chips just wont work)

Aliexpress holds the cash in escrow until you confirm the package has arrived so the seller wont get paid until you release that money

I am sure they will be correct as per the sellers details on the item though and if there is issue contact the seller

how many weeks did you have to wait? i remember the shipping being pretty fast from him last time

ill look into the carbon scrubber-looks like i might have space for a micro auto grow

the screws are usually m2 but just check with the data sheet on the holders(bolts are an option too)

which heat sinks did you settle on?
 

The Dopest

[THC] True Hippie Coonass
Veteran
You are correct, these drivers have the 34v box checked but the package has 1.5a 40v written clearly in sharpie. I'll need to test them, I do have a multi meter, just need to refresh my memory of how to check what.

The cob holder specs list M3 or #4 screws, I don't have a tap for either so I'm looking at other options. If I can find a screw with a thread of a tap I already have, win, if not I'll invest in a tap.

I have not decided on a heatsink yet, I wanted to do some real world testing and see which ones are more effective. If I use regular thermal grease and cob holders I should be able to swap sinks easily, right?
 

Dion

Active member
You are correct, these drivers have the 34v box checked but the package has 1.5a 40v written clearly in sharpie. I'll need to test them, I do have a multi meter, just need to refresh my memory of how to check what.

The cob holder specs list M3 or #4 screws, I don't have a tap for either so I'm looking at other options. If I can find a screw with a thread of a tap I already have, win, if not I'll invest in a tap.

I have not decided on a heatsink yet, I wanted to do some real world testing and see which ones are more effective. If I use regular thermal grease and cob holders I should be able to swap sinks easily, right?


dont need to tap if u dont wanna spend

option 1) drill the hole so its just a lil bit smaller than the screw-screw directly into the heatsink like into pre-drilled wood(uliminium is pretty soft)

option 2) drill all the way through the heatsink and use a bolt with a nut


yeah thats anpther advantage of the grease and holder method you can change things around as needed just make sure the screws/bolts are pretty tight(double nut if going that way) because the contact is maintained that way obviously

you can guestimate which heat sinks will work based on weight pretty accurately fyi im sure whichever one u use first will work so its prob not so important to try all of them(unless u like to play around)

FYI- regarding having the drivers far away- while i was testing the cobs with my father in law(retired electrician) i found out that the drivers can be as far away as you like once the current gets higher( so last time i was using .56A he said not to have the drivers too far, this time with 1A he is runnnig 5m of cable to his wall washers- aparently voltage drop is not a problem once the current gets up thier) good to know
 

The Dopest

[THC] True Hippie Coonass
Veteran
Do you happen to know if these drivers are Power Factor Corrected?

The only two heatsinks I really want to test are the ones we both mentioned already. The one with the squirrel cage fan is silent at 12v but moves less air. The square fan one with heat tubes is heavier but the fan is way loud at 12v, it runs almost silent at 5v so I'll need to test those two at least.

I got the fan/filter hooked up last night, now I have to "break it in". BRB, going to smoke a fat blunt in the flower closet. :joint:
 

Dion

Active member
power factor:
≥0.95
as per specs on the page- these r good drivers, trust me i put the last ones( dif model) under serious tests when i got them current volts power draw heat overload everything the elctrician had in his equipment room for testing electricty was used. it all was as per the specs of the seller
 

The Dopest

[THC] True Hippie Coonass
Veteran
They should be great then. I have a Kill a Watt meter too so I will be doing some testing with it on everything. The 6" filter fan pulls 28w on low, I'll probably have a couple plant fans for circulation and a fan on the drivers so all that will get tested. I'm thinking I may put 3/4 of the drivers on toggle switches so I can run between 1&4 cobs at the flip of a few switches.
 

Dion

Active member
hey can u plz take a look at the led faq thread and let me know if i skipped anything?

ill also troll back though this thread and see what questions u asked me, do you mind if i just copy them in?

thanks

also can i use your pics of the heatsink porn?
 

The Dopest

[THC] True Hippie Coonass
Veteran
I will check it out shortly, feel free to use any questions/comments/pictures you want. I will have some more pics soon along with some testing so we can add that to your thread as well.
 

Dion

Active member
clean ur heatsinsk well before you work on them and vacuum the dust off and between the fins( heat sink vacuuming is good to do every once in a while keeps dust from hindering heat dissipation)
 

The Dopest

[THC] True Hippie Coonass
Veteran
Well I found some screws that match a drill and tap I already had so lucked up and only $0.13 each, that was my cheapest route. I also picked up a tube of thermal compound from the electronics store so needless to say I got to testing things. I wish I could get a pic of how BRIGHT this thing is, it's crazy! :woohoo:

I have a driver plugged in to a "Kill A Watt" for wall readings and a multi meter on the DC side, along with an infrared thermometer for temps. Only got to test the squirrel cage style today but I should get the other done tomorrow.

Input:
122.4 volts
.48 amps
59 watts
Power Factor .99-1.0

Output
1.481 amps
37.98 volts
56.263 watts

Temp
Measuring on the cob side of heatsink outer edges averages 30.7* C with light and fan on for an hour. Measuring the junction point with the light/fan on for an hour averages 47.8*C. The heatsink with light/fan off measured 27.6*C before ever turning it on.

Keep in mind, this is not cabinet- real world measurements, this was on a test bench but all numbers are accurate and impressive. Those drivers are really great!! Thanks for the link and all the help!!
 

Dion

Active member
Well I found some screws that match a drill and tap I already had so lucked up and only $0.13 each, that was my cheapest route. I also picked up a tube of thermal compound from the electronics store so needless to say I got to testing things. I wish I could get a pic of how BRIGHT this thing is, it's crazy! :woohoo:

I have a driver plugged in to a "Kill A Watt" for wall readings and a multi meter on the DC side, along with an infrared thermometer for temps. Only got to test the squirrel cage style today but I should get the other done tomorrow.

Input:
122.4 volts
.48 amps
59 watts
Power Factor .99-1.0

Output
1.481 amps
37.98 volts
56.263 watts

Temp
Measuring on the cob side of heatsink outer edges averages 30.7* C with light and fan on for an hour. Measuring the junction point with the light/fan on for an hour averages 47.8*C. The heatsink with light/fan off measured 27.6*C before ever turning it on.

Keep in mind, this is not cabinet- real world measurements, this was on a test bench but all numbers are accurate and impressive. Those drivers are really great!! Thanks for the link and all the help!!


im really glad to hear are happy with those drivers like i said they r pretty good =D

your temps are great btw BUT i advise:

heatsink measurement should be taken above the chip on the opposite side-heat rises(EDIT: oh u have a fan there ooops) ofcourse if u have an IR thermometer heatsink temps are pretty moot

sounds good though and only 20c above ambient? (47.8c on 27.6c off?) thats amazing!!!
i have to say for heat management these cree cobs are the easiest ive ever worked with even compared to 3w chips- cree says its the ceramic board they r on- i thought that was hype until i tested mine and now your results are just a dream

on the cab u mean u didnt even hand it up? then it will be better once air can freely flow OmG

i dont think heat will be an issue in this cab lol

sounds like its all coming together for ya i bet u are glad u didnt get a cheap LED or use that mH now huh?
 

The Dopest

[THC] True Hippie Coonass
Veteran
Yeah it was not in the cabinet, I tested it on a bench. I suspect that with four of them in the cabinet, temps may rise. :dunno:

I can't express how happy I am with choice of lighting. This is a pretty amazing amount of light coming from this tiny chip. I would have had the other heatsink style tested last night too but I didn't tap deep enough on one screw and broke it off in the heatsink. grrr

I'll get it tested tonight and post it later.
 

Latest posts

Latest posts

Top