Pod Racer
Member
Welcome All,
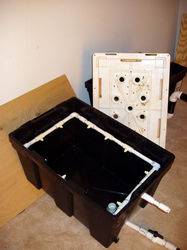
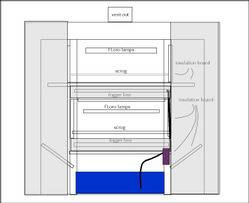
My name is the Pod Racer (a.k.a - Room2Grow from the days of OG) and I race Aeropods utilizing a high pressure, True Aeroponic Growing style I call TAG.
TAG is based on extenstive research I and other aeroponic enthusist have gained, tested and verified over the years. It is no longer considered to be 'new' or 'evolving' as most of all the kinks have been worked out.
It is the goal of this thread to not only provide a central aeroponics forum for this sight, but also allow those interested to share how they have 'personalized' or 'enhanced' their aeropods to do so.
This is called 'Tricking the Pod' as it is also a Punn on the effect adding 'turbos' to your pod will have. But we will get to these enhancements later.
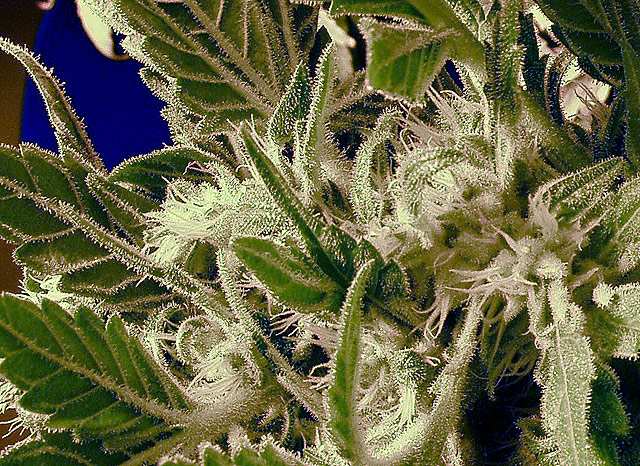
Now, there will be no restriction on the style of aeroponics discussed here, however there is a distinction that unfortunately causes a great deal of debate amongst growers in the hydro arena. For the purposes of this forum aeroponics will be divided into two growing styles. These are my personal definitions and not industry, but for the purpose of understanding the inherent differences of both I feel there must be a distinct difference in style of growing:
TAG Style = True Aerosol Growing Style and
LAAG = A Lo-pressure AeroAssisted Growing Style based more on NFT than True Aerosol Delivery systems.
The reason for these classifications is that in TAG the objective and method of nutrient delivery differs considerably from that of Lo-pressure tube style 'aeroponic' rigs like the Pipe Dream or any non-pod based system. Though I have a fairly extensive understand of all growing styles, TAG is my personally developed style based on strick adherence to effective aeroponic parameters which are the optimal growing conditions for any plant tissue given the correct adjustments.
I will spare all the involved explanations as these can be found in the myriad pages of posts you'll find under my style or name on this sight. Eventually I am sure I'll repeat all of it, but there isn't a need for extensive examination unless the need arises.
Now, that being said, what are the Parameters for TAG?
1. PSI > 30, 50=Ideal, 100 psi even better.
2. Interval cycling 20-30 seconds on, 3-4 minutes off (Dark periods may extend dry periods).
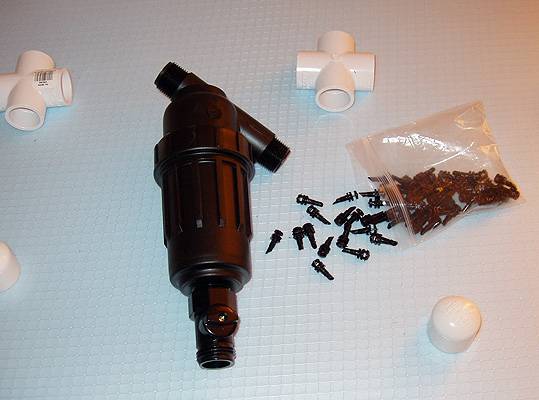
3.Average droplet size 50µ (micron) nozzles (acceptable ranges 30-80µ) with flows < 2 gph preferably .5-1gph with screen filters of 150 and up.
4.Target root temperatures maintained at 68F. (Mature clones lower temps/younger prefer warmer) Temperatures should never exceed 74F (Dangerous).
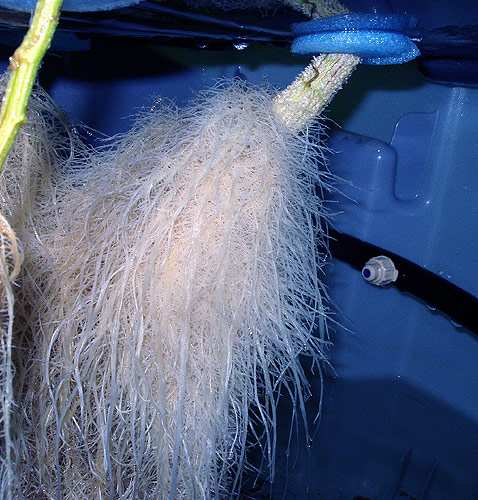
5. The greater the aerospace around the root zones the better—lateral root development equals bud thickness and development your goal are pom pom roots.
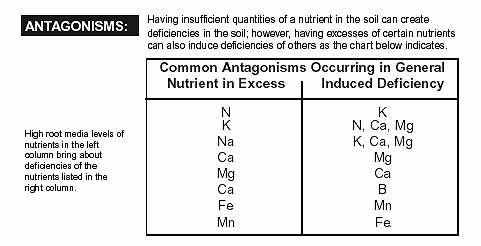
6. Nutrient strengths for TAG are extremely ratio sensitive. Most strains will demonstrate deficiencies in K, Ca, Mg, and P, for optimal absorption of nutrients ratios shoud be as follows:
Nutrient balances necessary to avoid lock out or nutrient burn is:
Ca:Mg 3:1
NO3:NH4 9:1
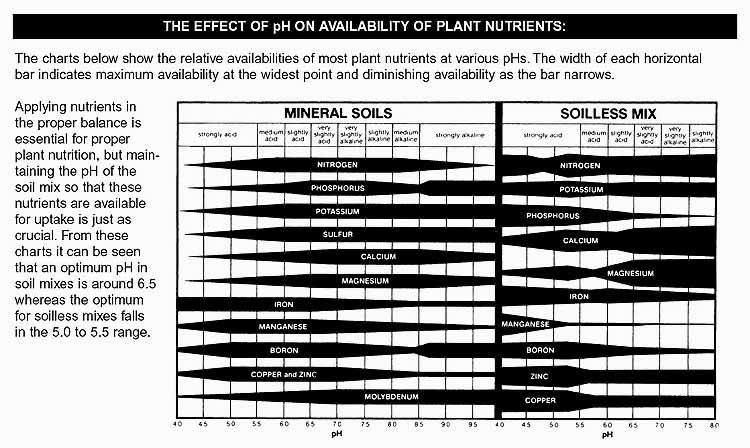
ph is 5.4-5.8
7. Always have a back up pump or system for failure—always!
8. Root zones should be completely dark and sealed from any UV penetration. UV kills AM (bacteria that feeds the root system)
9. Always use RO water and premix nutrients before adding to systems to prevent chemicals from coming out of solution and clogging nozzles when possible - as well as 150 mesh filter or higher.
The Root Zone:
should be unrestricted with enough volume to allow every square cm of root zone to become completely coated with a micro-fine mist of 50µ average population nutrient solution every 3 to 4 minutes in under 60 seconds (preferably 20-30 second misting cycles).
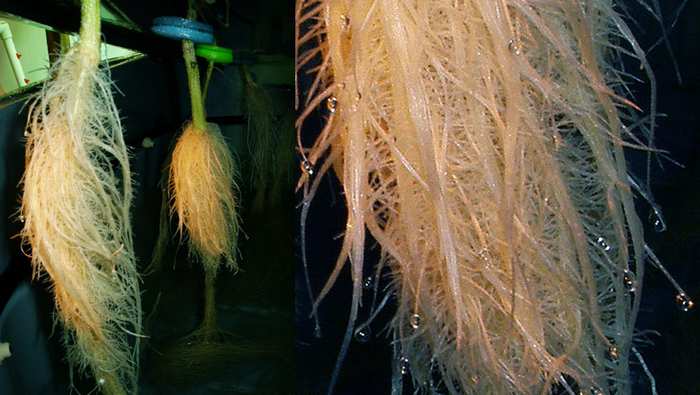
Root Zone Temperatures are found to be ideally suited at approximately 68-72°F for maximum efficiency, though younger plants grow faster at higher temperatures and older ones at lower—these extremes are not conducive to the microculture necessary to support the root colonies and risk of possible bad bacterial infections. The use of HG or any AM inoculant is advised and recommended.
Ideal root temperature has been established at 68°F
Root zone temperatures should see very little temperature fluctuation and absolutely no light penetration if possible. Anything above 75°F should be considered dangerous to the health and well being of your plants and HydroGuard or other benefical is highly recommended. Beneficials are recommended in general as the speed and growth in a TAE is exceptional and the rooting environment needs as much support as possible to keep up with increasing growth demands.
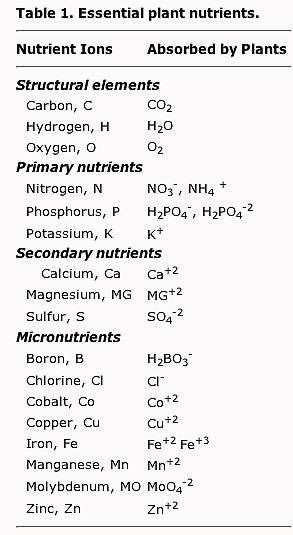
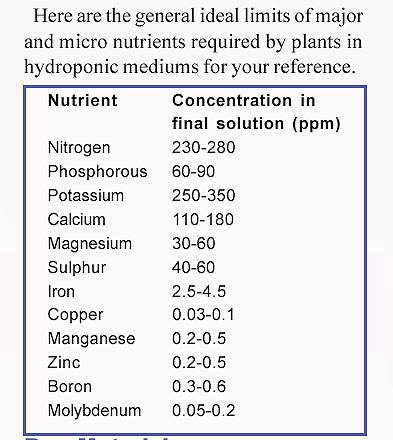
Macronutrients
Nitrogen is a major component of proteins, hormones, chlorophyll, vitamins and enzymes essential for plant life. Nitrogen metabolism is a major factor in stem and leaf growth (vegetative growth). Too much can delay flowering and fruiting. Deficiencies can reduce yields, cause yellowing of the leaves and stunt growth.
Ratio between 2 forms of N (NO3:NH4) Best ratio of NO3-N (Nitrate) Vs. NH4-N (Ammoniacal) in any liquid fert is 9:1 as most of the N taken by the plant is in a nitrate form and a very small portion is taken up in an Ammoniacal form.
Secondly...ferts with higher NH4-N can reduce volume of the total plant growth. In general those plants will produce smaller darker green foliage compared to higher NO3-N ferts.
This is due to N form effects on photosynthesis and N assimilation as NH4-N must be immediately used in a process requiring carbos (the sugars you are trying to produce) and without sufficient levels of carbos free NH4-N can be toxic to plants. While on the other hand when NO3-N is taken up it is reduced to NH3 and assimilated into amino acid. If sufficient carobs are not available then the NO3-N is stored in the vacuoles (storage house for salts used to build up osmotic pressure) of the cell until carbos are available. Which means NO3-N will never tie up available carbos (sugars) at the expense of the plant's growth.
Phosphorus is necessary for seed germination, photosynthesis, protein formation and almost all aspects of growth and metabolism in plants. It is essential for flower and fruit formation. Low pH (<4) results in phosphate being chemically locked up in organic soils. Deficiency symptoms are purple stems and leaves; maturity and growth are retarded. Yields of fruit and flowers are poor. Premature drop of fruits and flowers may often occur. Phosphorus must be applied close to the plant's roots in order for the plant to utilize it. Large applications of phosphorus without adequate levels of zinc can cause a zinc deficiency.
Potassium is necessary for formation of sugars, starches, carbohydrates, protein synthesis and cell division in roots and other parts of the plant. It helps to adjust water balance, improves stem rigidity and cold hardiness, enhances flavor and color on fruit and vegetable crops, increases the oil content of fruits and is important for leafy crops. Deficiencies result in low yields, mottled, spotted or curled leaves, scorched or burned look to leaves..
Sulfur is a structural component of amino acids, proteins, vitamins and enzymes and is essential to produce chlorophyll. It imparts flavor to many vegetables. Deficiencies show as light green leaves. Sulfur is readily lost by leaching from soils and should be applied with a nutrient formula. Some water supplies may contain Sulfur.
Magnesium is a critical structural component of the chlorophyll molecule and is necessary for functioning of plant enzymes to produce carbohydrates, sugars and fats. It is used for fruit and nut formation and essential for germination of seeds. Deficient plants appear chlorotic, show yellowing between veins of older leaves; leaves may droop. Magnesium is leached by watering and must be supplied when feeding. It can be applied as a foliar spray to correct deficiencies.
Calcium activates enzymes, is a structural component of cell walls, influences water movement in cells and is necessary for cell growth and division. Some plants must have calcium to take up nitrogen and other minerals. Calcium is easily leached. Calcium, once deposited in plant tissue, is immobile (non-translocatable) so there must be a constant supply for growth. Deficiency causes stunting of new growth in stems, flowers and roots. Symptoms range from distorted new growth to black spots on leaves and fruit. Yellow leaf margins may also appear.
Interesting FYI:
Every amino acid contains nitrogen.
Every molecule making up every cell's membrane contains phosphorous (the membrane molecules are called phospholipids), and so does every molecule of ATP (the main energy source of all cells).
Potassium makes up 1 percent to 2 percent of the weight of any plant and, as an ion in cells, is essential to metabolism.
Nitrogen...
as NH4:
“ammonium (NH4)”
Definition: The ionized form of ammonia, which is occurs when the water is acidic. It is not toxic to fish as ammonia is, which is why aquariums that have acidic water do not have as many problems with the intial phase of the nitrogen cycle.
Ammonium, the most important nitrogenous fertilizer for water plants, is essential for the breakdown of plant protein.
as NO3
Nitrate is the result of the bacterial breakdown of ammonia > nitrite > nitrate which is the final stage of the natural biological metabolic waste conversion also known as the nitrogen cycle.
The process of breaking down ammonia > nitrites > nitrates is known as the nitrification process. It takes place in an aerobic environment. Nitrifying bacteria settle on gravel and build colonies. They need nutrients (ammonia and nitrite) and oxygen in order to perform their tasks. The result is nitrate. The removal of nitrate, if not utilized by plants, takes place in an anaerobic environment and is called denitrification.
Nitrate is also a key nutrient source for algae. Most of the pesky and unwanted algae thrive on poor water quality, high nutrient levels and excessive nitrate. Many initially cycling tanks experience an algae bloom due to this effect.
Some very important information:
Nitrifiers are most active at temperatures ranging from 68 - 86 degrees F. Their metabolism will decrease below 50 degrees F, while levels above 95 degrees F are potentially life threatening.
Nitrifiers need oxygen to perform their task (aerobic respiration). Nitrate is the final product after completion of the biochemical oxidation, which plants utilize as a fertilizer thus removing them from the water.
Nitrifying bacteria work either at full capacity or drift into a resting phase. Major changes in the bioload will effect the bacteria population. Additional bioload may have the effect of a new cycle (adjustment through growth).
The need for light proofing
Nitrifiers are light sensitive, especially toward ultraviolet (UV/ sunlight). Room light has a negative impact on bacterial activity as well. Colonizing the filter is therefore the preferred settlement of the bacteria, as it provides a dark environment. Light exposure (i.e. cleaning the filter) will not cause stress, as the time frame is too short allowing the colony to recuperate within hours.
The nitrifier's colony creates a surrounding, slimy bio-film, as they clutter together. This somewhat protects the settlement from light exposure. Good films smell earthy, if otherwise, it is an indication of problems in the aquatic environment.
Micronutrients
Iron is necessary for many enzyme functions and as a catalyst for the synthesis of chlorophyll. It is essential for the young growing parts of plants. Deficiencies are pale leaf color of young leaves followed by yellowing of leaves and large veins. Iron is lost by leaching and is held in the lower portions of the soil structure. Under conditions of high pH (alkaline) iron is rendered unavailable to plants. When soils are alkaline, iron may be abundant but unavailable. Applications of an acid nutrient formula containing iron chelates, held in soluble form, should correct the problem.
Manganese is involved in enzyme activity for photosynthesis, respiration, and nitrogen metabolism. Deficiency in young leaves may show a network of green veins on a light green background similar to an iron deficiency. In the advanced stages the light green parts become white, and leaves are shed. Brownish, black, or grayish spots may appear next to the veins. In neutral or alkaline soils plants often show deficiency symptoms. In highly acid soils, manganese may be available to the extent that it results in toxicity.
I thought this was very interesting:
Boron is necessary for cell wall formation, membrane integrity, calcium uptake and may aid in the translocation of sugars. Boron affects at least 16 functions in plants. These functions include flowering, pollen germination, fruiting, cell division, water relationships and the movement of hormones. Boron must be available throughout the life of the plant. It is not translocated and is easily leached from soils. Deficiencies kill terminal buds leaving a rosette effect on the plant. Leaves are thick, curled and brittle. Fruits, tubers and roots are discolored, cracked and flecked with brown spots.
Zinc is a component of enzymes or a functional cofactor of a large number of enzymes including auxins (plant growth hormones). It is essential to carbohydrate metabolism, protein synthesis and internodal elongation (stem growth). Deficient plants have mottled leaves with irregular chlorotic areas. Zinc deficiency leads to iron deficiency causing similar symptoms. Deficiency occurs on eroded soils and is least available at a pH range of 5.5 - 7.0. Lowering the pH can render zinc more available to the point of toxicity.
* This would explain why it is best to be at the lower end of the Ph scale for aero... 5.6-5.8
Copper is concentrated in roots of plants and plays a part in nitrogen metabolism. It is a component of several enzymes and may be part of the enzyme systems that use carbohydrates and proteins. Deficiencies cause die back of the shoot tips, and terminal leaves develop brown spots. Copper is bound tightly in organic matter and may be deficient in highly organic soils. It is not readily lost from soil but may often be unavailable. Too much copper can cause toxicity.
Molybdenum is a structural component of the enzyme that reduces nitrates to ammonia. Without it, the synthesis of proteins is blocked and plant growth ceases. Root nodule (nitrogen fixing) bacteria also require it. Seeds may not form completely, and nitrogen deficiency may occur if plants are lacking molybdenum. Deficiency signs are pale green leaves with rolled or cupped margins.
Chlorine is involved in osmosis (movement of water or solutes in cells), the ionic balance necessary for plants to take up mineral elements and in photosynthesis. Deficiency symptoms include wilting, stubby roots, chlorosis (yellowing) and bronzing. Odors in some plants may be decreased. Chloride, the ionic form of chlorine used by plants, is usually found in soluble forms and is lost by leaching. Some plants may show signs of toxicity if levels are too high.
Nickel has just recently won the status as an essential trace element for plants according to the Agricultural Research Service Plant, Soil and Nutrition Laboratory in Ithaca, NY. It is required for the enzyme urease to break down urea to liberate the nitrogen into a usable form for plants. Nickel is required for iron absorption. Seeds need nickel in order to germinate. Plants grown without additional nickel will gradually reach a deficient level at about the time they mature and begin reproductive growth. If nickel is deficient plants may fail to produce viable seeds.
Sodium is involved in osmotic (water movement) and ionic balance in plants.
Cobalt is required for nitrogen fixation in legumes and in root nodules of nonlegumes. The demand for cobalt is much higher for nitrogen fixation than for ammonium nutrition. Deficient levels could result in nitrogen deficiency symptoms.
Silicon is found as a component of cell walls. Plants with supplies of soluble silicon produce stronger, tougher cell walls making them a mechanical barrier to piercing and sucking insects. This significantly enhances plant heat and drought tolerance. Foliar sprays of silicon have also shown benefits reducing populations of aphids on field crops. Tests have also found that silicon can be deposited by the plants at the site of infection by fungus to combat the penetration of the cell walls by the attacking fungus. Improved leaf erectness, stem strength and prevention or depression of iron and manganese toxicity have all been noted as effects from silicon. Silicon has not been determined essential for all plants but may be beneficial for many.
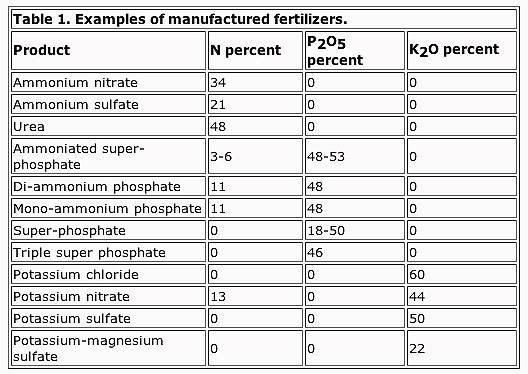
Even more detailed information:
The next installment: TAG Gear - equipment used to build a pod.
My name is the Pod Racer (a.k.a - Room2Grow from the days of OG) and I race Aeropods utilizing a high pressure, True Aeroponic Growing style I call TAG.
TAG is based on extenstive research I and other aeroponic enthusist have gained, tested and verified over the years. It is no longer considered to be 'new' or 'evolving' as most of all the kinks have been worked out.
It is the goal of this thread to not only provide a central aeroponics forum for this sight, but also allow those interested to share how they have 'personalized' or 'enhanced' their aeropods to do so.
This is called 'Tricking the Pod' as it is also a Punn on the effect adding 'turbos' to your pod will have. But we will get to these enhancements later.

Now, there will be no restriction on the style of aeroponics discussed here, however there is a distinction that unfortunately causes a great deal of debate amongst growers in the hydro arena. For the purposes of this forum aeroponics will be divided into two growing styles. These are my personal definitions and not industry, but for the purpose of understanding the inherent differences of both I feel there must be a distinct difference in style of growing:
TAG Style = True Aerosol Growing Style and
LAAG = A Lo-pressure AeroAssisted Growing Style based more on NFT than True Aerosol Delivery systems.
The reason for these classifications is that in TAG the objective and method of nutrient delivery differs considerably from that of Lo-pressure tube style 'aeroponic' rigs like the Pipe Dream or any non-pod based system. Though I have a fairly extensive understand of all growing styles, TAG is my personally developed style based on strick adherence to effective aeroponic parameters which are the optimal growing conditions for any plant tissue given the correct adjustments.
I will spare all the involved explanations as these can be found in the myriad pages of posts you'll find under my style or name on this sight. Eventually I am sure I'll repeat all of it, but there isn't a need for extensive examination unless the need arises.
Now, that being said, what are the Parameters for TAG?
1. PSI > 30, 50=Ideal, 100 psi even better.
2. Interval cycling 20-30 seconds on, 3-4 minutes off (Dark periods may extend dry periods).
3.Average droplet size 50µ (micron) nozzles (acceptable ranges 30-80µ) with flows < 2 gph preferably .5-1gph with screen filters of 150 and up.
4.Target root temperatures maintained at 68F. (Mature clones lower temps/younger prefer warmer) Temperatures should never exceed 74F (Dangerous).
5. The greater the aerospace around the root zones the better—lateral root development equals bud thickness and development your goal are pom pom roots.

6. Nutrient strengths for TAG are extremely ratio sensitive. Most strains will demonstrate deficiencies in K, Ca, Mg, and P, for optimal absorption of nutrients ratios shoud be as follows:
Nutrient balances necessary to avoid lock out or nutrient burn is:
Ca:Mg 3:1
NO3:NH4 9:1
ph is 5.4-5.8
7. Always have a back up pump or system for failure—always!
8. Root zones should be completely dark and sealed from any UV penetration. UV kills AM (bacteria that feeds the root system)
9. Always use RO water and premix nutrients before adding to systems to prevent chemicals from coming out of solution and clogging nozzles when possible - as well as 150 mesh filter or higher.
The Root Zone:
should be unrestricted with enough volume to allow every square cm of root zone to become completely coated with a micro-fine mist of 50µ average population nutrient solution every 3 to 4 minutes in under 60 seconds (preferably 20-30 second misting cycles).

Root Zone Temperatures are found to be ideally suited at approximately 68-72°F for maximum efficiency, though younger plants grow faster at higher temperatures and older ones at lower—these extremes are not conducive to the microculture necessary to support the root colonies and risk of possible bad bacterial infections. The use of HG or any AM inoculant is advised and recommended.
Ideal root temperature has been established at 68°F
Root zone temperatures should see very little temperature fluctuation and absolutely no light penetration if possible. Anything above 75°F should be considered dangerous to the health and well being of your plants and HydroGuard or other benefical is highly recommended. Beneficials are recommended in general as the speed and growth in a TAE is exceptional and the rooting environment needs as much support as possible to keep up with increasing growth demands.
Macronutrients
Nitrogen is a major component of proteins, hormones, chlorophyll, vitamins and enzymes essential for plant life. Nitrogen metabolism is a major factor in stem and leaf growth (vegetative growth). Too much can delay flowering and fruiting. Deficiencies can reduce yields, cause yellowing of the leaves and stunt growth.
Ratio between 2 forms of N (NO3:NH4) Best ratio of NO3-N (Nitrate) Vs. NH4-N (Ammoniacal) in any liquid fert is 9:1 as most of the N taken by the plant is in a nitrate form and a very small portion is taken up in an Ammoniacal form.
Secondly...ferts with higher NH4-N can reduce volume of the total plant growth. In general those plants will produce smaller darker green foliage compared to higher NO3-N ferts.
This is due to N form effects on photosynthesis and N assimilation as NH4-N must be immediately used in a process requiring carbos (the sugars you are trying to produce) and without sufficient levels of carbos free NH4-N can be toxic to plants. While on the other hand when NO3-N is taken up it is reduced to NH3 and assimilated into amino acid. If sufficient carobs are not available then the NO3-N is stored in the vacuoles (storage house for salts used to build up osmotic pressure) of the cell until carbos are available. Which means NO3-N will never tie up available carbos (sugars) at the expense of the plant's growth.
Phosphorus is necessary for seed germination, photosynthesis, protein formation and almost all aspects of growth and metabolism in plants. It is essential for flower and fruit formation. Low pH (<4) results in phosphate being chemically locked up in organic soils. Deficiency symptoms are purple stems and leaves; maturity and growth are retarded. Yields of fruit and flowers are poor. Premature drop of fruits and flowers may often occur. Phosphorus must be applied close to the plant's roots in order for the plant to utilize it. Large applications of phosphorus without adequate levels of zinc can cause a zinc deficiency.
Potassium is necessary for formation of sugars, starches, carbohydrates, protein synthesis and cell division in roots and other parts of the plant. It helps to adjust water balance, improves stem rigidity and cold hardiness, enhances flavor and color on fruit and vegetable crops, increases the oil content of fruits and is important for leafy crops. Deficiencies result in low yields, mottled, spotted or curled leaves, scorched or burned look to leaves..
Sulfur is a structural component of amino acids, proteins, vitamins and enzymes and is essential to produce chlorophyll. It imparts flavor to many vegetables. Deficiencies show as light green leaves. Sulfur is readily lost by leaching from soils and should be applied with a nutrient formula. Some water supplies may contain Sulfur.
Magnesium is a critical structural component of the chlorophyll molecule and is necessary for functioning of plant enzymes to produce carbohydrates, sugars and fats. It is used for fruit and nut formation and essential for germination of seeds. Deficient plants appear chlorotic, show yellowing between veins of older leaves; leaves may droop. Magnesium is leached by watering and must be supplied when feeding. It can be applied as a foliar spray to correct deficiencies.
Calcium activates enzymes, is a structural component of cell walls, influences water movement in cells and is necessary for cell growth and division. Some plants must have calcium to take up nitrogen and other minerals. Calcium is easily leached. Calcium, once deposited in plant tissue, is immobile (non-translocatable) so there must be a constant supply for growth. Deficiency causes stunting of new growth in stems, flowers and roots. Symptoms range from distorted new growth to black spots on leaves and fruit. Yellow leaf margins may also appear.
Interesting FYI:
Every amino acid contains nitrogen.
Every molecule making up every cell's membrane contains phosphorous (the membrane molecules are called phospholipids), and so does every molecule of ATP (the main energy source of all cells).
Potassium makes up 1 percent to 2 percent of the weight of any plant and, as an ion in cells, is essential to metabolism.
Nitrogen...
as NH4:
“ammonium (NH4)”
Definition: The ionized form of ammonia, which is occurs when the water is acidic. It is not toxic to fish as ammonia is, which is why aquariums that have acidic water do not have as many problems with the intial phase of the nitrogen cycle.
Ammonium, the most important nitrogenous fertilizer for water plants, is essential for the breakdown of plant protein.
as NO3
Nitrate is the result of the bacterial breakdown of ammonia > nitrite > nitrate which is the final stage of the natural biological metabolic waste conversion also known as the nitrogen cycle.
The process of breaking down ammonia > nitrites > nitrates is known as the nitrification process. It takes place in an aerobic environment. Nitrifying bacteria settle on gravel and build colonies. They need nutrients (ammonia and nitrite) and oxygen in order to perform their tasks. The result is nitrate. The removal of nitrate, if not utilized by plants, takes place in an anaerobic environment and is called denitrification.
Nitrate is also a key nutrient source for algae. Most of the pesky and unwanted algae thrive on poor water quality, high nutrient levels and excessive nitrate. Many initially cycling tanks experience an algae bloom due to this effect.
Some very important information:
Nitrifiers are most active at temperatures ranging from 68 - 86 degrees F. Their metabolism will decrease below 50 degrees F, while levels above 95 degrees F are potentially life threatening.
Nitrifiers need oxygen to perform their task (aerobic respiration). Nitrate is the final product after completion of the biochemical oxidation, which plants utilize as a fertilizer thus removing them from the water.
Nitrifying bacteria work either at full capacity or drift into a resting phase. Major changes in the bioload will effect the bacteria population. Additional bioload may have the effect of a new cycle (adjustment through growth).
The need for light proofing
Nitrifiers are light sensitive, especially toward ultraviolet (UV/ sunlight). Room light has a negative impact on bacterial activity as well. Colonizing the filter is therefore the preferred settlement of the bacteria, as it provides a dark environment. Light exposure (i.e. cleaning the filter) will not cause stress, as the time frame is too short allowing the colony to recuperate within hours.
The nitrifier's colony creates a surrounding, slimy bio-film, as they clutter together. This somewhat protects the settlement from light exposure. Good films smell earthy, if otherwise, it is an indication of problems in the aquatic environment.
Micronutrients
Iron is necessary for many enzyme functions and as a catalyst for the synthesis of chlorophyll. It is essential for the young growing parts of plants. Deficiencies are pale leaf color of young leaves followed by yellowing of leaves and large veins. Iron is lost by leaching and is held in the lower portions of the soil structure. Under conditions of high pH (alkaline) iron is rendered unavailable to plants. When soils are alkaline, iron may be abundant but unavailable. Applications of an acid nutrient formula containing iron chelates, held in soluble form, should correct the problem.
Manganese is involved in enzyme activity for photosynthesis, respiration, and nitrogen metabolism. Deficiency in young leaves may show a network of green veins on a light green background similar to an iron deficiency. In the advanced stages the light green parts become white, and leaves are shed. Brownish, black, or grayish spots may appear next to the veins. In neutral or alkaline soils plants often show deficiency symptoms. In highly acid soils, manganese may be available to the extent that it results in toxicity.
I thought this was very interesting:
Boron is necessary for cell wall formation, membrane integrity, calcium uptake and may aid in the translocation of sugars. Boron affects at least 16 functions in plants. These functions include flowering, pollen germination, fruiting, cell division, water relationships and the movement of hormones. Boron must be available throughout the life of the plant. It is not translocated and is easily leached from soils. Deficiencies kill terminal buds leaving a rosette effect on the plant. Leaves are thick, curled and brittle. Fruits, tubers and roots are discolored, cracked and flecked with brown spots.
Zinc is a component of enzymes or a functional cofactor of a large number of enzymes including auxins (plant growth hormones). It is essential to carbohydrate metabolism, protein synthesis and internodal elongation (stem growth). Deficient plants have mottled leaves with irregular chlorotic areas. Zinc deficiency leads to iron deficiency causing similar symptoms. Deficiency occurs on eroded soils and is least available at a pH range of 5.5 - 7.0. Lowering the pH can render zinc more available to the point of toxicity.
* This would explain why it is best to be at the lower end of the Ph scale for aero... 5.6-5.8
Copper is concentrated in roots of plants and plays a part in nitrogen metabolism. It is a component of several enzymes and may be part of the enzyme systems that use carbohydrates and proteins. Deficiencies cause die back of the shoot tips, and terminal leaves develop brown spots. Copper is bound tightly in organic matter and may be deficient in highly organic soils. It is not readily lost from soil but may often be unavailable. Too much copper can cause toxicity.
Molybdenum is a structural component of the enzyme that reduces nitrates to ammonia. Without it, the synthesis of proteins is blocked and plant growth ceases. Root nodule (nitrogen fixing) bacteria also require it. Seeds may not form completely, and nitrogen deficiency may occur if plants are lacking molybdenum. Deficiency signs are pale green leaves with rolled or cupped margins.
Chlorine is involved in osmosis (movement of water or solutes in cells), the ionic balance necessary for plants to take up mineral elements and in photosynthesis. Deficiency symptoms include wilting, stubby roots, chlorosis (yellowing) and bronzing. Odors in some plants may be decreased. Chloride, the ionic form of chlorine used by plants, is usually found in soluble forms and is lost by leaching. Some plants may show signs of toxicity if levels are too high.
Nickel has just recently won the status as an essential trace element for plants according to the Agricultural Research Service Plant, Soil and Nutrition Laboratory in Ithaca, NY. It is required for the enzyme urease to break down urea to liberate the nitrogen into a usable form for plants. Nickel is required for iron absorption. Seeds need nickel in order to germinate. Plants grown without additional nickel will gradually reach a deficient level at about the time they mature and begin reproductive growth. If nickel is deficient plants may fail to produce viable seeds.
Sodium is involved in osmotic (water movement) and ionic balance in plants.
Cobalt is required for nitrogen fixation in legumes and in root nodules of nonlegumes. The demand for cobalt is much higher for nitrogen fixation than for ammonium nutrition. Deficient levels could result in nitrogen deficiency symptoms.
Silicon is found as a component of cell walls. Plants with supplies of soluble silicon produce stronger, tougher cell walls making them a mechanical barrier to piercing and sucking insects. This significantly enhances plant heat and drought tolerance. Foliar sprays of silicon have also shown benefits reducing populations of aphids on field crops. Tests have also found that silicon can be deposited by the plants at the site of infection by fungus to combat the penetration of the cell walls by the attacking fungus. Improved leaf erectness, stem strength and prevention or depression of iron and manganese toxicity have all been noted as effects from silicon. Silicon has not been determined essential for all plants but may be beneficial for many.
Even more detailed information:


The next installment: TAG Gear - equipment used to build a pod.


Last edited:









 Its the life, ain't it?


