What's new

The Groffice

Palindrome

King of Schwag
Thanks for all the positive comments and K+!!!!

It's been a while since I have been working on the groffice build, as I have been busy with other projects and I was supposed to go on vacation.
Long storry short, the misses got sick (nothing too serious) had minor surgery. So we wherent able to go sailing, it was a shame but gave me time to fix a bunch around the house.


Moved to the next step in the build progress, tho I am not yet 100% done with the cabinets. There is air-flow issues or something, that have been causing mold. I think it's stale air, between the many plants.
The radiator fans, are not as ideal for moving air around the cabinets as hoped. It have helped to install them, but I am waiting on PC fans to see if they might end up moving more air with less wattage.

The Clone n Dry closet


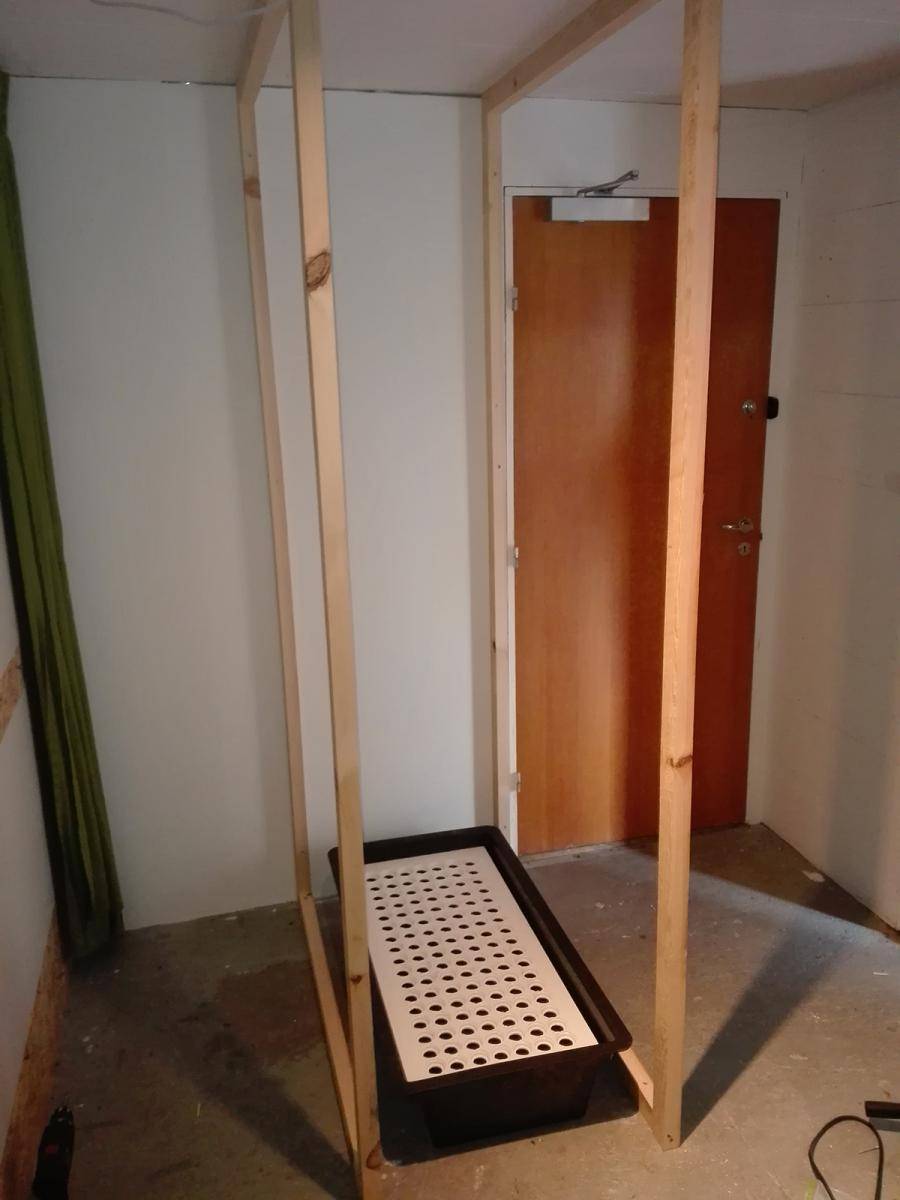
Simply just making a bottom section for the aero cloner, and the top section will be a large drying cabinet.
Where I can dry the plants, hopefully under more ideal temps.


Frame up, fast and simple.


Backside mounted
And yes there is enough space for the flowering cabinet doors


Devider between the clone and dry section, just went with MDF as there will be no water in the top part of the cabinet.


The clone cab will have 3 doors, two in the front and one in the side.
So I acctually can get the cloner in and out, as the space will be tight and not sure I'd be able to angle it into finished cabinet.
 

Palindrome

King of Schwag
Ventilation 125 mm ducting, and gonne try these small inline fans.
Figuring I won't need, a whole lot of air flow in either of the cabinets.

For controll I will be using a hygrostat, and possible some fan dimmers.


Palindrome

King of Schwag
Making the side hatch

Fairly simple, just made a frame and mountet it with some hinges.


Cut the sheet in size and trimmed an 45 degree angle of the hinge side edges.


Making it possible to open it up, I might find a gas spring or something. That can hold it open, when I need to roll the cloner in and out of the hatch.
 

Palindrome

King of Schwag
Slowly moving along, trying to get a little done every day. Next to all the other projects, I got going atm. this should be first priority.

Got the cabinet door frames made, now I just need to cut the OSB sheet into small matching sheets.


Inlet for the dry cabinet, they will be covered with a sheet of OSB inner wall.
Forcing the air down, to the bottom of the cabinet
 

Palindrome

King of Schwag
always nice to see your projects

Thanks mate, it's my pleasure to share and maybe inspire others.


Been busy with not growing, taking time off and suffering in the summer heat.
Anyway made new lids for the aerocloner, so now the cloner is about done. Still need to put the watering timer together, but that shouldn't take long.
Compared to the construction parts, of the cloner and cabinet.


Palindrome

King of Schwag
LED there be clone light

LED there be clone light

Got the clone strip lights done

Going with two strips, running 15 Watt at 334 mA (47V) each.

Drilled a Alu profile, and tapped the 4 holes with a M5 threading.
Mounted a M5 bolt in each, and basicly just stripped the driver to em.
Some of the driver I got, didn't have any housing. So I just covered the whole driver in heat shrink, and cut a small hole to access the dipswitch.
That allow me to change the current/voltage of the driver, and change the wattage and amount of light.
In this range (+/- ½ a Watt)
15 Watt
17 Watt
20 Watt
23 Watt


Palindrome

King of Schwag
Light on in the clone cab


Put together a watering timer thing, from a few parts of Ebay.

This infinity loop cycle timer
https://www.ebay.com/itm/DC-12V-Inf...e=STRK:MEBIDX:IT&_trksid=p2057872.m2749.l2649

Along with a small 18W 12V DC PSU
https://www.ebay.com/itm/LED-Driver...-Strip-/293123269715?var=&hash=item443f822453

10$ or so + 4-5 weeks waiting, so fairly cheap. (still waiting for the waterproof box)
This run both 12V DC and 220V AC, it's not ideal to have that total exposed. I already zapped myself, while testing it. LOL


Anyway it's fairly simple, the 12V PSU power the timer/delay that activated the blue NO/NC relay (Normal Open/Normal Closed)
The relay can handle up to 240V 10Amp or 30V DC 10Amp.

220V is connected to the 12V PSU and the center pole of the relay, the water pump is connected to the NC side of the relay.
The on/off switch is just shorted, so the timer is powered on all the time.
On time is set to aprox 1 min
Off time is set to aprox 5 min

As soon I plug the timer into a wall plug, it will start and keep running this cycle of 1 min on and 5min off.
 

Palindrome

King of Schwag
Whoop Whoop


bb351bd878b3fd5744b1d21363cc248f7099b830.gif
 

Palindrome

King of Schwag
Beautiful workmanship Palindrome!!! :tiphat:

Thank you

Haven't been doing much lately, after I shut down the grow.
Did let the aerocloner run, just to see if it would work or not.


It did!

Hopefully I'll be able to get back to the build soon, finishing up the dry cabinet and other small stuff that need some final finish.
 

DARKSIDER

Official Seed Tester
Moderator
ICMag Donor
Veteran
Hope this comes together in the end for you palindrome i enjoyed tagging along best of luck for the future episodes.:tiphat:
Will be lurking from time to time to see if anything has changed.:biggrin:
 

Palindrome

King of Schwag
Hope this comes together in the end for you palindrome i enjoyed tagging along best of luck for the future episodes.:tiphat:
Will be lurking from time to time to see if anything has changed.:biggrin:

Thanks mate, it will I am sure. Just have to give it a little time, I ended up keeping a few small moms.
They are in veg, have no THC and kept small.

It sucks big time, I mis taking care of the garden. But it's freed up time for other stuff and projects, and im still covered on weed for several months ahead.

Working on the Garage/workshop


Gonna build something like this


Not for weed tho!
 

Badfishy1

Active member
Looking good Pal! Love the homemade aero cloner! Just scored a couple of lights similar if not exactly the same as the panels you put in. Had a service call to replace 3 light fixtures at a dentist office for my brother. He did the original build out a couple years ago. The ballasts had went bad, but we had extra fixtures laying around (cracked lenses). So after swapping ballasts, I threw the lights fixtures away but I kept the led panels. With all the led tape scraps I have I will be Frankensteining a new light for the cost of a ballast and my time :)
 

Fixer

Active member
Palindrome, The Journal of Light Construction (jlconline.com) has a great article on built in place cabinets. It bight save you some time and effort as opposed to building boxes and installing them.
 

Palindrome

King of Schwag
Palindrome, The Journal of Light Construction (jlconline.com) has a great article on built in place cabinets. It bight save you some time and effort as opposed to building boxes and installing them.

Just doing a frame, slap some sides and cabinet doors it.
In the end it's mainly ment to be practical, so it prolly won't be highly detailed and beautiful. But a workbench, that I won't mind using cos it's already looking banged up :D
 

exploziv

pure dynamite
Administrator
Veteran
This thread is a true inspiration. Btw, if you decide to go into arduino and need any pointers I can help. And I am sure there are others that can help you as well. It's really easy once you get the basics, and there are lots of examples, tutorials and projects from where you can learn or even "steal" bits of code you can use to make your own.
Meanwhile, I am sure your thread will inspire lots of new or even older growers over the next years. Cause it rocks! And you did a great job describing each step.
:lurk:
 

Fixer

Active member
Then you have it licked. That's essentially what the article describes. I'll look forward to seeing the end result.
 
Top