What's new
  • As of today ICMag has his own Discord server. In this Discord server you can chat, talk with eachother, listen to music, share stories and pictures...and much more. Join now and let's grow together! Join ICMag Discord here! More details in this thread here: here.

plug n play flip flop detailed DYI

Stay Puft

Member
Wow... nice find if it is true!
I never thought I would see someone make/sell these commercially.
I actually have said so in this forum before. It appears I was wrong. (It happens)
I have 2 questions about these .
1- How much does it cost?
2- What is the UL[or ETL] file number? (They claim safety compliance, so they should have a file # that can be verified.)
If it works like it says, and is not too expensive.. I would say you have found your answer. Nice digging!
Regards,
Puft
 

sparky101

New member
Ballasts have to be turned off to prevent the contacts on the flip relays from arcing. They'l last about 2 years and need to be replaced. There is no way to prevent the arcing from hot flips unless ballasts are powered off and then back on during each 12 hour flip cycle.

Best Regards

sparky101
 

dub 6

Member
step 1
drill 3 hole's 3/4" one on each side make sure you drill them above the relay all so why your at it in the middle of the bottem of this box theres a bump drill that flat as well or the relay dont set right..... this was the test box so one female plug was put in place to make sure every thing was OK... the 4th hole i drilled at 3/4" but i think that its to big im still waiting on the last strain relief the one i ordered was wrong


step 2
remove all screw's from relay and set in project box
if you look at the relay theres 4 set's of screw's the way the relay is facing in the pic the top is lamp 1 , the next set down is lamp 2 the 3rd set is 120volt coli, & 4th is ballast input.....
you want your lamp 1 & 2 female plugs coming in from the sides as the pic show's if you put them any where else it is a pain in the ass to wire


step 3
crimp all ring term's the blue ones is for the female plug's and the ballast cord
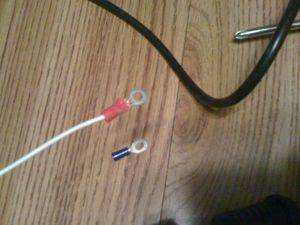

step 4
add the ballast cord & the 120volt coli wire's
the ballast cord should be put in on the side that its hooked up on the power cord will be added on top


step 5
brake out that screw driver again and go to town.......
all the white wires go on one side and all the black's go on the other just make sure you do one item at a time ie lamp 1 do your white then black then move to lamp 2 add both wire's then to your power cord (120volt coli) and last the ballast load..... after all the white/blacks wire's are screwed down your left with 4 green wires...... you can do a 2 things here
1. wire nut and black tape
2. buy a ground bar and screw it in the box
im going to pick #2 i just have not went to home depot to pick it up all add pic of that asap...


step 6 holding down the relay..... i have not yet got this far i was thinking of glue as i dont want screw's hanging out the bottem... again i will post this once its done....


Please enlighten me good sir. How are the timer and ballast connected to the flip flop?

Let's see if i understand...
2chajqs.jpg


The red circles indicate where the bulbs get plugged into.
The yellow circle plugs into the timer.
The blue circle connects to the ballast, and the ballast is plugged into the wall outlet.
Is this correct? And if so, I dont see how the timer works in the equation. Please help. All i need to flip between is 2 400w hps.
 

iSmokeTrees

Member
Could someone please label the picture with all the wires connected? The low light makes it very difficult to see and I would really appreciate it. This guide is kind of hard to follow.
 

dub 6

Member
The timer sends a current to relay, shifting power to the other pole/bulb, and is plugged into an outlet that generates electricity.

http://www.icmag.com/gallery/data/500/7541relaywire.jpg

That's as clear as the wiring gets, use a ground bar for the grounds.

so the timer itself is not wired to the relay, but the male plug connected to the coil plugs into the timer, and the timer, requiring a separate power source, is then plugged into an electrical outlet?

to further clarify, would both the ballast and the timer have to be plugged into the wall outlets??
or is the timer being powered from the ballast as well?
 

One Love 731

Senior Member
Veteran
take a 6' extension cord cut off the female end and connect those wires to the coil 5 and 6 in the diagram linked to above. now plug the other end with the male plug in, into a timer that is already plugged in.
 

dub 6

Member
take a 6' extension cord cut off the female end and connect those wires to the coil 5 and 6 in the diagram linked to above. now plug the other end with the male plug in, into a timer that is already plugged in.

thanks. i guess i was confused cuz I got the aube TI003 timer with the 3 wires blue (load), black (line) and white (neutral). so in my case I would have to wire the black and white wires of the timer to the line and neutral of the relay and the blue load wire of the timer to the coil, and also wire the neutral wire of the timer to the neutral of the coil. I figured as much but I didnt wanna blow myself up.

Good looks to DB2004 for certifying my assumptions, and to everyone who contributed to this thread.
 

toastfighter2

Active member
Does anyone see a reason why I shouldn't put one of these together for my little 150w light? I do plan on upgrading to a larger light at some point so I would definitely built it to take at least a 600w.
 

FirstTracks

natural medicator
Veteran
how can a flip flop help you out and how does it work

1) a flip flop will allow you to run 2 lights off one ballast (while one is on in room 1, other is off in room 2), saving you a little money, and allowing you to run a more contiuous power load than 12 on 12 off.

2) im not gonna even try. read the thread?
 
Anybody have any good info on the horti control brand??

2 ballast flipping 2 of four lights every 2 hours per room per 12 hour shift. 2 ballast running 8 lights.

I think I'd stick with mag ballast. Way too easy to maintain & no worries about restarts.

How much increase in yield? 40% ?,,,70% ???,,,

for the same electric bill.

some of those units are capable of 10 ballast = 40 lights WOW ! ! !

8 ballast would be good using a 16 light checkerboard pattern in each room, If you could only muster a pound a light that's still 32 #'s with 8 ballast....hahaha
 

Latest posts

Latest posts

Top