What's new
  • ICMag with help from Landrace Warden and The Vault is running a NEW contest in November! You can check it here. Prizes are seeds & forum premium access. Come join in!

Diary PCBuds mini-grow

PCBuds

Well-known member
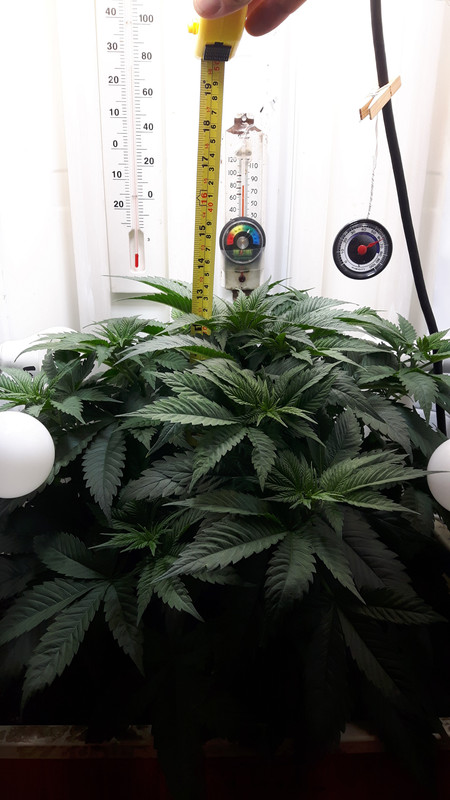
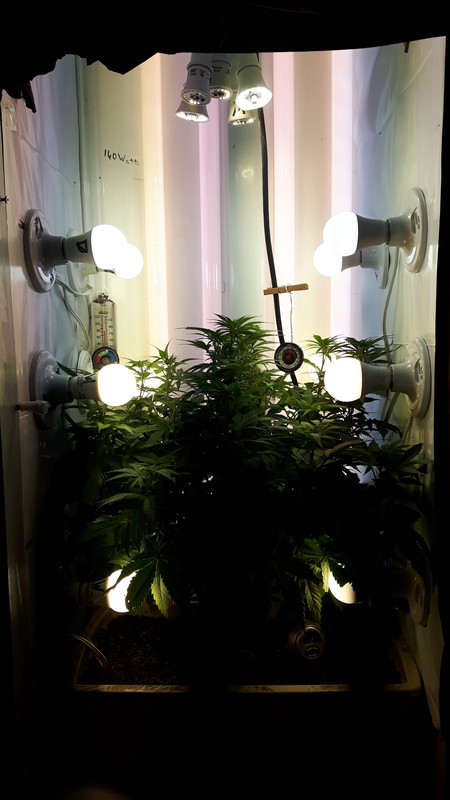
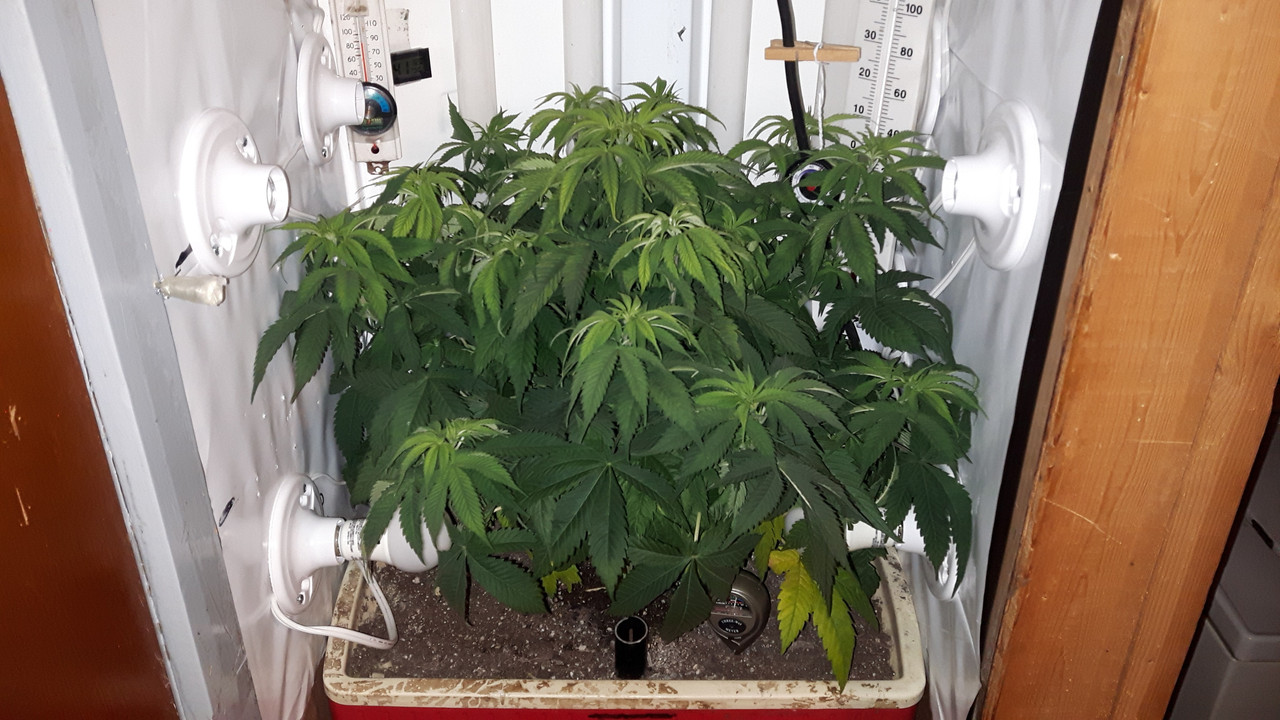
My plant is looking pretty healthy but she's almost 5 weeks old and pretty stumpy.


She's got really close nodes.
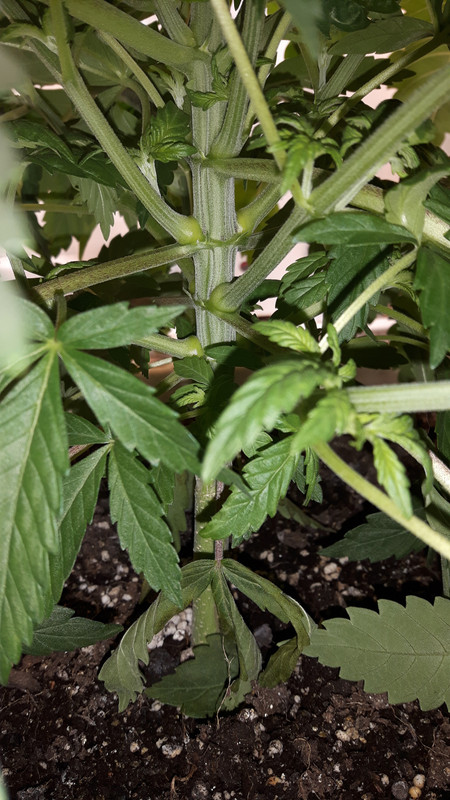


But I'm hoping she'll stay short and bushy and fill my cab with leaves and I won't have to Top, FIM or LST her at all even though she's in 9 gallons of soil.

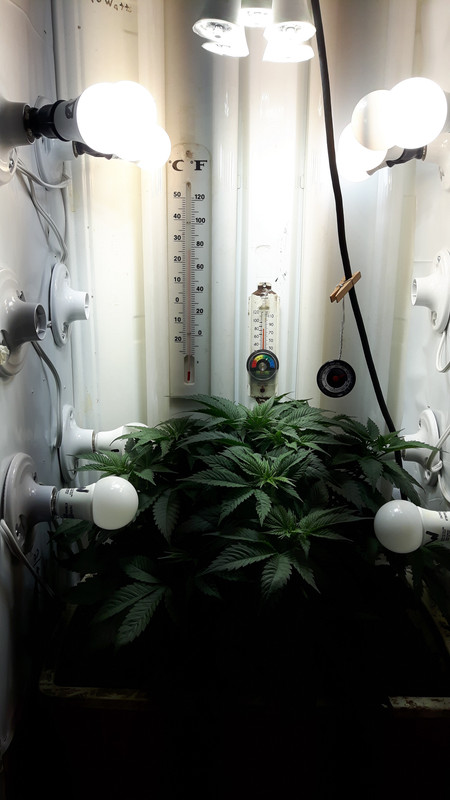
I'm gonna try to train her with side lighting.
 

PCBuds

Well-known member
It's been a while since I last posted so I thought I'd update.

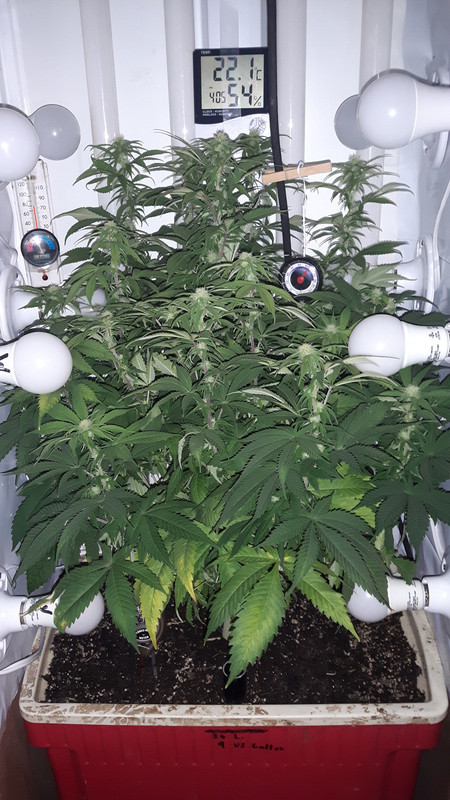
My indoor plant is looking pretty good but it's a lot shorter than I was expecting.

I'm 3 1/2 weeks into flower now and I'm pretty sure the stretch is over but I still have a lot of space above the plant. The middle and bottom of the plant are really dense with leaves.

This is the progression starting Aug. 31.


PCBuds

Well-known member
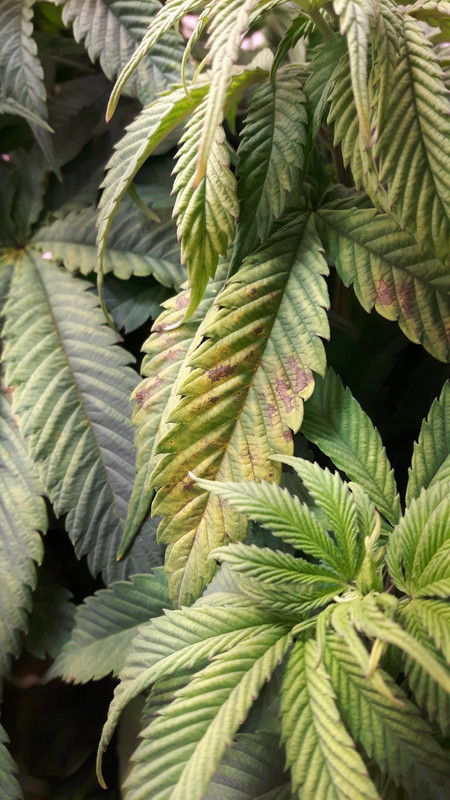
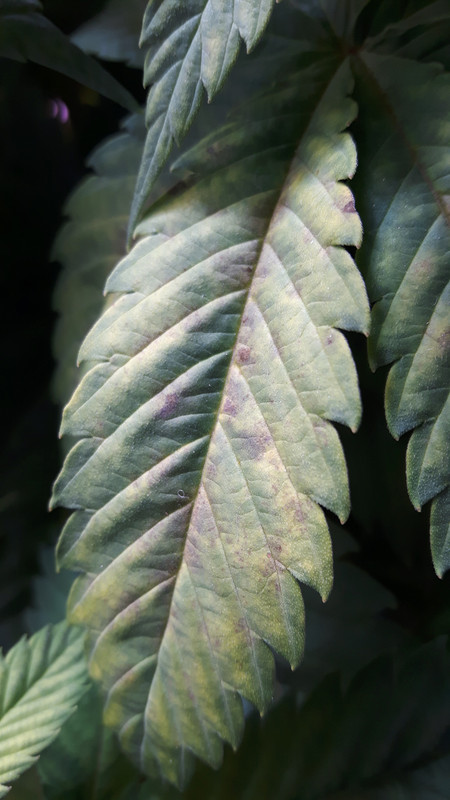
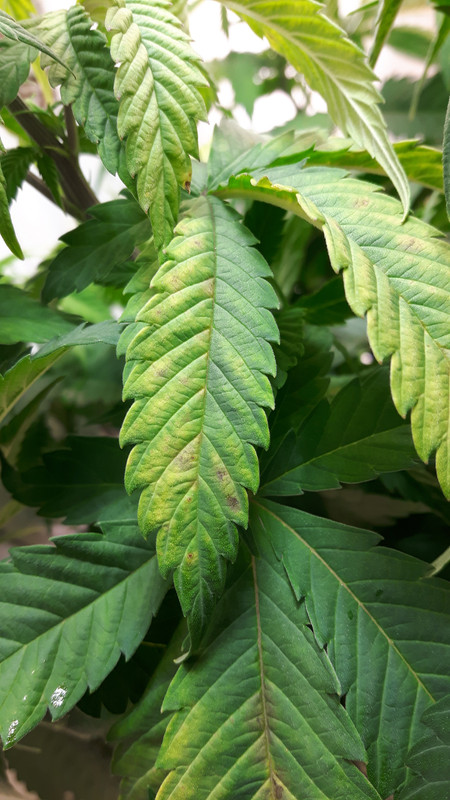
I had some unhappy looking leaves and blame it on magnesium deficiency.

I've been having a hard time with my watering. I go from a cooler full of muck to a cooler full of powder.
I am using Maxi-Gro and Maxi-Bloom as well as molasses and garden lime in the soil at the start and all with plenty of magnesium, but my soil was so dry that the plant couldn't make use of it.

(After a bit of research I found that magnesium (and I think calcium too) needs water to make it available to the plant.)


PCBuds

Well-known member
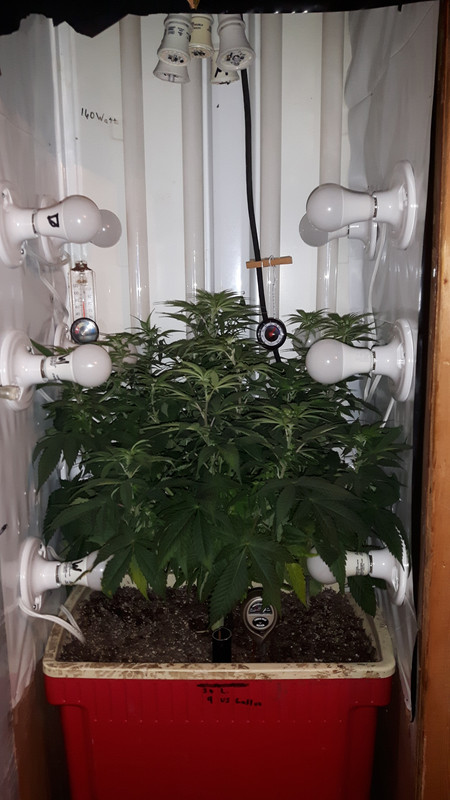
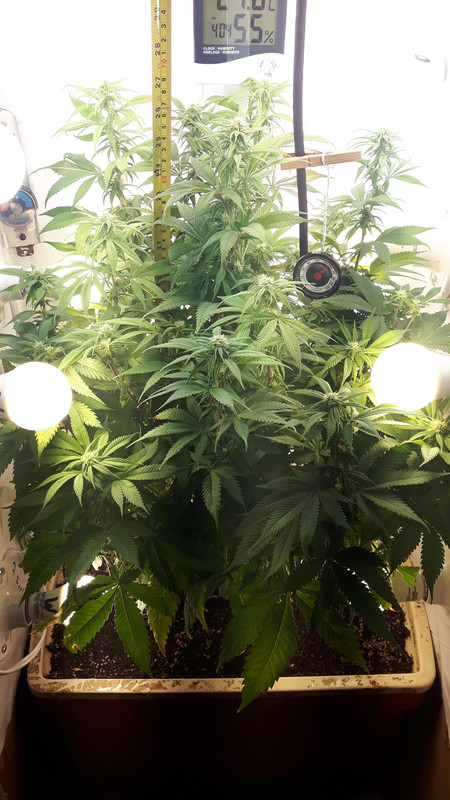
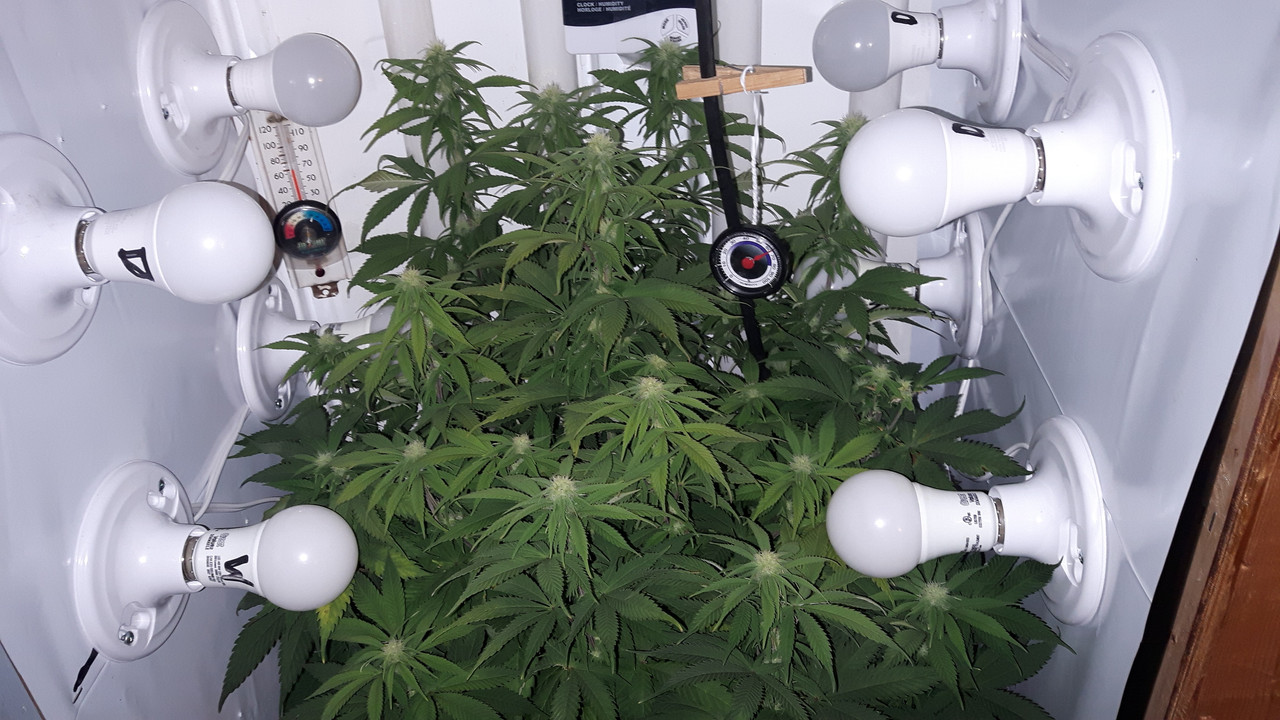
This is my plant today.

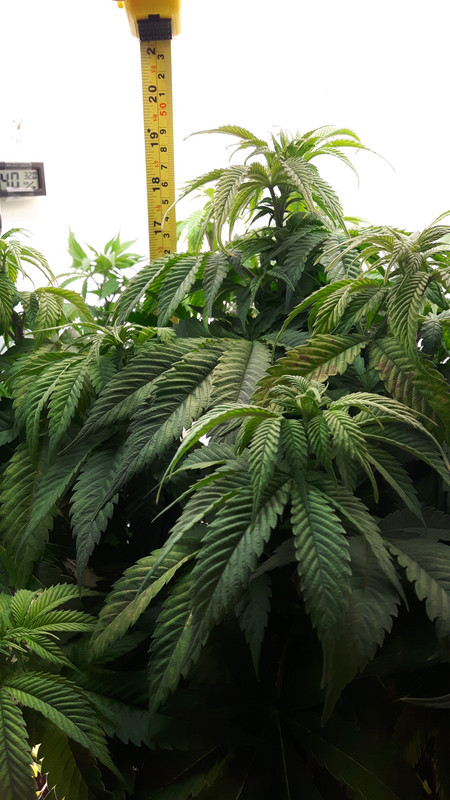
It's 27" tall now.


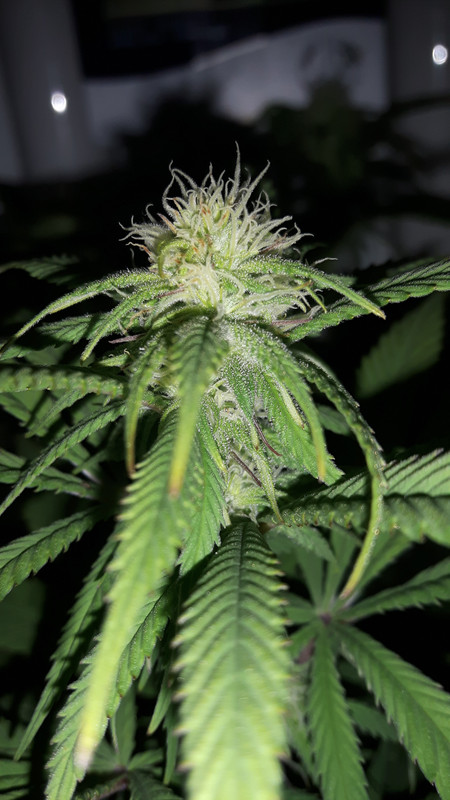
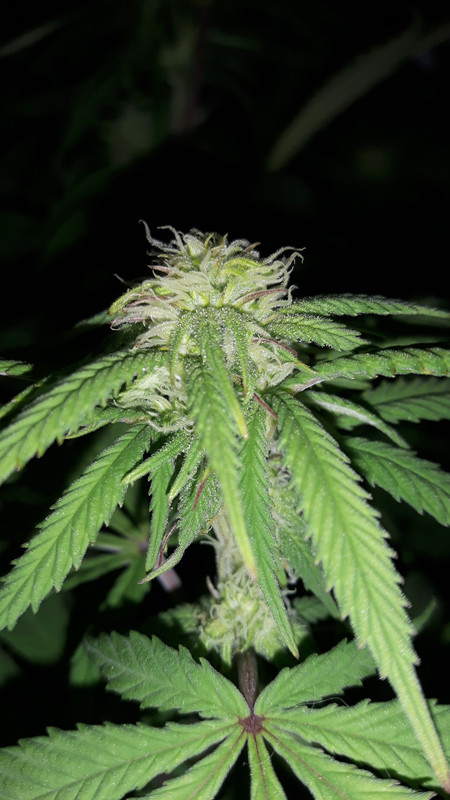
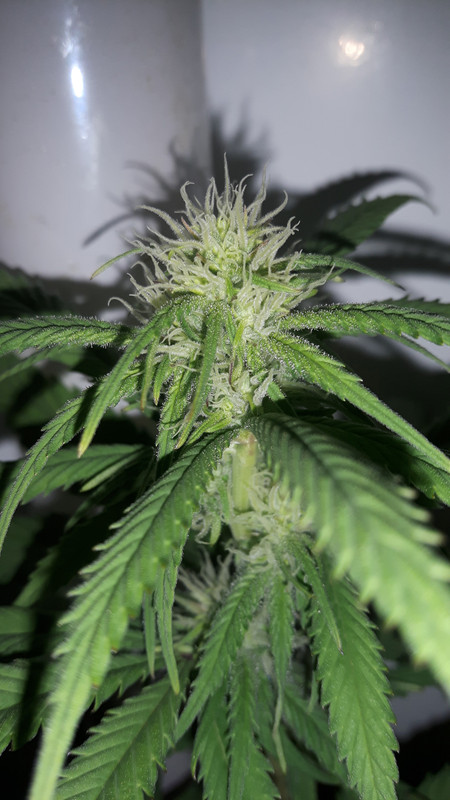
The buds are starting to get frosty.

I've got 5 colas that are as tall as the main cola.


I didn't realize how much I could stunt the vertical growth of the plant with the side lights.
The plant is supposed to grow to about 5 feet tall and I wanted to keep it at about 3'-3 1/2' but it looks like it's going to top out at about 2 1/2'.

Next time I'm only going to run the top five lights for about the first month or so to get it to stretch upwards.

I'm going to lower my side lights as well to get them more underneath the plant.
 

noknees

Active member
I had some unhappy looking leaves and blame it on magnesium deficiency. I've been having a hard time with my watering. I go from a cooler full of muck to a cooler full of powder. I am using Maxi-Gro and Maxi-Bloom as well as molasses and garden lime in the soil


you're a prime candidate for a hempy bucket.
 

piramidon

recidivist icmag - OUT-ist convins - microgrower
Veteran
...I didn't realize how much I could stunt the vertical growth of the plant with the side lights.
The plant is supposed to grow to about 5 feet tall and I wanted to keep it at about 3'-3 1/2' but it looks like it's going to top out at about 2 1/2'...
Don't be sad brother, with just those two sentences you contributed greatly to the community. I was just looking for ways to keep my plants dwarfs and you just handed to me, and I'm sure I'm not the only one apreciating your efforts and the great work you do.
Keep it up and always lit. :tiphat:
 

PCBuds

Well-known member
Don't be sad brother, with just those two sentences you contributed greatly to the community. I was just looking for ways to keep my plants dwarfs and you just handed to me, and I'm sure I'm not the only one apreciating your efforts and the great work you do.
Keep it up and always lit. :tiphat:

Well, Thanks !!
I never really thought of myself as doing great work. lol. I tend to make a lot of mistakes and messes.

I do a lot of guessing and making changes then forget what I did but I'm getting things a little more dialed in. (This forum is really helping me keep track of things as I make posts)

My goal is to grow the most and best weed I can as cheaply and easily as possible.


I'm not really upset about the progress of my plant. In fact, it's probably good that my plant has lots of headroom to help it breathe and not overheat.
(but half my fluorescent fixture is going to waste. Maybe it's time to replace that wall with SIL's. I could put in 16 bulbs for the same wattage.)

Now it's just a matter of seeing how the buds fill in.
 

PCBuds

Well-known member
you're a prime candidate for a hempy bucket.

I had to Google that.


I like it!
In fact it's a lot like what I'm doing except I'm not in 100% perlite. I've got a 34-liter cooler including 5 liters of perlite, 5 liters of vermiculite and 2 in of clay pellets balls at the bottom with a layer of fiberglass weave on top of them for drainage and the rest is Miracle Grow potting mix.

Instead of a hole 2 inches from the bottom of the bucket, I have a drain tube down to the bottom of the cooler that I use to siphon off the runoff.
When I first set up the cooler I put in a bubbler down to the bottom and thought I could have the bottom inch or two as just water but I found that the entire grow media turned to muck and was way too wet then I went the other extreme and almost stopped watering and my grow media went dry as a bone. I was bottom watering, feeding through the drain tube and I thought the media would pull the water up from the bottom and keep things moist but it didn't.

I'm finally getting the hang of it now and I water from the top and wait till I get runoff.
It takes about 10 L and gives 2 L of runoff I use my maxi grow nutes at half strength at every feeding now.
The hard part is waiting for about six days between waterings. It just seems wrong, but it's finally working better and the plant looks happy and healthy now.


I will think about switching to 100% perlite but I'm kinda nervous about going completely Hydro. My semi-organic media right now offers a bit of cushion against mistakes and I've got a healthy bio heard including springtails and soil mites. My pH is fine and my runoff is about 180 PPM.

I also don't know if I can plant a sprouted seed directly into the perlite? I don't want to kill a whole bunch of $10 seeds.
 

noknees

Active member
Don't be sad brother, with just those two sentences you contributed greatly to the community. I was just looking for ways to keep my plants dwarfs and you just handed to me, and I'm sure I'm not the only one apreciating your efforts and the great work you do.
Keep it up and always lit.
tiphat.gif


it's not just the location. he's also running quite a bit of overall intensity and from the looks of it, a "cool" spectrum.


I also don't know if I can plant a sprouted seed directly into the perlite? I don't want to kill a whole bunch of $10 seeds.


you can transplant into a hempy. rockwool cube, (clone) jiffy pod, etc.


three parts perlite, one verm.
 

PCBuds

Well-known member
it's not just the location. he's also running quite a bit of overall intensity and from the looks of it, a "cool" spectrum.


My lights are about a 50/50 mix of "daylight" bulbs (5000k) and "warm" bulbs (2700k or 3000k)

I used more "daylight" during veg (but not as many as I wanted because that color didn't seem to go on sale) and more "warm" during flower.


This is how I started.


Then I went to this.


Then this.


Then this because it just wouldn't grow. (not vertically anyway)


PCBuds

Well-known member
It finally hit 19 1/2" at 7 1/2 weeks and I flipped the lights to 12/12 and fired up the 160 watt fluorescent light. (Two warm "grow" bulbs and two daylight).


Then I screwed all the bulbs in. (I kinda gave up on trying to get her to stretch)


And this is where I am today.


I had to Google that.

View Image

I like it!
In fact it's a lot like what I'm doing except I'm not in 100% perlite. I've got a 34-liter cooler including 5 liters of perlite, 5 liters of vermiculite and 2 in of clay pellets balls at the bottom with a layer of fiberglass weave on top of them for drainage and the rest is Miracle Grow potting mix.

<snip>

I will think about switching to 100% perlite but I'm kinda nervous about going completely Hydro. My semi-organic media right now offers a bit of cushion against mistakes and I've got a healthy bio heard including springtails and soil mites. My pH is fine and my runoff is about 180 PPM.

I also don't know if I can plant a sprouted seed directly into the perlite? I don't want to kill a whole bunch of $10 seeds.


I've enjoyed following your posts in the SIL thread. And big congrats on that WW grow!:tiphat: That was some danky looking stuff!! (not afraid to admit I might have been just slightly jealous of your results)


I'm still a little confused by your system...it seems like part hydro and part soil. I'm thinking about trying some soil pots inside just for the sake of simplicity. With a micro space, I'm trying to be super efficient, so I'm thinking about just some large square pots that I fill with some slightly enriched soil and just hand water with plain water. No air stones, no pumps. no reservoirs and no plumbing etc.


I have some large older plants inside that I have in a 50/50 perlite and coir mix that have done pretty well for mothers.

Perlite sheds water and is designed to create empty air space in the planting mix and make it lighter and more airy so it doesn't compact. Perlite is made by heating sand in an oven so it pops and expands like popcorn.

Vermiculite is a mined mineral and will retain water and make your planting mix wetter.


The 50/50 mix I mentioned is easy and cheap and was basically invented by Cornell University as a 'standard' soilless planting mix (although they used peat moss instead of coir) It can be treated like soil and hand watered, or used in a hydro system that has automatic feeding cycles.

I usually start seeds between some wet paper towels and then transplant them as soon as a root tip pops out. Have your pots all filled and ready to go when you first start the seeds in the paper towels.


Looking forward to seeing more updates from you.
 

PCBuds

Well-known member
I'm still a little confused by your system...it seems like part hydro and part soil. I'm thinking about trying some soil pots inside just for the sake of simplicity. With a micro space, I'm trying to be super efficient, so I'm thinking about just some large square pots that I fill with some slightly enriched soil and just hand water with plain water. No air stones, no pumps. no reservoirs and no plumbing etc.

I think my system is really just a regular soil grow except that I don't have a drain hole at the bottom and I just siphon the runoff from the top. (I don't want a drain hole at the bottom for fear of leaks. There's an electric heater under the cooler)

I was trying to bottom feed/water but it wasn't working for me.

Now I water from the top until I get runoff and that seems to be working way better.

I like my system because if it fails in any way, I've got a few days to figure it out and fix it.

I remember one guy posting that his exhaust fan failed in the middle of the night and his plants were dead by morning.

I like what you're planning on doing with your next grow but you might want to consider adding some nutes, maybe at 1/4 strength or less at every watering because apparently nuted soil runs out of nutes after about a month.

I found out the hard way that sprouts and seedlings are really sensitive to nutes, so I buy a small bag of Great Value potting soil mix (with no nutes, just peat moss, humus, perlite, and sand) and put that in the middle of my cooler about 6 inches deep.
I plant the seedling or sprout into that un-nuted soil and by the time it grows into the nuted stuff, it's big and strong enough to handle it.

I use bottled water until my plant has two full sets of leaves then I switch to tap water with my 1/4 strength Maxi-Gro and molasses.

I don't have to bother checking the runoff because the system takes care of itself.
It makes it easy and you don't have to keep track of a feeding/watering schedule.

I just did a check for reference sake.

My degassed tap water is 118 PPM, that goes up to 687 PPM after mixing in the nutes and molasses, and my runoff is 180 PPM.
The runoff PH looks to be dead on and doesn't smell of rot or anything funky.


I know some guys use or make organic soil that lasts for the full grow but that's too involved and expensive for me.

I just dump out my used soil, mix in some garden lime and reuse it.
I leave most of my old roots in the soil. I figure it's just organic matter that feeds my next plant and micro-herd.

I think I might add in another 5-liter bag or two of perlite for my next grow.
That should help with even better drainage and be closer to a true Hempy.
 

PCBuds

Well-known member
I've enjoyed following your posts in the SIL thread. And big congrats on that WW grow!:tiphat:

I'm a bit hesitant to post in the SIL thread because I'm not a true SIL grower with my fluorescent still being used and left the globes on my sidelights.

My grow cab isn't pretty with my backwoods hillbilly approach to gardening. Lol

I tend to make stuff up as go and everything is an experiment. (I remember buying blackboard chalk from the dollar store and putting a few sticks in my soil as a cheap calcium supplement. Lol)

I did remember this from the start of blynx's thread when I started with the side lights.

One thing to note. The LEDs are more directed. So while the cone below the light is brighter than it would be for a CFL, a CFL does put it's light out evenly all around the bulb. So plants can grow up next to and above a CFL and still get a lot of light. Using these lights, if a plant grew next to and above the LEDs, the plant would not get very much light.

I wanted to keep the globes on so that the leaves don't touch the circuitry and either short circuit something or start a fire.

I also wanted to beam the light in all directions when they're right "in" the plant.

Apparently, there is only a 1-2% total loss of light from the globe itself so I figured it was negligible.

My biggest concern was the leaves getting up against the base of the bulbs and maybe catching fire but that hasn't been an issue.

The leaves that touch the base turn brown and dry up but I haven't seen any evidence of burning or smoldering.

And with the bulbs mounted horizontally, the leaves tend to grow up and past the bulbs without too much interference with the bulb bases.
 
Last edited:

PCBuds

Well-known member
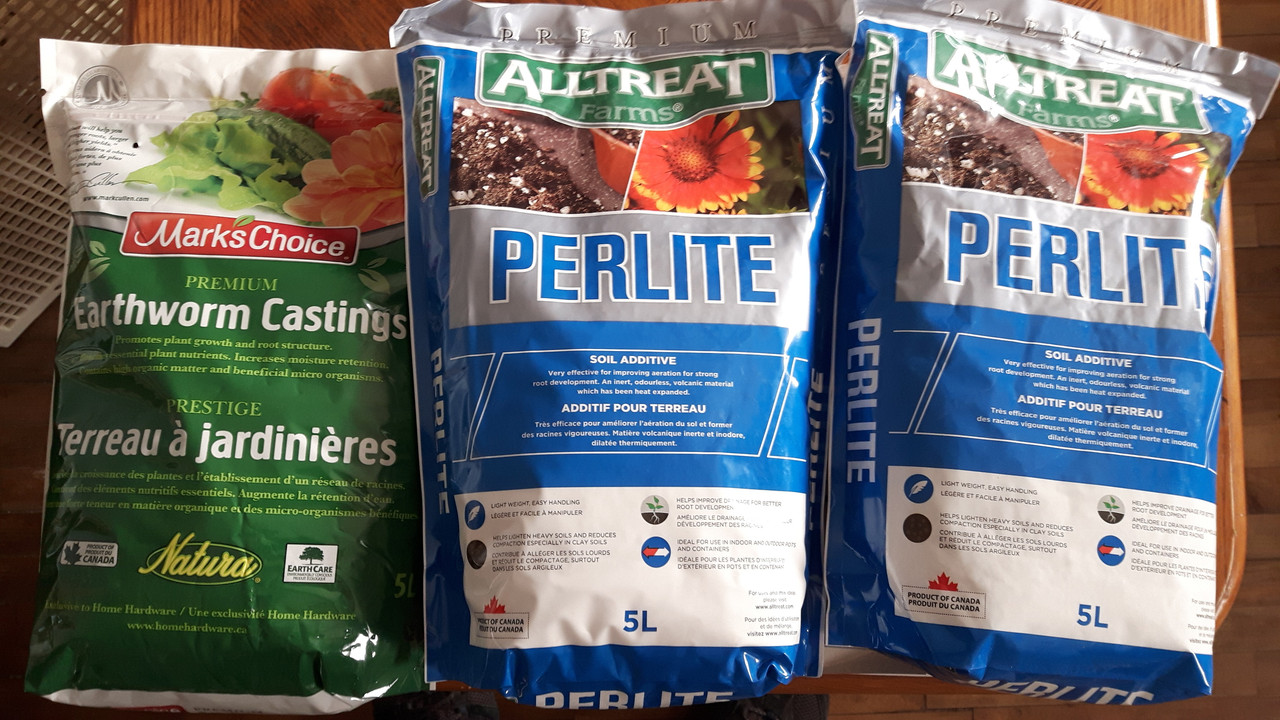
I decided to go to the local hardware store and I bought this.


The perlite was only $4.50 a bag and the worm poop was only $7 on sale.

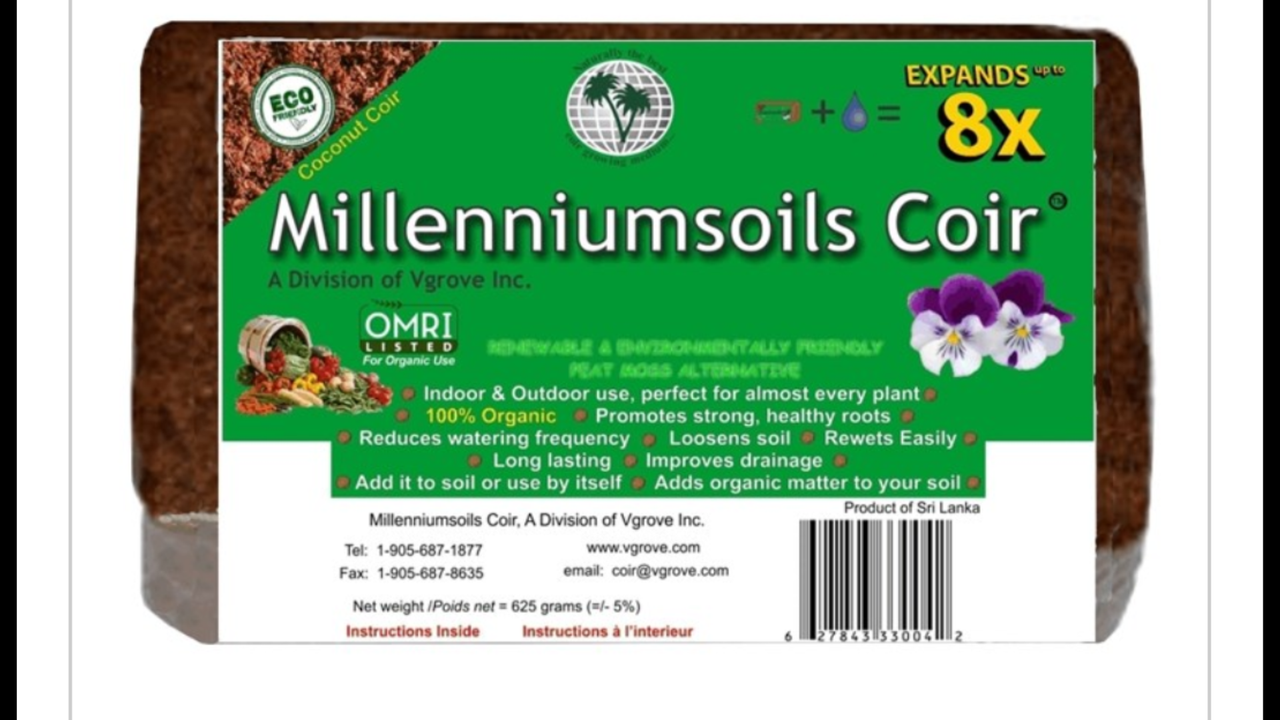
I also ordered two bricks of this.


It apparently measures 4"X6"X8" and expands up to 8 times so I should have lots.

I still don't think I want to go full hydro so I think I'm going to use half the soil that's already in my cooler then mix in the perlite, worm castings and the rest coco coir to fill the cooler.
 
I think my system is really just a regular soil grow except that I don't have a drain hole at the bottom and I just siphon the runoff from the top. (I don't want a drain hole at the bottom for fear of leaks. There's an electric heater under the cooler)

I was trying to bottom feed/water but it wasn't working for me.

Now I water from the top until I get runoff and that seems to be working way better.

I like my system because if it fails in any way, I've got a few days to figure it out and fix it.

I remember one guy posting that his exhaust fan failed in the middle of the night and his plants were dead by morning.

I like what you're planning on doing with your next grow but you might want to consider adding some nutes, maybe at 1/4 strength or less at every watering because apparently nuted soil runs out of nutes after about a month.

I found out the hard way that sprouts and seedlings are really sensitive to nutes, so I buy a small bag of Great Value potting soil mix (with no nutes, just peat moss, humus, perlite, and sand) and put that in the middle of my cooler about 6 inches deep.
I plant the seedling or sprout into that un-nuted soil and by the time it grows into the nuted stuff, it's big and strong enough to handle it.

I use bottled water until my plant has two full sets of leaves then I switch to tap water with my 1/4 strength Maxi-Gro and molasses.

I don't have to bother checking the runoff because the system takes care of itself.
It makes it easy and you don't have to keep track of a feeding/watering schedule.

I just did a check for reference sake.

My degassed tap water is 118 PPM, that goes up to 687 PPM after mixing in the nutes and molasses, and my runoff is 180 PPM.
The runoff PH looks to be dead on and doesn't smell of rot or anything funky.

https://postimg.cc/gn1QT2qZView Image


I know some guys use or make organic soil that lasts for the full grow but that's too involved and expensive for me.

I just dump out my used soil, mix in some garden lime and reuse it.
I leave most of my old roots in the soil. I figure it's just organic matter that feeds my next plant and micro-herd.

I think I might add in another 5-liter bag or two of perlite for my next grow.
That should help with even better drainage and be closer to a true Hempy.


Fair enough. Everyone has to find a 'personal' system that works for them. I like hydro, but the simplicity of soil seems like a better fit for a smaller space. And I want to use the Bonzai Mother Plant method and he called for soil.


Another issue I have is that the high P bloom ferts like some quano or rock phosphate or whatever is not water soluble, so with soil I can cheaply pre-add the nutes to the planting mix and then just use plain water most of the time with the occasional watering with some liquid nutes. My Botanicare nutes are $60 a gallon, so I'd like to use the least amount possible.


My tap water is over 300PPM, and I have plenty of calcium in it! :biggrin:
To be honest, I no longer check pH or much else with a meter.
In the hydro, I let the pH and PPM vary all over the place since each nutrient is only available in a narrow ph range.

(you can google for the nute/pH range chart if anyone wants to see it.)

I use the Lucas method and only fully change out the reservoir every 2-4 months.
I judge moisture by how heavy or light the pot feels when I pick it up. If it feels light, it gets watered. Or if I stick a finger into the soil and it's dry an inch or more below the surface, I'll water it.


Small plants can't handle full strength nutes, but they like nuts at say, 25-15% strength. Whenever I use coir, I always presoak it in a 25% strength balanced NPK ratio and I've never burned a clone or seedling with it. I've even used it for cactus seedlings and they loved it.
 
Just google - or better yet use startpage dot com for anonymous searches - "nutrient ph chart" and you will find the info you need.


LOL..looks like they even have fancy colored versions now. When I was coming up, we only had black and white diagrams...and we liked it! lol


But seriously- check out the chart and you'll see why most people DON"T actually have a Mg deficiency- they actually have a pH that out of range for the Mg to be absorbed! and no amount of epson salts is going to fix it.
 
I'm a bit hesitant to post in the SIL thread because I'm not a true SIL grower with my fluorescent still being used and left the globes on my sidelights.

My grow cab isn't pretty with my backwoods hillbilly approach to gardening. Lol

I tend to make stuff up as go and everything is an experiment. (I remember buying blackboard chalk from the dollar store and putting a few sticks in my soil as a cheap calcium supplement. Lol)

I did remember this from the start of blynx's thread when I started with the side lights.


I wanted to keep the globes on so that the leaves don't touch the circuitry and either short circuit something or start a fire.

I also wanted to beam the light in all directions when they're right "in" the plant.

Apparently, there is only a 1-2% total loss of light from the globe itself so I figured it was negligible.

My biggest concern was the leaves getting up against the base of the bulbs and maybe catching fire but that hasn't been an issue.

The leaves that touch the base turn brown and dry up but I haven't seen any evidence of burning or smoldering.

And with the bulbs mounted horizontally, the leaves tend to grow up and past the bulbs without too much interference with the bulb bases.


Firstly, congratulations (and thanks) on being brave enough to post your 'newbie' grow. Because:
A- I like watching people's learning curve and eventual success.

and B- you showed solid proof that the concept worked and made it less intimidating for other newbs to get started. :tiphat:


(and I had been wondering if you had a plan or were just totally winging it...:biggrin: Nothing really wrong with that approach- except if you want consistent results over a long term. Just get a soil or soilless mix and the nutes dialed in and you're pretty much good to go. I like just coir and perlite as a planting mix. You can treat it like soil or like hydro. )
 

Latest posts

Latest posts

Top