What's new
  • ICMag with help from Landrace Warden and The Vault is running a NEW contest in November! You can check it here. Prizes are seeds & forum premium access. Come join in!

MadMac's haze and haze hybrid's grow & show

Status
Not open for further replies.

JohnnyChicago

Well-known member
Hey MadMac,
Not sure I have posted this one here in your thread.
But it's its place :)

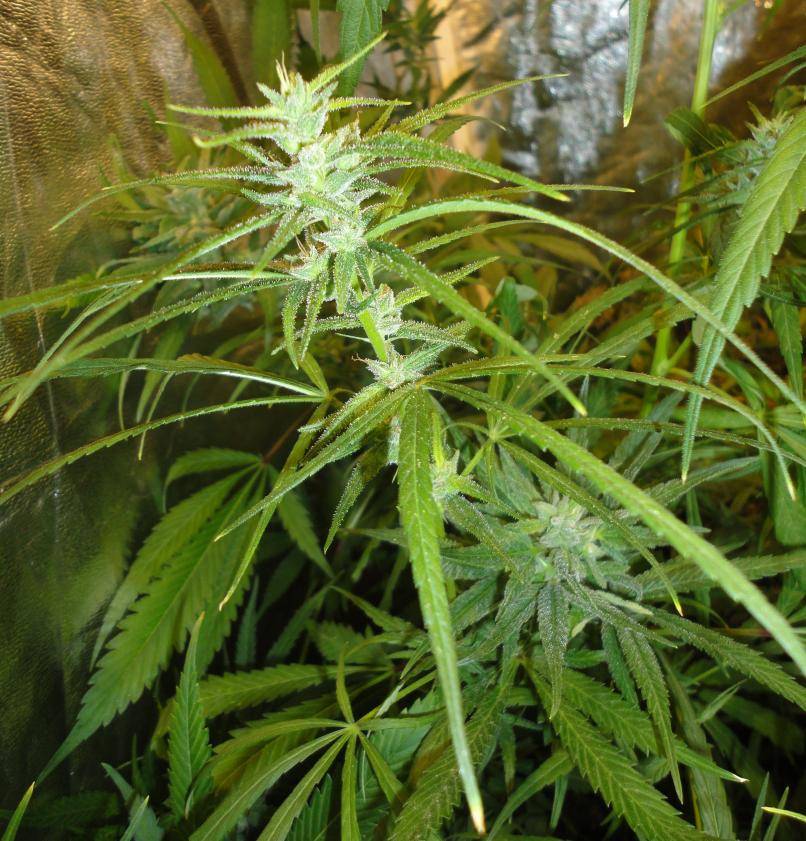
Smoke gets a nice cinnamon taste with the cure.
No grape, all spices, pepper ...


90sOHxTHH, purple pheno
picture.php
picture.php
picture.php
 

midwestkid

Well-known member
Veteran
Reverse

Reverse

hello,
well here my secret haze lab...
reversed my best OHz girls and they pollinating my best gear i'll had @ hand... and of corse the best OHz girls ... S1 for the fun...
only for smoking...
A5hz, NL#5 x Oax, Col. Black, PR, Satori, SK#1 tripol., Tangie special, Mandala #1 for outdoors and a few more...
big chunky is Columbian Black... picked the best pheno for my task as you can see :biggrin:
and in my hand a reversed Ohz girl...
View Image
here some more reversed OHz girls...
View Image

so much more in the pipe...
so stay tuned...
M.:smoker:


Hey Mac,
Any pointers you'd care to pass along on reversing a haze? I'm thinking about giving it a try. Was hoping you could save me a couple years of hard learning. Lol
Colloidal or STS? Dilution ratio? 3 sprays a week apart?
Thanks sir! Awesome thread. Thanks for keeping these tall skinny ladies and gents out there and available to the public. We truly appreciate it.
 

MadMac

far beyond driven...
STS... reversing a girl...

STS... reversing a girl...

Hey Mac,
Any pointers you'd care to pass along on reversing a haze? I'm thinking about giving it a try. Was hoping you could save me a couple years of hard learning. Lol
Colloidal or STS? Dilution ratio? 3 sprays a week apart?
Thanks sir! Awesome thread. Thanks for keeping these tall skinny ladies and gents out there and available to the public. We truly appreciate it.

hello,
well here is the how too:
Preparation of STS:
First, a stock solution is made. It consists of two parts (A and B) that are initially mixed separately, then blended together. Part A is ALWAYS mixed into part B while stirring rapidly. Use distilled water; tap water may cause precipitates to form.

Wear gloves while mixing and using these chemicals, and mix and use in a properly ventilated area. A mask will prevent the breathing of any dust, which is caustic. STS is colorless and odorless, and poses minimal health risks if used as described here. (See material safety data sheet links below). Note that silver nitrate and STS can cause brown stains upon drying, so spray over newspaper and avoid spilling.

Part A: .5 gram silver nitrate stirred into 500ml distilled water
Part B: 2.5 grams sodium thiosulfate (anhydrous) stirred into 500ml distilled water

The silver nitrate dissolves within 15 seconds. The sodium thiosulfate takes 30-45 seconds to dissolve.

The silver nitrate solution (A) is then mixed into the sodium thiosulfate solution (B) while stirring rapidly. The resulting blend is stock silver thiosulfate solution (STS).

This stock solution is then diluted at a ratio of 1:9 to make a working solution. For example, 100ml of stock STS is added to 900ml of distilled water. This is then sprayed on select female plants.

Both the stock STS and the working solution should be refrigerated after use, as well as the powdered chemicals, to avoid activity loss. Excess working solution can be safely poured down the drain after use (with ample running water) with negligible environmental impact. It's pretty cheap.

Each liter of stock STS will make ten 1-liter batches of working solution of STS. With the minimum amount of base chemicals ordered from Photographer's Formulary (see link below), this means that each 1-liter bottle of working solution STS costs less than 9 cents, and can treat 15-20 mid-sized plants. That's 200 1-liter batches of STS for $18. Note that the distilled water costs far more than the chemicals.

-------------------------------------

Application:
The STS working solution is sprayed on select female plants until runoff. Do the spraying over newspaper in a separate area from the flower room. You probably won't smell anything, but ventilate anyway. You now have what I call a "F>M plant"; a female plant that will produce male flowers.

I have discovered that using a stronger concentration of STS does not make a plant more likely to produce pollen. It just burns/stresses the plant. What DOES make a plant much more likely to complete it's mission and make pollen is a second spraying at the end of week 2.

My conclusion is that STS in any concentration is only effective at inhibiting ethylene for about 3 weeks; at that point the plant's natural female metabolism begins to take back control, and even a plant that is covered with male blooms doesn't always finish the journey to manhood and produce pollen. A second spraying allows inhibition to last through week 6, which is more than enough time to release pollen.

After the F>M plant dries move it into 12/12 immediately. This is usually done three to four weeks prior to the date that the target (to be pollinated) plants will be ready to pollinate. Response times may vary slightly depending upon the strain. More specific times can be determined by trial with your own individual strains. In my application it takes around 26 days for the first pollen. 30-35 days seems optimum for planning purposes.

So, assuming that a target plant needs 3-4 weeks to produce fully mature seeds, a strain that takes 8 weeks to mature should be moved into flower at about the same time as the female>male plant. A target plant that finishes flowering in 6 weeks needs to be moved into flower later (10 days or so) so that it doesn't finish before the seeds can fully mature.

A seeded individual branch can be left to mature on a plant for a bit longer, while harvesting the other seedless buds if they finish first. Just leave enough leaves on the plant for it to stay healthy.

-------------------------------------

Effects:
Within days I noticed a yellowing of the leaves on the F>M plants. This effect persisted for two weeks or so; after this they became green again, except for a few of the larger fans. The plants otherwise seem healthy. No burning was observed. Growth stopped dead for the first ten days, and then resumed slowly. No stretch was ever seen. After two weeks the F>M plants were obviously forming male flower clusters. Not just a few clusters of balls, but complete male flower tops. One plant still formed some pistillate flowers, but overall it was predominantly male.

It is strange indeed to see an old girlfriend that you know like the back of your hand go through a sex change. I'll admit that things were awkward between us at first.

When the F>M plants look like they may soon open and release pollen, ( 3-1/2 to 4 weeks) move them from the main flower room into another unventilated room or closet with lighting on a 12/12 timer. Don't worry too much about watts per square foot; it will only be temporary.

When the pollen flies, move your target plants into the closet and pollinate.

A more controlled approach is to isolate the F>M plants in a third remote closet (no light is necessary in this one, as they are releasing pollen now and are nearly finished anyway). In this remote other closet the pollen is very carefully collected in a plastic produce bag or newspaper sleeve and then brought back to the lighted closet, where the target plants are now located. If this is done, be careful to not mix pollen types by letting the F>Ms dust each other. Avoid movement, or use yet another closet.

Take special care to not let pollen gather on the outside of this bag- a static charge is sometimes present. Drop small open clusters of blooms inside and then close the bag at the mouth and shake. Important: next, step outside and slowly release the excess air from the bag, collapsing it completely, so that pollen doesn't get released accidentally. Points downwind; don’t let it get on your hands or clothes. I always shower and change clothes at this point...

This collapsed pollinated bag is now very carefully slipped over only one branch and is then tied off tightly at the mouth around the branch stem with a twist tie or tape, sealing the pollen inside. Let the bag inflate slightly with air again before sealing it off, so the branch can breathe. This technique keeps the entire plant from seeding. Agitate the bag a bit after tying it off to distribute the pollen. Don't forget to label the branch so you know which seeds are which. Other branches on this same plant can be hit with different pollen sources.

If no lighted closet is available, the plant can be moved back into the main room, but- be very careful: pollen is sneaky. After 4-5 days, the bag is gently removed and the plant completes its flowering cycle.

Yet another method that has worked well for me. I position the target plants in a non-ventilated lighted closet, and then I collect pollen on a piece of mirror or glass. This is then carefully applied to the pistils of one pre-labeled branch by using a very fine watercolor paintbrush. Care is taken to not agitate the branch or the pollen. No sneezing. The plant needs to be in place first; moving it after pollination can shake pollen free and blow this technique.

Regardless of technique, at completion you will have feminized seeds. Let them dry for 2-4 weeks.

with OHz it takes 2-3 weeks longer before the pollen flies...
rule of thump:
look for the time the plant needs from sexing to real flowering...
sativa = 5-6 weeks...
hybrids = around 2-4 weeks..
indica = 2 - 3 weeks

timing is the key when doing this... indicas & hybrids have a smaller pollination window than true sativas...
also reversing gives not much pollen as true males...
M.:smoker:
 

MadMac

far beyond driven...
awesome!

awesome!

Hey MadMac,
Not sure I have posted this one here in your thread.
But it's its place :)

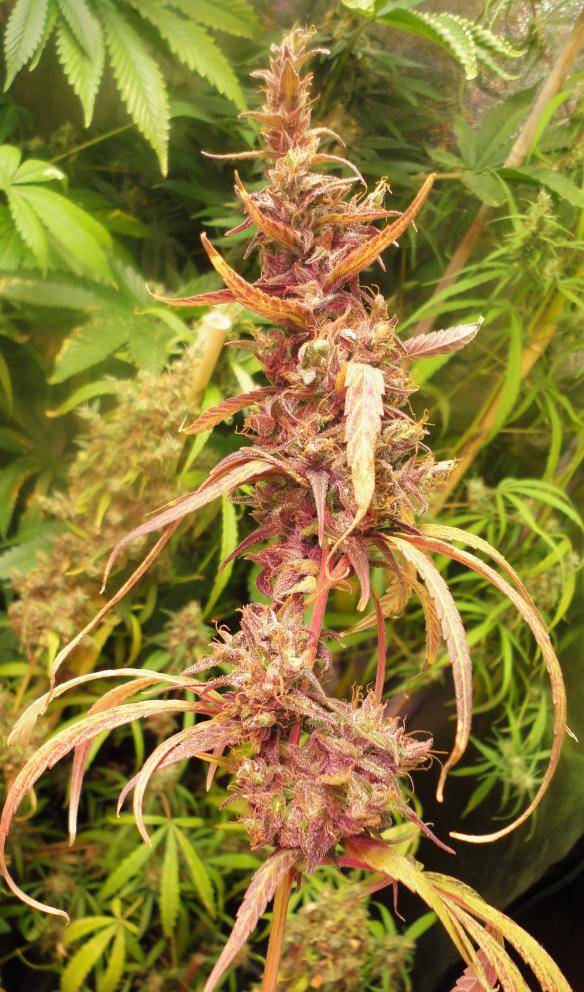
Smoke gets a nice cinnamon taste with the cure.
No grape, all spices, pepper ...


90sOHxTHH, purple pheno
View Image View Image View Image

and before i'll forget to thank you... :angelshug:
much respect & amazing grow you did...
it's only a little return for the original haze seeds that changed my life
together with Golli's o-haze from da 90'...
more is on your way soon...
many many thx for sharing the pic's and info's here!
loving it
cu
M.:smoker:
 

Hammerhead

Disabled Farmer
ICMag Donor
Veteran
I use STS at a dilution rate of 1:7. Some don't reverse well using 1:9.


Edit:

Fem pollen is more sticky/wet vs male pollen. Its more difficult to collect. Some drop pollen some wont. Most are difficult to get pollen out. I use a pollen box to collect pollen sacs. I agitate those to get the pollen out.
 
Last edited:

midwestkid

Well-known member
Veteran
Thanks

Thanks

hello,
well here is the how too:
Preparation of STS:
First, a stock solution is made. It consists of two parts (A and B) that are initially mixed separately, then blended together. Part A is ALWAYS mixed into part B while stirring rapidly. Use distilled water; tap water may cause precipitates to form.

Wear gloves while mixing and using these chemicals, and mix and use in a properly ventilated area. A mask will prevent the breathing of any dust, which is caustic. STS is colorless and odorless, and poses minimal health risks if used as described here. (See material safety data sheet links below). Note that silver nitrate and STS can cause brown stains upon drying, so spray over newspaper and avoid spilling.

Part A: .5 gram silver nitrate stirred into 500ml distilled water
Part B: 2.5 grams sodium thiosulfate (anhydrous) stirred into 500ml distilled water

The silver nitrate dissolves within 15 seconds. The sodium thiosulfate takes 30-45 seconds to dissolve.

The silver nitrate solution (A) is then mixed into the sodium thiosulfate solution (B) while stirring rapidly. The resulting blend is stock silver thiosulfate solution (STS).

This stock solution is then diluted at a ratio of 1:9 to make a working solution. For example, 100ml of stock STS is added to 900ml of distilled water. This is then sprayed on select female plants.

Both the stock STS and the working solution should be refrigerated after use, as well as the powdered chemicals, to avoid activity loss. Excess working solution can be safely poured down the drain after use (with ample running water) with negligible environmental impact. It's pretty cheap.

Each liter of stock STS will make ten 1-liter batches of working solution of STS. With the minimum amount of base chemicals ordered from Photographer's Formulary (see link below), this means that each 1-liter bottle of working solution STS costs less than 9 cents, and can treat 15-20 mid-sized plants. That's 200 1-liter batches of STS for $18. Note that the distilled water costs far more than the chemicals.

-------------------------------------

Application:
The STS working solution is sprayed on select female plants until runoff. Do the spraying over newspaper in a separate area from the flower room. You probably won't smell anything, but ventilate anyway. You now have what I call a "F>M plant"; a female plant that will produce male flowers.

I have discovered that using a stronger concentration of STS does not make a plant more likely to produce pollen. It just burns/stresses the plant. What DOES make a plant much more likely to complete it's mission and make pollen is a second spraying at the end of week 2.

My conclusion is that STS in any concentration is only effective at inhibiting ethylene for about 3 weeks; at that point the plant's natural female metabolism begins to take back control, and even a plant that is covered with male blooms doesn't always finish the journey to manhood and produce pollen. A second spraying allows inhibition to last through week 6, which is more than enough time to release pollen.

After the F>M plant dries move it into 12/12 immediately. This is usually done three to four weeks prior to the date that the target (to be pollinated) plants will be ready to pollinate. Response times may vary slightly depending upon the strain. More specific times can be determined by trial with your own individual strains. In my application it takes around 26 days for the first pollen. 30-35 days seems optimum for planning purposes.

So, assuming that a target plant needs 3-4 weeks to produce fully mature seeds, a strain that takes 8 weeks to mature should be moved into flower at about the same time as the female>male plant. A target plant that finishes flowering in 6 weeks needs to be moved into flower later (10 days or so) so that it doesn't finish before the seeds can fully mature.

A seeded individual branch can be left to mature on a plant for a bit longer, while harvesting the other seedless buds if they finish first. Just leave enough leaves on the plant for it to stay healthy.

-------------------------------------

Effects:
Within days I noticed a yellowing of the leaves on the F>M plants. This effect persisted for two weeks or so; after this they became green again, except for a few of the larger fans. The plants otherwise seem healthy. No burning was observed. Growth stopped dead for the first ten days, and then resumed slowly. No stretch was ever seen. After two weeks the F>M plants were obviously forming male flower clusters. Not just a few clusters of balls, but complete male flower tops. One plant still formed some pistillate flowers, but overall it was predominantly male.

It is strange indeed to see an old girlfriend that you know like the back of your hand go through a sex change. I'll admit that things were awkward between us at first.

When the F>M plants look like they may soon open and release pollen, ( 3-1/2 to 4 weeks) move them from the main flower room into another unventilated room or closet with lighting on a 12/12 timer. Don't worry too much about watts per square foot; it will only be temporary.

When the pollen flies, move your target plants into the closet and pollinate.

A more controlled approach is to isolate the F>M plants in a third remote closet (no light is necessary in this one, as they are releasing pollen now and are nearly finished anyway). In this remote other closet the pollen is very carefully collected in a plastic produce bag or newspaper sleeve and then brought back to the lighted closet, where the target plants are now located. If this is done, be careful to not mix pollen types by letting the F>Ms dust each other. Avoid movement, or use yet another closet.

Take special care to not let pollen gather on the outside of this bag- a static charge is sometimes present. Drop small open clusters of blooms inside and then close the bag at the mouth and shake. Important: next, step outside and slowly release the excess air from the bag, collapsing it completely, so that pollen doesn't get released accidentally. Points downwind; don’t let it get on your hands or clothes. I always shower and change clothes at this point...

This collapsed pollinated bag is now very carefully slipped over only one branch and is then tied off tightly at the mouth around the branch stem with a twist tie or tape, sealing the pollen inside. Let the bag inflate slightly with air again before sealing it off, so the branch can breathe. This technique keeps the entire plant from seeding. Agitate the bag a bit after tying it off to distribute the pollen. Don't forget to label the branch so you know which seeds are which. Other branches on this same plant can be hit with different pollen sources.

If no lighted closet is available, the plant can be moved back into the main room, but- be very careful: pollen is sneaky. After 4-5 days, the bag is gently removed and the plant completes its flowering cycle.

Yet another method that has worked well for me. I position the target plants in a non-ventilated lighted closet, and then I collect pollen on a piece of mirror or glass. This is then carefully applied to the pistils of one pre-labeled branch by using a very fine watercolor paintbrush. Care is taken to not agitate the branch or the pollen. No sneezing. The plant needs to be in place first; moving it after pollination can shake pollen free and blow this technique.

Regardless of technique, at completion you will have feminized seeds. Let them dry for 2-4 weeks.

with OHz it takes 2-3 weeks longer before the pollen flies...
rule of thump:
look for the time the plant needs from sexing to real flowering...
sativa = 5-6 weeks...
hybrids = around 2-4 weeks..
indica = 2 - 3 weeks

timing is the key when doing this... indicas & hybrids have a smaller pollination window than true sativas...
also reversing gives not much pollen as true males...
M.:smoker:

Thanks for the thorough explanation!
 

midwestkid

Well-known member
Veteran
Thanks

Thanks

I use STS at a dilution rate of 1:7. Some don't reverse well using 1:9.


Edit:

Fem pollen is more sticky/wet vs male pollen. Its more difficult to collect. Some drop pollen some wont. Most are difficult to get pollen out. I use a pollen box to collect pollen sacs. I agitate those to get the pollen out.


Thanks for your input as well Hammerhead...
I'm wanting to reverse my OHaze female onto most of my room because I've gotten to where making seeds is more exciting for me then making seedless buds. The gift that keeps giving.
 

midwestkid

Well-known member
Veteran
I don't want to take your thread too far off subject. I guess my questions on reversing a fem. Haze should have been more specific.
Thank you for the extensive response.
One question I have is this...
Does the spray get applied before flipping to 12/12 or can it be successful after 12/12 has already been initiated?
Do I spray just one part of the plant or soak the whole thing?
I've studied the STS thread quite thoroughly, but I assume as with most things haze there are some differences.
As you noted only two sprays.
Have you had luck getting pollen to drop or have you had to do it manually as Hammerhead mentioned?
Thanks guys
 

Hammerhead

Disabled Farmer
ICMag Donor
Veteran
Spray/soak the day you flip 12/12. How much of the plant you soak will be what reverses. You can treat 1 branch if you don't need that much pollen. I treat the hole plant. Ive never made fem haze pollen.
Some plants will drop as I said. Ive had more that did not.
 

MadMac

far beyond driven...
OHz S1 harvest

OHz S1 harvest

hello,
and here my test grow OHz S1...
it's much more as it looks like hehe
well all untopped and grown from seed...
not much care too... just to see how they do...
and ... impressed by amount of resin everywhere...
was also too hot in beginning... they shoot over 27°C...
best temp for haze is 25°C max indoors... outdoors it doesn't matter that much... will grow much more OHz next year...
some THH x OHz and OHz x THH etc are waiting... also new S1...

picture.php

picture.php

picture.php

picture.php

picture.php


all the best for 2021 ...
and get hazed...
the time is now!
M
 
Status
Not open for further replies.
Top