What's new
  • As of today ICMag has his own Discord server. In this Discord server you can chat, talk with eachother, listen to music, share stories and pictures...and much more. Join now and let's grow together! Join ICMag Discord here! More details in this thread here: here.

KBS extreme NFT: soaker hose vs. porous tube? pump vs. regenerative blower?

~SYK~

Member
Yes I have.

Properly flowered and grown, a tree in a vertical light system, again - done correctly - can yield between 3-4lbs per plant dried medicine.

That being said - a full grown plant can weigh in excess of 15+ lbs.

Now, I will concede that the media itself will not hold up a plant of that size indoors alone. OUTdoors plants will grow thicker stalks due to air movement that is almost impossible to simulate indoors IMO. ... to assist in supporting the plant - plant-yo's are used. - deployed by the hundreds :)

http://www.bghydro.com/BGH/itemdesc.asp?ic=MPYY&eq=&Tp=

Hope it Helps

SYK
 

snowkitty

Member
... where are the 'advantages' - there has to be at least one no?

Several of my disadvantages are advantages viewed in a different light

Heavy
Good - supports your treez
Bad - pain in the ass to lug around and load up (use yo-yos or nets instead to achieve the stability of lava rock)

Crevices
Good - places for roots to grow, places for good bacteria to grow
Bad - places for bad bacteria to grow, pain in the ass to clean

I'm guessing the relative cheap-ness of lava rock was also a big plus to krusty. It fits with his whole system being made up off stuff you can buy at home depot or wal mart (not specialty hydroponics items). Lava rock is cheap and available everywhere...but perhaps that is its downfall, too...because you get no consistency when you recommend a cheap product available everywhere from different manufacturers.

I saw HyGradeChronic complaining about getting some lava rock that had been painted red. He switched to the black stuff only because he discovered red paint on one batch of lava rock he was washing off....
 
Last edited:

~SYK~

Member
Nets wont work to support a full grown tree.

The problem with them is that they bunch the plant up too much, and hinder growth on the inside part of the plant.

Did you order your perlite yet?

SYK
 

Skyburn

Member
SYK I was planning on makeing 4x4 box's out of pvc and streching a net across it at about every foot. Do you think i should use yoyo's instead and just zip tie them to the top of the pvc?
 

Skyburn

Member
So I change my mind alot but i was planning on takeing the lights down and putting up chicken wire on the cieling and just useing yoyo's and forgetting the pvc. thats my other option would that be a better idea?
 

snowkitty

Member
Nets wont work to support a full grown tree.

The problem with them is that they bunch the plant up too much, and hinder growth on the inside part of the plant.

Did you order your perlite yet?

SYK

I was planning to use nets because I used them in my last grow with some success...just stretched them out in sections here and there and trained my plants through them. BUT I'm switching methods because I didn't get the results I wanted...so perhaps I need to change my mind about netting, too.

If I go with chicken wire, how do I affix it to the ceiling? Can I use my staple gun and staple it to the studs...or do I need to do something better than that? Also, how many yo-yos per plant? Is 25 a good number to start with? I have 4 plants in my room so that would be 100 per room to start with...

I checked out home depot just to see what they carried for perlite. It's about 1/2 the price of the Fox Farm stuff but definitely doesn't look "big" and "chunky." I will make the drive out to the big city grow store to pick up some of the Fox Farm brand this weekend.
 

snowkitty

Member
Room lay-out and specs

Room lay-out and specs

Here is my room lay-out and specifications...I'll edit this as I look it over this Saturday morning but I think I've got everything down. I'm working on showing you guys my bucket design next...

picture.php
 

snowkitty

Member
Bucket design and the diffuser hose and regen blower

Bucket design and the diffuser hose and regen blower

I decided that a diagram would be more helpful than photographs. Plus I'm still not totally decided about whether I feel comfortable posting photographs of my tomato garden online...so here's what's going on with my buckets...

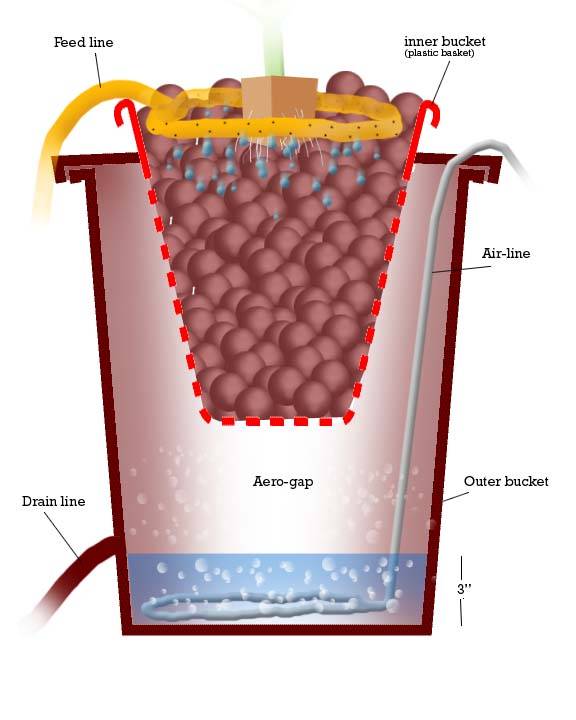
It's a basic Krusty set-up with 2 five gallon buckets. I've got the third bucket there to control root growth.

The top bucket is a mesh pot made out of a five gallon black paint bucket. 5/8 inch holes are drilled throughout the bottom 5 inches of the bucket. Planning to use Fox Farm Big & Chunky Perlite. I bought a roll of screen door material that I’m planning to loosen up (make the mesh a little larger) and use to line the inside of my top bucket…to keep the perlite from falling out of the holes in the bottom and sides of the bucket.

The spacer between the top bucket and the middle bucket is a 3.5 inch diameter piece of PVC pipe, drilled throughout with 5/8 inch holes. It is cut into an 8.5 inch segment. That gives me a LOT of room between the top and middle buckets but with good stability. I’ve got weatherstripping around the inside top edges of the buckets to keep light out. Plan to cut a channel through weatherstripping for my feedlines and airlines.

The middle bucket is another five gallon black paint bucket. This time it has 6 drain holes drilled at a height to allow 1 inch of nutrients to collect in this bucket. There are three 5/8 drain holes on one side of the bucket and three on the other. The idea here is that I don’t want a lot of holes for my roots to grow out of…I want to contain my root mass in this middle bucket…with nutrients spilling over into the bottom bucket to get recirculated…

I’ve got two nylon paint strainers over the bottom of this middle bucket to stop roots from getting out into my drain line, which is in the bottom bucket.

The bottom bucket just has a drain feeding into 1 1/4 inch flexible hose that goes back to my reservoir. Four buckets are on a loop connected to the reservoir.

picture.php


Question #1: Aeration from a silicone rubber diffuser hose
Decided to go with the Alita silicone rubber diffuser hose this time around. I saw it recommended by both JK and by BlindDate after repeated harvests. It’s $7/foot and I’m willing to give it a shot based on the gardener reports I’ve read. Plan B (if the hose doesn’t perform)…is to use PVC that I drill myself based on SYK’s advice. SYK sez: simply drill some tiny holes (say like 1/16") every 2-3 inches down the pvc on the BOTTOM of the tube. Plan B is to make the Alita porous PVC pipe myself, basically.

Dom Goddess gave me advice to: place/wrap/affix air hose/tube ONTO SIDES/INNER-WALLS of bucket/tub - ABOVE WATER LINE. no roots to get tangled in.

The manufacturer mentioned not putting any stress/weights on the airline, but only on the tee that you use to make it into a hoop. He was telling me not to grab the hose and bend it out of a circle by tying it somewhere…that it needs to be round to perform…without being pulled out of shape. He said to use wire to make it keep its shape. I don’t have it in hand yet so that’s all I have to report… Question #1 is just any comments you have on my plans here…

Question #2: Regenerative blower
I’m planning to buy the Sweetwater 1/2 HP regenerative blower (Model S31) from AquaticEco. Based on my novice reading of their performance curves I believe that it is rated at 55 CFM in 1 inch of water. (Question #2 is definitely what the hell all this cfm stuff means and how I do this right…hehe) I think that 30 CFM would be sufficient for 4 buckets, and saw advice all over the place to go oversized if I could. The difference a 1/3 HP blower and the 1/2 HP one like 10% of the cost…that’s pretty cheap to improve performance that much…so I settled on the 1/2 HP as enough oversized without going crazy and getting too hot/loud.

Performance curves are here and I’m looking at Model S31: http://www.aquaticeco.com/images/static/pump-curves/S11.gif

Question #3: Drain hole in the middle bucket at 1 inch
So I’ve got my drain holes in the middle bucket at 1 inch…to allow 1 inch of nutrient solution to collect there. Krusty recommended 1-2” of nutrient solution. I saw HyGradeChronic mention 2 inches and now I am wondering if I have it in the right place at 1 inch. I guess this kind of all goes with how I attach the diffuser hose to the walls or on top of the solution or what. I will have to have the blower and hose to do any testing and see how it all performs…but yeah…advice on this would be appreciated…

Oh, and a disclaimer...I'm kind of at the do or die stage when it comes to getting this setup up and running...i was a foolish young grasshopper who did not prepare for the winter...hah. I’ve got the 5-gallon buckets and I’m going to use them this time around…I think… There are some improvements when it comes to the size of the bottom bucket (for more root growth). SYK mentioned a Rubbermaid Brute 10-gallon round trashcan and I know that Jalisco Kid has posted a larger bucket he designed himself (he took down the pictures because he’s thinking of selling the design so I’m not sure what it looked like). Dom Goddess specifically recommended 8-10 gal square tubs as the #1 modification to consider over in Stitch's master KBS thread. Anyway…yeah…5 gallons for now…
 

snowkitty

Member
Just want to quote some of the tips I've been going by...they are in another thread and its easier for me to be able to read them over here...

always nice to see the krusty buckets again. ran w/ success.

couple modifications that may be of help.

1. 8-10 gal, square tubs works well. more volume for roots than 5 gal bucket + easier to perform maintenance on. 4 gal squar pails work well too.

2. air/soaker hose/diffuser wrapped/affixed to the inner walls of the buckets/tubs, instead of @ bottom. so roots dont get tangled in air hose(s).

3. can be run w/ any cultivar. training/topping/pruning, etc are important + knowing the cultivars' characteristics. can easily overgrow an area is fruiting initiated too late. w/ 1-4 plants, after training, etc, can start flower @~ 8-12" tall/wide, depending on area for plant. min area ~ 3x3x3'. know stretch rate. thin out the plant to achieve mass w/ out too many branches, too close to ea other.

4. consider maintenance in/on garden. when mature, will be little room to move aound, change machines, etc.

5. have hvac in order. should have both vertical + diagonal + horizontal air flows. have way to exchange huge volume of transpiration coming from large plants; whether ac or in/out fans.

6. have sun glasses for vert systems. glare will affect eyes over time.

7. size of air pump was of major issue in original krusty thread. same oxygen supply as dwc will work. ~smallest air pump in general store per bucket will work. 4" 50-150 cfm fan, stepped down to 1" poly hose/pvc plumbed to buckets/tubs will work.

8. smallest water pump will work too, as long as trickle comes out onto/into bucket. no need for high pressure, just recirculation. once roots in outer bucket/tub res, can move feed line(s) into inner walls of outer bucket, to flow down over roots.

hope this helps. enjoy your garden!
 

snowkitty

Member
Question #4: Feeding schedule

Do I still feed 24/7 with perlite? Two feedlines per bucket?

Was planning to have my feedlines positioned in the top bucket at the beginning. Then move them into the middle bucket once I had root growth throw the holes in the top bucket. That logic comes from krusty's advice below...I welcome feedback...

krusty on feed line position and 24/7 feeding
• you have the feed lines pointing at the bottom where the roots reach...like i am serious...you have it so the nutrient lines will hit a lava rock that will barely wet the end of the root.. like i am saying MAYBE 1/4" of the roots ends are getting water....then each day you pull the feed lines back....if you don’t do this the roots will not try and reach/grow out.. this is where a lot of folks run into problems...i wont mention any names but the one person who is trolling e NEVER learned this...i watched all his threads and he never grasped this:/
• you jsut cannot keep the top portion of the root mass wet...as in the tap root...you want the area JUST BELOW the stem to keep dry ALWAYS...the OBJECT is to keep the end of the roots WET..the tap root or top portion of roots or the area under the stem DRY. what dires out faster?? the ends of the roots or the tap root???? well cum on answer you fucking einstiens??? the fucking end roots that are sooo smal will OBVIOUSLY dry out faster...that is why we MUST keep them wet 24/7 but we want them to grow away from the tap root....and we want the tap root dry all the time...we want the tap root to look like a big ole solid oak...
• you want it so that just the very tip ends of the roots are getting wet from nutrients. NOTHING ELSE
• if you have a system where you are providing nutrients to the roots it should ALWYAS be 24/7....this is to maintain not only nute levels but also to maintain temps in the root area....if you turn off the nutrients at night and the roots don’t get any food that is bad...they do take in food at night...but also now you have changed the temps of the roots...again you will stunt the plant EACH DAY by doing this
 

basilfarmer

Member
wow

thanks for the heads up on the lava rock, won't be touching that stuff

instead of chunky perlite, how about hydroton?

-----

i thought the evolution of the air system went from

thomas air compressors + soaker hose = terrible, noisy, clogged, high energy consumption and heat to the res

to

regen blowers + sweetwater stones

to

regen blowers + "Alita HDPE Porus Tube" -----was the best???

I am asking more that stating, due to legal limits on a med grow, mega trees is a way I want to go too.
 

snowkitty

Member
Notes on the Alita silicone rubber diffuser hose

Notes on the Alita silicone rubber diffuser hose

Alita Industries is located in Arcadia, CA. They are “dedicated to the design and distribution of the efficient and effective air and water moving products since 1990.” Alita manufactures the HDPE (aka PVC) porous tube that KBS growers started using in place of the soaker hose to generate bubbles in the nutrients in each bucket. They also manufacture a silicone rubber diffuser hose, which is what I’ve decided to experiment with this time around.

Silcone Rubber Diffuser Hose: Non-clog performance, provide uniform air distribution for any length. Suitable for aquaculture aeration applications. Ideal replacement for traditional black rubber hose.
Outer diameter 14 mm.
Inner diameter 11 mm.

Here is the original place I learned about it:

The tubing is 1/2" ID silicone with thousands of tiny knife cuts in it. Because silicone expands under pressure, this stuff NEVER cloggs and does produce nice fine bubbles. I arrived here after trying everything on the market and would never go back.

I am using 3/16" lead wire run thru the inside to weigh the assembly down. The hoops are 12" diameter.


The absolute biggest hoop that could fit in my bucket is 31 inches, so I figure I will use somewhere between 24” and 28” of diffuser hose per bucket. Four buckets per room = 8 – 10 ft. of hose per room.

You can purchase this directly from the manufacturer (alita.com) by calling them during normal business hours on the west coast. Minimum order size is 1 foot. They quoted me $7/foot. I asked about a quantity discount and they said 5% discount for 50 meters or more and a 10% discount for 100 meters or more….lol…no, thanks, I’m not ready to buy that much. They offered that I could save on shipping if I was near them in southern ca and wanted to pick up my order myself...not an option for me but shipping was reasonable...

The manufacturer was extremely helpful when I called for a price quote. He mentioned that the hose is very lightweight and will not sink on its own. It is necessary to use wire to hold it into a curved shape. No hard turns on the hose. Don’t cut off the airflow in any way. Do not place a lead weight anywhere on the hose or otherwise bend it out of shape. You can place a weight on the tee that you use to put it into a hoop.

Set up instructions for diffuser tube hoops:
You have to put it together yourself. They only sell the hose. Get 1/2" to 1/4" reducing tees from US Plastics:

http://www.usplastic.com/catalog/va...ry_name=6918&product_id=6664&variant_id=62104

Buy the lead wire from Mcmaster Carr.

As for the porus polyethylene: Been there, done that, same clogging issue.
 

basilfarmer

Member
cool, awsome info, without the ridiculous krusty drama

"As for the porus polyethylene: Been there, done that, same clogging issue." i guess he talking about hdpe

well if he is then it sounds like your choice is a great one.

i'd never use lead wire though :eek: lead disolves in water, and there are lots of alternatives

good luck with your monster trees :D

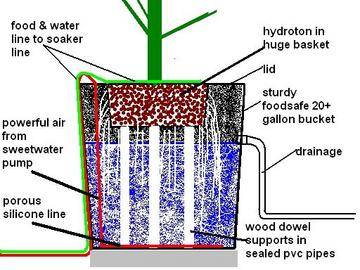
heres a diagram from uk420, the only thing is, the hydroton area is smaller and more inportantly, there shoud be support underneath the hydroton like an upside odwn bucket with holes or pillars staballized to a ring

bucket.jpg


i'm doing this too as soon as i get my permit, i'll let you know if i make any discoveries

another 2 things i'm doing for comparison are

1) just making a huge bubbler bucket with a secure smaller bucket w/ hydroton
dwc_on_steroids_.jpg


support.jpg


2) and another with the bottom 15% bubbling water and aero spinners going at the top

just to see
 

snowkitty

Member
basilfarmer, I always love pictures, thanks for sharing...I look forward to watching your comparison...you've selected a good cross section of methods.

I was using hydroton in my last grow, which was in net pots in buckets in Rubbermaid containers. I had some babies in hydroton this time around but I started having pH problems and decided to scrap it...that's when I decided to go to lava rock...and now I own a bunch of lava rock I've decided not to use...grrrrr

I guess we didn't like the sediment off the hydroton...can't really remember what else was frustrating me about it other than it was suspected in pH problems I was having.

I'm going with perlite this time around...and I just noticed that SYK echoed a method that I saw Jalisco Kid post pictures of on another forum:

I would also recommend adding a 1/2" piece of pvc that goes all the way from the bottom of the bucket and up about 18" above the media. Push this down into the center of the perlite once you get your buckets loaded up. Use a short piece of velco wire strap (check amazon) to attach the plant to the stake. Adjust weekly. This will keep your plants sturdy where you want them.

So I guess I will be going back to home depot yet again to buy some pvc and make a plant support for the center of each bucket.

I also noticed your uk420 diagram shows 3 inches of nutrients in the bottom bucket, around the aeration hose. The prototype bucket we made has drain lines set to maintain only 1 inch of nutrients. That's my Question #3 and it's still a big one for me...how much nutrient solution to leave in the lower bucket.

I guess once i have the blower and hose in hand I can see what kind of results I get from the first product off the snowkitty production line and then modify it from there...
 

~SYK~

Member
I guess we didn't like the sediment off the hydroton...can't really remember what else was frustrating me about it other than it was suspected in pH problems I was having.

I also noticed your uk420 diagram shows 3 inches of nutrients in the bottom bucket, around the aeration hose. The prototype bucket we made has drain lines set to maintain only 1 inch of nutrients. That's my Question #3 and it's still a big one for me...how much nutrient solution to leave in the lower bucket.

Perlite is the correct choice. The recommendations that I make, are not made lightly. Meaning - I'm not flying by the seat of my pants making suggestions off posts I have read, or what I think might work based on other systems. My suggestions are based on MUCHO hard experience and many a crop "less than it could be" - so all the recommendations I have are based off tweeks made to the original "Krusty" system (which was crap) ... and why I now call KBS ... Killer Buckets ... because they have been completely IMO refined based on the experiences of myself and fellow KBS growers over the past years ...

Hydroton is awful. It doesnt clean well, doesnt hold water/air at the correct ratio, and adds to PH drift problems. It CAN be used in some systems, I have seen many an ebb and flow table work well with these ... but it is now what we want in Killer Buckets.

No-One and GBV (the AZ crew) had much success using Coir/Hydroton mixture and I used that myself for a few grows back when I was growing. It is not the 'ideal' media though - I think Perlite is.


My Suggestion to your Question #3 - is NONE.

I think you should have NO water in your lower bucket, but that is only based on my experiences...I would use your blower in your rez to be honest with you! Good Job on oversizing BTW.

Also - you may want to rethink your drainage solution/root barrier.

If that thing gets clogged (and chances are it might) there is going to be no way for you to clean it mid grow. That could lead to some SERIOUS issues down the road when you have invested months in buildout and veg to loose it all then off something you could have fixed now .... would stink!

Hope it Helps

SomeoneYouKnow
 

~SYK~

Member
So I guess I will be going back to home depot yet again to buy some pvc and make a plant support for the center of each bucket.

Yep - 1/2" PVC. Yer going to need about 3' per bucket.

DONT complicate it by adding a "t" at the bottom.

It is not needed. Simply fill your buckets with the perlite, then place the pipe in the center of the bucket and press firmly down until it is seated fully.

Also - Try these .... cheap, and work great!

http://www.amazon.com/VEK91140-Reus...=UTF8&s=office-products&qid=1240159564&sr=8-1

SYK
 

~SYK~

Member
i thought the evolution of the air system went from

thomas air compressors + soaker hose = terrible, noisy, clogged, high energy consumption and heat to the res

to

regen blowers + sweetwater stones

to

regen blowers + "Alita HDPE Porus Tube" -----was the best???

It did ... then it continued to evolve from there.

I have never used this latex tubing - I do think however that it will work VERY well - even better than drilled holes!
 

~SYK~

Member
I was planning to use nets because I used them in my last grow with some success...just stretched them out in sections here and there and trained my plants through them. BUT I'm switching methods because I didn't get the results I wanted...so perhaps I need to change my mind about netting, too.

If I go with chicken wire, how do I affix it to the ceiling? Can I use my staple gun and staple it to the studs...or do I need to do something better than that? Also, how many yo-yos per plant? Is 25 a good number to start with? I have 4 plants in my room so that would be 100 per room to start with...

I checked out home depot just to see what they carried for perlite. It's about 1/2 the price of the Fox Farm stuff but definitely doesn't look "big" and "chunky." I will make the drive out to the big city grow store to pick up some of the Fox Farm brand this weekend.

A) Good Thought Process. One definition for Insanity is : doing the same thing and expecting different results.

B) I weave 1/2" pvc every 10' in and out of the chicken wire. I then predrill it and use anchor bolts (if drywall) or screws if plywood.

That is another suggestion - for those of you building your room from scratch - you may want to consider a plywood ceiling - for all the things you are going to have to mount, and for the times you are crawling around playing with ballasts, you are going to want the added strength of wood over drywall.

Especially when one of your Hydrofoggers controllers fail and it floods your rooms, making your drywall soaked with water - and your lights and filters and such pull out of the ceiling and start falling on your plants - not much fun!

C) I would think more like 40+ per plant.

A friend of mine came up with a neat suggestion for this as well. Put up all your yo's before you plant, then take a 6' dowel and attach a cup hook to the end (or pvc and duct tape (or end cap) and cup hook) then use this to retrieve your hooks from their location. Trying to move a step stool is not too nice, when your room is grown out properly :grin:
 

Latest posts

Latest posts

Top