What's new
  • ICMag with help from Landrace Warden and The Vault is running a NEW contest in November! You can check it here. Prizes are seeds & forum premium access. Come join in!

Gen. Contractor/Handyman advice needed to reinforce gutted Mill's Pride type cabinet.

Hi all.

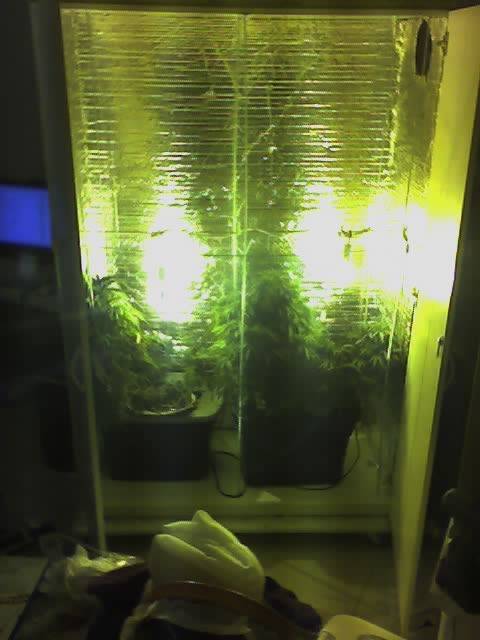
I'm using almost an exact duplicate of this Mill's Pride cabinet I made 6 years ago, but would like to reinforce the hell out of it because without the interior shelves installed and the rear having a large door, it is very wobbly. Cab dimensions are approx. 4' x 1.5' x 6', and the walls are 1/2 to 3/4 inches thick at the most. As I said, I'm not using any of the interior shelves (except maybe the top shelf for electrical and 4 bare 150 watt ballasts each inside a 4x4 electrical switch box). I'll be hanging an S&P TD-150s and scrubber above that shelf also, so it'll be top-heavy as well (last time, the ventilation stack was outside, like in my avatar).

Here's what the old cab looks like (front doors open, rear door open, and front doors closed):


Question 1: What would be the best way to reinforce this? I tried L brackets and other such things, but they still allowed the thing to wobble WAY too much. It's on wheels so I can move it from the wall to access the rear door for daily maintenance of rear screens (two chicken wire tubes, top to bottom), and when the rear door is opened I was always afraid the entire thing would fall apart. I'd like to just build some kind of interior frame top to bottom, but do it as unobtrusively as possible. Are 2x4s the best option for this? 2x2s? Please explain in detail how I'd cut and screw the frame together (wood screws, drywall screws, etc.). Is there an option for some type of metal frame? I'd prefer to not have a bunch of screw heads visible on the sides...going for max stealth with this cab.

Question 2: I need the top shelf to allow good air flow through it, as I'm venting 600 watts (4 X 150 hps) and the 6' exhaust port is going to be on the rear wall, above the shelf that's holding the 4 small ballasts. I was considering just drilling a bunch of 2" holes through the included shelf, but there has to be something else I can use, like some kind of heavy-duty large mesh screen? What do you think?

If you've read all the way to this point thanks...I can be a wordy mofo.
 

hayday

Well-known member
Veteran
Take the shelves you are not using and use them for gussets.Stand them verticle an tape them on with foil tape or use screws if possible.Do this wherever you can that no access in needed.
 

DTFuqua

Member
JB weld is only good if you do the prep work. Any glue is only as good as the prep work. Do the prep work, use lots of gorilla wood glue and clamps, and put 2X4 triangular gussets in all corners and as many as you feel comfortable with. You can just rip a 2X2 on a 45 angle and gusset the entire corner which is what I did long ago. Other than some X racing the whole thing, the only other thought is to put face framing around the face or recess it just inside the face to be flush.
 
D

DapperDon

I've been a professional Cabinet and Furniture Maker for over 25 years and now have taken that experience and have been creating custom automated high end grow cabinets for the past 8 years and would be happy to help. You need to make what is called in the Cabinet Making industry a "Stringer". Take the inside measurement of your cabinet's width. Let's say that the measurement is say 36", and with that measurement go to Lowes or wherever you can get pre-dimensional lumber and purchase three pieces of 3/4" material (plywood or hardwood) 3/4" x 3" x (whatever unit is sold in length closest over the 36" number we are using) and have them cut the material to exact length for you. Why not, the first cut is always free. So, after you get your freshly cut stringer home, you are going to need a few things. Some gorilla glue, 2 medium sized wood clamps, a drill, and some 2 1/2" deep thread screws (drywall screws are fine). You are then going to use the wood and clamps to attach the stringers to the BACK of the cabinet at equal height starting with one at the top, one in the middle, then one at the bottom. Pre-fab cabinets are shitty and they do not stand up to really heavy useage so you will want to exercise a lot of delicacy when drilling into those. The particle board doesn't really like brute force and will crumble apart. So you will really want to pre drill your screw locations with a countersink.
 

the gnome

Active member
Veteran
you can do a layover with 3/8-1/2" cdx, on the back of the cabinet
make sure you screw it abut every 6" on the edge of the 4 sides of the cabinet,
and predrill your holes 1st .
lastly make sure your cab. is positioned square and where you want it before screwing it off
 

iampolluted

Active member
^^^^^ what he said. easiest and best idea, and probably most structurally sound one anyway. the stringer idea is good too, but you're trusting only a few screws using those. one way to get it square is to make triangle cuts to put in the front corners. do all 4 corners up front and it wouldn't hurt to have em in the back of the cab too, then put a sheet of mdf, or plywood across the entire back.
 
I agree a heavier back panel use some glue to glue the two together I'd level the feet so the doors look straight then measure outside back corner to corner both ways adjust the floor level to make the measurements the same then glue and screw the heavier back on and predrill.
You can empty the cabinet and lay it face down on a blanket it is much better and easier leave it for an hour or more for the glue to set up between the backs it will be much better if you glue pieces on then inside corners to reinforce the joints and screwed from the inside just get the right length screw with some two by two s but use silicon wood glue won't hold on the finished cabinet. When your done level the feet with cardboard front and back so the doors line up it will be very sturdy and better balanced weight. You could also just glue and screw 3 inch strips top and bottom and screw to a wall.
 
Also for light blocking you can glue and screw a strip on the inside of one door then put strips on the sides if your careful it will block all the light you can drill holes in the back with covers to block light or the bottom.
 

the gnome

Active member
Veteran
quick-nn- easy way to make it square is to get the width and hieght of the cab. and mark he measurements to the plywood using 2 sides to start at, the plywood is square alreday so if your exact with the measurements just cut it out, lay the cab face down and put the cut plywood on the back and line it up and screw it off

your done
 
D

DapperDon

There are quite a few issues with your triangle method. First you are assuming that the saw cutting the pieces are going to give you a true miter. Secondly there is nothing to give lateral as well as torsional support.
 
WOW! Thanks for all the responses...really appreciate them! I'm afraid some of you are giving me too much credit tor understanding and constructing based on your different ideas; I'm not the handiest guy on the planet, but if I can get a somewhat simple idea picked-out I can follow through OK. Let me do a multi-quote and get some ideas clearer in my head.


Take the shelves you are not using and use them for gussets.Stand them verticle an tape them on with foil tape or use screws if possible.Do this wherever you can that no access in needed.

This is exactly the first step I was considering, as I could use one shelf permanently screwed vertically into the bottom rear wall of the cab, and the other I could screw (or hinge) into the top of the rear wall, covering the electric/scrubber/exhaust compartment (from the upper shelf to the top of the cab). Then that would leave room for the rear door (@ 4 feet high, that is absolutely necessary) that gives me access to the rear screen maintenance, but still gives support to the rear of the cab top and bottom when rear door is open. The shelves are included, so I figured I might as well use them.


Use JB weld (two part epoxy)to add your L brackets. Use lots.

JB weld is only good if you do the prep work. Any glue is only as good as the prep work. Do the prep work, use lots of gorilla wood glue and clamps, and put 2X4 triangular gussets in all corners and as many as you feel comfortable with. You can just rip a 2X2 on a 45 angle and gusset the entire corner which is what I did long ago. Other than some X racing the whole thing, the only other thought is to put face framing around the face or recess it just inside the face to be flush.

Added glue is a great idea, but what prep work is required for the glue? Sanding? I think this is just covered particle board, not solid melamine (just FYI).

In using 2x4 triangular gussets, do you mean to have me put four gussets in each top corner, have 2x4s connecting these gussets together (horizontally) around the entire perimeter of the top (two 48 inch pieces and two 18 inch pieces to put an entire frame around the top) then do the same thing for the bottom four corners (framing the perimeter)? If so, would I then connect these top and bottom frames together with 6 foot 2x4s vertically in each corner? This is what I was thinking I needed to do, somehow frame the entire insides of the cab...but again, all of you know more about this stuff then me, I'm sure.


X bracing across the back of cabinet

I think this would interfere too much with my access to the rear screens in the cab. I'll have 4 foot high tubes of chicken wire, and need to be able to tie, trim, and spread the growing branches in a 4'x4' area in the back of the cab. Great idea though, if I didn't need such access!


I've been a professional Cabinet and Furniture Maker for over 25 years and now have taken that experience and have been creating custom automated high end grow cabinets for the past 8 years and would be happy to help. You need to make what is called in the Cabinet Making industry a "Stringer". Take the inside measurement of your cabinet's width. Let's say that the measurement is say 36", and with that measurement go to Lowes or wherever you can get pre-dimensional lumber and purchase three pieces of 3/4" material (plywood or hardwood) 3/4" x 3" x (whatever unit is sold in length closest over the 36" number we are using) and have them cut the material to exact length for you. Why not, the first cut is always free. So, after you get your freshly cut stringer home, you are going to need a few things. Some gorilla glue, 2 medium sized wood clamps, a drill, and some 2 1/2" deep thread screws (drywall screws are fine). You are then going to use the wood and clamps to attach the stringers to the BACK of the cabinet at equal height starting with one at the top, one in the middle, then one at the bottom. Pre-fab cabinets are shitty and they do not stand up to really heavy useage so you will want to exercise a lot of delicacy when drilling into those. The particle board doesn't really like brute force and will crumble apart. So you will really want to pre drill your screw locations with a countersink.

I really like this idea, as it is simple and easy for me to understand, although I'm not sure how I'd use the wood clamps. Say I use 2x2 "predimensional" lumber, get it cut to 48" in length (inside measurment). I understand I would drill the countersunk holes through the sides of the cab, so that I could screw the 2.5 inch screws into the 2x2 sides of each stringer (2x2 side of stringers are what are flush with the side walls of cab, right?), so three stringers in back, six screws into them from the sides. But where would I use the wood clamps? The only place the stringers touch different wood would be on the 2x2 inch sides, right, so how would clamps help me here? I could see also using the glue on the touching 2x2 sides, but do not see how to attach the clamps. I'm assuming the stringers would be flush with the back wallspace of the cab, so that the rear door would fit tight up against them; that is, I open the rear door, and there are three stringers mounted across the doorway, permently screwed into the sides of the cab in the countersunk holes, right?


you can do a layover with 3/8-1/2" cdx, on the back of the cabinet
make sure you screw it abut every 6" on the edge of the 4 sides of the cabinet,
and predrill your holes 1st .
lastly make sure your cab. is positioned square and where you want it before screwing it off

^^^^^ what he said. easiest and best idea, and probably most structurally sound one anyway. the stringer idea is good too, but you're trusting only a few screws using those. one way to get it square is to make triangle cuts to put in the front corners. do all 4 corners up front and it wouldn't hurt to have em in the back of the cab too, then put a sheet of mdf, or plywood across the entire back.


Is this taking into account I need to have a door on the back, or is this "layover" just simply replacing the crappy cardboard backing with a heavy 1/2" piece of wood screwed permanently around the perimeter of the rear wall? I definitely need a 4' x 4' door on the back 4' x 6' wall. I like the triangle idea as well...does Lowes or Home Depot sell these, or do you need to cut them yourself? If cutting myself, they'll only be as square as I'll be able to cut them, which is a scary proposition!


I agree a heavier back panel use some glue to glue the two together I'd level the feet so the doors look straight then measure outside back corner to corner both ways adjust the floor level to make the measurements the same then glue and screw the heavier back on and predrill.
You can empty the cabinet and lay it face down on a blanket it is much better and easier leave it for an hour or more for the glue to set up between the backs it will be much better if you glue pieces on then inside corners to reinforce the joints and screwed from the inside just get the right length screw with some two by two s but use silicon wood glue won't hold on the finished cabinet. When your done level the feet with cardboard front and back so the doors line up it will be very sturdy and better balanced weight. You could also just glue and screw 3 inch strips top and bottom and screw to a wall.


Again, does this method take into account that I need a 4' x4' door in the middle of the back wall? I'm all for reinforcing the corners regardless, though. Thanks.


Thanks again for all the responses, and if you could take the time to follow-up on these questions, I'd be grateful.

I'm thinking a combination of using the included shelves vertically screwed into top/bottom of rear wall, along with three stringers spanning the 4 foot doorway in the rear, and maybe two stringers inside the front doors, around 15" from the top and bottom of the cab (leaving 4' open to install tubs, screens, and maintenance). Then reinforcing the corners with triangles or triangular gussets (if I can figure out how to use them). I'd much rather over-engineer this thing than under-engineer it; it's virtually disposable in a year if I do nothing.
 

junior_grower

Active member
Man take the cab glue ( a good water/moisture proof wood glue) a sheet of 1/2 ply to the back, screw every 12" . (throw the factory back out) Cut your hole in the back. You would be better off cutting a 3'10" wide hole so the sheet of ply has 1" on each side to help strengthen the sides.


A second option is to make a plywood cabinet your self. And attach the mills doors, or other doors on a much stronger box. The knock down cabinets have a thermo wrap melamine covering, over 1/2 particle board.

If you want to go this route I can make a cut list for you to take to the lumber yard. A homebox will be an 8hr job start to finish with paint.

This is an interesting idea, the one-piece back with a 3'10" door in it. It's easy, and makes sense, an could easily be combined with the other reinforcements.

I'd love the cut list for a 48" x 20" x 72" box, and instructions/tools list for putting it together. I'm not completely confident I could put it together, but I'd definitely consider it as I've not bought the other yet. Can you get prefab doors that would be suitable for our purpose? I'm kicking myself now for throwing out the last cab doors...I did have the foresight to keep the rear door though.

Thanks a lot for the offer and advice!
 
Do you have a drill/ or brad nailer. ?
Cut list will be up later tonight.


Drill...yes. Brad nailer...no, but I might be able to borrow one, if needed. I'm still not positive I should opt for this route, as I'm sure it'll be twice the money and much more difficult for a guy like me, but having the info to check out would be great! I still love the idea of the rear one-piece wall with a door, though.

Maybe you'd know...would lining the cab with cedar cut down/eliminate on bugs? I know they line closets to stop moths from eating your clothes. Would the cedar negatively impact the plants?
 
First measure the back you have now exactly then take that number to a store that will cut it for you and see if they will cut the center out for you leave an an inch or two on the sides and keep the cut out piece you can mount it as a door with some trim to cover the gaps. But it would be easier and just about as strong if you used two pieces one on top the other on the bottom cut to the size you need for access like putting the shelves in the back mounted vertically inside the cabinet and if you use cleats or brackets you could do it from the inside keeping the screws from the outside.
 

junior_grower

Active member
Cut list

I made this for a 24" deep buy 48" wide cabinet, doors are 3/4, back is 1/2 material.
I recommend plywood, chip board, particle board and mdf don't like water.

Height is 84" and to change height subtract from sides and back.

Cut list
48*81 x1 1/2 ply -back
3*48 x2 3/4 ply -toe kick front and back
3*21 x5 3/4 ply -toe kick sides, and support ribs
22 3/4 * 79 1/2 x2 3/4 ply -sides
22 3/4 * 48 x2 3/4 ply -top and bottom
23 7/8 * 81 x2 3/4ply - doors


You will need 6 hinges (3 per door)


The sides rest on the bottom, the bottom rest on the toe kick.
 
Top