What's new
  • As of today ICMag has his own Discord server. In this Discord server you can chat, talk with eachother, listen to music, share stories and pictures...and much more. Join now and let's grow together! Join ICMag Discord here! More details in this thread here: here.

First Attempt seems fine but.....

Klompen

Active member
I wouldn't worry too much about what is natural in terms of the branch growth honestly. I used to get kind of hung up on that and I think I just wasted plant resources. Unless you're going to reveg the plant. In that case, keeping some of that larf growing down there is vital.

For FIM I have tried pinching, but I think I got the very best results by using a sterilized pair of nail scissors. Cutting about 80% or so of the apex growth tip off leaves just enough of it that it doesn't die, but temporarily forces the plant to redirect its distribution of auxins. The wildest branching I ever got was a combination of FIM and application of artificial cytokinin(Bonide Blossom Set Spray). The cut resulted in about 16 branches forming instead of the usual 2 from a conventional topping. You'll undoubtedly hear arguments for and against use of hormones though. Personally I stopped bothering because FIM was already producing plenty of canopy without it, but it certainly can give you some wild branching if that fits your needs.

Damn that's crazy 16 branches? Trip! I'm not worried about it. I can nip and tuck remove whatever but just use common sense. I am probably gonna wanna take some clones. Just wondering if you do or what your technique is. There is tons of info on it but so many ways and opinions. I just want a silver bullet no fail works 99% of the time kind of deal. You smell what I'm steppin in?
 

Klompen

Active member
Damn that's crazy 16 branches? Trip! I'm not worried about it. I can nip and tuck remove whatever but just use common sense. I am probably gonna wanna take some clones. Just wondering if you do or what your technique is. There is tons of info on it but so many ways and opinions. I just want a silver bullet no fail works 99% of the time kind of deal. You smell what I'm steppin in?

It has been a while, but I used to do quite a bit of cloning. Way back on Overgrow I invented the shoebox bubble cloner concept that a lot of folks use these days. For little branches that is by far the best method I have ever tried. For larger clones though I am really a fan of air layering. There are some guys on here that do it a lot better than I ever did, but I did experiment with it some and if you want to take a huge clone that's basically the only sure-fire way. It also produces roots crazy fast.

My method was to inflate a coir puck and then let it dry out most of the way. Then I would carefully cut one side of it lengthwise to the core and fit it over the branch you want roots on. To prepare the branch I scraped the bark until the very outermost layer was gone and put rooting powder on it. Then I would spray the puck a bit with water from a spritzer bottle and wrap the whole thing in cling wrap. Then I would gently but snugly tie twist ties on each end of the cling wrap. Took me about a week to get really solid roots but once it did it could be cut loose of the plant, a little rooting powder could go on the cut end and then it would go into a party cup full of soil and stay there until it filled the entire thing with roots. Others who do it have differing methods ranging from burlap to cut up plastic bottles. The important thing is to create a little pocket of soil and darkness around the branch. No other method comes even close to the size of clones this can produce, and its one of the only methods that produces roots while the plant is still supporting the clone.

The other method I can think of that I've only done outdoors is to bury the plant deeper so that branches get buried and start to root. After they do, they can be excavated and cut off the original plant. There's risks to the main stem involved with this method and I only know of it because I did it accidentally to begin with and decided to see what would happen if I separated it.
 
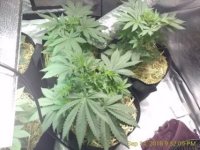
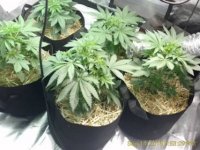
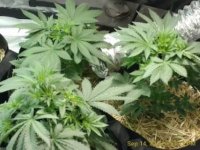
Well, here they are right under 6 weeks from sprout. I have topped two and fimmed one. They seem to be doing better as far as growth but feel they still just aren't exploding. They are in an excellent environment (could be a little cooler but they were started in the heat of August. Temps are tapering off now so that is good. Do these look ok for their age? I moved them into 5 gal smart pots 2 weeks ago so the soil base mix I used should give them the nutrients they are needing without any nutrient feed. I have watered them a couple times since I transplanted them as I tend to let the soil dry out a bit. I have been told that I should be good for 4 to 6 weeks before I start seeing signs or deficiencies but is there a way around that by feeding them something even if it is in micro doses and I am not talking about 4 way double dipped flash. I do amend my waterings First amendment I watered with was Recharge (Helps in Microbial life explosion. Second watering I gave them Extreme Gardening's Mykos WP (had a free sample) Basically does the same thing. However, these are not feed/nutrients for lack of better term. Everything used in my soil was OMRI certified with the exception of FFOF which I had laying around and needed to use. It's not a bad soil but it's not 100% OMRI certified organic but it's working until my next study. I guess I am looking for suggestions on what else I could add to my waterings that would kick these whores into a frenzy but at the same time I don't want to F**K it up sending me off chasing down problems. So I prefer not to receive one liner product comments without any reason behind the suggestion if that's cool. Just looking for simplicity and something that I can apply to my current grow you see in the photos. Don't care to spend a shit ton of $$$ as I think these full lines advertised with 5 different products are somewhat a marketing ploy. I am not saying that they are bad but as a betting man, I'd put my money on that you could probably take a grow and a bloom from a nutrient line and just apply those from start to finish without adding all the others recommendations in the line for different stages of the plants natural cycle and still get excellent results. I'm not planning on competing in any Cannabis cups.

So in summary, There are so many product choices when it comes to feeding. I like to keep it pretty simple. However I would like to harvest some excellent flowers. I have everything I need from great genetics to all the grow equipment I need. The only thing I need is a great organic nutrient line. I don't want to buy 10 different things. Maybe like a grow nutrient for the vegetative stage and a bloom feed for the flower cycle. What would be your top choice or choices for what I am trying to accomplish? I do have some Canna A B nutes but they are for Coco. Could I feed with those even though they are designed to feed in an inert substance? Or would that send the ladies home crying? I read up on it and there are mixed reviews so probably not a safe bet. Anyway, feedback and suggestions are always welcome and appreciated!

Thanks Peeps!

9:14a.jpg 9:14b.jpg 914.jpg
 
11 days later

11 days later

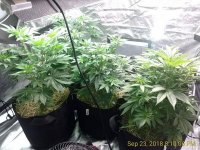
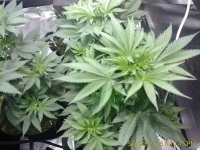
Man these are around 50 days since they popped the dirt. I think they are looking good. They seem a little small. Just hit em with some feed today for the first time. Been giving them recharge on every watering but today I mixed in a lil Earth Juice. I was worried at first in that it lowers the waters ph but the microbial life balances it out. I was wanting to get some recommendations on giving these ladies a hair cut. Like removing some of the bottom foliage without doing to much harm? Suggestions?

IMG_20180923_201006.jpg

IMG_20180923_201045.jpg
 

Klompen

Active member
They look good. They indeed are a bit on the small side for plants that age, but then again they're also very dense. Often if you have very intense and very blue light, plants can veg a great number of nodes without much space between them.

What light cycle do you have them in? 18/6, 24/0?
 
What light cycle do you have them in? 18/6, 24/0?

18/6, 400w MH mixed with eight 2.5ft T5 lamps and one cfl. Fixing to rip all that out and put in a 1000w cooltube. Just waiting to get my ducting so I can put it all together. I don't know when I want to switch to 12/12 I am not on any deadlines or anything. This is my first organic grow. I used to do Hydro but it's high maintenance at least more than I want to dick with. I think these ladies will produce some good flower. Just thinking they are getting to bushy and wanting to trim em up a little bit. I hear you can do it after you flip so I got some time to read more up on it. Just wanted to see what you all might have to say about it.. Two of these are about 6 inches taller than the other three. I am wanting to even out the canopy so I might have to bend them in a sort of super crop way. Just not sure. Would like some input on what I could do to the over all grow to maximize its potential. So far I have just done some minor lst, topped 2 of them and fimmed one and left the other two normal. I just went up and looked at them and they look really happy. All the leaves have a slight canoe to them and they are all reaching slightly to the lights. This is about 11 hours after I fed them the earth juice for the first time. Makes me think maybe I should have been feeding them weeks ago and that is why they are smaller than usual. However, I was told and read by others that the fox farm ocean forest would provide nutes for the first 6 weeks or so which it is past that technically. Anyway, this point forward they will receive a feed on waterings. I tend to go the less is more route and give them about 50% of suggested feed. The way I see it if the plants look happy then just keep doing what I am doing. I wont fall to the two most rookie mistakes...overwatering and overfeeding....
 
H

HBF

Learn to distribute the light better by trapping all the stuff that doesn't go directly to the plants with reflective material.

You can recover a lot from your being light short by using 1/2" styrofoam sheet for houses, as reflectors around the plants,

and/or by making everything around the grow reflect light onto the plants.

Light drops off at a rate of four times change - for double the distance.

In other words twice the distance, one fourth the light.

Half the distance, four times the light.

Ok? But there always comes a point, where inefficiency sets in, as you put the light closer and closer to the plant.

When you see pictures of pot growing a lot of times people have lifted the lights to do some work and take photos.

That's NOT where they actually keep em so - oh yeah I remember the second part - if you'll trap all the light you can, you can actually make it better for the plants by a lot. A lot.

A very highly reflective environment you specifically design to be as reflective as a chrome ball bearing (so to speak, you actually make things white generally or use aluminum foil) can make a BiG difference by the end of the grow.

And keep the reflectors close to the plants too, so you don't have to lower the light quite so much.

If you're a person who kinda has good sense, you'll get two security blankets, for the price of one: you get all this extra growth,

but in getting it you also buy yourself something else and that,

is that you're way, WAY less tempted to burn the plants, by lowering the light that last, extra couple of inches; that last few centimeters.

Since you know you're harvesting the light, cause you see the plants swelling with growth, every time you trap and reflect back more light,

you're much more capable of telling yourself the truth
about what 'too close' is vs 'Good & close,' for that light, that's allegedly too small. (And I'm not sayin' it's not).

The very best substance in the world for this, is that construction-sheet plastic type stuff you buy, called Black & White. The cheapest is gloss white paint. The split between those two is 1/2" styrofoam insulation sheet for houses.

And you try to imagine there's a sorta globe like space around the plants, under the lights, with the light forming the top,

and you try to make every last place under the plants, out to the side, about 90+% reflective. This is an easily grown talent cause the laws about it are all so simple. You just defy one single photon to ping around that room and not eventually hit a plant, by denying it the ability to absorb into anything, that isn't gloss white, or aluminum foil white or something like that.

Past that, when you transplant them, get a mister bottle that squeezes out a fine mist, and mist them. This can only go on so long obviously till flowering makes them crowd and water can't escape, and mold's a problem then.

But misting is very, very legit. Particularly when the mist is very fine, and particularly when you give them enough to really wet them.

Wetting them this way also, incidentally, keeps mites at bay. Most don't like water and one of the most dread, the spider mite, really avoids wet plants.

Read about it a bit, watch videos and stuff, it really does make plants health better. It's one of those things that the plants respond to better, if it's misted onto them by machine with a timer.

When I was in college I worked at what's called a clone nursery where they went around and cut peoples' shrubs, for a nominal amount, often free,

and we came back and trimmed all these cuttings into (per summer) from a quarter million to a third of a million little cuttings from the size of a toothpick, to the size of a new pencil, broken in half.

We wheelbarrowed wet river sand, just blond silica sand, into these long 2X6 beds about 30 feet by 5 feet.

We took knives and dragged a long line across the sand, and as fast as possible we stuck the cuttings into these lines so when it was over, there would be scores of thousands, we had stuck into this river sand. Every time we went on break we did what's called 'watered in' and this just means make spray with a hose and slowly fill the sand in around the little toothpick cuttings.

Over the next few weeks, couple of months, every day all day, these plants were misted with well water.

No ferts, no nothing. Under shade cloth, about 70% sunlight, perfect for plants, and well water on them about 30 seconds every 3 to 5 minutes.

Soon they'd all have roots like crazy and would be plants themselves, just stuck into sand. No nutes, no nothing. So I kinda have a personal experience with misting plants to keep them alive.

I worked there for two summers.

Your plants looked really good and you shouldn't have any problems as a grower if you keep it up.
 

Klompen

Active member
It may seem counter-intuitive, but flat white paint is far superior to gloss white. It will not get the hot spot issues and actually has a higher reflectivity as well as better dispersion.
 
H

HBF

Yeah that was a mistake, I was watching TV and the word gloss came to mind, I'm painting some cabinets gloss white at my son's new house.

What he said guys, you're supposed to use flat paint not gloss.

It may seem counter-intuitive, but flat white paint is far superior to gloss white. It will not get the hot spot issues and actually has a higher reflectivity as well as better dispersion.
 
Top