BPJR
Member
Cloning-
I wanted to put together a tutorial for cloning. When I got started cloning it was one of the most difficult tasks for me to accomplish. I would take what I thought were good viable clones only to watch them sit doing nothing. I rarely would see them die off but rather stay in a state of indefinite hibernation.
After studying, and experimenting with lots of trial and error I found a method that works for me. Most of the info can be found already on this or other sites. Its not new and might not be the best method out there but it does work. I get results every time and typically get about a 90%+ success rate.
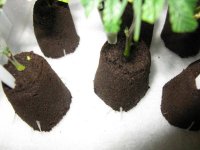
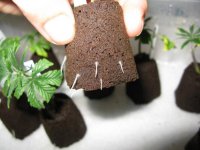
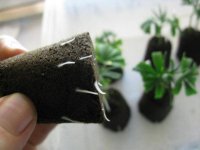
Time from cutting to rooting depends on strain and conditions. I average about 9 days. I have some that have popped in 4 and some in 20.
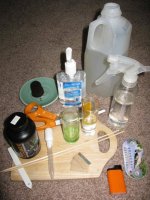
Items needed:
Cutting board
New single edge razor blade
Sharp clean scissors
Wood skewer
Cloning Gel ( I like Rootex but have had good results with other major brands such as Olivias. I like thick gels)
Rapid Rooters
Clear Plastic Shoe Box X2 ( got mine for about $2 each at Bed Bath and Beyond)
Distilled Water or Reverse Osmosis (PH around 5.8 ) Some advise a PH as low as 5.2
Tall skinny shot glass X2
Lighter
Hand Sanitizer
Bleach
Tea Cup Saucer (Gel Reservoir)
(1) 2' T5 CFL in blue kelvin spectrum
H2O Mister
Thermometer
1/2oz+/- water dropper
It is important to have all items within arms reach BEFORE you start to take cuts.
1) Begin by using a 5% bleach solution to clean the plastic boxes.
2) Disinfect your hands with the hand sanitizer. Use the lighter to disinfect the scissors and razor blade.
3) Fill both of the shot glasses with the PH balanced H2O
4) Use tea saucer for rooting gel. Don't contaminate gel by dipping directly
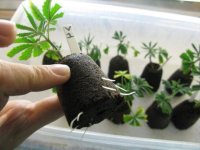
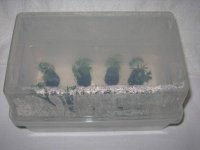
5) Prepare Rapid Rooters upside down in clear plastic shoe box. Fat side down. Should fit about 10-15 clones in box
6) Moisten the Rapid Rooter with the water.
7) Use skewer to poke hole in the top of Rapid Rooter.
8 ) Use skewer to put some cloning gel into the holes of the Rapid Rooters
9) Take cuts with razor and put directly into water in the shot glass. I use the trim from the lower 1/2 of the plant. It cleans the plant leaving the tops for larger denser buds. Let sit for at least 30 min. This helps all the cells in the cut absorb all the water they can before you put them in the medium.
10) Take 1 cut at a time from the shot glass. Use scissors to trip the fan leaves back. Leave about 4 leaves on the top cut back about half way. Too much leaf with cause the plant to sag and have a harder time taking root. I find less is more.
11) Prepare cutting board. Take razor and cut stem near a node at an 45degree angle. Node should wind up inside the Rapid Rooter. The longer the cut the better as this is where roots will form first.
12) Fallowing the cut hold directly in the water of the other shot glass for about 20 seconds. This will help prevent an embolism.
13) Take skewer and apply cloning gel to the stem of the cut. Carefully paint it on. Dipping would work too. Be generous with the gel and make sure to get it on the stem node too.
14) Careful put into pre-made hole in Rapid Rooter.
15) Continue process until all cuts are done.
16) Mist with PH balanced H2O
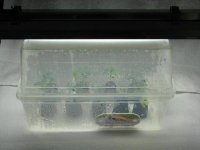
17) Take other plastic shoe box and use as lid
18 ) Lay T5 directly on top of plastic shoe box
Notes:
Keep lighting on 24/7.
Temps around 82-85 degrees F.
Humidity around 85-100% Higher in the first few days. Slightly crack the lid on the box after a couple days to let breath.
I use a PH of around 5.8 to 6.0 - Some advise a PH as low as 5.2 - I have had successful clones with a PH as high as 7.2 as well
Leaves should not touch each other or walls of box. I rarely use a heat mat. However if ambient temps are really cold you may want to use a heat mat. But I would not put it directly under the box. I use dowels or pencils laid out to provide a barrier to avoid frying them.
Root temps should be a few degrees warmer than the air. I insulate with a towel under the box if not using a heat pad.
Mist. Cuts have no roots to take in moisture so misting provides the leaves with an alternative. (Some dont advocate misting. I do)
Keep Rapid Rooters moist but not soaked. Roots need oxygen to grow and water logged medium causes numerous problems. Don't let them dry out too much either.
Rock wool cubes, or other medium will work. But I like Rapid Rooters.
Make sure to crack the box slightly to let fresh air in.
Use water dropper to remove any pooling water from box.
Lower the Nitrogen level on your nutes about a week before you take your cuts. Misting your plant with H2O in the days before trimming will help this process.
If they sag and wilt especially in the first day or two don't despair. They will likely bounce back. Give them time.
Don't forget to label your babies.
When they are ready to transplant I use a minimum of a 1gl pot.
Don't mess with them too much. Sit back and let nature take its course.
This is only one way to take clones. There are many techniques that work.
Hope this helps.
B

 Just in case you're interested, ignore at will.
