Cannabean
Active member
Hello fellow potheads!!
I decided to post this thread becuase there arn't very many diy guides here on the mag for AC boxes with pics of the actual build. I used to use a 13k btu portable ac to cool my Growlab GL145 4'x4' tent and it was very inefficient and my electric bill shot through the roof. So I decided to build a window AC box for my tent.
The problem with most AC's in tents, especially small tents, is there not being enough room for the ac to sit inside, so our only options are to use a portable and duct it in or buy an expensive mini split.
I suggest everyone who wants to build a box like this FIRST read Hoosierdaddy's thread on the planning aspects of the build, seen here https://www.icmag.com/ic/showthread.php?t=95491
However his guide does not list the style in which most tent AC users will need, which is the entire AC unit sitting outside of the tent. This is our final product:
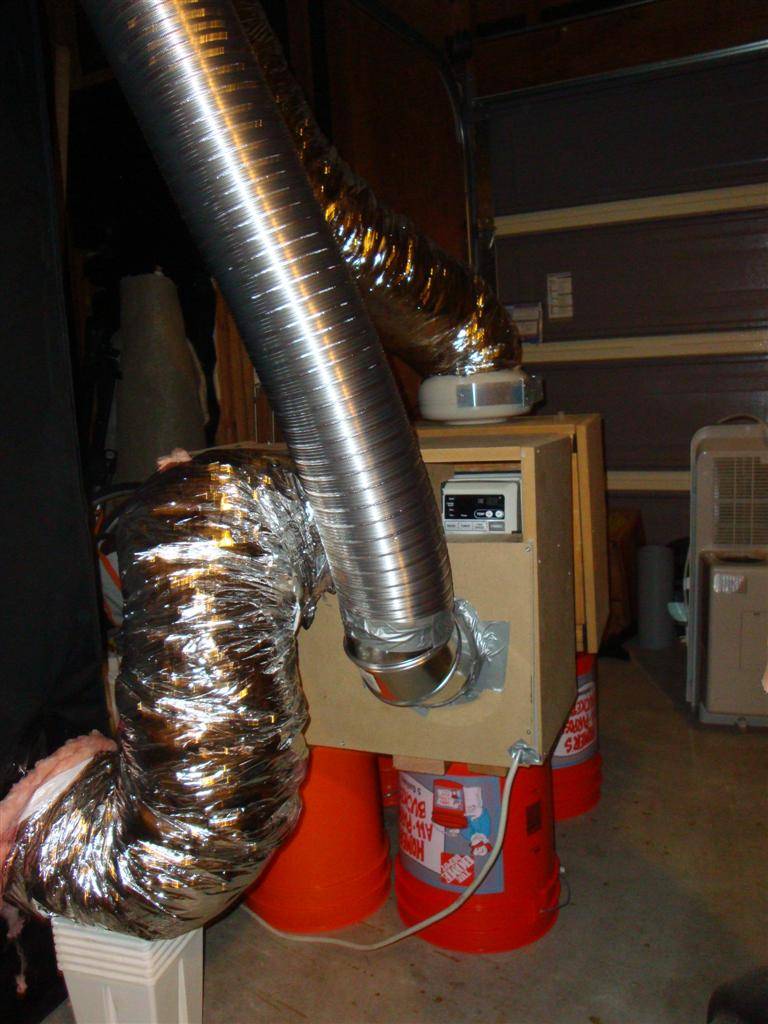
This build allows me to use a $75 window ac I got on craigslist to accomplish two things: create a truely sealed environment (portable AC's exhaust a little bit of smelly growroom air) while using a more efficient machine to cool the same area.
Parts needed and costs:
10k btu window air conditioner, craigslist, $75
6" inline fan, craiglist, $70
40' weatherstrip tape, home depot, $12
12' of 2x4 dimensional lumber, home depot, $10
2x 8' of 1"x12" plywood or 2x 2'x4' MDF fiberboard, home depot, $15
2x ¼" thick 2'x4' fiberboard or thin plywood, home depot, $8
Other parts needed: powered drill, jigsaw, screws, ducting for your specific application.
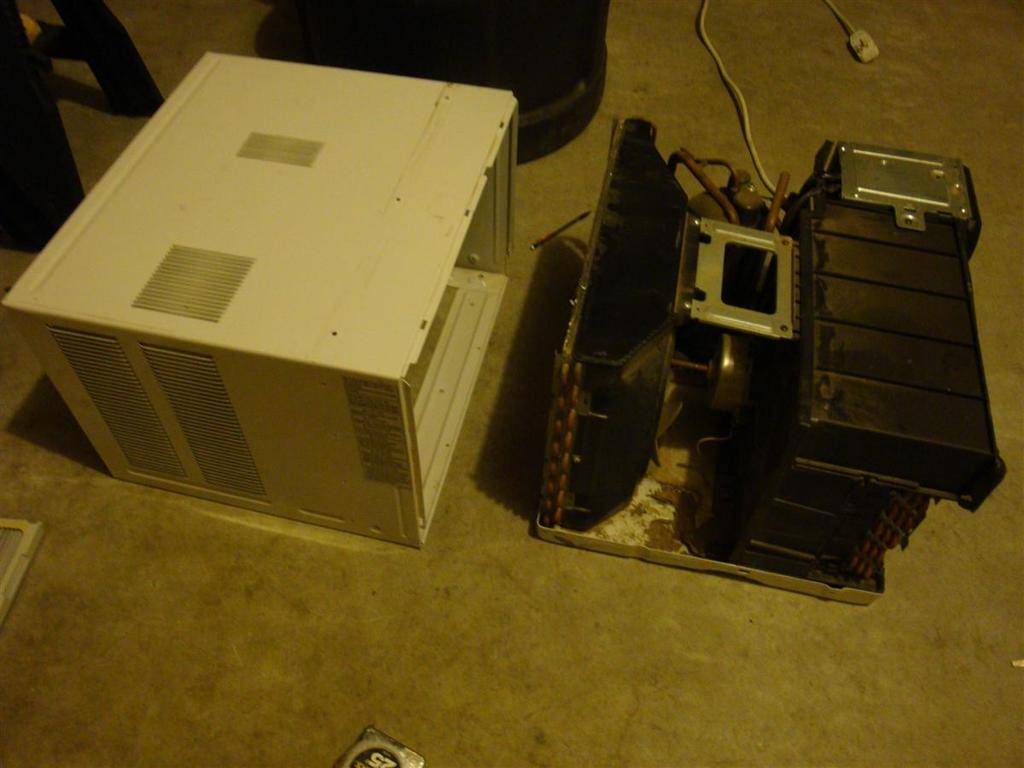
The air conditioner I'm using is the LG LWHD1006RY 10,000 btu window ac. As you can see, it has cold air exhaust on front top, ambient air intake on lower front, motor cooling intake on middle sides and top, and hot air exhaust on the entire back part of the unit.

For my setup, where the ac unit sits outside of the tent completely, we need to section off a few parts of the unit to direct the airflow. The hot air exhaust will be ducted out of the ambient air room entirely. The motor intake will suck from the ambiet air where the tent sits (the same air that a light's exhaust would suck from in a sealed room setup). And the cold air intake and exhaust (front bottom and top) will each have their own seperated ducts into the tent.
So first we must use the 2x4's cut to fit snugly, but not to tight, around the exterior unit of the ac. I removed the AC motor from its housing to make this step easier.
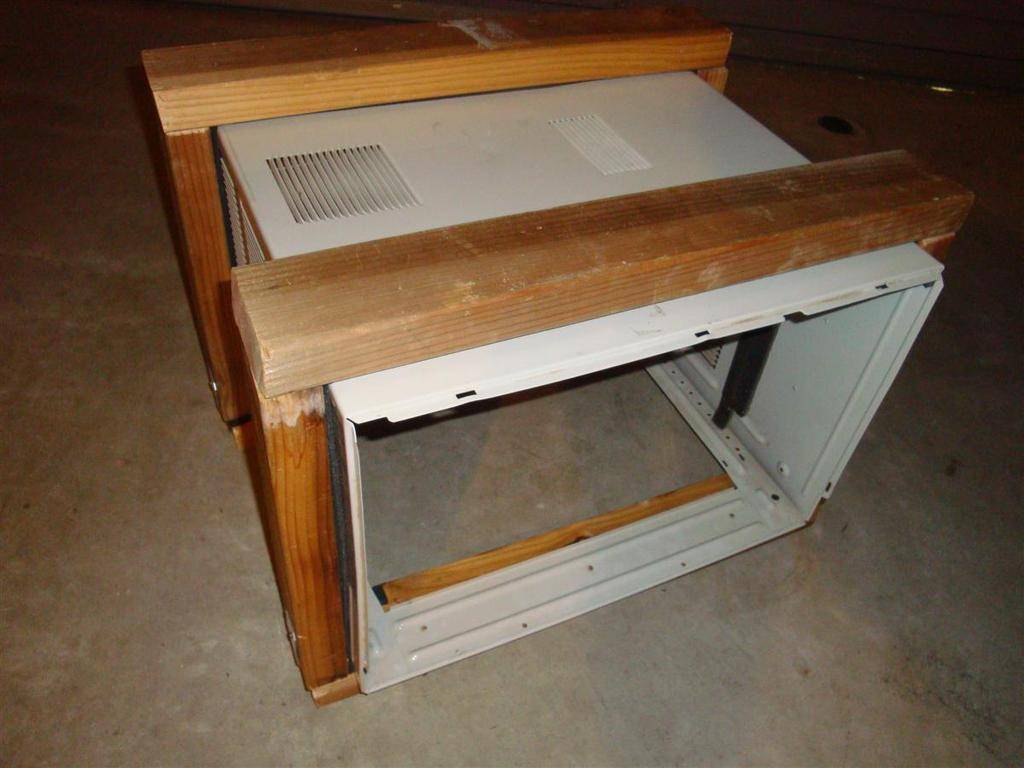
Once you have your 2x4's cut, line them with weatherstrip to create a nice snug seal.

Either slide the square 2x4's with weatherstip over each end of the unit, or if its too snug, you can piece the 2x4's together in L shape and connect them around the ac unit.

Do the same for the exhaust side, but make sure you don't cover up any of the intake slits with the 2x4 housing or the air will be restricted from exhaust and eventually kill your ac exhaust motor.
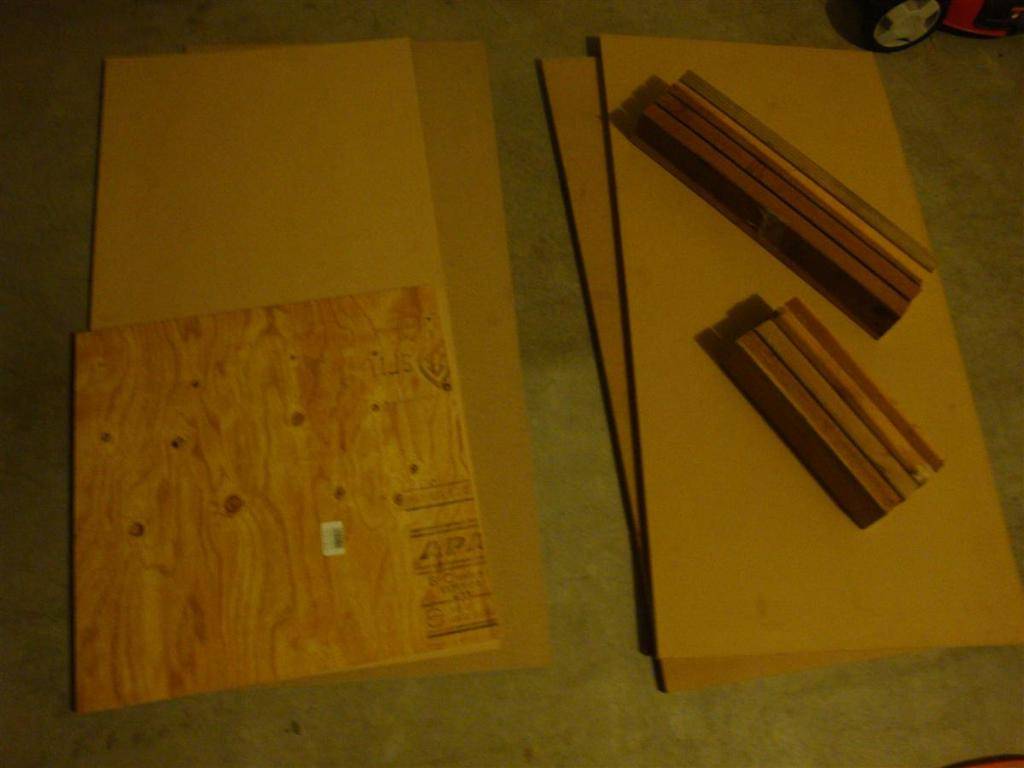
Now its time to cut the sides of our housing in order to mount the ducting. I chose to use 1" MDF fiberboard instead of precut 1x12" lumber becuase it seemed cheaper and is easier and less messy to cut. If you don't have a skillsaw or want to use the jigsaw as little as possible, then consider using 1x12" lumber instead.
I cut the fiberboard into 1"x12" pieces to make the "walls" for both intake and exhaust sides, lined them with weatherstip tape to create a seal, and then screwed them onto the 2x4" braces.
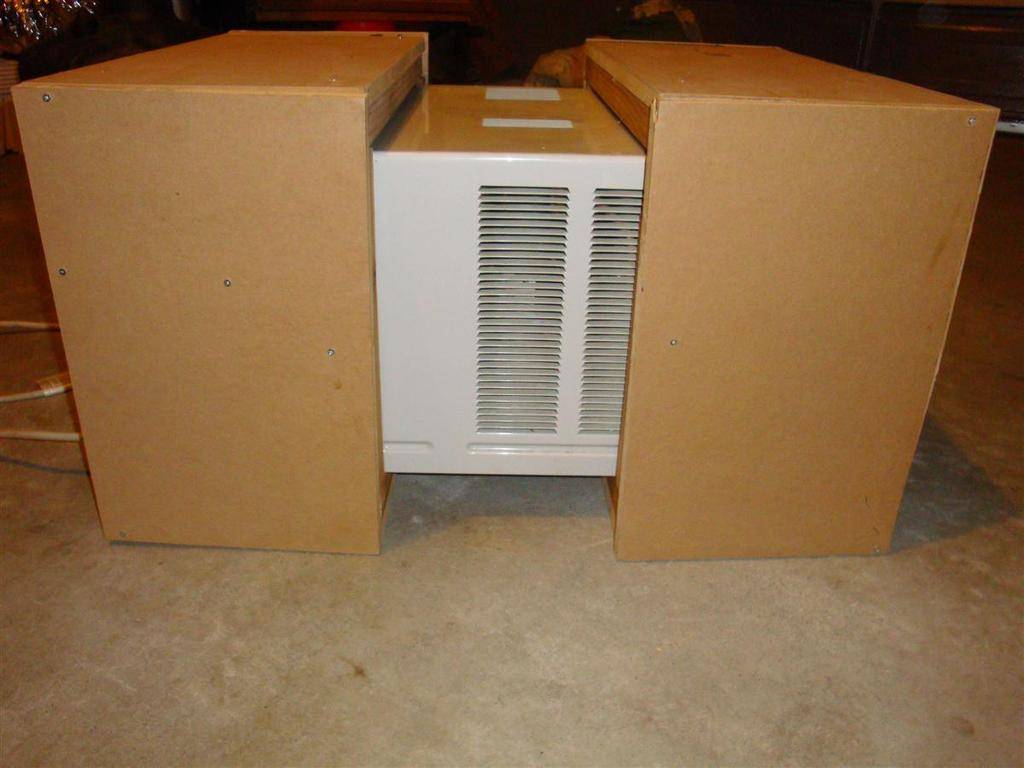
I cut squares of the ¼" fiberboard to create the ends or the "roof" and attached it to the exhaust side.

The front required tent air intake and cold exhaust to be sectioned off from eachother, and weatherstipped to create a seal. Holes were cut to attach ducting to the front.
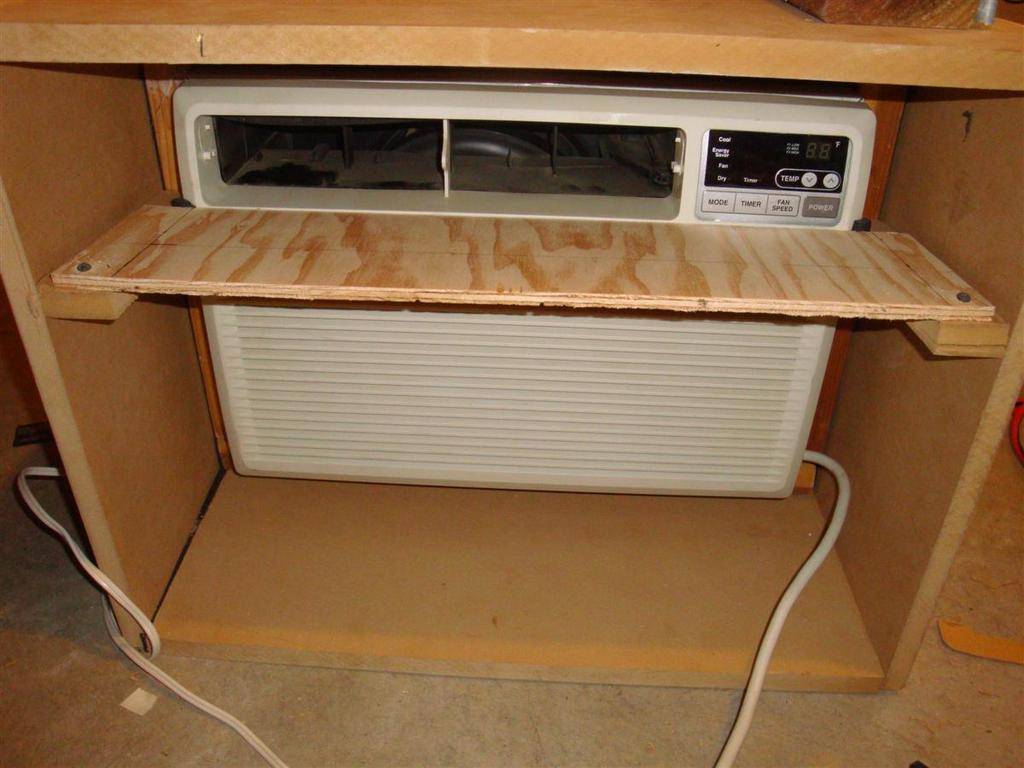

The hot air exhaust will need a fan to help push the hot air through ducting. The ac units exhaust fan is not designed for ducting and the exhaust motor will burn out if its working hard to push air with resistance. A 6" hole was cut for an inline fan to help exhaust the air.
Try to match your fan cfm to the cfm of the AC unit, which should be listed in the manual. Mine was 240 cfm so I matched it with a 270cfm 6" can fan, slightly overkill but I'm ducting it 15' out.
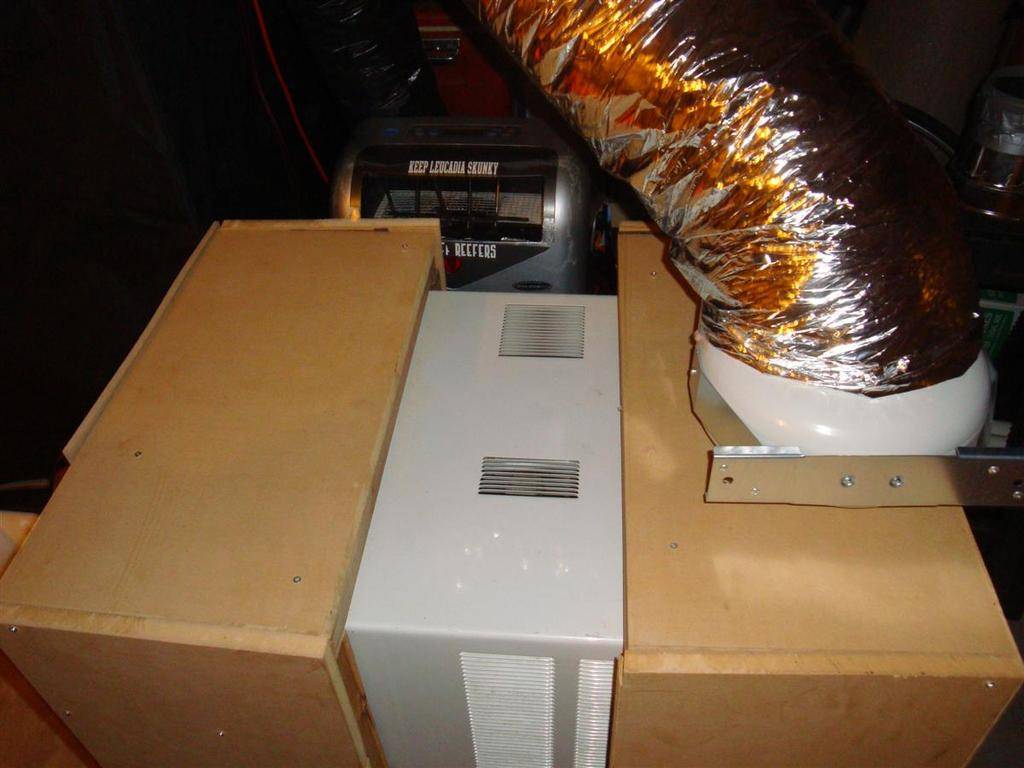
Determine the ducting you plan on using for your holes, I suggest keeping the duct size the same throughout. For instance I used a 6" intake, 6" exhaust, and a 4x12" to 6" universal register box for cold air exhaust. All of these can be bought at home depot.
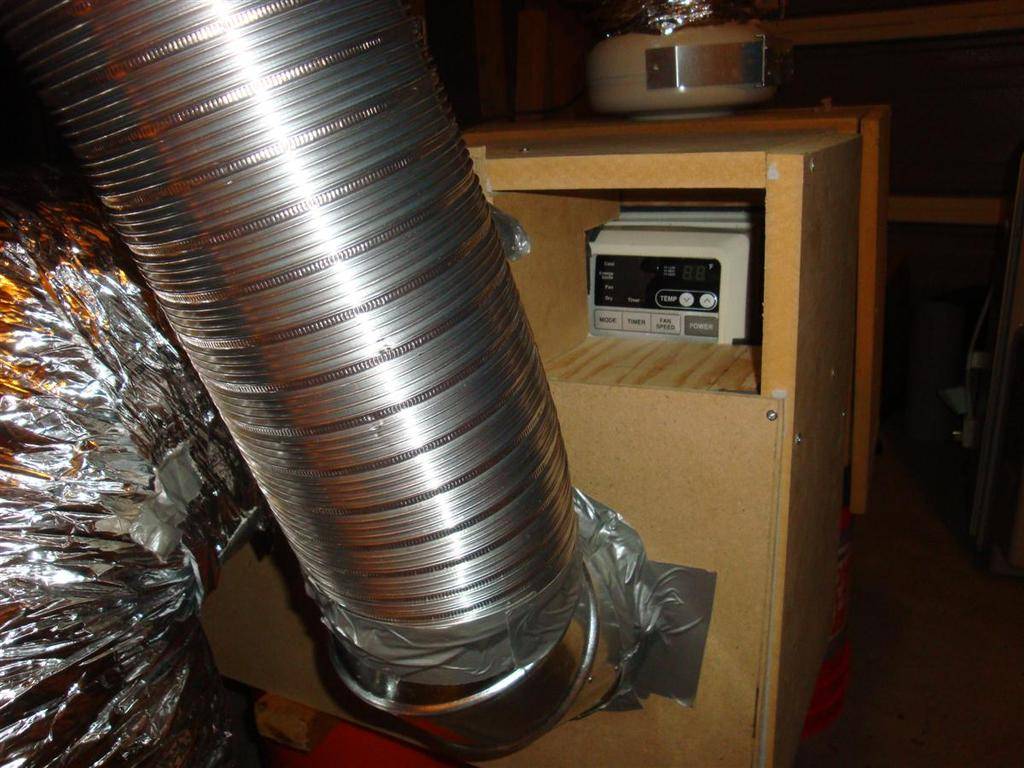
All finished! I have the cold air blowing into the bottom of the tent, the tent intake pulling from the roof port, and the hot air exhausted out of the garage.

I have it and the fan connected to a C.A.P. TMP-DNe day/night temperature controller which turns on the ac and the exhaust fan when my tent temps get too high. Works like a charm and costs less than a portable.

I decided to post this thread becuase there arn't very many diy guides here on the mag for AC boxes with pics of the actual build. I used to use a 13k btu portable ac to cool my Growlab GL145 4'x4' tent and it was very inefficient and my electric bill shot through the roof. So I decided to build a window AC box for my tent.
The problem with most AC's in tents, especially small tents, is there not being enough room for the ac to sit inside, so our only options are to use a portable and duct it in or buy an expensive mini split.
I suggest everyone who wants to build a box like this FIRST read Hoosierdaddy's thread on the planning aspects of the build, seen here https://www.icmag.com/ic/showthread.php?t=95491
However his guide does not list the style in which most tent AC users will need, which is the entire AC unit sitting outside of the tent. This is our final product:
This build allows me to use a $75 window ac I got on craigslist to accomplish two things: create a truely sealed environment (portable AC's exhaust a little bit of smelly growroom air) while using a more efficient machine to cool the same area.
Parts needed and costs:
10k btu window air conditioner, craigslist, $75
6" inline fan, craiglist, $70
40' weatherstrip tape, home depot, $12
12' of 2x4 dimensional lumber, home depot, $10
2x 8' of 1"x12" plywood or 2x 2'x4' MDF fiberboard, home depot, $15
2x ¼" thick 2'x4' fiberboard or thin plywood, home depot, $8
Other parts needed: powered drill, jigsaw, screws, ducting for your specific application.
The air conditioner I'm using is the LG LWHD1006RY 10,000 btu window ac. As you can see, it has cold air exhaust on front top, ambient air intake on lower front, motor cooling intake on middle sides and top, and hot air exhaust on the entire back part of the unit.
For my setup, where the ac unit sits outside of the tent completely, we need to section off a few parts of the unit to direct the airflow. The hot air exhaust will be ducted out of the ambient air room entirely. The motor intake will suck from the ambiet air where the tent sits (the same air that a light's exhaust would suck from in a sealed room setup). And the cold air intake and exhaust (front bottom and top) will each have their own seperated ducts into the tent.
So first we must use the 2x4's cut to fit snugly, but not to tight, around the exterior unit of the ac. I removed the AC motor from its housing to make this step easier.
Once you have your 2x4's cut, line them with weatherstrip to create a nice snug seal.
Either slide the square 2x4's with weatherstip over each end of the unit, or if its too snug, you can piece the 2x4's together in L shape and connect them around the ac unit.
Do the same for the exhaust side, but make sure you don't cover up any of the intake slits with the 2x4 housing or the air will be restricted from exhaust and eventually kill your ac exhaust motor.
Now its time to cut the sides of our housing in order to mount the ducting. I chose to use 1" MDF fiberboard instead of precut 1x12" lumber becuase it seemed cheaper and is easier and less messy to cut. If you don't have a skillsaw or want to use the jigsaw as little as possible, then consider using 1x12" lumber instead.
I cut the fiberboard into 1"x12" pieces to make the "walls" for both intake and exhaust sides, lined them with weatherstip tape to create a seal, and then screwed them onto the 2x4" braces.
I cut squares of the ¼" fiberboard to create the ends or the "roof" and attached it to the exhaust side.
The front required tent air intake and cold exhaust to be sectioned off from eachother, and weatherstipped to create a seal. Holes were cut to attach ducting to the front.
The hot air exhaust will need a fan to help push the hot air through ducting. The ac units exhaust fan is not designed for ducting and the exhaust motor will burn out if its working hard to push air with resistance. A 6" hole was cut for an inline fan to help exhaust the air.
Try to match your fan cfm to the cfm of the AC unit, which should be listed in the manual. Mine was 240 cfm so I matched it with a 270cfm 6" can fan, slightly overkill but I'm ducting it 15' out.
Determine the ducting you plan on using for your holes, I suggest keeping the duct size the same throughout. For instance I used a 6" intake, 6" exhaust, and a 4x12" to 6" universal register box for cold air exhaust. All of these can be bought at home depot.
All finished! I have the cold air blowing into the bottom of the tent, the tent intake pulling from the roof port, and the hot air exhausted out of the garage.
I have it and the fan connected to a C.A.P. TMP-DNe day/night temperature controller which turns on the ac and the exhaust fan when my tent temps get too high. Works like a charm and costs less than a portable.


