Or as I've started calling it, the Elevation Station 
The good news is this build should be well documented in photos. The bad news is that I'm still building it! I'll need some advice along the way and I wanted a seperate thread from my tent thread so the info is all in one place.
The main ingredient, $20 secondhand cupboard: (ignore the hood resting on top for now)

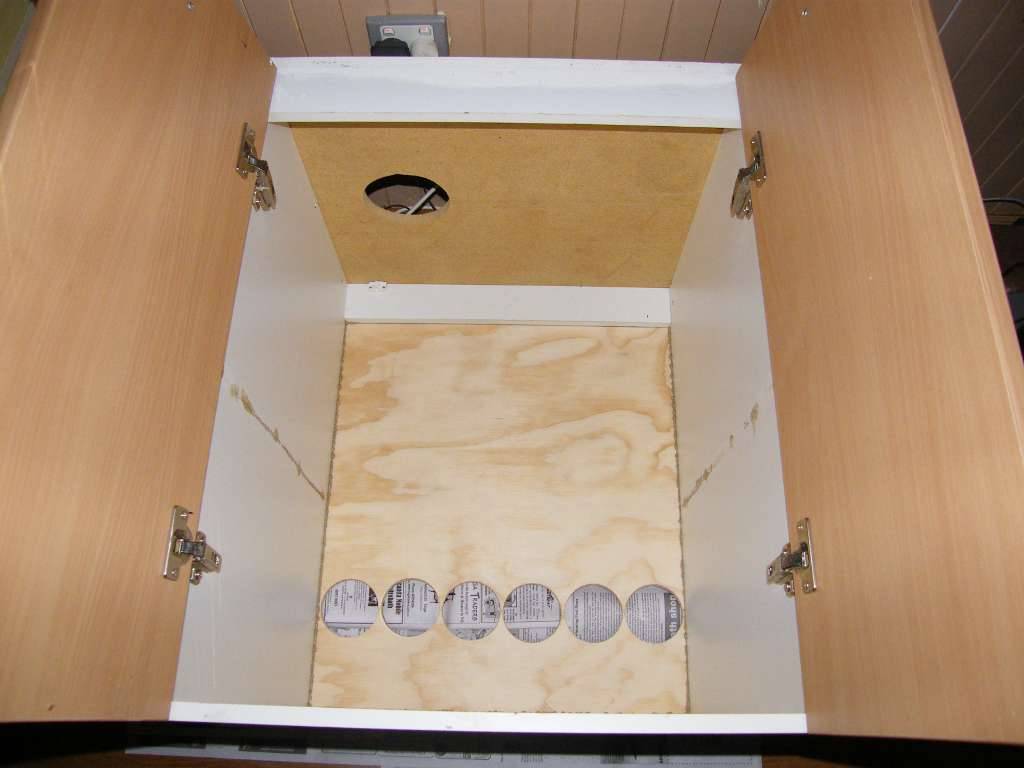
As well as being secondhand, it was built out of recycled furniture, so it's thirdhand or more. It's as solid as a rock and as heavy as a bunch of them. Walls and doors are 16mm thick chipboard which is coated both sides with some kind of hard Laminex style sheeting. Except for the back board which was some kind of thin MDF and was replaced with a sheet of 12mm ply seen here:

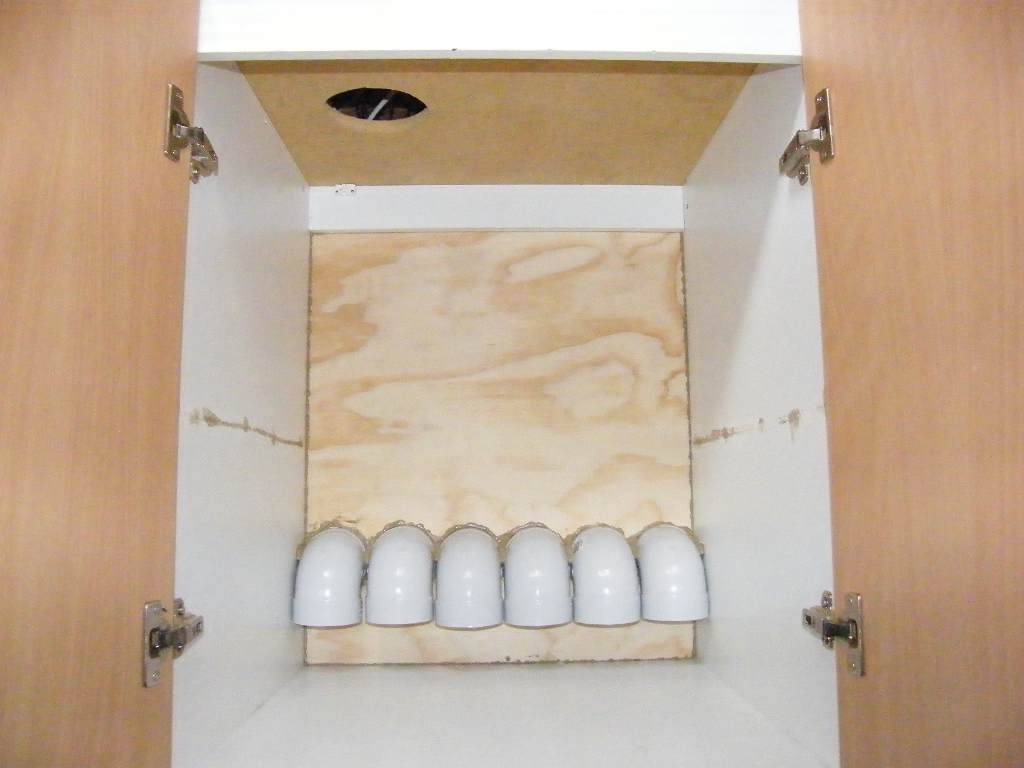
Those are six 90mm intake holes and a 120mm exhaust hole in the roof. I attached 90mm PVC elbows to the intakes:

The actual inside diameter of the elbows seems to be more like 85mm. This gives me 3x the amount of intake as exhaust. I'll probably be filtering the intakes so that will reduce it substantially, I think. But it's nice to have it in reserve if I need it. I live in the tropics so I can't take any shorts on the ventilation.
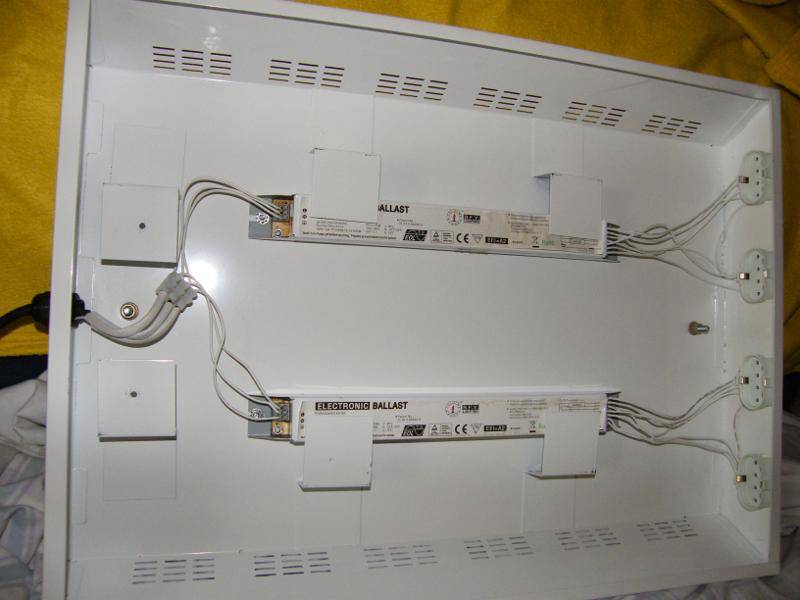
The pl-l hood was obtained secondhand but rarely used (1 veg run), with Philips veg spectrum bulbs installed. I obtained some random thin glass sheet and what do ya know, it's almost the perfect size to DIY a vented glass hood. It's quite do-able despite not being purrrfect.


There will be two stacked 120mm Thermaltake Smart Case Fan II fans mounted on top of the hood connecting up to the exhaust hole in the roof of the cab. I may use flexible ducting so I can lower the lights. These two fans will be pushing into (and hopefully muffled by) the carbon filter. They'll also be packed around with fibreglass insulation.

The carbon filter will be sitting on top of the cupboard and will be a large black plastic rubbermaid style container with a lid. There will be a third Thermaltake located on the rear of this container, out of sight and hopefully on low speed, doing some pulling.
The Thermaltake has some mighty impressive mm/h2o pressure specs so I'm confident I can get away with the configuration I've got planned. Otherwise I can rearrange fans if needed. I have ordered a lot.
For air circulation on top of the scrog, I ordered two 120mm Cooler Master Long Life fans. For circulation under the screen (and anywhere else I may randomly need a fan), I went with three cheap generic 80mm fans which are usually pretty quiet and low powered but perfect for the job. I'm hoping all these fans get here in the next couple of days.
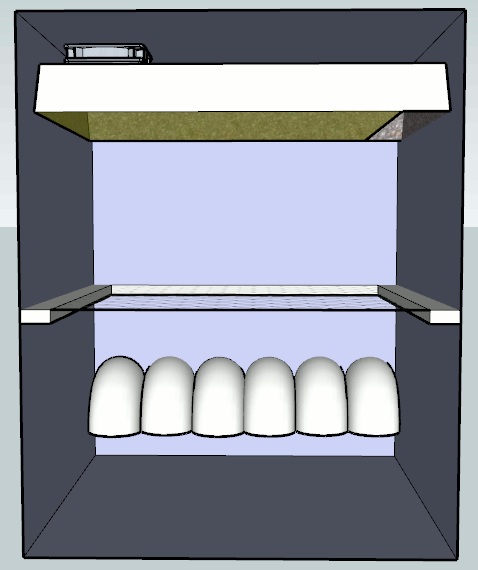
Here's sort of what it should look like when I'm done:


The roof and rear panel have been made invisible in the second pic so you can see better. I hope to install a large slide out tray on the floor so I can have better access to underneath the scrog. That's why I didn't stick with my original fixed-scrog design shown here:

I also hope to install an automated watering system and res, for which I think I've got all the parts needed. But apart from that it'll just look like a cupboard with a rubbermaid sitting on it. With the res it'll look like a cupboard with a rubbermaid sitting on it and another one beside it.
Some specs:
Feel free to follow along as I turn this into reality and also, uhhh, if you have a glass covered hood, how did you attach it? I heard they need regular cleaning and if I can't come up with a good system, I'll have to remove the hood to clean it, and to remove the hood I need to remove the doors. I will filter intakes but will that be enough? I may go glass free the first run since it's winter here. Thanks for reading!
EDIT: Hello I am making this edit from the future. It's important to note that stacking PC fans directly on top of each other is not a good idea! Indeed, it can be counter productive. So read up first, unlike me. Oh and while I'm here, it should also be said that the design strays a lot in general from the initial Sketchups etc.

The good news is this build should be well documented in photos. The bad news is that I'm still building it! I'll need some advice along the way and I wanted a seperate thread from my tent thread so the info is all in one place.
The main ingredient, $20 secondhand cupboard: (ignore the hood resting on top for now)
As well as being secondhand, it was built out of recycled furniture, so it's thirdhand or more. It's as solid as a rock and as heavy as a bunch of them. Walls and doors are 16mm thick chipboard which is coated both sides with some kind of hard Laminex style sheeting. Except for the back board which was some kind of thin MDF and was replaced with a sheet of 12mm ply seen here:
Those are six 90mm intake holes and a 120mm exhaust hole in the roof. I attached 90mm PVC elbows to the intakes:
The actual inside diameter of the elbows seems to be more like 85mm. This gives me 3x the amount of intake as exhaust. I'll probably be filtering the intakes so that will reduce it substantially, I think. But it's nice to have it in reserve if I need it. I live in the tropics so I can't take any shorts on the ventilation.
The pl-l hood was obtained secondhand but rarely used (1 veg run), with Philips veg spectrum bulbs installed. I obtained some random thin glass sheet and what do ya know, it's almost the perfect size to DIY a vented glass hood. It's quite do-able despite not being purrrfect.
There will be two stacked 120mm Thermaltake Smart Case Fan II fans mounted on top of the hood connecting up to the exhaust hole in the roof of the cab. I may use flexible ducting so I can lower the lights. These two fans will be pushing into (and hopefully muffled by) the carbon filter. They'll also be packed around with fibreglass insulation.
The carbon filter will be sitting on top of the cupboard and will be a large black plastic rubbermaid style container with a lid. There will be a third Thermaltake located on the rear of this container, out of sight and hopefully on low speed, doing some pulling.
The Thermaltake has some mighty impressive mm/h2o pressure specs so I'm confident I can get away with the configuration I've got planned. Otherwise I can rearrange fans if needed. I have ordered a lot.
For air circulation on top of the scrog, I ordered two 120mm Cooler Master Long Life fans. For circulation under the screen (and anywhere else I may randomly need a fan), I went with three cheap generic 80mm fans which are usually pretty quiet and low powered but perfect for the job. I'm hoping all these fans get here in the next couple of days.
Here's sort of what it should look like when I'm done:
The roof and rear panel have been made invisible in the second pic so you can see better. I hope to install a large slide out tray on the floor so I can have better access to underneath the scrog. That's why I didn't stick with my original fixed-scrog design shown here:
I also hope to install an automated watering system and res, for which I think I've got all the parts needed. But apart from that it'll just look like a cupboard with a rubbermaid sitting on it. With the res it'll look like a cupboard with a rubbermaid sitting on it and another one beside it.
Some specs:
- W: 575mm 0r 22.5"
- D: 550mm or 21.5"
- H: 715mm or 28"
- Square footage: 3.34
- Watts: 220+
- w/sq ft: 65
Feel free to follow along as I turn this into reality and also, uhhh, if you have a glass covered hood, how did you attach it? I heard they need regular cleaning and if I can't come up with a good system, I'll have to remove the hood to clean it, and to remove the hood I need to remove the doors. I will filter intakes but will that be enough? I may go glass free the first run since it's winter here. Thanks for reading!
EDIT: Hello I am making this edit from the future. It's important to note that stacking PC fans directly on top of each other is not a good idea! Indeed, it can be counter productive. So read up first, unlike me. Oh and while I'm here, it should also be said that the design strays a lot in general from the initial Sketchups etc.


