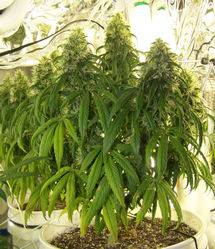
Spidermites can cause a disaster if you don't stay on top of them. I've had them in the past and know from personal experience. The best natural way to combat them is to raise your humidity level as high as possible and spray the plants down with Neem Oil. Some folks swear by the "No Pest Strips" you can buy, however I'm not a fan of exposing something I'm going to inhale into my lungs to harsh chemicals.
150w HPS Club and Resource Guide......
- Thread starter Thread starter Pipedream
- Start date Start date
StickyGreenCola
New member
Well so far it seem's my home made spay has worked so far i dont seem to see any mites
i made it with about a pint of water about 2 table spoon of dish wahing soap one gram of red peppers powder and as for neem oil where do you get it does homedepot or wally world sell it?
i made it with about a pint of water about 2 table spoon of dish wahing soap one gram of red peppers powder and as for neem oil where do you get it does homedepot or wally world sell it?
G
Guest
hermie problems
hermie problems
hey y'all what's new in the 150 club?
My plants are doing well at 55 days of 12/12, well except the blue sat x jack herer that is popping out more and more male flowers from the terminal buds. This started out last week I noticed one around day 51 of 12/12; see pic;

I picked off about a dozen of the little f-ers friday and today i picked off another 8 or so. it's getting kinda annoying.
So I also decided to check the trichromes under a scope and they're mostly cloudy with some clear and no amber. normally I would wait until I see some amber before I chop, however with this hermie issue I'm thinking I might chop soon.
however I prefer to do my drying in the cabinet for obvious smell reasons (active carbon filter on cabinet keeps the smell down) and these buds are reaking compared to the burmese and nl x c99 I grew in here last few times.
To make matters worse the oregon90 could really benefit from another few days as she's also mostly cloudy and no amber.

So I think I have two options;
1. Chop the blue sat x jack herer and hang in the cabinet with the Oregon90 while it finishes.
If i do this will the buds have an increased chance of mold? or will there be other problems caused by the light?
2. Wait and chop both later this week or next when the trichromes are ready.
If I do this I'm sure I will miss some of the male parts and wonder how much damage will be caused by the wait? I mean will seeds start to develop?
Thanks,
pola
hermie problems
hey y'all what's new in the 150 club?
My plants are doing well at 55 days of 12/12, well except the blue sat x jack herer that is popping out more and more male flowers from the terminal buds. This started out last week I noticed one around day 51 of 12/12; see pic;
I picked off about a dozen of the little f-ers friday and today i picked off another 8 or so. it's getting kinda annoying.
So I also decided to check the trichromes under a scope and they're mostly cloudy with some clear and no amber. normally I would wait until I see some amber before I chop, however with this hermie issue I'm thinking I might chop soon.
however I prefer to do my drying in the cabinet for obvious smell reasons (active carbon filter on cabinet keeps the smell down) and these buds are reaking compared to the burmese and nl x c99 I grew in here last few times.
To make matters worse the oregon90 could really benefit from another few days as she's also mostly cloudy and no amber.
So I think
 I have two options;
1. Chop the blue sat x jack herer and hang in the cabinet with the Oregon90 while it finishes.
If i do this will the buds have an increased chance of mold? or will there be other problems caused by the light?
2. Wait and chop both later this week or next when the trichromes are ready.
If I do this I'm sure I will miss some of the male parts and wonder how much damage will be caused by the wait? I mean will seeds start to develop?
Thanks,
pola
G
Guest
Nice cabinet fat puta !
If you don't mind me asking how much you pull per harvest in that setup? and also how big is your cabinet and fan.
-pola
If you don't mind me asking how much you pull per harvest in that setup? and also how big is your cabinet and fan.
-pola
StickyGreenCola
New member
I Dont know about y'all but harvest day is always a fine day, indeed. 
Took down the rest of my big plant today. She was at 83 days, and dont let the blonde hair fool you (it did me) she has amber trichs all over her, and some pretty swollen calyxes.
Now my scale is seriously miscalibrated(digital ). but if I had to eyeball it I would guess between 3 and 4 ounces lay on that table, closer to 3 then 4 prolly. I took two other branches, a week and change ago, probably another 3/4 zip.
That would make the total for the two big plants around 6 oz's somewhere, and one small clone at about 1/4oz. Theres still one clone left from the test run, due in 3 weeks in pretty terrible shape.
No matter, I'm sold on the efficiency of the 150. I got a pile of herb off my first pull ever, and its pretty good smoke to boot. I guesstimate to be around .5-.75 gpw which works for me. Should only improve with the smaller containers and major increase in plant numbers, at least in regularity.
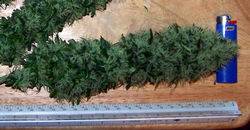
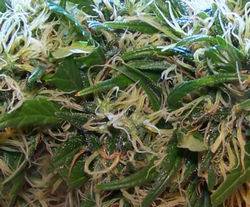


Took down the rest of my big plant today. She was at 83 days, and dont let the blonde hair fool you (it did me) she has amber trichs all over her, and some pretty swollen calyxes.
Now my scale is seriously miscalibrated(digital
That would make the total for the two big plants around 6 oz's somewhere, and one small clone at about 1/4oz. Theres still one clone left from the test run, due in 3 weeks in pretty terrible shape.
No matter, I'm sold on the efficiency of the 150. I got a pile of herb off my first pull ever, and its pretty good smoke to boot. I guesstimate to be around .5-.75 gpw which works for me. Should only improve with the smaller containers and major increase in plant numbers, at least in regularity.


Last edited:
G
Guest
Count me in.
Count me in.
I never posted more than twice on OG but this is my home so COUNT ME IN.
I got an LST'd NYCD on day 40 of flower and an afghan pushing clsoe to the end.
Ill get some pics up.
im using about 2.7 SQ feet and looks to be about 2.5 oz's from this haul
Count me in.
I never posted more than twice on OG but this is my home so COUNT ME IN.
I got an LST'd NYCD on day 40 of flower and an afghan pushing clsoe to the end.
Ill get some pics up.
im using about 2.7 SQ feet and looks to be about 2.5 oz's from this haul
Fat Puta
Member
Polar_bear said:Nice cabinet fat puta !
If you don't mind me asking how much you pull per harvest in that setup? and also how big is your cabinet and fan.
-pola
About 3 oz's has bin my best but the next crop will be scrog, hope it helps
cab is 1 3/4' d 2 1/2' w 5' h

G
Guest
well tonight brings the axe - not because of OG/CW/HS but because it was time 


So here we go this is the blue satelite x jack herer. she smells dank, spicy jasmine/day lilly floral smell, with sickly sweet undertones. Glad i have a carbon filter
so here she is before I chopped
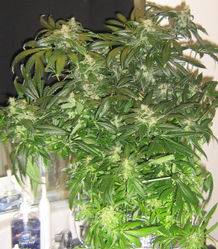
and a macro from before I chopped
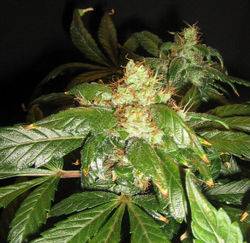
the big buds from the plant
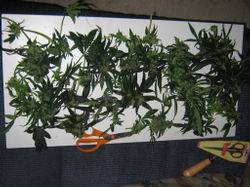
the lower buds of the plant

a bud hanging to dry

roots - yeah Pipe dream you're the man to inspir e me to the DWC and as we can see the results are amazing - this plant was sprouted from seed and vegged in DWC - at 21 days from putting the seeds in the paper towels I flipped to 12/12 - now 56 days later I harvest. total days from seed to chop 77.


So here we go this is the blue satelite x jack herer. she smells dank, spicy jasmine/day lilly floral smell, with sickly sweet undertones. Glad i have a carbon filter
so here she is before I chopped

and a macro from before I chopped
the big buds from the plant
the lower buds of the plant
a bud hanging to dry
roots - yeah Pipe dream you're the man to inspir e me to the DWC and as we can see the results are amazing - this plant was sprouted from seed and vegged in DWC - at 21 days from putting the seeds in the paper towels I flipped to 12/12 - now 56 days later I harvest. total days from seed to chop 77.
Last edited:
J
JH151399-OG
wow dude, 77 days? that's not bad at all. I was always under the impression that you had to veg for two months or so.
G
Guest
JH151399-OG
the simple answer is no, you don't have to veg for 2 months or so.
There is reason to believe including my own personal experience that some strains, sativa doms esp, get stronger with longer age from seed. However the difference will be barely perceptable and considering the ability to pull a quick harvest from seed the advantages are obvious. I mean look at the macro - does this plant look like it needed more time in veg?
And remember what this is all about - the 150 watt hps - and this is 1 of 2 plants to be harvested grown from seed under my 150 watt hps.
G
Guest
Howdy Folks,
I wanna go up in light to the 150hps. The ones at home depot have the activator switch to go on in the dark. How difficult is it to remove or de-activate the switch?
Thanks for the help
Woof
I wanna go up in light to the 150hps. The ones at home depot have the activator switch to go on in the dark. How difficult is it to remove or de-activate the switch?
Thanks for the help
Woof
BombSquadron65
Member
SmokingDog, it should be simple. Unscrew the housing and simply cut the wires going to the detector and reconnect them to the wires running into the ballast. Interestingly, the 150HPS security light I got from Lowes didn't include a sensor. Ask about it. There's a very good chance they stock ones without the sensor since a lot of business' (the main people that are gonna use those kind of lights) are gonna hook the lights to a universal timer/switch.
I'll try to see if I can google a diagram for ya.
-edit- no such luck. here's the article from OG, minus the pics. Still, you should be able to figure it out. The articles written pretty well and very easy to understand, even without pics.
I'll try to see if I can google a diagram for ya.
-edit- no such luck. here's the article from OG, minus the pics.
How do I convert a common home security light into a remote ballast grow light?
Added by: 10k Last edited by: 10k Viewed: 661 times Rated by 52 users: 9.41/10
How do I convert a home security light into a remote ballast grow light?
Contributed by: Spliffco, Inc.
For some reason growlight manufacturers are completely ignoring the small, personal grower. A quick look around Overgrow and you can see some very respectable bud being grown under 150's, and even 70 watt HPS lights. But the smallest ready made remote ballast growlight you can buy is a 250 watter, and they usually cost well over $150 (US).
So, as usual in the medicinal herb growing world, you need to take matters into your own hands.
Here’s how to turn a 150 watt HPS security light available at most Home improvment stores, into a nice remote-ballast grow light.
Materials & Tools:
MATERIALS
Regent GT150H, (About $79)
Heavy Duty extension cord of suitable length
One heavy duty grounded electrical plug end (male)
Electrical box
Electrical box plate
Romex cable connectors (3)
Wire nuts
Bolts, nuts washers
Strip of metal to secure ballast
Project case from Radio Shack ($6.99) #270-253A
TOOLS
5/16 nut driver (for removing parts from the casing -- regular pliers will work)
Philips head screwdriver
Regular screwdriver
Hammer
Power drill and assorted bits
Metal file
Wire cutters
Utility knife or wire stripper
Diagonal Pliers
Pliers
Wiring Diagram
Be careful...
Remove guts
Remove the guts from the casing - bulb socket, ignitor, light sensor socket, ballast. The ballast was glued to the casing. I heated the casing for a couple of minutes on an oven burner (high), and when it was getting too hot to hold, I put it on the floor and wedged a hammer between the ballast and casing and popped it out gently.
REMOVE LIGHT SENSOR
These security lights are designed to automatically turn on when it gets dark, so there is a built in light sensor that needs to be removed.
Remove all wire nuts.
Disconnect the white wire that comes out of the sensor (currently connected to all 3 other white wires).
Disconnect the black wire that comes out of the sensor (currently connected to the black “power in” wire).
The red wire coming out of the sensor is currently connected to the black wire coming out of the ballast. Remove the red wire, and then connect the black wire coming out of the ballast to the black “power in” wire.
Reattach wire nuts (there were 5 originally, now you only need 4).
Refer to the wiring diagram!
WIRE THE SOCKET
The socket on this particular light had some metal wiring connectors that stuck up and made it impossible to attach to the electrical plate without some modification (sorry no photo). Just pull the black and white wires off of the connectors, and cut the connectors down flush with socket base with diagonal pliers. Now loosen the connectors (screws inside the socket), slip the wires under them and tighten them back down. Please use some plastic electrical tape on the end of the socket to prevent any chance of the metal from the connectors making contact with the electrical box cover plate.
Secure the cord in the electrical box with a romex cable connector and wire it to the socket: black to black, white to white, secure with wire nuts. Some electrical boxes have a green screw inside to fasten ground wires, use that if yours has one, otherwise fasten the green ground wire to the box using one of the cover plate screws when you tighten the cover plate.
WIRE THE REMOTE BALLAST
Hopefully you can see the wiring clearly in the photo, but if not, refer to the wiring diagram for details.
You’re going to have to cut some holes in the Radio Shack project box for the power cords and some bolts to hold the ballast, ignitor and ground wires down.
I used a short length of metal (plumbing department) to secure the ballast. The ignitor had a notch that made it easy to bolt down. The ground wires from both electrical cords are screwed to the base of the box.
Cut a short length off the socket (female) end of the extension cord and wire it appropriately (again - see diagram). Wire the remaining electrical cord, including the grounded male plug to the other end of the box.
Use a tie wrap to bundle up the wires in the box and try to keep them away from the ballast, which will heat up during use.
TEST IT!
If you've done everything right, it should light.
Now, build a reflector and you’ve got a nice little custom grow light.
Safety Warnings:
Always wire the male plug to the bulb socket and the female receptacle to the ballast to avoid possible electrocution! Always use an all metal project box which already has ventilation cooling slots, or if your project box has none, please cut adequate cooling slots, or drill several vent holes in the ballast enclosure (project box) to allow the heat to escape the box. Not adding the cooling slots or holes, could result in failure of the insulation and/or the transformer. Also, please be sure the enclosure is located in a well ventilated area to aid cooling.
Last modified: 06:25 - Nov 23, 2001
Last edited:
the continuation is looking good! 
J
JH151399-OG
excellent FAQ post BombSquadron!
And Polar_Bear, that's the whole reason I was looking into MasterLow... the quick pull. You're saying a sweet-ass indica in 77 days? That sounds simply amazing!
Has anyone tried to supplement thier 150 with cool white flouros? How did it work, and did it increase the heat much?
And... after many designs and re-designs (plan 1000 times, build once) I have settled on my growbox design. It will be 2'x1'x~3' (lxdxh). If I were to stuff a 150 watter in there, would it get too hot you reckon? Or should I not really worry too much about it?
My current plan for lighting was 1 100 w HPS and two supplemental 30 or 42 watt cool white CFLs (to encorage vegatative growth). What do you guys think would be a better set-up? I am planning on cooling it with two 4" PC fans for exhaust, and ample passive intakes. All help would be really appreciated!
Last edited:
StickyGreenCola
New member
JH151399-OG said:excellent FAQ post BombSquadron!
And Polar_Bear, that's the whole reason I was looking into MasterLow... the quick pull. You're saying a sweet-ass indica in 77 days? That sounds simply amazing!
Has anyone tried to supplement thier 150 with cool white flouros? How did it work, and did it increase the heat much?
And... after many designs and re-designs (plan 1000 times, build once) I have settled on my growbox design. It will be 2'x1'x~3' (lxdxh). If I were to stuff a 150 watter in there, would it get too hot you reckon? Or should I not really worry too much about it?
My current plan for lighting was 1 100 w HPS and two supplemental 30 or 42 watt cool white CFLs (to encorage vegatative growth). What do you guys think would be a better set-up? I am planning on cooling it with two 4" PC fans for exhaust, and ample passive intakes. All help would be really appreciated!
Thats almost exactly what I have done. I have the one 150(hanging in a batwing now that the big plants are gone) and four cool white 20w cool whites in the 4 corners of the box. My box is 2.5' x 1.5' x 3' ( wide x deep x high )
It does add heat, so be prepared, but in my opinion if you can manage the heat, the mixed spectrum is worth the work. It takes a little extra ventillation, but the benefits are unmistakeable. Sidelighting is a big benefit to compact spaces. It expands bud volume from the top few inches of canopy all the way down the plant. Much improved lower development.
Whatever you decide good luck.
I also found an el cheapo attic thermostat (at lowes) that has 5 degree power on increments. I'm going to give this a shot to cut down the energy consumption even further. The more efficient the better. Its only an $11 experiment. Either way I'm smokin like royalty for awhile.

J
JH151399-OG
StickyGreenCola said:Thats almost exactly what I have done. I have the one 150(hanging in a batwing now that the big plants are gone) and four cool white 20w cool whites in the 4 corners of the box. My box is 2.5' x 1.5' x 3' ( wide x deep x high )
It does add heat, so be prepared, but in my opinion if you can manage the heat, the mixed spectrum is worth the work. It takes a little extra ventillation, but the benefits are unmistakeable. Sidelighting is a big benefit to compact spaces. It expands bud volume from the top few inches of canopy all the way down the plant. Much improved lower development.
Whatever you decide good luck.
I also found an el cheapo attic thermostat (at lowes) that has 5 degree power on increments. I'm going to give this a shot to cut down the energy consumption even further. The more efficient the better. Its only an $11 experiment. Either way I'm smokin like royalty for awhile.
That is good to hear, especially your dimensions... you have an entire extra square foot of space compared to me. I guess I'll just stick with the 100 watter and the cool whites. I appreciate your input!

And by the way...
 is my favorite smiley!
Last edited:
G
Guest
JH151399-OG,
yeah sure man you can pull a sweet ass 7~8 week flower time indica in 77 days frorm seed if grown in DWC hydro as the growth rate is very fast. I think 90 days in soil is do-able too. Just wait till I harvest the other plant - she's a very sugary pure indica.
If you scrog and/or LST with a 150 this method works well. Only hard part is that you have to start a few seeds and get rid of the males when they show at about 10~14 days into flower.
Feminized seeds have a distinct advantage here. I know some people have had very good success w/female seeds.

