What's new
  • ICMag with help from Landrace Warden and The Vault is running a NEW contest in November! You can check it here. Prizes are seeds & forum premium access. Come join in!

BigTokes Hardcore, Bio-Buckets—Playing Around Is Over!!!

BigToke

Bio-Bucket Specialist *********
Veteran
Well everyone it’s getting a little difficult going to OG to update my grow/thread documentation when I spend all of my time here at IC, so in order to keep up with every thing I’m going to go head and move it so as to better document as I go.

Introduction:
  • Well I, like most other people probable started growing outside? After a few years of growing outside I decided I would take the skills indoors.
  • And for several years I did great!! But I could not get over those hydroponic pictures, then I started looking into going hydro, but after reading lot of different styles of growing hydro I thought it was out of my league. And then I came across the Bio-Bucket section over at OG a few years ago, I thought that was the most fascinating thing I have ever saw, and I new this was duable for a newbie, so with no hydroponic knowledge experience ahead of me it was back to the drawing board.
  • Searching researching, searching researching, and allot of reading & more reading & more reading!!!! Several mounts latter I had finely understood the Recirculating DWC Bio-Bucket system, that I thought suited me to the T, and with no Perrier experience in building an home made hydro system I took my time and allot of thought which took several mounts to get all the parts I needed (I HAD TO HAVE THE BEAST) win it came to the parts of building this system.

In conclusion: This system is NOT A TOY SYSTEM, but well rapidly produces fast growing plants with the most ease of maintenance. I well provide some links to the various different types of bio-bucket system styles, enjoy!!!

HurtBack as far as I know he is the one how came up with the principles and design of the Bio-Buckets, although I love the principles behind the bio-bucket system I did not like the design of the system. So I set out on a journey which took me several mounts to complete.

So here's what I did, and some of the things I kept.
  • I am a farm believer in the bio-filled of the system, the beneficial bacterium or "bio-filled" is supported in my system by 8" Net-Pots, I have mounted these net-pots underneath the lids, that way they would be submerged in water as far as possible, which is about an inch from the top, and they are full of Lava Rook, this gives the beneficial bacterium and place to live, this good bacterium well keep your systems water clean and healthy, and there is no need to do a change-out of the systems res.....So I kept the bio-principles and they have preformed great for me!!
  • The principles of having total circulation, that mines no dead spots at all in the system, if there were dead spots it would germinate bad bacterium or algae in the system and would cause root rot ect.....So I kept the total circulation principles of the bio-system.

And here's some of the things that I changed.
  • As far as I know I am the only one to use a 8" Net-Pot in the Bio-Buckets, this was done to harbor more good bacterium in the system,......since I am recirculating 36 bio-buckets and a 25gal res, that makes it a total of 205gal system, that's allot of water so I thought I needed to harbor as much of good bacterium as possible......So I went with a bigger net pots.
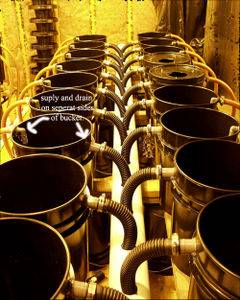
  • In HurtBacks design, there was no way to empty the buckets or res, except by head......And each bucket had the supply line running up through the drain hose, which reduce in the amount of water derange you could do....and caused some clogging.....In my design each bucket is independently supplied and drained, I also modified the supply it was a ½”, mine is ¾”, to offer a more better supply of Nutrients and a faster supply dissolved oxygen in the system, the drain is now 1"1/4, and I have never had one clog, (at the time when this was written) my plants were in there second week of flowering and there are 4'1/2 to 6' foot tall I even have a couple that is 8' foot tall, and they look great and I have never did a change-out. Also I added a Chiller.

That's just a few things that I did....To bring new ideas to the system, you know what they all ways say, a picture is worth a thousand words, so here you go.

The Bio-Bucket Concepts:
  • beneficial bacterium
The Use Of Beneficial Bacteria For Water Quality Control
I well try to explain some of the concepts of growing in a bio-bucket system, and sense a lot of people have never heard of "bio-buckets" I'll start with what makes it "bio," I am not referring to the nutrients! I am referring to the beneficial bacterium, there is good and bad bacterium, the good bacterium if put under a microscope is a "short chained bacteria" which are the good one's and feeds off of the bad bacteria which is a "long chained bacteria" which grows when something is non moving and steal and stagnate, that’s way they say to only drink out of fast moving streams because long-chained bad bacteria well build up in a non moving system, so the idea here is to have a recirculating system.
The use of beneficial bacteria populations that can decompose organic sludge as well as bacteria that can convert ammonia and nitrites into nitrates, reduce BOD (biochemical oxygen demand), bind excess phosphates, prevents algal blooms and maintains a microbiological equilibrium in the system. This process has been studied for many years in the water treatment industry and recently has been introduced in aquaculture with very encouraging results. (I well discuss this in more detail later on) so that there is NO DEAD SPOTS in the design of your system.
Now how do you get the beneficial bacterium started in your system, well that's the essayist part of all, you need to give them a home to live in, sense this is a DWC type of system in the bottom of my lid I use an 8" net-pots, DO NOT USE CLAY BALLS, the beneficial bacterium cannot penetrate the heard clay balls, so you won't to use something like "lava rock" or some kind of pumice rock that has tiny little holes in it were the good bacterium can live, Now that you have that just fill up your system with tap water or RO water and live your pump running 24/7 for one week, NOTE: (any thing over 100 gallons, live for two weeks) mine is a 205 gallon system so I fill the system and let it run and in the min time I take my cutting's and by the time thy are rooted the system is ready!
Recap:
  • Recirculating System!
  • Beneficial Bacterium!

Click for Larger Image


Click for Larger Image

Click for Larger Image


Click for Larger Image


Click for Larger Image


Click for Larger Image


Click for Larger Image


Click for Larger Image


Click for Larger Image


Click for Larger Image
 
Last edited:

BigToke

Bio-Bucket Specialist *********
Veteran
BigTokes Hardcore, Bio-Buckets—Playing Around Is Over!!!

Before I get into the design of the bio-buckets, lets talk about some of the benefits that I have personally experience with this kind of system?
  • Stable pH levels, (what I mine is, because of the living bacterium in the system, and because of the constant raped movement of water/nutrient solution and the waterfall effect, it well stabilize the ph in the system, as long as you use a none-organic media in the system, I use Oasis Cubs, because they are none-organic or use nothing at all. In my system after about two weeks before I put my clones in the system, the ph well settle at about 5.5ppm this well very according to the design of your system, and weather you use tap water or RO. I have seen others settle at 6.0ppm, and others settle at 5.0ppm, and as the plaints get larger and began to use more water the ph well rise.)
  • Because of the beneficial bacterium, your system can run at a higher tempters with no problems at all. (There are several growers who grow in this style of and do not have a chiller at all, and there temps are in the 80's.)
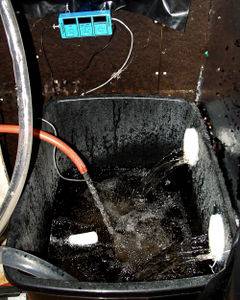
  • No air is needed in this system because of the design!! The bio-bucket system use's what's called a recalculating waterfall effect of airation, as the water is pumped out of the reservoir and to each individual DWC Bio-Bucket, the bucket is supplied and drained at the same time, and as the system drains back into the reservoir you design it to were it falls about 7" to 12" drop before it hits the water and that is what is known as the waterfall effect, and the churning of the surface of your reservoir well cerate huge amount of O2. Since I was a newbie at this I did not won't to take any chances, so I bought a DO Meter, and if you design the system right it well make all the O2 you won't!! Without air!!
  • Well I think the last thing mite be the most controversial of all but hear it goes: No Reservoir Change-outs, I can almost see some of you sink down in your sits as you read that, that's all right, but it's true, I know it sounds terrible but it's not, actually that is some what of a "misnomer." Let me explain, you use one central reservoir to feed every how many bio-buckets you won't, this reservoir has a float valve which is connected to your water
    supply as your plaints well suck up water faster then the nutrients, your float valve is automatically toping off your reservoir with fresh water, this is in away reservoir change-out, let me put it this way, in my 205 gallon system (including reservoir) if a plaint is two foot tall and in flowering it could use as much as, one to two or three quarts a day!! That's depending on room temp and other things, so let's do the math, I have a 36 recirculating bio-bucket
    system, that's five gallon buckets to, on average my system uses one quart a per plant a day, so that minas that my system has put back nine gallon's of fresh water being put back into the system or reservoir a day, so you could say that the system automatically do's it's own reservoir change-out's, thus
    eliminating nutrient burn, instead of your nutrient ppm's going up, they go down........When I live on vacation I well raise the nut's up to about 1800ppm's depending of strain, and sometimes I'm gone for a little over two
    weeks, when I get back my ppm's are at around 400ppm to 600ppm’s just depends on how big they are at the time I live.

Recap:
  • Stable PH levels.
  • Higher toleration of heat temp.
  • No need for air. (if designed right!!)
  • And no reservoir change-outs, (or you know what I mine be that.)
These are just some of the benefits that I have noticed from being a bio-bucket user.

Click for Larger Image


Click for Larger Image


Click for Larger Image


Click for Larger Image


Click for Larger Image


Click for Larger Image


Click for Larger Image


Click for Larger Image


Click for Larger Image


Click for Larger Image
 
Last edited:
G

Guest

Awesome Big Toke

I love the info and the pics. This is some killer work you've done here man.

I want to use this method in the future on a project and love to gleen as much quality information as I can from post.

I'll be following with open eyes and mind

Tex
 
G

Guest

HOLY SHIT there Bucketman!

HOLY SHIT there Bucketman!

Awesome BigToke!

I read all the Hurtback and subsequent posts on bio buckets. It looks like you got this thing down. I'm in on this thread.

Very professional... How much $ have you invested thus far in your system?
 

BigToke

Bio-Bucket Specialist *********
Veteran
BigTokes Hardcore, Bio-Buckets—Playing Around Is Over!!!

The Bio-Bucket Concepts:
  • beneficial bacterium
The Use Of Beneficial Bacteria For Water Quality Control
I well try to explain some of the concepts of growing in a bio-bucket system, and sense a lot of people have
never heard of "bio-buckets" I'll start with what makes it "bio," I am not referring to the nutrients! I am
referring to the beneficial bacterium, there is good and bad bacterium, the good bacterium if put under a
microscope is a "short chained bacteria" which are the good one's and feeds off of the bad bacteria which is a "long
chained bacteria" which grows when something is non moving and steal and stagnate, that’s way they say to only drink out of fast moving streams because long-chained bad bacteria well build up in a non moving system, so the idea here is to have a recirculating system.
The use of beneficial bacteria populations that can decompose organic sludge as well as bacteria that can convert ammonia and nitrites into nitrates, reduce BOD (biochemical oxygen demand), bind excess
phosphates, prevents algal blooms and maintains a microbiological equilibrium in the system. This process has been studied for many years in the water treatment industry and recently has been introduced in aquaculture with very encouraging results. (I well discuss this in more detail later on) so that there is NO DEAD SPOTS in the design of your system.
Now how do you get the beneficial bacterium started in your system, well that's the essayist part of all, you need to give them a home to live in, sense this is a DWC type of system in the bottom of my lid I use an 8" net-pots, DO NOT USE CLAY BALLS, the beneficial bacterium cannot penetrate the heard clay balls, so you won't to use something like "lava rock" or some kind of pumice rock that has tiny little holes in it were the good bacterium can live, Now that you have that just fill up your system with tap water or RO water and live your pump running 24/7 for one week, NOTE: (any thing over 100 gallons, live for two weeks) mine is a 205 gallon system so I fill the system and let it run and in the min time I take my cutting's and by the time thy are rooted the system is ready!

Click for Larger Image


Click for Larger Image


Click for Larger Image


Click for Larger Image


Click for Larger Image


Click for Larger Image


Click for Larger Image


Click for Larger Image


Click for Larger Image


Click for Larger Image
 
Last edited:

BuzzBob

aka Buzz'dBob
Veteran
Holy Chit!!! You were talk'n 16 Five Gallon Buckets in my thread... LOL... Awesome!!! I am going to be right there with TK, examining every word of your posts, and every pixel of your pics!

Way Cool!!!

-BuzzBob
 
Last edited:

BigToke

Bio-Bucket Specialist *********
Veteran
Texas Kid,
Thanks for the props, I’ll do my best on the quality info but coming from a stoner!! I would keep both eye’s open.

Maistre,
Hurtback, did some body say Hurtback!! Ya I’d like to set down at the table and chew the fat with that fellow, but since he is not around any more? I’ll do the best that I can. I don’t have the total cost of this system, so I’ll guess around $2.5k I’m sure you could get buy with less but I was in a hurry to put it together, so I bought every thing new!!

Buzzbob,
Sorry about that it must have been a typo or something, thanks for stopping by.
 

BigToke

Bio-Bucket Specialist *********
Veteran
BigTokes Hardcore, Bio-Buckets—Playing Around Is Over!!!

Beta Testing, And First Harvest!!

Well to see if this system really was up for a good grow, I pushed it to the max!!
And it delivered above and beyond my wildest expectations, this system is virtually maintenance free, every thing is setup so that it adds it’s own add-backs of fresh water, so every other day or so,
I just bump up the nutrients and walk off and live it, oh I forgot and raise the lights!!
As you can see I built these horse rack around each bio-bucket system (2) and then when harvest time comes,
I just lay down these slats across the system and lift the lid’s out of the buckets and place them up above the
system so that the roots can dry-out, I have found that it makes it easier for the roots to break apart from the net-pots this way.


Click for Larger Image


Click for Larger Image


Click for Larger Image


Click for Larger Image


Click for Larger Image


Click for Larger Image


Click for Larger Image


Click for Larger Image
 
Last edited:

BigToke

Bio-Bucket Specialist *********
Veteran
Light’s well that would be 3.6k of blooming power!! As for which strain, your guess is as good as mine? It’s just some bag seed that a friend had and said that it did very well out-side, but imo it’s not for the indoors, so I thought of ordering C99 and giving that a try, btw any body got any good idea’s about what’s the best DWC strain to use? If so drop my a line and let my in on it.
 

Hooked-On-Grown

Active member
Veteran
Very nice Big Toke!! Welcome to the world of buckets!!

I just breezed through your thread......trying to catch up from hurricanes......
but will re-read later today.
I also will be watching this one .....
Very clean and professional!!
 

Dr. D

Active member
Veteran
ROOTS

ROOTS

Those roots look impressive, im just about to chop my first hydro grow in a home made oxy pot but my roots dont match those of yours. il post pics and results when iv chopped the little lady down. peace
 

BigToke

Bio-Bucket Specialist *********
Veteran
Hooked-On-Grown, Ya I like my buckets, thanks for stopping by sorry to here about the hurricane trouble, hope every thing works out for ya, stop by any time.

Dr. D, Thanks for stopping by doc, ya the roots grow pretty massive in this type of system, I thank it’s due to the high dissolved oxygen levels through the design of the waterfall effect, and to think I don’t even use any air? This system is so stealthy you could stand two feet from it, and wouldn’t even know it was there. Hey doc, I don’t think I know what a oxy pot is? So I’ll just have to see when get your pic’s up.
 

BigToke

Bio-Bucket Specialist *********
Veteran
BigTokes Hardcore, Bio-Buckets—Playing Around Is Over!!!

Round Two, Ding Ding Ding!!!

Well fellows here it is, round two of the Bio-Buckets, the only thing I did different this time is I have added
SuperThrive to the veg nuts, I’m hoping this will shorten my veg time just a little.
I usually veg for three weeks, I’m hoping this well boost my clones up and shorten my veg down to two week.
  • Here are my clones, I take my clones from a seed mother, and dip them in a cloning powder called: Schultz Take Root, rooting hormone, and then I put them directly into the Oasis Cubs, then I lay them on top of some sand in a try or perlit with a dome, then wate two week and you have roots.
    Hint, wial your waiting on your clones to root, go ahead and fill the bio-system up and let it run 24/7, this well be plenty of time for the beneficial bacterium to build up in your system.
  • Ok so I took a picture from up above looking down on both bio-bucket systems, and took a pic down the middle.
  • On my last grow I had two buckets that liked just a little not enough to hurt any thing, so after the grow was over I took a little Clear Water Proof Silicon and on the (inside of the bucket) rubbed it around the barb, this was effective, and stopped all leeks.
  • Here is a pic of how that I mount the 8” net-pot underneath the led, this was do so that I could submerge the net-pots as deep in to the water as possible so to give the beneficial bacterium more living space to colonize, the water dos not come all the way up to the top, it like an inch from the top Hint, this is were you put your Oasis Cubs in that dry space, above the water line, and let your roots hang down into the water.


Click for Larger Image


Click for Larger Image


Click for Larger Image


Click for Larger Image


Click for Larger Image


Click for Larger Image


Click for Larger Image


Click for Larger Image


Click for Larger Image


Click for Larger Image
 
Last edited:

BigToke

Bio-Bucket Specialist *********
Veteran
BigTokes Hardcore, Bio-Buckets—Playing Around Is Over!!!

  • Here is the clones at day one, they are 5” tall, and now one week later the same plant is 10” tall, absolutely amazing, Wow!!!
  • If you decide to add SuperThrive to your grow, don’t worry about the brown water, because the superthrive will turn the water brown but it’s no problem.
  • And last but not lest, one week later and the same clone is now at 10” tall, it looks like the superthrive is doing it’s stuff!!
And Now Conserning Dissolved Oxygen (mg/l)
The dissolved oxygen concentration refers to the amount of oxygen contained in water. Plant roots require oxygen for respiration. Oxygen dissolves in water mainly by two methods:
  • directly from the atmosphere and as a by-product from plant photosynthesis.
  • Dissolved oxygen concentrations are generally controlled by five factors:
  1. Temperature – warmer water holds less dissolved oxygen.
  2. Atmospheric pressure – water at higher atmospheric pressure holds more dissolved oxygen longer and better.
  3. Turbulence – increased turbulence or mixing or chering will increase dissolved oxygen concentrations.
  4. Plant growth – increased photosynthesis will result in increased dissolved oxygen concentrations.
  5. Decomposition – increased decomposition uses dissolved oxygen from the water.
    [/list=1]
    • General Information: Dissolved oxygen (DO) refers to the volume of oxygen that is contained in water.
    • Oxygen enters the water by several different ways photosynthesis of aquatic biota are one, and by the transfer of oxygen across the air-water interface, (this is what I call white-capping.)
    • The amount of oxygen that can be held by the water depends on the water temperature, salinity, and pressure.
    • Gas solubility increases with decreasing temperature (colder water holds more oxygen.)
    • Gas solubility increases with decreasing salinity (freshwater holds more oxygen than does saltwater.)
    • Both the partial pressure and the degree of saturation of oxygen will change with altitude .
    • Finally, gas solubility decreases as pressure decreases. Thus, the amount of oxygen absorbed in water decreases as altitude increases because of the decrease in relative pressure (Smith, 1990).
    Once you have your Bio-Buckets up and running, oxygen is absorbed throughout the water body via internal currents or is lost from the system. Hint: This is the resin that we exchange the water in the buckets 10 times an hour. Flowing water is more likely to have higher dissolved oxygen levels than standing water because of the water movement at the air-water interface. In flowing water, (water-fall effect) oxygen-rich water at the surface is constantly being replaced by water containing less oxygen as a result of turbulence, creating a greater potential for exchange of oxygen across the air-water interface.

    Click for Larger Image


    Click for Larger Image


    Click for Larger Image


    Click for Larger Image


    Click for Larger Image


    Click for Larger Image


    Click for Larger Image


    Click for Larger Image


    Click for Larger Image
 
Last edited:

BigToke

Bio-Bucket Specialist *********
Veteran
BigTokes Hardcore, Bio-Buckets—Playing Around Is Over!!!

Root-to-Root Travel of the Beneficial Bacterium
  • Let’s talk for a minuet about the {colonization levels} of Beneficial Bacterium; because both of my Bio-Bucket Systems share the same reservoir, this will speed up the {colonization levels} and give a more equal spared of the Beneficial Bacterium throughout the recirculating systems, as they travel from root to root the: Bacillus Subtilis GB03 is a Beneficial Bacterium with activity against water-borne fungal root pathogens.
  • Let me share a little something with you, in an effort to see if I could sweeten up my bud’s, I ran an experiment with some sugar, I used icing sugar which dissolves really easy in hot or cold water, which is a good thing! I put 3 ½ cups of white powdered sugar in 205 gallons of water at the last week of harvest…….well to make a long story short, the plants didn’t seem to mind it at first, but the Beneficial Bacterium was overcame!!! Within one week my water was for the first time ever was infected, and the plant stems became week and soft, and the roots began to decay there was to much decomposition going on for the Beneficial Bacterium to keep up with.
  • In conclusion: let me say just stick with something like PK-13/14 and you’ll be just fine.
  • In conclusion to the conclusion: I steal have the utmost confidents in the ability of the Beneficial Bacterium to keep my water cline and healthy, to prove this, when it came time for me to clean my system all I did was just fill it up with plain old tap-water with a little H202, let it run for 24 hours, flush and refilled the system with fresh tap-water let it set for two weeks and that’s it, now I know that my pip’s are coated with sugar residue, but I am very confided that what I left behind that the Beneficial Bacterium will clean up for me, thus reducing my startup time, and if it does not, well I’ll post pic’s of that to.

Click for Larger Image


Click for Larger Image


Click for Larger Image


Click for Larger Image
 
Last edited:

BigToke

Bio-Bucket Specialist *********
Veteran
BigTokes Hardcore, Bio-Buckets—Playing Around Is Over!!!

Put back into your plant-production system a set of organisms that will work for you, instead of against you.
  • Most people have the attitude that microbes are all harmful, but in fact, most organisms in soil or in solution are beneficial for plant growth. Modern agriculture developed the view that all disease-causing and pest organisms need to be killed, and so the kill-everything-but-the-plant attitude came about. Unaware that healthy soil or solution in fact should contain more beneficial bacterium, and so a program to wipe out life in soil and solution was initiated. But more and more toxic chemicals have had to be used as the diseases and pests develop resistance with the ever-increasing use of killing agents.
  • Why don’t the beneficial organisms develop resistance to the toxic chemicals being used? Because almost by definition, disease organisms and pests have a boom-and-bust life cycle, so when one pest organism survives the chemical onslaught, hundreds, or thousands, or billions of offspring are produced. Beneficial organisms rarely employ that kind of growth strategy, but instead reproduce only a few times a year, with perhaps only a few offspring produced each time. Thus, when you use toxic chemicals to control diseases, but in fact kill most of the beneficial organisms in the soil or solution, it takes a long time for the beneficials to return. Thus the likelihood that they will develop resistance is significantly less than that for any disease or pest organism.
  • Modern agriculture has set the stage for non-stop, never-ending reliance on chemicals. That’s great if you want to sell chemicals, not so great if you need to have drinkable water.
  • Do we have to go this route? What we need in production agriculture is to help the beneficials more than the diseases and pests. We need to tip the balance in favor of the good guys. What conditions favor the good guys? Do we really need to know all the names of all the organisms in soil or solution, or do we just need to know which conditions favor the beneficials and which favor the diseases?
    I’m just basically tinkering around here with these photo’s
    1. Well the first two of photo’s are of a Thermal Gun that I picked up after going to the race track and seeing some of the race car drivers pop the hood and look at the Radiant Temp with one of these thermal gun’s, so I ask what was going on, and he said, temp gauges most often only check the internal temp’s of a motor, but the thermal gun tales me the surface temp’s of ANY THING!!! So I bought one was a tad-bit expensive, like around $85.00, but I thought I would go ahead and buy it because I wanted to fine tune Bio-Buckets.
    2. Well is a picture of how that I caped off the end of my main’s, they are 1” ½ in size and I just glued the cap’s right on the end’s. Later on I plain on putting water gauges at the end of each line.
    3. Well this is pic is just anther shot of some of the high tek equipment that I use in my grow room. haa eakljkjjjhhh
    4. This shot is of the res, and I decided to do something a little different, I bought some of that plastic screening to go over the top of my res, for two resins.
      [/list=1]
      • To keep bugs and stuff out of my res place.
      • So that I may remove the lid, and let the res air-out more.
        [/list=a]


      Click for Larger Image


      Click for Larger Image


      Click for Larger Image


      Click for Larger Image


      Click for Larger Image
 
Last edited:

Latest posts

Latest posts

Top