Merman
Active member
I have read with great interest all the threads surrounding ultrasonic foggers for hydro. I have tried this trial and error style with varied results. So here it goes all you DIY dudes, I'm sure if you've got some skills this will be no problem! After many failed prototypes, here's the best I have to offer:
The FOGGAPONIC FLORACLONER!!!
This post could go in the Micro-Grow section too. I keep things rolling in compliance with my RX. in Cal. (If you want to know the requirements in Cal., check out Joe A. Grower's posts)
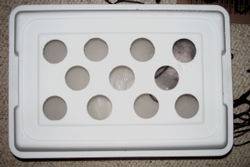
This holds only 11 clones...The Rubbermaid is 13.5"L x 10.5"W x 9.5"H with the lid on. First thing to note is the shape of the lid. The flat lid boxes don't work as well, plus you miss out on the optional DWC action. Search around for the perfect one, its worth the time and effort believe me. By the way, I think this certainly scalable if you want to go bigger.
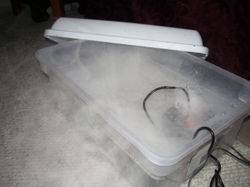
There it is going full tilt on its maiden run!
Here is what makes the fog. It is very important to purchase the float accessory (the round black shape around the red light). Its a plastic encased styrofoam float that keeps the fogger at exactly the correct height in the water for maximum fog. You'll run into all kinds of problems if you dont' get one.

Water for the fogger: I recommend you use only RO water. The ceramic disc in the fogger attracts electrolytes (thats your PPM/EC) in the water and gets all gummed up, RO water has zero PPM/EC. I think you can get away with tap water if its the usual 200-300PPM, but you'll wear out the disc faster. Another spare part necessity when ordering the fogger is the extra wrench and disk set.
The lid holes were cut with 1 5/8" hole saw. those are 1 1/2" neoprene discs, they are a little bit tapered so they set nicely into the holes.
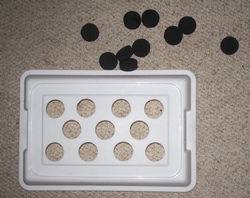
Top view of the lid:
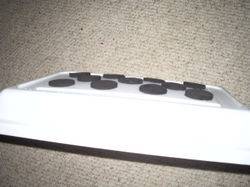
Bottom view of the lid:
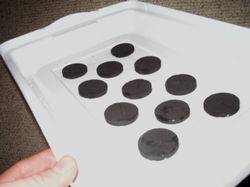
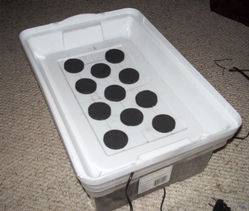
Top view with the lid on. The white stuff you see is not the top of the water, its the top of the fog! If I could get good side shot, you would see vapor coming out of all of the holes. This is the fog bank your clone roots are in!
Now here is the trick with the lid I mentioned above, when all your clones have some roots, turn the lid over and you have an instant DWC! I'll explain later why this is an important step.
This is an Animalia Chordata Mammalia Rodentia Hystricomorpha:

Ha! Made ya look! Trippy critter Eh!
That's it for the construction part, now how does it work!?
The FOGGAPONIC FLORACLONER operating instructions:
1. Fill up about 2/3 with 'solution'. I use RO water only, you can use tap water if you want, but the RO works better.
A. The solution: Keep PPM low, low, low. Under a 100! A few drops your favorite veg nute, few drops Superthrive, few drops Protekt. Correct pH to 5.8-6.0.
2. Set the fogger in. Leave slack in the cable so it can move to all four corner's of your Rubbermaid.
3. Place a small submersible aquarium heater set on 76 degrees F.
Break out your Mutha plant.
1. Cut clones per your usual routine. Make sure to account for the the width of the neoprene collar (about a 1/2") when cutting your clones. I like to leave at least a 1.5 inch stem, but do whatever you want.
2. Prep your clone (cutting, shaving, etc.), place into neoprene collar.
3. Dip into cloning hormone of your choice, I like the gels for this.
4. Place into Floracloner. HINT: If you buy two containers you can now use the base (the clear part) from the second box as a humidity dome! I only do this the first day, otherwise the clones get too soaked, but it helps them get through that first rough patch.
5. Plug it in and light'em up! Light source and timing of your choice. I use CFLs at 18/6. Run the fogger on a timer. I've used 15 min. on/ 15" off (standard timer settings) with success. I think this will possible extend the life of the fogger. The manufacuturer says don't run more than eight hours a day... I assume that's continuous, so I figure it should go about 12 hours total in a 24-hour period (someone check my math) but will get some breaks to cool down.
Once root are establised, pull the plugs out carefully and reinsert from the bottom. The top of the lid now becomes the bottom and your plant roots are now in the water. Take out the fogger and replace with some airstones and a pump and you've got a bubblercloner! I've found that changing over to a DWC style of growth helps before transplanting into netpots with medium of your choice, I use hydroton.
As for results, I haven't got any photos from previous attempts. I can tell you that it works great. I used 2" net pots with the clones in rockwool on one trial and that worked just fine, but the rockwool tends to make a mess of your water.
Total cost:
Container: US$ 2.95
Fogger 22.75
Heater 8.95
Neoprene 2.75
Float/Buoy 6.50
43.90
I realize that's no small change, but hi-tech ain't cheap!
I won't be able to test this out for awhile as I have mature plants going now and don't want to exceed my limit.
Maybe I should have posted a poll to see how many of you think it works vs. those who don't1
Thanks for checking it out!
The FOGGAPONIC FLORACLONER!!!
This post could go in the Micro-Grow section too. I keep things rolling in compliance with my RX. in Cal. (If you want to know the requirements in Cal., check out Joe A. Grower's posts)
This holds only 11 clones...The Rubbermaid is 13.5"L x 10.5"W x 9.5"H with the lid on. First thing to note is the shape of the lid. The flat lid boxes don't work as well, plus you miss out on the optional DWC action. Search around for the perfect one, its worth the time and effort believe me. By the way, I think this certainly scalable if you want to go bigger.
There it is going full tilt on its maiden run!
Here is what makes the fog. It is very important to purchase the float accessory (the round black shape around the red light). Its a plastic encased styrofoam float that keeps the fogger at exactly the correct height in the water for maximum fog. You'll run into all kinds of problems if you dont' get one.

Water for the fogger: I recommend you use only RO water. The ceramic disc in the fogger attracts electrolytes (thats your PPM/EC) in the water and gets all gummed up, RO water has zero PPM/EC. I think you can get away with tap water if its the usual 200-300PPM, but you'll wear out the disc faster. Another spare part necessity when ordering the fogger is the extra wrench and disk set.
The lid holes were cut with 1 5/8" hole saw. those are 1 1/2" neoprene discs, they are a little bit tapered so they set nicely into the holes.
Top view of the lid:
Bottom view of the lid:
Top view with the lid on. The white stuff you see is not the top of the water, its the top of the fog! If I could get good side shot, you would see vapor coming out of all of the holes. This is the fog bank your clone roots are in!
Now here is the trick with the lid I mentioned above, when all your clones have some roots, turn the lid over and you have an instant DWC! I'll explain later why this is an important step.
This is an Animalia Chordata Mammalia Rodentia Hystricomorpha:

Ha! Made ya look! Trippy critter Eh!
That's it for the construction part, now how does it work!?
The FOGGAPONIC FLORACLONER operating instructions:
1. Fill up about 2/3 with 'solution'. I use RO water only, you can use tap water if you want, but the RO works better.
A. The solution: Keep PPM low, low, low. Under a 100! A few drops your favorite veg nute, few drops Superthrive, few drops Protekt. Correct pH to 5.8-6.0.
2. Set the fogger in. Leave slack in the cable so it can move to all four corner's of your Rubbermaid.
3. Place a small submersible aquarium heater set on 76 degrees F.
Break out your Mutha plant.
1. Cut clones per your usual routine. Make sure to account for the the width of the neoprene collar (about a 1/2") when cutting your clones. I like to leave at least a 1.5 inch stem, but do whatever you want.
2. Prep your clone (cutting, shaving, etc.), place into neoprene collar.
3. Dip into cloning hormone of your choice, I like the gels for this.
4. Place into Floracloner. HINT: If you buy two containers you can now use the base (the clear part) from the second box as a humidity dome! I only do this the first day, otherwise the clones get too soaked, but it helps them get through that first rough patch.
5. Plug it in and light'em up! Light source and timing of your choice. I use CFLs at 18/6. Run the fogger on a timer. I've used 15 min. on/ 15" off (standard timer settings) with success. I think this will possible extend the life of the fogger. The manufacuturer says don't run more than eight hours a day... I assume that's continuous, so I figure it should go about 12 hours total in a 24-hour period (someone check my math) but will get some breaks to cool down.
Once root are establised, pull the plugs out carefully and reinsert from the bottom. The top of the lid now becomes the bottom and your plant roots are now in the water. Take out the fogger and replace with some airstones and a pump and you've got a bubblercloner! I've found that changing over to a DWC style of growth helps before transplanting into netpots with medium of your choice, I use hydroton.
As for results, I haven't got any photos from previous attempts. I can tell you that it works great. I used 2" net pots with the clones in rockwool on one trial and that worked just fine, but the rockwool tends to make a mess of your water.
Total cost:
Container: US$ 2.95
Fogger 22.75
Heater 8.95
Neoprene 2.75
Float/Buoy 6.50
43.90
I realize that's no small change, but hi-tech ain't cheap!
I won't be able to test this out for awhile as I have mature plants going now and don't want to exceed my limit.
Maybe I should have posted a poll to see how many of you think it works vs. those who don't1
Thanks for checking it out!

Last edited:


