What's new
  • ICMag with help from Landrace Warden and The Vault is running a NEW contest in November! You can check it here. Prizes are seeds & forum premium access. Come join in!

Blazeoneup's Recirculating Dwc Construction Tutorial!

blazeoneup

The Helpful One
Moderator
Chat Moderator
Veteran
:wave: Guys im back to share a recirculating dwc tutorial,Hope this helps some of you out there.Now let me hit the bong and get started :joint::lurk:

Introduction
Some of you may or may not be familiar with Recirculating Dwc,However it is just a multiple bucket version of Dwc "DEEP WATER CULTURE" that is all connected to a single controller,Where nutrients is pumped from a pump to the top of each bucket,And returns through the bottom of each bucket back to the controller,Basically continuously mixing the nutrient solution making it stable through-out the whole system.The controller will have a float valve installed where it is connected to a reservoir which will auto top/feed the system.Each bucket will have an airline and airstone/air difffuser.Or the controller will have a powerhead installed.This is how the water/nutrient solution will get its Do "DISSOLVED OXYGEN".

Pros
The Bennifits to this system are!You can cool the whole system using a single water chiller.The system will auto top off and mix nutrient solution 24/7 keeping ph and ppm stable from bucket to bucket.And the growth and vigor is explosive when optimized.

Cons
Well the drawbacks,#1 is that this system uses lots of water.#2 is that its recirculating,So if one plants root system gets effected it can/will spread through out the system.Though on this version i put shut off valve on each row to insure if problem accurs i can isolate it to one single row.Its also possible for the roots to clog the return line causing an overflow however in this version thats very unlikely.

Adding up the parts list
Ok this is a tutorial on a 12 bucket system,The parts list will vary depending on how many buckets.Each bucket will require 1x 1/4" straight barb,1x 1/4" barbed elbow,1x 3/4" ebb n flow fitting,1x 2' air diffuser or airstone.You will need some 3/4" tees and elbows,The ammount will vary depending on number of buckets and rows.For example im running 4 rows of 3 buckets,I will need 8 t's and 4 elbows for connecting the buckets in each row.Now for the controller you will need 1x ebb n flow fitting for each row you will be running,For example im doing 4 rows of 3 buckets,So i will need to be able to connect 4 return lines to the controller.The feed line will only need 1x 1/2" ebb n flow fitting the rest will be split through t's and tubing.I suggest always buy extra elbows and t's as you may need them either way remember this is a part list for a 12 bucket system.Also i suggest buying black buckets ordering off the net as i bought white buckets locally and spray painted them pain in the arse imo.So i reccomend purchasing black 5 gallon buckets.

Parts list
12x 5 gallon buckets
12x lids with 6" nets built in
12x 2' air diffusers
1x 18 gallon rubbermaid tub
1x 45 gallon reservoir
16x 3/4" elbows
16x 3/4" tee's
16x 3/4" (tub outlets) ebb n flow fittings
22x Ebb n Flow Screens
4x 3/4" shut off valves
2x 1/2" ebb n flow fittings
24x 1/4" straight barbs
70 7/8" hose clamps
12x 1/4" barbed elbows
4x 1/2" shut off valves
4x 1/2" end caps
100' 3/4" ID tubing
100' 1/4" ID tubing
50' 1/2" ID tubing
1x Float valve
1x eco 264 gph water pumps
2x eco 8 air pumps


Tools list
1x Drill
1x 3/16" bit
1x 3/8" bit
1x 1&1/4" hole saw bit with starter bit
1x Needle nose plyers
1x sharp knife
1x heavy duty scissors

Now i will post links to some places you can order all the supplies from!

You can get the 5 gallon buckets black cheap here!
http://www.usplastic.com/catalog/pr...SPlastic&category_name=20327&product_id=26588


Now heres a couple links to places that carry all the rest of the equipment,Exept the 18 gallon rubber maids which can be ordered through home depot or lowes either one.
http://www.texashydroponics.com/shop/home.php
http://www.wormsway.com

Time for a smoke break will finish this tutorial promtly! :bongsmi:
 
Last edited:

blazeoneup

The Helpful One
Moderator
Chat Moderator
Veteran
Part 1 "Prepairing the buckets"

If you did not purchase black buckets now is the time to light proof them,I used black spray paint.After the buckets are light proofed we are ready to move on to the next step.


First take the 1&1/4" hole saw bit with starter bit,To make the holes for the 3/4" ebb n flow fittings.


You want to drill about 1/4" above the lip at the bottom of the bucket.


After drilling the hole clean the access plastic and stripping away leaving a fairly smooth hole.


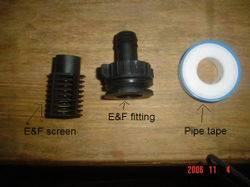
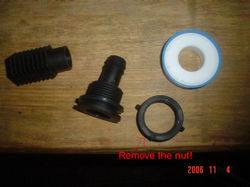
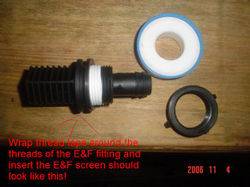
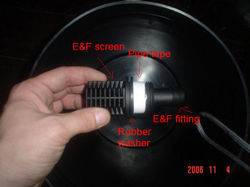
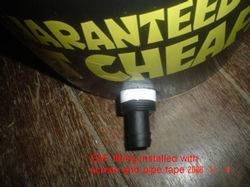
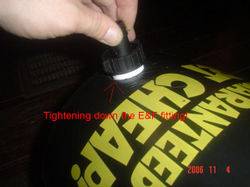
Now get the ebb n flow fitting prepaired to instal to the bucket! For this you will need to unscrew the nut, And wrap the thread tape around the thread of the ebb n flow fitting, And shove the ebb n flow screens into the back of the ebb n flow fitting and your ready to install to the bucket. just insert the fitting as shown in the pics below.


Now screw the nut back on tighten making sure its nice and secure.


Ok time to make the holes for our 1/4" barbs for the feed line and air line.


Using the 3/16" bit we want to drill 2 holes right under the rim of the bucket at the top.Where we will install our 1/4" barbs.


Using needle nose plyers insert a 1/4" barbed elbow into the bottom hole.


Now insert a 1/4" straight barb in the top hole.And using some type of glue i used liquid nail just seal around the edges of the barbs slightly not to leak proof it but to secure it as water will never reach this level.Or you can leave as is but the barbs will be slightly loose.Edit do not use a 1/4" straight barb for the feed line use a barbed elbow so the feed sprays towards the solution below not towards the net cups.I have to come back and edit this soon.


Ok now attach a piece of 1/4" tubing to the barbed elbow and run it to the diffuser which is lined into a circle at the bottom to basically shape up with the net cups.If using an airstone just run a line from it to your airstone.


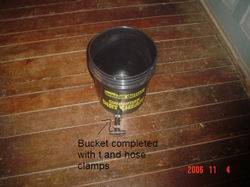
Now that the buckets are all ready its time to install the 3/4" tee's and elbows to connect each row.I need 8 buckets with tee's and 4 with elbows.To do this just use a piece of 3/4" ID tubing about 3"-4" long to attach barb to barb and use the hose clamps to clamp the tubing the the ebb n flow fittings to insure a leak tight seal.


Time to take a smoke break! :joint:
 
Last edited:

blazeoneup

The Helpful One
Moderator
Chat Moderator
Veteran
Part 2 "Prepairing the controller"

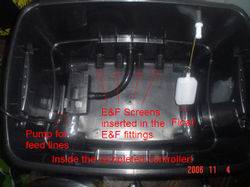
For the controller i will need to install 4x 3/4" ebb n flow fittings,These will be for the return lines.Also need 1x 1/2" ebb n flow fitting installed,This will be for the Feed lines.Finally we will install the float valve.Using the 1&1/4" hole saw bit and starter bit,Drill 4 holes 1/4" above the bottom of the 18 gallon tub,These will be for the return lines.Then in the middle of them,About 3"-4" above them drill another one,This will be for the feed line.


Ok prepairing the 1/2" ebb n flow fitting to connect to a pump.For this we need a sharp knife and 1 piece of 3/4" ID tubing,1 piece of 5/8" ID tubing,And a 1/2" OD ebb n flow fitting.First shove the piece of 3/4" ID tubing into the back of the 1/2" OD ebb n flow fitting.Then shove the 5/8" ID tubing into the 3/4" ID tubing.Now take the knife and cut away any tubing sticking out.Now you can shove a piece of 1/2" Id tubing and connect it to the pump.


Now insert the ebb n flow fittings,The 1/2" fitting goes in the top hole for the feed line,We needed to alter the 1/2" ebb n flow fitting so we can hook the pump to it.The other 4 on bottom are the return lines use the 3/4" fitting for them.


Now we need to drill the hole for the float valve.Using a 3/8" bit drill a hole on the side of the tub around 4"-5" from the top of the tub.


Now take the float valve out and unscrew the barbed fitting and nut,Pull of the washer and rub the glue they provide with it all around the washer.And put the washer back on the float.


Now shove the float and washer with sealant on it through the 3/8" hole.


Ok time to put the nut on and tighten it down,Same way you done the nut on the ebb n flow fittings,Make sure its nice and tight securing the washer against the wall of the tub.


Go ahead and screw the barbed fitting back on it and its finished.


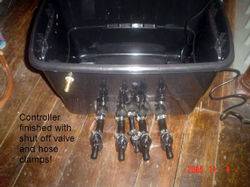
Using the ebb n flow screens and hose clamps the finished controller should look something like this i went ahead and installed the shut off valves on this updated system as well!

 
Last edited:

blazeoneup

The Helpful One
Moderator
Chat Moderator
Veteran
Part 3 "Prepairing the reservoir"

Ok this is a easy one,We need to drill a hole in the bottom of the reservoir using the 1&1/4" hole saw bit.


Now we need to clean the hole up!


Now install the 1/2" ebb n flow fitting.


Thats all the reservoir is ready.
 
Last edited:

blazeoneup

The Helpful One
Moderator
Chat Moderator
Veteran
Part 4 "Hooking up the system"

Ok first we need to get the controller in place!


Now time to place the 1st row and measure out the spacing.


Ok now that we have figured out the proper spacing,And measured it out we need to pre cut enough for all 4 rows of buckets.This will insure each row is evenly spaced.So pre measure and cut them i needed to run 4 rows so i had to pre cut 8 pieces.


Now that we have the lines cut and ready we need to go ahead and hook up the 1st row.


Now that the 1st row is hooked up,Time to hook up the shut off valve,This will be installed at the beggining of the row.


Next step is hooking the elbow up to the shut off valve.


Now connect the row to the controller.


Now lets hook up row 2.


Now hook up the shut off valve.


Time to connect the elbow,And run a line from it to the controller.


Lets move onto row 3,We wil be connect the row,Hooking up the shut off valve,Running the tubing from shut of valve to the elbow,From the elbow to the controller,Just repeating the previous steps.


Time to hook up the 4th and final row for this system,Connect the buckets together hook in the shut off valve,Run line from shut off to elbow,Then from the elbow to the controller,Repeating previous steps again.


Its time to install the feed lines,But i need a smoke break first :bongsmi:
 
Last edited:

blazeoneup

The Helpful One
Moderator
Chat Moderator
Veteran
Its time to hook up the feed lines.First off we need to make a little fitting to drop our feed line down even with the return lines.For this i used 2 1/2" OD elbows and some 1/2" ID tubing.


Now we will connect it to the controller,Should drop it right down level with the 3/4" ID lines.


Ok next step is to run a line from the fitting,To 1" past the 3/4" OD shut off valve in the 1st row,Then connect a 1/2" OD tee.


Now run a line from the tee to the 3/4" OD shut off valve,Be sure to cut even with it.Then connect the 1/2" ID shut off valve.This will enable us to isolate a row if a problem were to accur,Preventing it from spreading through out the system.


Now run a line from the tee to 1" past the second rows 3/4" OD shut off valve.Connect another tee,Run line from it up to the 3/4" OD shut off valve and install the 1/2" ID shut off valve for the second row.


Now we will repeat the previous steps,Run a line from the tee to the 3rd row,Cut off install another tee,Run line from the up to 3/4" OD shut off valve and connect the 1/2" ID shut off valve.


Now we will repeat the previous steps,Run a line from the 1/2" OD tee to the 4th and final row,This time we will be connecting a 1/2" OD elbow to end the run.Then we will run a line from the elbow to the 3/4" OD shut off valve and connect a 1/2" ID shut off valve.


Ok lets go back to row 1 now.We will be running a line from the 1/2" ID shut off valve,To 4" past the last bucket in the row,Cutting it off and installing a 1/2" ID end cap.


Then we will do the same with rows 2 3 & 4,Run a line from the 1/2" ID shut off valve,To 4" past the last bucket in the row cutting it off and connect a 1/2" ID end cap.

 
Last edited:

blazeoneup

The Helpful One
Moderator
Chat Moderator
Veteran
Time to install 1/4" feed lines and run the 1/4" air lines!

Time to install 1/4" feed lines and run the 1/4" air lines!

First we will using a sharp pointy object,I used a cooking thermometer,Works like a charm.We need to poke a hole into the 1/2" Id tubing directly below the 1/4" barb on the bucket installed for the feed line,Make sure its properly lined up for neatness.


Ok lets insert a 1/4" straight barb into the hole we just made.Make sure it is all the way down into the tubing so it does not leak.


Ok now connect a piece of 1/4" ID tubing onto the 1/4" barbs and run it to the 1/4" barbs installed on the buckets for the feed lines.


Ok now all that is left is connecting the 1/4" air lines and row one is complete.


Now its just a repeat process for rows 2,3&4 the pics explain each step,But its just repeating the steps from row 1!


Hooking up the reservoir!

What i do is set my reservoir up on a crate,Then run a 1/2" line from the res to the controller,Connecting it to the barb for the float valve,This is how the system will get auto topp off during the week.


Nutrient solution temps

Now for this type of system i recommend investing in a good water chiller,That is correct horse power for the job,The main problem most people have in dwc is root rot do too high res/nutrient solution temps which cause the water to have lower DO (dissolved Oxygen levels and can cause the water to become stagnant and that combined with high ppm solution will eventually lead to root rot.Nutrient solution temps should be kept in the ranges of 67f-71f no higher or lower for optimal growth.There are a couple types of chillers available on the market,One type is an inline which requires a pump to pump the nutrient solution through the chiller.The other is a coil chiller,For this one you simply run the coil into the controller so as the pump recirculates the water it is chilled as it passes the coil.Either of the 2 will work so its preference really,If you cannot afford the chiller then you must resort to a cheap alternative to help keep the res temps down.Take empty 2 liter bottles and fill them with water freeze them and just drop them into the controller.You will more than likely need to do this multiple times through-out a day to keep optimal nutrient solution temperatures.

For this system i am using a 1/3hp coil chiller,Little overboard but will be could upgrade to 40 buckets in future using this chiller,So always think ahead a few extra $$$ now can save some in the future.


Feeding scedule

Ok heres a chart adjust as needed to maximize growth with your particular strains needs,This is just a good guideline to get you close enough to insure no problems,To allow you to find your plants optimal nutrient levels and adjust to the strains needs.A good thing to do is slowly test your strains raise the ppm's a little drop it a little,Same with the ph take note of the differences in growth save it and use it to see where your getting the increased health and vigor then keep it set at proper levels.Test it often through-out the whole grow slowly making adjustments,You will eventually find the levels your strain best grows at.All strains have different genetic make/ups,And will require different levels of nutrients,And temperature/humidity levels to maximize yeilds/production,So be sure to slowly change all aspects a little at a time and learn your strain,Then maximize your growth/Yeilds!

Indica's
Seedlings and clones 300-400ppm 5.3-5.5 ph
early vegg 500-600ppm 5.3-5.6 ph
middle vegg 600-800ppm 5.4-5.6 ph
late vegg 800-1000ppm 5.5-5.7 ph
early flower 1000-1300ppm 5.5-5.7 ph
middle flower 1400-1600ppm 5.5-5.8 ph
late flower 1000-1100ppm 5.5-5.7 ph
ripening 300-500ppm 5.4-5.6 ph


sativa's
seedlings and clones 250-350ppm 5.3-5.5 ph
early vegg 300-500ppm 5.3-5.6 ph
middle vegg 500-700ppm 5.4-5.6 ph
late vegg 700-900ppm 5.5-5.7 ph
early flower 1000-1100ppm 5.5-5.7 ph
middle flower 1100-1300ppm 5.5-5.8 ph
late flower 800-1000ppm 5.5-5.7 ph
ripening 300-500ppm 5.4-5.6 ph
 
Last edited:

blazeoneup

The Helpful One
Moderator
Chat Moderator
Veteran
Thanks man im going to be working hard to finish it up quickly,But im doing it as i go,And i have to tear down the old system and relocate it before actually setting it up,So i figured i could take and start it make a few extra post edit them in over the next 24hrs,So it should be finished soon enough.

Thanks for stopping in :)
 

SpoCannabis

Active member
Sounds like a plan bro. We sure appreciate you taking the time to post up the construction of your ingenius setup! I was REALLY disappointed when I found out that the original Recirc. DWC FAQ article by train1 was basically completely gone and was unable to be cached =(.... but you have impressed me by posting up your Recirc. DWC Tutorial! K+...ooops ='( ...shed a tear for OG
 

BigToke

Bio-Bucket Specialist *********
Veteran
Niccce blaze, very nice………if there's one thing that i really like and that's a good tutorial and so I give this one a good two thumbs up…..:yes: :yes:
 
Last edited:

blazeoneup

The Helpful One
Moderator
Chat Moderator
Veteran
Bigtoke im sure you do,And i also know theres multiple differences but they simular in the fact that they both DWC.I guess i could have been more specific none the less no pun intended,Thanks for the thumbs up...

Steady smoking thanks for dropping by...

vhGhost hope all is well,This will be finished tonight,Just have to get busy lol,Anyways thanks everyone until next time be safe and take care :)
 

NiteTiger

Tiger, Tiger, burning bright...
Veteran
:lurk:

C'mon, c'mon, quit chatting and finish ya damn lazy stoner! :nanana:

:D
 
Last edited:

blazeoneup

The Helpful One
Moderator
Chat Moderator
Veteran
Im on it,I have the old system torn down room cleaned up right now im cleaning all the new buckets and everything getting ready to hook it all up.

So wont be but 2 hrs max and this will be finished,Time for a smoke break then back to work....
 

NiteTiger

Tiger, Tiger, burning bright...
Veteran
blazeoneup said:
So wont be but 2 hrs max and this will be finished,Time for a smoke break then back to work....

:rolleyes:

The only reason you're excused is because I know what you're smoking :D

Back to work! :whip:
 

Latest posts

Latest posts

Top