What's new

Repuk HML/Coco/Blumat understairs stealth micro grow

repuk

Altruistic Hazeist
Veteran
Hi!

The chamber
The "chamber" is an understairs space, measuring 60x70cm (23"x28") area, 1.20m (4') height. Surface is 0.43 sq meter or 4,7 sq feet and volume is 0,5 cubic meter, or 18,7 cubic feet.

One of the problems you face when trying to prop everthing up in the chamber "ceiling" is the unsderstairs concrete is a real PITA to drill, so I simply glued timber pieces to it, then screw all the hooks I need easily to it by hand.

I built a 3 piece timber "frame", then hung the "door" on the upper frame. The door is a wood sheet with the reflective covering stapled to it.

I stapled the reflective covering to the walls, fixed an AC inline extractor (120CFM) to the back wall. It vents through a wall air conduit, and pulls air through a Mountain Air Carbon Scrubber rated for 150CFM.

I built a dimmer to regulate its speed, not only for noise, but to dial humidity. It's always on.

A couple PC fans circulate air, one below the screens, one above, that will eventually have a twin soon.

The Home Made LED (HML)
Last week the items for my Home Made LED unit arrived and I built it.

The items:

100x25cm Finned Heatsink I cut in two 50 cm long pieces.

P100%2025.JPG


Drivers: 2 Mean Well LPC-60-1050 driving a string of 12 XP-G WW each, and one LPC-60-1750 driving a 10 XM-L string (5 XM-L in each heatsink).

LEDs (Cree already in MCPCBs):
24 Warm White XP-G (5W)
6 Neutral White XM-L (10W)
4 Cool White XM-L (10W)

Artic alumina thermal epoxy to glue the LEDs MCPCBs to the heatsinks.

This gives 220Watts raw, will be run @ ~150-160Watts.

The plan:

Each heatsink has 12 WW XP-Gs, 3 NW XM-L and 2 CW XM-L (black circle: NW, red circle WW, blue circle CW):

picture.php


I tested all the LEDs, tinned the MCPCBs, mark their placement on the heatsinks, placed them w/o gluing yet to check the MCPCB "orientation" to ease wiring, then glued them, finished the wiring, tested for shorts with a multimeter, checked visually three times that the wiring was right, then hooked each string to its driver and lit them.
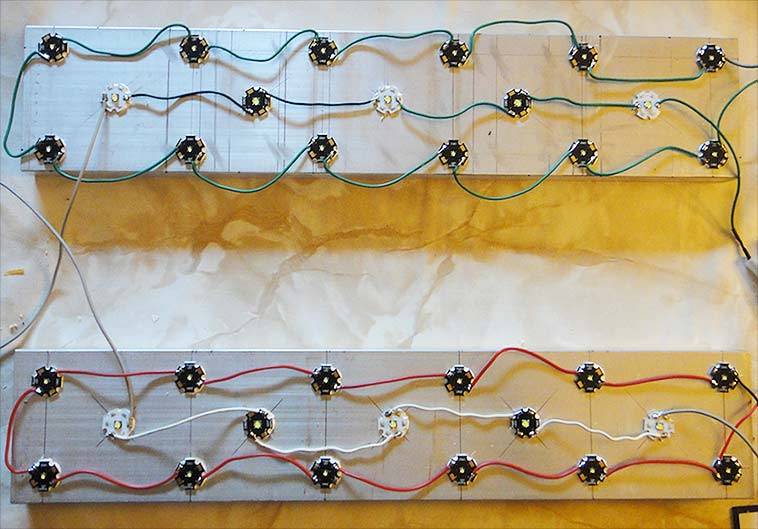
picture.php


I put an inline fuse in the positive rail with each of the strings: 1,5A for the XP-G's and 3A for the XM-Ls.

I checked AC amperage, 0.25A the LPC-60-1050 (AC voltage read 232V), or 58W. The LPC-60-1750 0.4A. That's 90Watts, had me puzzled as expected the 1750 to be much more efficient.
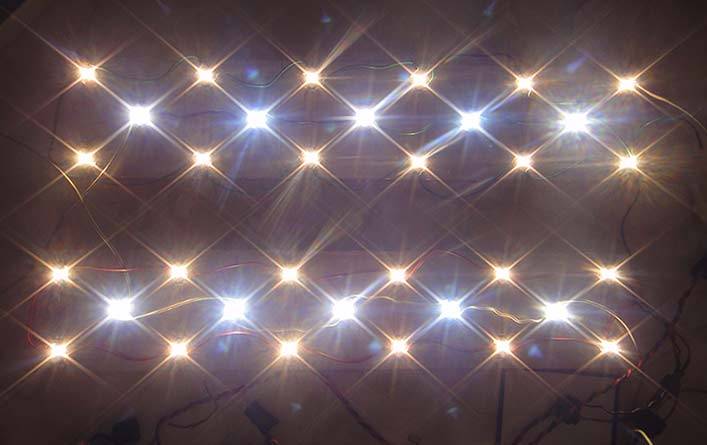
picture.php


Mad brightness, had to be careful not to ever look directly to the lit chips.

The heatsinks get hot, but you can touch them and hold the finger there.

I have put them 15" (40cm) above the canopy. Still in 18/6, I intend to flip to 12/12 by mid week, still have to repot one clone and prop its screen.
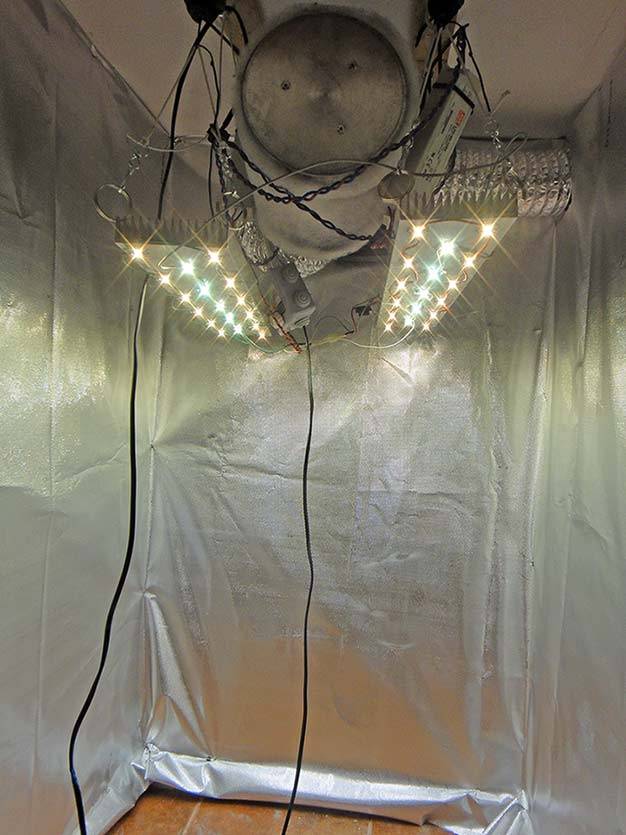
picture.php


I vegged 2 seedlings: Somango on 16th Sept and Amnesia Haze one week later with a two 55W PLL fixture I built myself. A mate gave me a couple Atomic Haze clones, which have been vegging for a week under that same PLL.

Lots of changes at once, something not advisable as if anything goes wrong there will be lots of variables to check, but... had no other chance:

Swapped the PLL for the HML
Repotted all the plants, but one clone, as ran out of coco!
Fitted the modular screens
Put the Tropf Blumat cones and its tubing
Set up the reservoir

I repotted to 11L pots and fitted the modular screens.

The somango had to be severely bent/supercropped to fit under the screen.

I gave them a dose of rhizotonic + B52 (PH 5.7, EC 0.9), until all the pots were well wet, then put the blumats that had been sitting in a water jar for a couple days on saturday, then fitted the tubing and setup the reservoir on Sunday. I adjusted each blumat so that it dripped 1 drop per second, then closed a couple markings.

The reservoir has an small aquarium pump inside, that fires 15 minutes on, 15 minutes off.

I filled the reservoir with tap water (0.4EC), adding Canna's coco A+B solution for EC 1.8, PH'ed to 5,6 and added Drip clean.
 

blynx

WALSTIB
Moderator
ICMag Donor
Veteran
Nice clean setup! Looking forward to seeing this run.

Are the Somango and Amnesia Haze fem seeds? or did you sex them already?
 

repuk

Altruistic Hazeist
Veteran
Nice clean setup! Looking forward to seeing this run.

thanks!! I've followed your threads learning micro scrogs! A pleasure having a micro scrog master here! :)

Are the Somango and Amnesia Haze fem seeds? or did you sex them already?

Yes, they are feminized. I may have vegged the somango too much, but in a previous grow back In 2009 in SOG they came out with rather weak stems and fluffy buds so I thought I'd better let her gain strength. She has a rather thick and strong main stem right now... Hope it doesn't stretch too much as I don't have too much clearance to the HML...

Glad to see you here baino! Welcome :)
 

repuk

Altruistic Hazeist
Veteran
ModSCREENS

ModSCREENS

I want to share what I learnt from a newbie perspective, so will comment on the other two key aspects of this grow that are new to me growing wise.

The modular screens: modSCROG

Having a fixed screen is something I don't like, but the idea of modular ones changes the game. Two great threads to check (learnt a ton from them!) VerdantGreen's: VerdantGreen's Quarters - 187 watt LED - Organic Modular ScrOG a great place to get a grip on modSCROG! and Blynx thread for micro scrog with tons of "daylapse" like pics.

First step: making my mind on the pot size. As VG once told me SCROG plants are big ones crammed/convoluted in a small space, i.e. big pots = big yields.

I use 100% coco, two key points are: coco doesn't need big pots as it's an hydro medium where we feed the plants on each watering as it doesn't have any nutrients itself; the another one being coco shouldn't be let to get bone dry, it's best when humidity is kept high or salt buildup and some other less than optimal conditions take place.

I finally chose 11L (2,4gal) square sturdy plastic pots, keeping an eye on its height. I could have gone further and use 5.5 gallon (25L) pots, but that would make controlling relative humidity a hard task, and RH is key while flowering in such a small space.

11L is a decent size, and by using blumats, a constant, per-pot customized dampness and feed can be maintained ensuring the plants will never lack nutrients.

I chose them square for easier modular screen fitting. I drilled an array of holes on all the pot walls for better coco aireation and air pruning the roots. (Coco promotes incredible root growth), and also drilled the pot upper lip to screw from the underside of the lip to the modular screens.

Following are some pics, I just used the exact same system VerdantGreen uses in his latter modSCROGs to fit the modular screens to the pots.

I built the screens with timber, then cut and stapled "rubber cord" pieces making the net. This hollow rubber cord is sold to tie plants/branches without damaging the stems.

An important thing when calculating the size is to let some clearance, i.e. my horizontal grow area is 60 cm x 73 cm, and I want to fit 4 modular screens, exact math would dictate that each will measure 30cm x 36,5cm.

DON'T. Leave some clearance (I made mine 28cm x 34cm):

Even when the grow space is the inside of a cabinet, where tolerances are small (rather bigger on a brick and mortar space) you will have a much easier time if you can easily take them in and out having some clearance to wiggle them, specially when they are "populated" by a flowering plant.

It will also ease air flow through all the chamber.

picture.php


As you can see here the screen will be fixed to the pot lip using two off-center pieces of timber (inside the frame, left and right). I offset their centers relative to the frame height to lessen the tendency to rotate being fixed by just two points.

This should be done with the pot at hand to test, I would have put the fixing timber pieces underneatch the frame, but when mocking up the setup with the pot I saw that screwing them inside the frame they happened to fit nicely the pot lips width.

picture.php


picture.php


Pot lip to screen frame height is 15cm (about 6 inches). It isn't much I know, but I'm constrained in height:

Remember I'm constrained in height as my DIY luminaries have 10W LEDs in it, and from what I've read, it should be kept between 30-40cm (12-15") from the canopy. Frame height from the floor is 42cm (~16,5"), so being the grow space height 1,2m (4') and the maximum height the HML can be lifted 105cm, that minus canopy distance leaves about 33cm for over the screen growth for a 30cm LED-canopy distance.
 
Last edited:

hempfield

Organic LED Grower
Veteran
:good: A little late , but I am 100% subbed ! :lurk:

Out setups are quite similar, (I have a slightly large surface but lower height) and will be fun to compare this grow in the following weeks, even so you have a short advantage ( I germinated the seeds on October 15th) which I hope I will overcome (by using DWC) :biggrin:.
 

repuk

Altruistic Hazeist
Veteran
The blumats

In my previous grows I used coco, and was impressed by the speedy and healthy growth it promotes, with the added benefit that being an hydro medium you know exactly what the plants are eating.

I hand watered them, and that end up being a royal PITA, not being able to be away from home for several days, taking substantial time that I didn't have, and impacting plants development if a day in need of watering I wasn't able to do so.

Right now I need blumats not for comfort but because due to the "environment" a week could pass before I could tender the girls.

Blumats are porous clay cones resembling a carrot that act as "live sensors" of substrate humidity, opening the dripper when it falls below your set level.

They don't need pumps, nor electricity.

I'll try to write down a Quick Howto, summarizing what I found most important for me, but if you want to really learn about them, go to the original blumat thread, is a couple hundred pages long, but you have a direct link to post collection at the first post, then to DesertHydro's Blumat auto watering FTW! to get a hold of its use with coco.

The Reservoir

Blumats aren't intended for hydro but for soil, but can be used for coco with a nute solution as long as gumpy nutes, organic nutes or anything susceptible to clog the lines isn't added to the reservoir feeding solution.

That doesn't mean you cannot feed whatever you want, by simply hand watering those nutes; the blumat will sense that and stop dripping... best of both worlds!

Is it advisable to use an salt preventing additive to the nute reservoir, like Drip Clean, that will both prevent salts clogging the lines, and salt buildup in the pot's coco.

Also note that you shouldn't use air pumps/stones inside the reservoir, as it will promote flocculation that will end up clogging the lines, or equally bad: air bubbles that end up clogging the lines. By continuous dripping and the nature of coco itself provides more than enough medium oxygenation.

I used a jerrycan style plastic container I got for free at a car wash, washed and rinsed it thoroughly to get rid of any soap residue, filled it with tap water and left it a couple weeks emptying / filling it twice: a 26L (5,7gal) free reservoir.

Mine is translucent, that should pose a problem with algae, but I keep it in a place that is always dark, so no problem. If you will let yours in a place which is usually lit, you should better get one non translucent, or simply cover it with a thick black trash can bag.

Blumat installation: what will you need (pics follow)

* Tropf Blumats (not juniors, nor maxies as long as your pots are below 5gal) one per pot. They come with an incorporated T.

* 8mm line: a black or white, hard plastic tubing which is a PITA to work with.

* 3mm line: a soft rubber, brown one, which is much more manageable. It usually sells in 5meter rolls.

* 8mm T connector (to build a vent line)

* Reservoir Thru-Hull connector: You must drill your reservoir and fit this, the rubber gasket goes inside, with the water.

* Blumat valve: 2 of these Will make your life easier, put one at the reservoir "output", and another at the end of the line to ease air/bubble purging (more on this later)

* Quick disconnect fitting, if you want to be able to "disconnect" the reservoir from the line installation for refilling, rinsing, etc. I used a 8mm quick disconnect intended for industrial pneumatic air installations. With this and the valve you'll be able to do so. See this post from BorkBorkBork I used the same but in 8mm, so no need for the clear tubing to adapt it.

* Optional (if you don't use valves) Blumat End Piece, AND 3mm cap.

Tropf Blumat:
picture.php


8mm T connector:
picture.php


Reservoir connector:
picture.php


Valve:
picture.php


End Piece:
picture.php
 
Last edited:

repuk

Altruistic Hazeist
Veteran
Blumats

Blumats

blumat installation: Howto

The most common option is to run a single line of 8mm tubing that goes from the reservoir to the T connector of the first blumat, then to the second, the third... etc, until the last one, where you add a piece of extra line, then you can put an end piece with a 3mm cap shutting off the 3mm connector, or much better, ditch the end piece and put a blumat valve at the end of the 8mm tubing.

Why? because once you get it installed, fill our res, etc, you'll need to open that valve (or remove the 3mm cap on the end piece) for air to escape letting water to go inside the lines. Not only at the first time, but in fact you should "purge" once a week, as air bubbles are blumats number one enemy.

A more elaborated install, which I used, uses additionaly a "vent" to ease air bubbles venting, right after the hull reservoir connector, goes a T with one 8mm tubing that should be at least as high as the highest water level your reservoir will have.

HeadyBlunts posted a very nice drawing that speaks for itself:

picture.php


The vent will provide a low resistance path for air to escape through it, rather than get trapped into the line or thru-hull connector.

picture.php


Here you can see closer the thru-hull, connector, the T with the vent, and the "quick release" connector: the grey thing on the right:

picture.php


It's better to install the T for the vent with the same orientation HeadyBlunts depicted, but I had to fit it this way due to space constraints.

The blue thing is a plastic disc to aid in releasing the "quick release" pneumatic connector, which requires a fair amount of prying force in order for the tubing to be released. I didn't have the valves at hand so to release the tubing the reservoir must be emptied first... a no-no... get the valves!

You may ask: Why the extra 3mm tubing? because although the blumats come with a T, and 3mm tubing that goes from the T through the blumat, is it much easier to route/work with the 3mm tubing than the 8mm hard tubing from the main line.

You can replace the short (~5") 3mm tubing that each blumat brings stock and replace it at a lentgh that eases moving the pots, etc, leaving 8cm protuding from the blumat is enough.

There's also the option to run a "closed loop" 8mm line, go to the HeadyBlunts posted for a detailed drawing.
 
Last edited:

repuk

Altruistic Hazeist
Veteran
:good: A little late , but I am 100% subbed ! :lurk:

A pleasure to have you here hempfield! :)

Out setups are quite similar, (I have a slightly large surface but lower height) and will be fun to compare this grow in the following weeks, even so you have a short advantage ( I germinated the seeds on October 15th) which I hope I will overcome (by using DWC) :biggrin:.

Aaaah, competition!!! :) DWC vs Coco+Blumats!! great!! It surely will be fun to watch!
 

Irie_Lion

Free up the Herbs....Let the Sacrament grow!
Veteran
Very nice informative thread so far..should produce some lovely ladies! Good vibez
 

hempfield

Organic LED Grower
Veteran
A pleasure to have you here hempfield! :)


Aaaah, competition!!! :) DWC vs Coco+Blumats!! great!! It surely will be fun to watch!

Not competition my friend : we will be like to pregnant ladies walking on the park, talking about pregnancy, changing baby food recipes , complaining about the long expectation until due date and so on :joint: :biggrin:

But hopefully, no pregnancy will occur neither on your or my growspace ! :laughing: (even so I intend to do some breeding experiments this winter, but in a separate place of course).
 

repuk

Altruistic Hazeist
Veteran
Heheh, I know, was just kidding!! :)

I will consider myself lucky if I get 90-100grams!!! Too many things new for me: genetics, HML, blumats, grow space, etc.
 

hempfield

Organic LED Grower
Veteran
You know, even I have a quite powerful light source for a single user grow, I wish sometimes that every harvest to be less than 50g so I can grow all the time, because it's so interesting to grow.
 

repuk

Altruistic Hazeist
Veteran
You know, even I have a quite powerful light source for a single user grow, I wish sometimes that every harvest to be less than 50g so I can grow all the time, because it's so interesting to grow.

Just as your sig says! I love this hobby!

Note: added more pics to the modscreens and blumats posts.

Here are the girls, I had an unexpected chance to tender them yesterday:

picture.php


From top to bottom, left to right:
Somango (seed, 6 weeks old) Amnesia Haze (seed, 5 weeks old), Atomic Haze #1 and #2, these were clones given to me, they have about 3-4 weeks I guess.

All were topped and LST'ed prior to being repotted to these final 11L pots and fitting the modscreens, I always water with just rhizotonic (0.9EC) when repotting, this time they got a dose of B-52 also. I ran out of coco so have still to repot Atomic Haze #1.

I feel they're in the typical phase of growing roots like mad in coco, where you don't see too much "green" development; once they sense the pot they start to grow like mad.

The somango had to be bent and supercropped to fit under the screen, it's very bushy with tons of fat fingered leaves not visible right now as they're under the screens, will defoliate the lower area once I see her "well stablished".

I lowered the HMLs yesterday to the minimum position of 30cm from canopy, I started at 50cm the first day, then lowered to 40cm for several days keeping an eye on new leaves, and felt they will benefit from the HML being closer.
 

repuk

Altruistic Hazeist
Veteran
I was able to repot and fit the modscreen to the last Atomic Haze yesterday! Boy that was working under pressure!! (while kids went out to get halloween costumes).

I checked and triple checked the blumats and they seem to be working nicely, I found myself checking the rez level every now and then like a paranoid!!

The lower led to canopy had a noticeable effect, girls look much happier now! (couldn't snap a pic, will do ASAP!
 
Last edited:

Chloemobile

Active member
I will be following this grow closely! I'm still experimenting with mediums and the coco/Blu mat sounds nice. Would love to see how it works out. I have a small cab that I want to do a micro sog in do you think the smaller Blu mats will work in 4in pots?

The led rig is really impressive curious about the costs?

Good luck man you have an admirer!

:lurk:


=D
 

Latest posts

Latest posts

Top