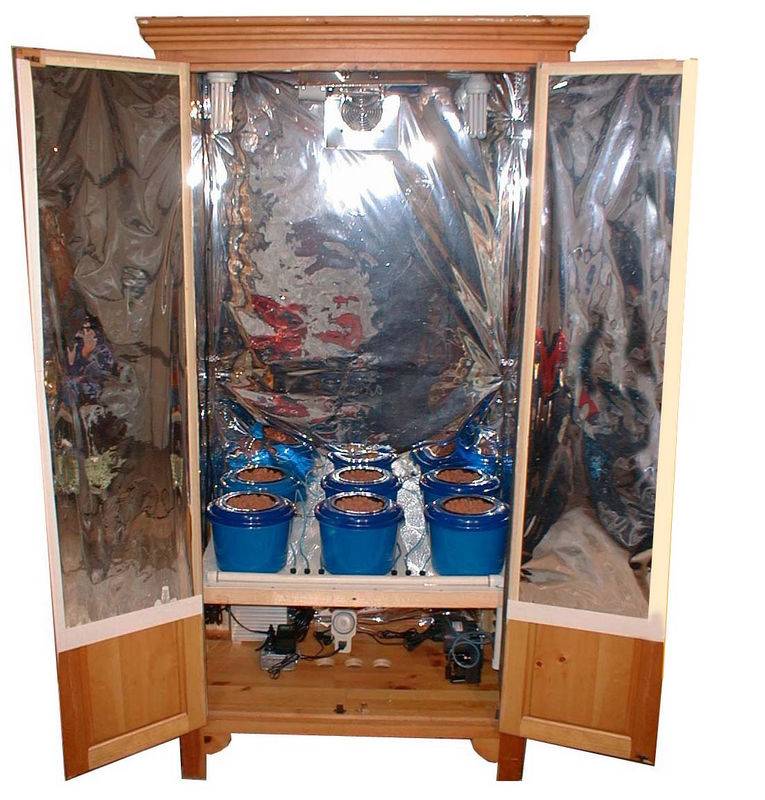
Well, for what it’s worth, here it is, my “150w Tiny Bubbler System”.
For those of you that know me from “Overgrow” consider this a refresher, and for any new fellow growers, I hope my efforts help you along your path to success.
Most folks post their grow set-ups as they build them. It’s a great way to do things as it lets others steer you away from mistakes that they’ve already made. And, it helps those that are coming up behind you too. But being a bit lazy, and even a little more stubborn thinking I know what’s best, I chose to build on my own. First off let me say I was wrong. Had I allowed others to see what I was doing, and comment on my efforts, my success would have come both sooner and with less aggravation. As you read thru my thread, even if you learn nothing at all, remember this one thing. Websites like ICMag are wonderful communities filled with a ton of knowledge and great folks just waiting to share it. The only foolish cultivators on-line are those that don’t use the resources freely available to them. Believe me, I speak from personal knowledge. And remember, not everything works for everyone, filter what you read and keep a close eye on your own plants, there are no greater teachers than they are.
OK, let me get off my soapbox and give you a little background. I’m in my late fifties now and have smoked and played around with growing since I was a teenager. Shortly after I got married, I drifted away from pot for a while. Then, just as I was turning 40, I had an accident that crushed a couple of disks in my back. It put me in the hospital for almost a month. Over the following year I became addicted to Percoset, and it took me another year to get off it. The accident had left me with chronic sciatic pain, and a deathly fear of prescription painkillers. At the suggestion of a friend, I tried marijuana as an alternative to addictive medications. And, as a result, I gained a new lease-on-life with both safe pain reduction and a hobby that brings peace to my spirit.
So I’ve been growing for many years now, learned a ton along the way, and continue to pick up new knowledge daily. I’ve tried every method out there including indoor and outdoor soil, soil-less, ebb & flow, wicking, aero, and some methods that may not even have names. My objective was simple…produce a small continuous supply of high-grade medication with a minimum of work while keeping the initial costs and ongoing expenses to a minimum. I also wanted it to be attractive enough to keep in my home and totally self-contained.
The system I’m presenting here has evolved over many years with numerous modifications resulting from trial and error. But for all intents and purposes, it has not been changed in the past 10 years or about 25 harvest cycles. It easily produces more than enough medications for my needs and a good bit left over to entertain friends. It is easy to build, with a large number of parts coming from “Dollar Stores” and the trash on “Big Pick-Up Day”. Even with nutrients, it cost less than a dollar a day to keep running. The maintenance of the whole system & crop take just a few moments every couple of days.
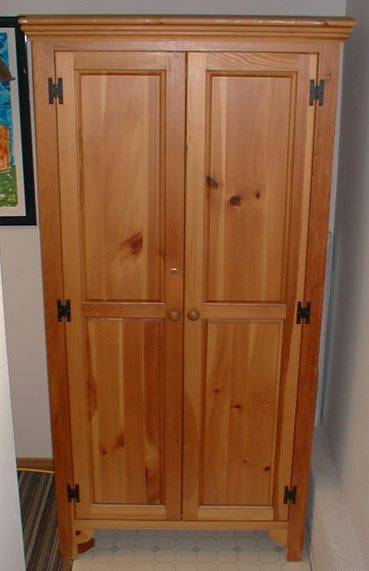
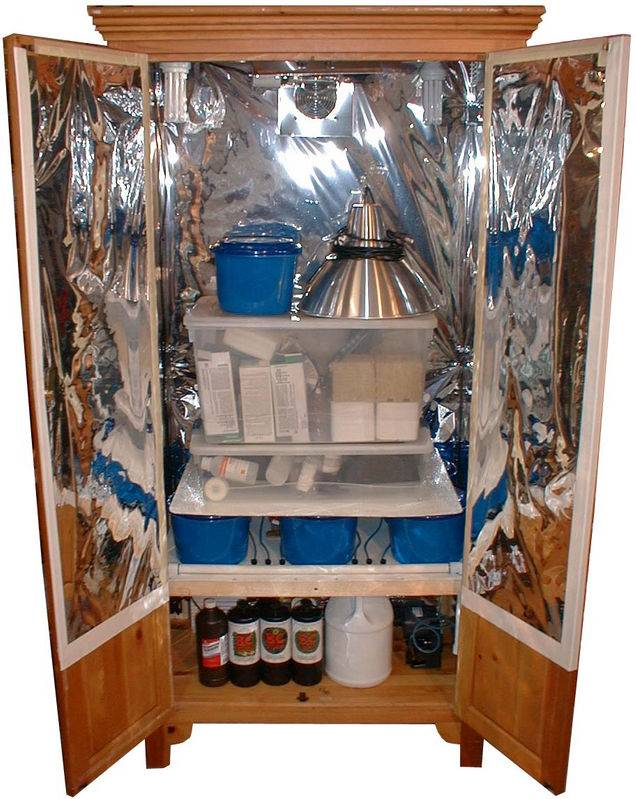
The cabinet itself was probably my luckiest find. It was a portable clothes closet with just one chamber and a hanger-pole running across the top.
Made from solid pine, its most interesting feature is that it will come totally apart and store flat without using any tools. There are small plastic clips on the inside with metal pins in them. Pull the pins out with your fingers and each wall just comes right off. I found this in a garage sale for $20. Inside it measures 20.5” x 33” x 65” with the outside dimensions just slightly bigger. The first thing I did was to install a lock in the door. Even though my family knows I grow, there are enough friends and workers coming and going to warrant a bit of privacy. Next, it needed a bit of reflective material to maximize my lighting. I started out with some white foam-core boards. I soon realized that I was insulating heat into the grow space, and swapped them out for the Mylar you now see. Purchased at a Hydro store it was not that cheap. My buddy uses Mylar gift-wrap from the Dollar store; it works just as well and cost him almost nothing. What I’ve learned is that Mylar is not easy to keep clean and flat. If you spray in your box (and you will) you’ll have a job washing down the walls. My advice is to go with several coats of bright flat white paint instead. When my Mylar does go, I’ll be going the paint route myself.
Early on, I had left the hanger pole inside and hung my light fixtures from it. Once I decided what my permanent lighting would be, I removed the pole and mounted my fixtures directly to the top.
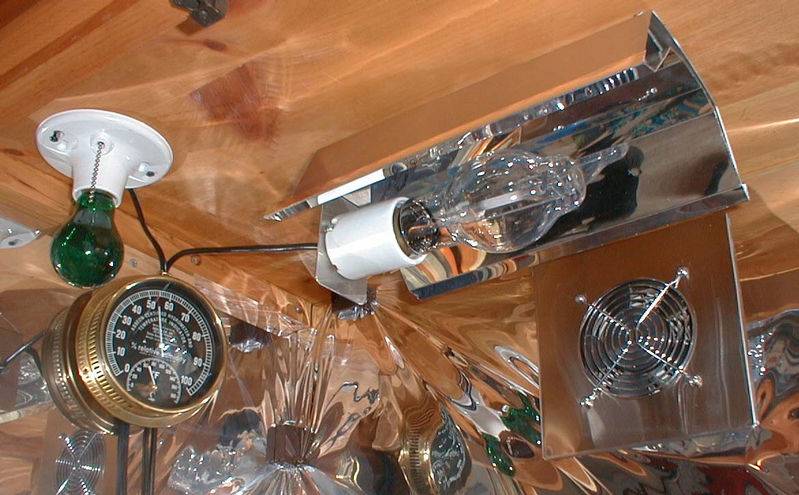
. The main lighting is a 150w HPS with remote ballast. It started life as a security light. The reflector was home built with some scrap metal and a piece of a light fixture I obtained while dumpster-diving. The bulb is nothing special, I use the cheapest ones I can find and never pay more than five bucks each. They usually come from flea markets and I change them every few months. I chose a 150 Sodium for several reasons. First off they are cheap to buy, run, and replace. Also, IMHO it’s the best bulb to use from sprouting right thru harvest if you are only going to use one. And lastly, it really doesn’t generate much heat at all. As you can see, my ballast is kept right inside the box with everything else.
If you look at the top of the box you’ll see two additional lamp holders. These are just plain sockets from the Dollar Store connected directly to my outlet strip. The original intent and still main use of these is to hold green bulbs. This is a cool idea I picked up while hanging out at the local Agricultural University Extension Service. They use them to work in the greenhouses during the dark period. Plants can’t utilize true green light in the photosynthesis process, and as a result it won’t disrupt their dark cycle. My job requires me to travel quite a bit and I never know exactly when I’ll be available to tend my garden. The use of green light has given me 24-hour access even during flowering. If you choose to use this technique be sure to get green-glass bulbs not just bulbs with a green coating on them. The second use of these sockets was never really planned for, but thank god they were there. A few cycles back a couple of my plants were allowed to vegetate a little longer than I had planned. As a result, when they stopped stretching, they had shot up past my 150 and were in the dark near the top of the box. I pulled out my greenies and replaced them with a couple of CFL’s, crisis solved! Could a 250 or 400 be used, and wouldn’t it produce larger tighter buds? Yes and yes. But I’m already growing more than I need and I don’t have to deal with the excess heat and cost. Besides, keep in mind that a larger bulb isn’t going to make your plants grow faster or ripen sooner. That aspect of their growth is programmed in their genes. As you may spot in some of my pictures, early on I adjusted my lamp height by raising my platform. Then I tried lowering the reflector. Both methods proved unsatisfactory due to the nature of a perpetual harvest with different size plants all growing at the same time. I’ve settled on leaving the light at the top, and occasionally raising individual pots by placing something under them.
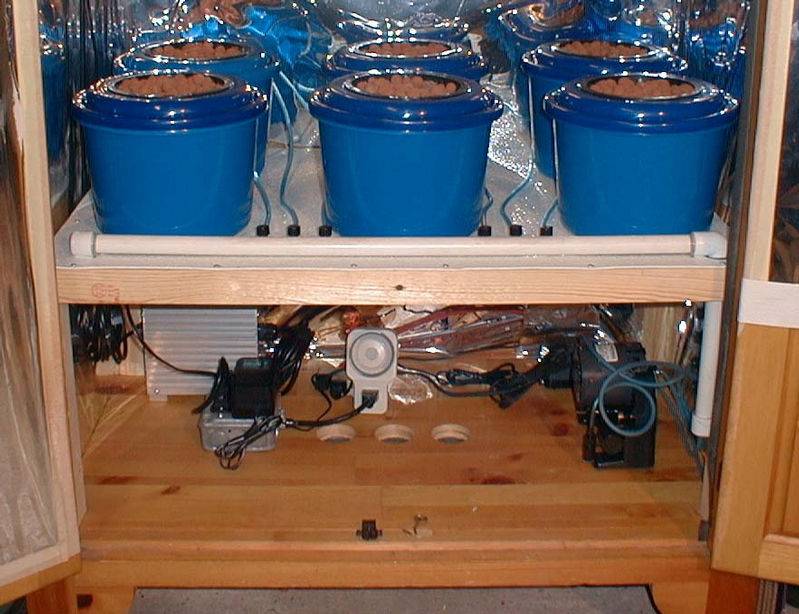
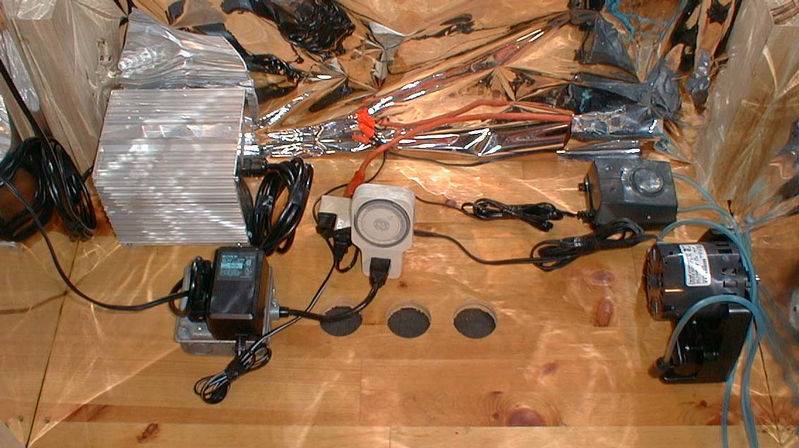
Ventilation in my cabinet is as basic as it gets. All I’m using is one heavy-duty 4.5-inch computer-type fan placed behind the main light near the top of the box. It’s a 12-volt DC model and I’ve got an old wall-wart powering it up. Both the fan and the power supply are two more examples of the value of dumpster diving. A word of advice for those of you new to hooking up electrical items such as these, when matching your device to your power supply make sure that the voltage match is exact, they are both either AC or DC, and that the amperage rating of the power supply matches or better yet exceeds the draw of the item you are powering up. My intake is comprised of three large passive holes in the floor of the box covered with window screening to keep any creeping or flying creatures out. I used the de-facto standard that says your intake should be 50% larger than your exhaust. To apply it properly use the formula for the area of a circle where, Area = Pi times the Radius Squared. And keep in mind that this is just a guideline, not all fans of the same size move the same amount of air, and you may need to go larger on your intake ports. Also, if your box is smaller or better insulated you will have more heat build-up and your cooling requirements will increase respectively. Plus remember that if your exhaust will go thru a scrubber you’ll likely need a more powerful fan. Another factor is light leaks. I keep my box in an unlit area. If yours will be in a space with normal ambient lighting, you’ll need to have light traps on all of your ports during flowering.
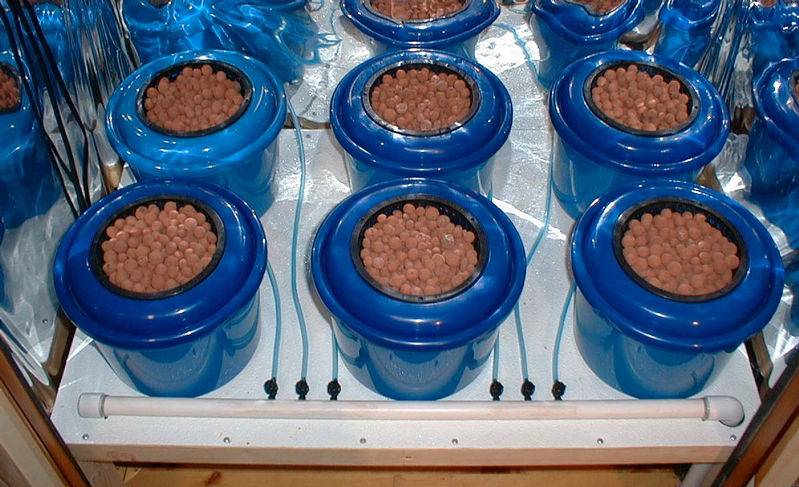
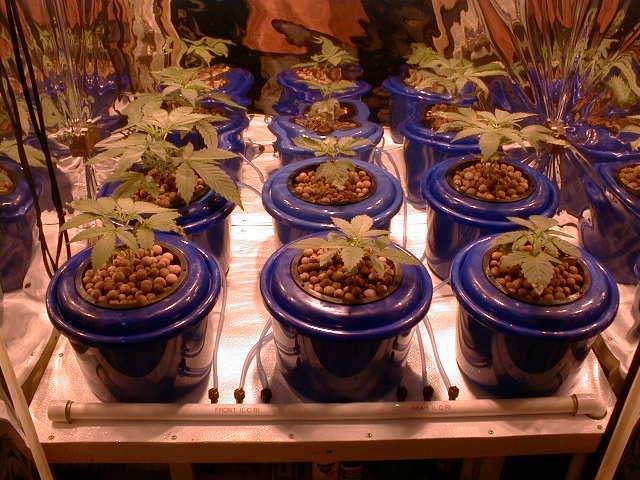
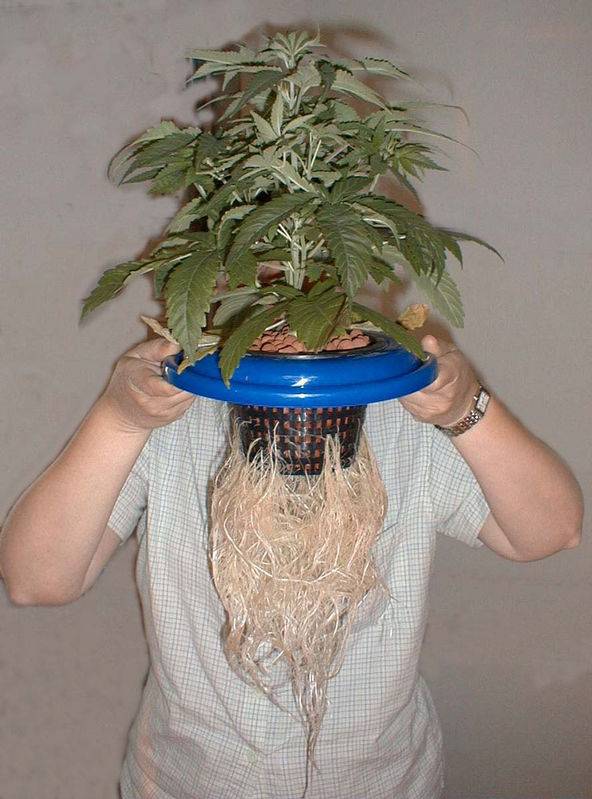
So I guess its time to get to the heart of the matter. The basic growing system is Deep Water Culture (DWC) Bubblers comprised of 6 very small individual containers. Each of the containers is only 5 liters in size, just over 5 quarts for those on my side of the big puddle. Again these are Dollar Store items that I cut a hole in the top of, dropped in a net-pot, drilled a very small hole in the side for my air-hose, and fastened a small air-stone to the bottom of. Total cost for each station with Hydroton was under $4.
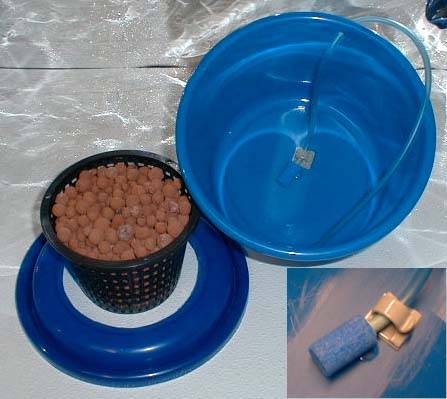
Let me take a minute to tell you the mistake I made with my air-stones. I wanted a ton of bubbles, so I bought 4” long flat-bottom air-stones and hot-glued them to the bottom of the buckets. They cost a couple of bucks each and worked great for about three weeks till the holes started to get blocked with minerals from the nutrients. Airflow was greatly reduced and I needed to get them cleaned. Problem was they were glued in. I had to remove my plant, remove the bucket, fill the bucket with a dissolving agent, let it sit overnight, flush it thoroughly, then put it all back together. This was a real pain in the ass for me, and an unneeded disruption for my plant. As a result I did two things. First, I went to small 1” round air-stones that only cost 30 cents each, they are now held in place with a cable clip glued in the bottom of the buckets. When they get clogged, it takes 10 seconds to put a new one in and throw out the old one (no more cleaning). And second, no matter what your bucket or tub looks like, buy an extra one. This way when you need to remove a plant to work on your system, you can lift off the whole top and have the perfect place to rest it.
Sorry for going off on a tangent. Lets get back to where we were.
There is no common control bucket or reservoir connected to my containers. As a result, each pot must be filled individually. It’s a bit more work this way but it offers some very good advantages over a common feed or large “tub” type system. First off, this is a perpetual harvest and it allows me to give each plant its own custom blend of nutrients for its stage of growth or condition. It also allows me to easily place or remove one plant at a time without tearing roots or disturbing the other plants. Additionally, if one plant should develop root-rot or some other aliment it won’t spread to the rest of the crop. These are very important factors to me as a medical grower as I can’t afford to put my entire crop at risk. Keep in mind that these small containers only have about one gallon or 4 liters of liquid in them at most, so fill-ups and change-outs are very easy and economical to do. During vegetative growth or late flower, top-offs are every three or four days. During heavy growth periods or very hot days that drops down to every two or three.
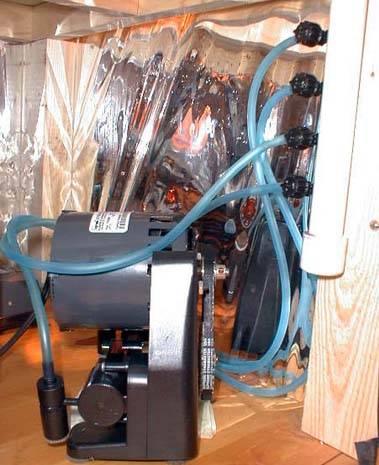
My air supply system was designed with ease of use and high reliability in mind. I’ve chosen to use a manifold-type system. Basically, I have two air pumps that supply air to a common manifold and each container has it’s own airline and control valve off the manifold. It’s made from standard PVC and inexpensive aquarium valves that were less than a buck each. This allows me to easily balance the system, as well as remove and replace a container or pump without any air-loss. I’m using two different pumps to supply the air. The first is a standard dual-diaphragm dual-output pump, and the second is a dual-piston type. The dual piston pump moves a ton of air, but does require oiling and is a bit noisier than the other one. Both run all the time, so if one pump should fail, the other picks up the load and keeps everything happy. I’m also thinking of purchasing an inexpensive battery operated back-up pump that would automatically come on if the whole system should loose power. It’s called a Silent Air B11 and they’re only $11. Seems like a good investment to me.
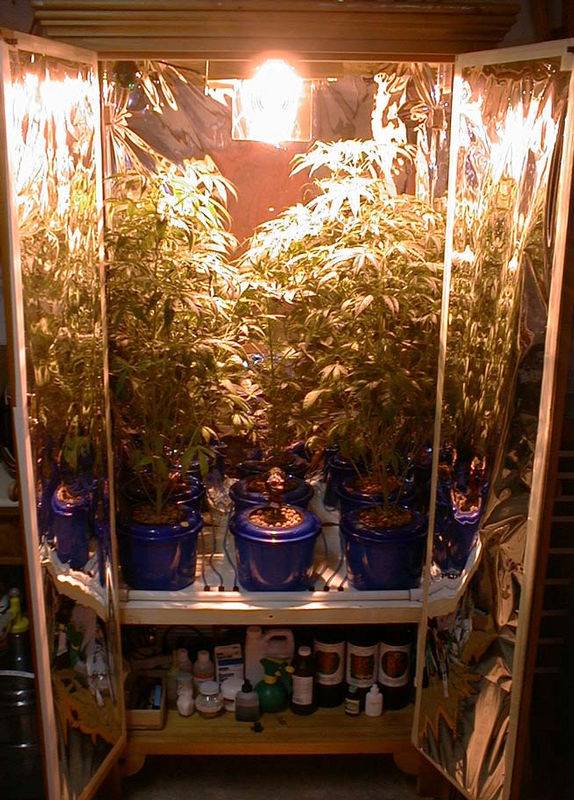
That’s the basics of my systems hardware. As far as the actual growing goes, I go both ways, seeds and clones. I’ll sometimes keep a small mom as a houseplant and use her to supply clones. I keep her in a small soil pot under low level lighting and feed her with a weak nutrient solution. This keeps her small and prevents flowering. Once winter comes, I usually have enough meds stored up to last me a while so she gets flowered too. My preference is Jamaican Sativas, but if I’m lucky enough to be gifted some seeds from good genetics, they get sprouted and put into rotation. Either way, seeds or clones, the plants are first placed in one of the side positions to the rear of the lamp. They are rotated in their own pots every few days, and then moved to the other side of the box, and then to the center position directly under the light in the later stages of flowering. As one is harvested, everybody rotates positions, and a new plant is introduced.
There are tons of threads and resources that speak to the benefits of different nutrient solutions, additives, and pH levels. It’s not an area I claim to be an expert in, so I’ll just tell you what works for me. I’ve been using the same nutrients for many years now and see no reason to switch. It’s a three-part solution made by Technaflora called BC Grow/Bloom/Boost. Using three parts allows me to easily mix it at different levels for the various ages of the plants. I run anywhere from 400 ppm up to 1200 ppm depending on their stage of growth. (5/11 Edit: In recent years I've gotten even lazier, if that's possible. I now use a one-part dry powdered nute by GH. It has eliminated all mixing, messy liquids, and I'm no longer concerned about the bottles freezing in the winter or how long their shelf-life is.)
PH is another issue. I used to fight with it continuously and was never happy with it. About three years ago, I switched over to 100% rainwater and haven’t checked my pH since. The girls get it exactly as Mother Nature provides it and they love it. All I do is to run it thru a coffee filter to remove any suspended matter.
Here’s a final word on Perpetual Harvests. While I call my crop a PH, it’s really more of a staggered harvest. Figuring out the timing to maintain true perpetuosity is very difficult. You must know precise vegetative and flowering times for your strain, start with only one plant, maintain perfect conditions, and be willing to wait weeks or even over a month to add the second and then third and so on. Throw another strain in the mix, and you screw everything up. Yes, they do exist, and can be maintained with a bit of effort. However, I feel they are better suited to much larger commercial set-ups. My modified version is close enough for my needs and more than likely those of most other medical and recreational users.
Well that’s about it. I’m sure I left a lot out, and I’m even more sure there are better ways to do things. And I know, there are more experienced and educated growers out there willing to help out. My only intent here was to show what works for me, and what might be a good starting point for other growers with personal medicinal needs.
Thanks for taking the time to read through my thread.
Grow Smart & Grow Safe
Pipedream
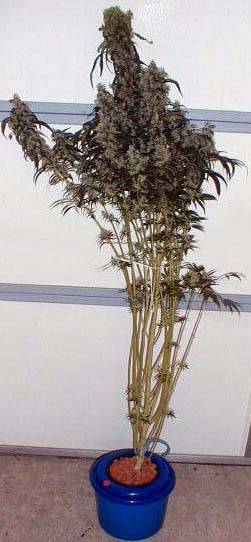
By the way, I thought you might like to see a few pictures from one of my grow cycles, so here goes. And, if you have any comments or questions, I'd love to hear them so post away.
Last edited:


