N
Neptune
Hey ICMAG, howzit?
I notice a lot of people having troubble with cloning, and I get a lot of questions on my technique... and since the wealth of information at OG is lost, I thought I'd do a little "How to Clone" thread.
Today I am taking 80 clones, the mothers were dosed up last night with a kelp and guano tea to help them survive the proccess a little better, plus the cuttings will have taken in some of the delicious juices to help them on their journey of making roots...
So here we go!!
I start by soaking Rockwool sheets in General Hydroponics 3 part Flora Series, at 2-2-2(grow-micro-bloom) ml per gallon. I use the rockwool sheets that have a 50 count per sheet. This gets my tap water to about 300 ppm, and a PH of ~ 6.2 roughly. PH is not too important during cloning, but it should be around the 5.8-6.4 range. I have a PH/TDS meter, but it is not needed if you stick to the 2-2-2 ml/gal.


The rockwool soaks in the GH solution for at least 1 hour, any longer is optional. Overnight is fine, and is my usual practice. I then collect my materials:
1) sharp scissors
2) poking thingy, a nail will work
3) exacto hobby knife
4) dip & grow rooting hormone, mixed to the "10x" concentration level.
5) iso alcohol for cleaning my utensils prior to use

I then remove each cube from the solution, and I shake out the excess moisture. This is important, Shake out the excess moisture!!! To do this, lightly move the cubes up and down firmly, as if shaking water off your hands after you have washed them.
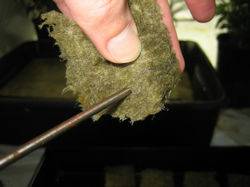
Next, take your nail/pokey thing and drive a hole on the outside of the cube. Do not use the pre-made hole, poke your hole on the Outside area of the cube. There is more oxygen out here, and the cube breathes better here.. Place your finger beneath the nail/pokey and stop driving the nail as soon as you lightly feel it on the other side. Do not puncture through the cube!!!


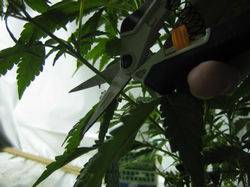
Once all your cubes are shaked, and poked, you can start taking cuttings from your favorite mother plants. I take my cuttings from healthy, medium thick branches. cuts should be done with anything SHARP, I prefer these snip scissors. Take the cuttings at a 45 degree angle.


Immediatly dip the freshly cut end of the stem into your Dip&Grow rooting hormone, or whatever you have decided on. There are plenty of rooting hormones, and all of them work basically the same.
Remove all excess branches and new forming shoots on the first 1 inch of the stem... these small shoots and branches wil make it hard to drive the stem into the hole.
Soak them in the hormone for a few seconds, remove them and lightly shove them into the hole you made, you should not poke the stem through the bottom of the cube!
Finally remove or trim any super big leaves on your cuttings... you really don't want big leaves, as they will make it harder for the plants to root... Lots of water is lost through the leaves.
Once all the cubes are in the tray, place a dome over them with poked air vents. NEVER MIST THE CUTTINGS. If you have to water them for some reason, water the tray, not the leaves or the cubes... the humidity should be 90-95% during the rooting proccess. If you spray them regularly like most books say to do, you are spoiling them, they will not root as quickly if they have water sitting on their leaves... you want them to have to work for their water, force them to make roots faster.
Place the trays, with their domes on, onto a heat mat set to 70-75F. Heat mat is crucial. You will not be able to clone well without one! I even have a theromostat, which was a worthwhile investment. Think about it, the XX-Large mat is about $60.00, the thermostat is about $40.00, for a total of $100.00. That mesely $100.00 will gaurentee you healthy clones forever, that is a CMEMORY gaurentee... buy the mat, buy the thermostat. Take control.

LIGHTING
I forgot to mention a very important part..(thx VT)! I place my trays under a shoplight with two 40w flourescent tubes, for a total of 80 watts. No CFLs are used, just shoplight flouros... they cover more area with low intensity light... and use less power for the space they effectively "light", although as I have said the light is not intense.. the shoplights are 8-12" from the tops of my fresh cuttings. This is more than enough light to bring roots, as the plants at this stage are not photosynthesizing hardly at all.

Updates to come, we should see 100% roots within 7 days.
I'll put up some new pics and more explanations as the questions roll in...
Hope this helps some folks!
I notice a lot of people having troubble with cloning, and I get a lot of questions on my technique... and since the wealth of information at OG is lost, I thought I'd do a little "How to Clone" thread.
Today I am taking 80 clones, the mothers were dosed up last night with a kelp and guano tea to help them survive the proccess a little better, plus the cuttings will have taken in some of the delicious juices to help them on their journey of making roots...
So here we go!!
I start by soaking Rockwool sheets in General Hydroponics 3 part Flora Series, at 2-2-2(grow-micro-bloom) ml per gallon. I use the rockwool sheets that have a 50 count per sheet. This gets my tap water to about 300 ppm, and a PH of ~ 6.2 roughly. PH is not too important during cloning, but it should be around the 5.8-6.4 range. I have a PH/TDS meter, but it is not needed if you stick to the 2-2-2 ml/gal.
The rockwool soaks in the GH solution for at least 1 hour, any longer is optional. Overnight is fine, and is my usual practice. I then collect my materials:
1) sharp scissors
2) poking thingy, a nail will work
3) exacto hobby knife
4) dip & grow rooting hormone, mixed to the "10x" concentration level.
5) iso alcohol for cleaning my utensils prior to use
I then remove each cube from the solution, and I shake out the excess moisture. This is important, Shake out the excess moisture!!! To do this, lightly move the cubes up and down firmly, as if shaking water off your hands after you have washed them.
Next, take your nail/pokey thing and drive a hole on the outside of the cube. Do not use the pre-made hole, poke your hole on the Outside area of the cube. There is more oxygen out here, and the cube breathes better here.. Place your finger beneath the nail/pokey and stop driving the nail as soon as you lightly feel it on the other side. Do not puncture through the cube!!!
Once all your cubes are shaked, and poked, you can start taking cuttings from your favorite mother plants. I take my cuttings from healthy, medium thick branches. cuts should be done with anything SHARP, I prefer these snip scissors. Take the cuttings at a 45 degree angle.
Immediatly dip the freshly cut end of the stem into your Dip&Grow rooting hormone, or whatever you have decided on. There are plenty of rooting hormones, and all of them work basically the same.
Remove all excess branches and new forming shoots on the first 1 inch of the stem... these small shoots and branches wil make it hard to drive the stem into the hole.
Soak them in the hormone for a few seconds, remove them and lightly shove them into the hole you made, you should not poke the stem through the bottom of the cube!
Finally remove or trim any super big leaves on your cuttings... you really don't want big leaves, as they will make it harder for the plants to root... Lots of water is lost through the leaves.
Once all the cubes are in the tray, place a dome over them with poked air vents. NEVER MIST THE CUTTINGS. If you have to water them for some reason, water the tray, not the leaves or the cubes... the humidity should be 90-95% during the rooting proccess. If you spray them regularly like most books say to do, you are spoiling them, they will not root as quickly if they have water sitting on their leaves... you want them to have to work for their water, force them to make roots faster.
Place the trays, with their domes on, onto a heat mat set to 70-75F. Heat mat is crucial. You will not be able to clone well without one! I even have a theromostat, which was a worthwhile investment. Think about it, the XX-Large mat is about $60.00, the thermostat is about $40.00, for a total of $100.00. That mesely $100.00 will gaurentee you healthy clones forever, that is a CMEMORY gaurentee... buy the mat, buy the thermostat. Take control.
LIGHTING
I forgot to mention a very important part..(thx VT)! I place my trays under a shoplight with two 40w flourescent tubes, for a total of 80 watts. No CFLs are used, just shoplight flouros... they cover more area with low intensity light... and use less power for the space they effectively "light", although as I have said the light is not intense.. the shoplights are 8-12" from the tops of my fresh cuttings. This is more than enough light to bring roots, as the plants at this stage are not photosynthesizing hardly at all.
Updates to come, we should see 100% roots within 7 days.
I'll put up some new pics and more explanations as the questions roll in...
Hope this helps some folks!

Last edited:


