
E
Elcap
Here we go ladies and gents. Welcome to my journal. Once upon a time I was an Overgrow student, a big fan of the Maliboo inspired Mills Pride cabinet scrogs. I tried one with some NL#5 and was amazed at how easy and high yielding the DWC hydro was. I'd always done soil and was never happy with the results.
Overgrow got me through that grow with flying colors as I documented it in real time. I vegged one plant for about a month then flowered for 57 days...yield was tremendous.
So this round two of documenting a single plant cabinet scrog. Feel free to ask questions or make suggestions. We're all here to learn after all. BTW, I am a legal mmj patient so you won't see alot of security measures in my activities.
System Basics:
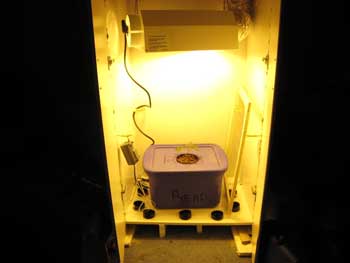
400w HPS, 6" vented hood, inline fan
30" x 20" melamine pre-fab cabinet from Home Depot
Screen of Green, single plant
Deep water culture hydroponics, using Lucas formula and Gen Hydro
First, I had to locate a desirable clone. Now I'm a sativa lover at heart. I prefer stuff like Hawaiian Snow, SSH, lambsbread, and hazy crosses like Blue Dream. But with a cabinet indoor grow, that doesn't work, so indica it will be. Around here, there is good choice. I wanted a branchy indica dom suited to indoor height restrictions and not overly smelly. I prefer NL#5 because it's a good, potent strain with relatively low odor and it is hard to kill, very forgiving of errors. It's also in the lineage of tons of "strain of the week" things. Since NL#5 hasn't been in vogue since about the mid 90s, I narrowed my choices to Bubblegum, ChemDawg, and Shiva Skunk (which is a NL#5 x SKunk#1). ChemDawg got the nod since I haven't smoked much diesel and enjoy a complex bouquet.
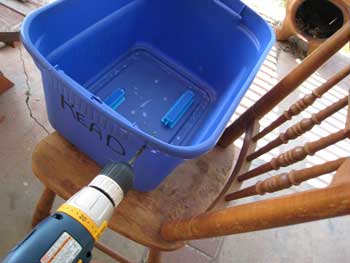
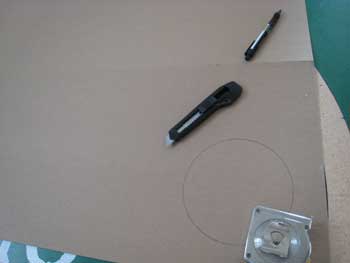
But first we have to put the system together, so let's get started. First I'll need a reservoir. A plastic storage tub works well, preferably a dark one to keep out light (light will encourage algae growth=bad).
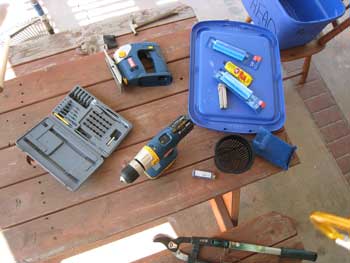
First, the supplies:
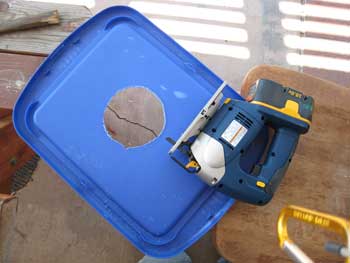
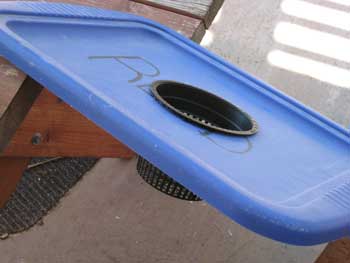
I glue in the airstones, drill out a couple of holes for the air tubing, and cut out the hole for the netpot using a cordless jigsaw. This was much easier than cutting it by hand with a knife, but you better be decent with the jigsaw as it's hard to control on the wiggly plastic. This res holds about 6 gal with the water level hitting the bottom of the netpot, and about 5 gal where I will run it for the majority of the grow (a few inches below the netpot)
With the glue on the airstones drying, I start putting the cabinet together.
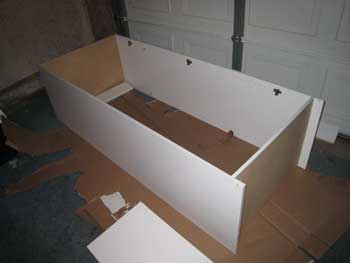
Cut out a vent hole in the back of the cabinet. I just use the flimsy cardboard piece that comes with it and cut the hole in that. I also add some L-brackets to the cabinet to increase stability since it doesn't have a real back.
With the cabinet mostly assembled, I use a 3" hole saw and cut a bunch of holes in the floor for my air intake. You ideally want a greater area in the intake compared to the outflow, which is a 6" vent off the light hood in this case. I can't quite get there with my number of holes (takes alot of 2.5" holes to equal the same area as one 6" hole). But my inline fan is way overkill, I only run it half speed at most anyway and I prefer a little negative pressure in the cabinet. In those holes, I insert 90degree black ABS elbows as light traps. Not really necessary to do that I don't think, but it makes the cabinet less conspicous since it's not blowing tons of light out the bottom. My screen is suspened from some hooks made to hang brooms and rakes and such...basically a "u" shaped deal with a coarse thread screw on the end. I also hang the air pump from that to cut down on transmitted vibration and keep it off the ground in case of water leak and to cut down on dirt in the filter. I screwed a couple of hooks into the top piece to hang the chain/lamp from, pre-drill a couple of pilot holes about 1/8" smaller diameter than the hook's screw ends and and just screw them in.
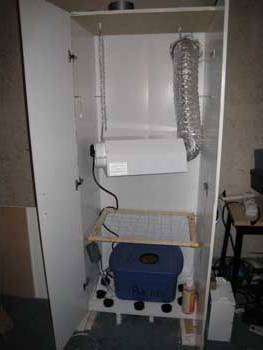
You'll notice the screen, the aquarium air pump also on the left, ballast is on the right outside the cab. Here's the screen:
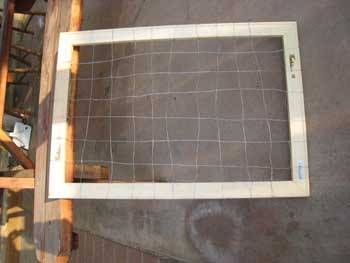
The openings are about 2.5" x 2.5". At any craft store you can get frame elements pre-cut to a bunch of different sizes with corners that you just mesh together. They use them for needlepoint or stretching canvas over. My cab is 30x20 and I got two each frame arms of 26 and 18. Grab a spool of light flexible wire, also at the craft shop, and make your screen.
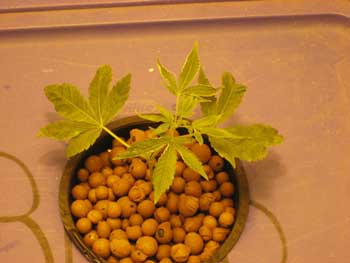
Finally, get your nutes mixed up and your pH adjusted. Mine is starting at 5.9 pH and 735ppm (starting water is 190ish). Get your timers set, and get your baby in there.
ChemDawg, Day 1 (today):
Ahhh-ight fellas, we're off and running. Let's see how this turns out.
Overgrow got me through that grow with flying colors as I documented it in real time. I vegged one plant for about a month then flowered for 57 days...yield was tremendous.
So this round two of documenting a single plant cabinet scrog. Feel free to ask questions or make suggestions. We're all here to learn after all. BTW, I am a legal mmj patient so you won't see alot of security measures in my activities.
System Basics:
400w HPS, 6" vented hood, inline fan
30" x 20" melamine pre-fab cabinet from Home Depot
Screen of Green, single plant
Deep water culture hydroponics, using Lucas formula and Gen Hydro
First, I had to locate a desirable clone. Now I'm a sativa lover at heart. I prefer stuff like Hawaiian Snow, SSH, lambsbread, and hazy crosses like Blue Dream. But with a cabinet indoor grow, that doesn't work, so indica it will be. Around here, there is good choice. I wanted a branchy indica dom suited to indoor height restrictions and not overly smelly. I prefer NL#5 because it's a good, potent strain with relatively low odor and it is hard to kill, very forgiving of errors. It's also in the lineage of tons of "strain of the week" things. Since NL#5 hasn't been in vogue since about the mid 90s, I narrowed my choices to Bubblegum, ChemDawg, and Shiva Skunk (which is a NL#5 x SKunk#1). ChemDawg got the nod since I haven't smoked much diesel and enjoy a complex bouquet.
But first we have to put the system together, so let's get started. First I'll need a reservoir. A plastic storage tub works well, preferably a dark one to keep out light (light will encourage algae growth=bad).
First, the supplies:
I glue in the airstones, drill out a couple of holes for the air tubing, and cut out the hole for the netpot using a cordless jigsaw. This was much easier than cutting it by hand with a knife, but you better be decent with the jigsaw as it's hard to control on the wiggly plastic. This res holds about 6 gal with the water level hitting the bottom of the netpot, and about 5 gal where I will run it for the majority of the grow (a few inches below the netpot)
With the glue on the airstones drying, I start putting the cabinet together.
Cut out a vent hole in the back of the cabinet. I just use the flimsy cardboard piece that comes with it and cut the hole in that. I also add some L-brackets to the cabinet to increase stability since it doesn't have a real back.
With the cabinet mostly assembled, I use a 3" hole saw and cut a bunch of holes in the floor for my air intake. You ideally want a greater area in the intake compared to the outflow, which is a 6" vent off the light hood in this case. I can't quite get there with my number of holes (takes alot of 2.5" holes to equal the same area as one 6" hole). But my inline fan is way overkill, I only run it half speed at most anyway and I prefer a little negative pressure in the cabinet. In those holes, I insert 90degree black ABS elbows as light traps. Not really necessary to do that I don't think, but it makes the cabinet less conspicous since it's not blowing tons of light out the bottom. My screen is suspened from some hooks made to hang brooms and rakes and such...basically a "u" shaped deal with a coarse thread screw on the end. I also hang the air pump from that to cut down on transmitted vibration and keep it off the ground in case of water leak and to cut down on dirt in the filter. I screwed a couple of hooks into the top piece to hang the chain/lamp from, pre-drill a couple of pilot holes about 1/8" smaller diameter than the hook's screw ends and and just screw them in.
You'll notice the screen, the aquarium air pump also on the left, ballast is on the right outside the cab. Here's the screen:
The openings are about 2.5" x 2.5". At any craft store you can get frame elements pre-cut to a bunch of different sizes with corners that you just mesh together. They use them for needlepoint or stretching canvas over. My cab is 30x20 and I got two each frame arms of 26 and 18. Grab a spool of light flexible wire, also at the craft shop, and make your screen.
Finally, get your nutes mixed up and your pH adjusted. Mine is starting at 5.9 pH and 735ppm (starting water is 190ish). Get your timers set, and get your baby in there.
ChemDawg, Day 1 (today):
Ahhh-ight fellas, we're off and running. Let's see how this turns out.


 Keep it coming! Momma said I have to be sneaky, this looks pretty sneaky! I will be watching and waiting.
")


