FishmanK
Member
This is a post I put up several years ago on another forum ~ I wanted to share
Happy 2016 Season to all!
(Hi & Good Luck [FONT=Arial, Helvetica, sans-serif]Revolutionary9!)[/FONT]
An inexpensive and efficient way to vegg your starts to prep them for outdoor growing
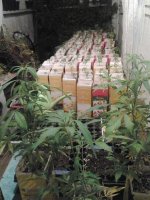
I wanted to share this method I've been using for a few years now. I get starts in rockwool blocks from other growers who are mostly working indoors, and plant them with this method in wax-paper container blanks manufatured to hold milk, juice or other liquids. These 1/2 gallon container blanks (hereafter referred to as "sleeves") have not yet been fully prepped for use as milk or juice containers. They are available for purchase by the case in lots of 144 sleeves.


I use duct tape to cover the hole where the screw cap would be mounted if they were used for juice. Laying them out in a line and using one piece of tape then slicing with a carpet knife to separate them is fast and gives a good surface to use for labelling w a sharpie pen.
The bottom folds in and a small tab catches and holds it closed.

getting the fold just right helps the sleeve stand straight.

@ the cost of $23 per gross (144 sleeves) gives a cost per sleeve of around 16¢ per sleeve!
UPDATE 2016 season!
Caes now over 300 sleeves for just over $20
Clones can be vegged out to more than 2 feet tall before the roots start to get "bound". This can give an outdoor grower a head-start on the season with a small greenhouse or a sunporch, especially if, like I do you have such a space at the coast.

When you are ready to transplant to the field, the bottom unfolds and the sleeve can be tugged upwards while holding your hand under. This sets the soil inside down to the lower edge of the opened sleeve. The roots are then easy to open up if bound. After putting in place into a grow bag or growing bed, soil can be placed to 1/2 way up the sleeve before it is gently tugged up and over the plant, leaving the roots completely undisturbed and eliminating transplant shock.
The duct tape takes ink well for labelling and then I can also keep track of which side should face north when they are moved around, thus eliminating re-orienting the plants (which causes them to pause in their growth). Keeping the label facing north prevents fading the ink from sunshine exposure.
The square shape allows overhead watering without losing the nutrients and warmed water through the gaps round containers have.
I was taught this method by a large-scale grower in Mendo CO, california (shout out to Psycho Kieth). These sleeves are used by the grape growing farmers for their starts. I have purchased the ones I've used from the mendo county farm supply in Ukiah, CA.
Happy 2016 Season to all!
(Hi & Good Luck [FONT=Arial, Helvetica, sans-serif]Revolutionary9!)[/FONT]
An inexpensive and efficient way to vegg your starts to prep them for outdoor growing
I wanted to share this method I've been using for a few years now. I get starts in rockwool blocks from other growers who are mostly working indoors, and plant them with this method in wax-paper container blanks manufatured to hold milk, juice or other liquids. These 1/2 gallon container blanks (hereafter referred to as "sleeves") have not yet been fully prepped for use as milk or juice containers. They are available for purchase by the case in lots of 144 sleeves.

I use duct tape to cover the hole where the screw cap would be mounted if they were used for juice. Laying them out in a line and using one piece of tape then slicing with a carpet knife to separate them is fast and gives a good surface to use for labelling w a sharpie pen.
The bottom folds in and a small tab catches and holds it closed.

getting the fold just right helps the sleeve stand straight.

@ the cost of $23 per gross (144 sleeves) gives a cost per sleeve of around 16¢ per sleeve!
UPDATE 2016 season!
Caes now over 300 sleeves for just over $20
Clones can be vegged out to more than 2 feet tall before the roots start to get "bound". This can give an outdoor grower a head-start on the season with a small greenhouse or a sunporch, especially if, like I do you have such a space at the coast.

When you are ready to transplant to the field, the bottom unfolds and the sleeve can be tugged upwards while holding your hand under. This sets the soil inside down to the lower edge of the opened sleeve. The roots are then easy to open up if bound. After putting in place into a grow bag or growing bed, soil can be placed to 1/2 way up the sleeve before it is gently tugged up and over the plant, leaving the roots completely undisturbed and eliminating transplant shock.
The duct tape takes ink well for labelling and then I can also keep track of which side should face north when they are moved around, thus eliminating re-orienting the plants (which causes them to pause in their growth). Keeping the label facing north prevents fading the ink from sunshine exposure.
The square shape allows overhead watering without losing the nutrients and warmed water through the gaps round containers have.
I was taught this method by a large-scale grower in Mendo CO, california (shout out to Psycho Kieth). These sleeves are used by the grape growing farmers for their starts. I have purchased the ones I've used from the mendo county farm supply in Ukiah, CA.


