What's new
  • ICMag with help from Landrace Warden and The Vault is running a NEW contest in November! You can check it here. Prizes are seeds & forum premium access. Come join in!

Red_Greenery's Handyman's DIY Grow Tub

G

Guest

Hey there Micro-growers, welcome to the Lodge! Pull up a chair and stay awhile. As they say, if the women don't find you handsome, they better find you handy.

I'd like to show you my little creation made with lot's of love and duct tape. My design is unique so if you've seen it before, that was probably me in another lifetime!

I'm not the first guy to make a growbox from stacked tubs. I've added enhancements to the basic design to have all features that the large cabinet growers are successfully implementing.

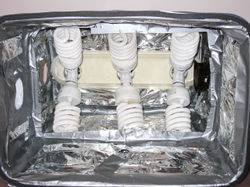
My growbox uses 6 x 42W CFL lights for 252W @ 100W/sqft. The growchamber and lightbox areas are separately ventilated similar to using a cooltube or vented hood. The lightchamber is cooled with a single computer fan. An activated carbon scrubber with a built in fan, removes air from the grow chamber to maintain total steath. I also manipulate the plant with screen of green, SCROG, to manage plant height and to maximize yield.

My growbox can be easily constructed using inexpensive household/hardware store items. Rubbermaids make really good growboxes. They can be easily cut with a utility knife and drilled and they are only worth $6 so if you make a mistake, get another one and start over. You can tuck it in a closet or down the basement. All the parts can be bought at Walmart or Home Depot. I also use fertilizers that can be bought at the grocery or hardware store too.
 
Last edited:
G

Guest

Grow Box Construction


Top Box

A 3 socket bathroom vanity fixuture is installed into the top box. To the right is a computer fan to exhaust the lights. Three exhaust holes and one intake are cut into the box. The intake for the lighting section is 5" x 5". It's very important to size the area of the intake to twice the exhaust to get maximum air flow from the fan.

I assembled all the parts then took everything apart before duct taping the emergency blanket to the inside of the box. Weather stripping is added to the edge of the box for a light seal and to keep the boxes from siding when stacked.

The inside can be painted as well. Use Krylon Fusion paint for plastic. Apply two coats of black paint first and then 2 coats of white. The tubs are a bit transparent and will glow if you only use white paint.

The acrylic light shield is laid on top of the lights and sealed with duct tape. Don't worry about the heat from the lights, CFL's don't run very hot.

Bottom Box

Two intakes are cut into the bottom box the same size as the dryer duct. The inside is lined with emergency blanket and weatherstripping is added to the edge.


Last edited:
G

Guest

Carbon Air Filter

My air filter uses two Sterilite containers. The small one must fit inside the large one.

The bottom is cut out of the small tub, I left a small rib in the center to support the screening.
Glue the window screen in place with the epoxy.

The lid of the large box is cut so that the small box with fit into it.

Intake holes are cut into the large box and the dryer adapters are fitted onto it. You can just duct tape it to the side if you don't have the adapters. This is probably the first time that duct tape is actually used for it's intended purpose. The flap is removed from the dryer adapter and I use a hack saw to trim off the pipe on one side.

A computer fan and a dryer hose adapter is fitted onto the lid of the small box.

When the filter is all assembled, I take silicone caulking and seal up crack where the small box goes into the large box lid.

My setup uses 1/2 lb of activated charcoal for a filter depth of 1" that I buy at the pet store. The 1" layer is good for the whole grow.


Last edited:
G

Guest

Assembled Growbox

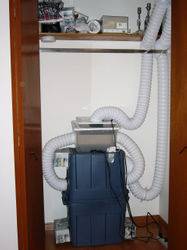
Here is the growbox all put together.

I've used Kleenex boxes duct taped to the side of the growbox to act as light traps. The lighting heat is exhausted through dryer duct to the crack above the closet door.

Dryer duct is used to ventilate the box to the scrubber and then from the scrubber to above the closet door. The ducting is just duct taped to the side to the box. I leave a lot of slack in the dryer hose so I can take the top box off and set it aside.

This set up is very stealthy since the computer fans made virtually no noise and the fans are installed inside of the both the growbox and the filter. The ventilation works all on negative pressure, so all the smelly air is filtered.

Technical Details:

Anyone can stick some lights in a box but it's up to the ventilation system to make it work right. The basic rule for ventilation is that the intake area must be 2x the exhaust area otherwise the air flow will be restricted.

The lighting chamber is cooled by a computer fan pushing about 38 CFM. The exhaust air comes out at about 82-84F, but there is little heat transferred to the grow chamber. The lights run about 90F inside the lighting chamber.

The grow area of the box is ventilated by the scrubber with about 10-15 CFM. The air temperature exhausted is about 1-2 F above ambient. The air exchange rate is optimal to provide fresh air to the plants while not stressing the plants out by drying from too much air flow.


Last edited:
G

Guest

Drying Box

Here's my eazy to make drying box. I take a hanging file rack and tie some strings across for closelines and stick it in a rubbermaid tub with an intake hole cut in the bottom. I cut a hole in the lid and duct tape a Hamilton Beach Tru Air filter.

I also refill the filter cartridge with activated charcoal. Just cut a slit in the blue filter cloth, shake out the old stuff and fill 'er up again for pennies. Cover the slit with duct tape and you're in business.
 
Last edited:

JARofHERB

Member
HOLY SHIZAT.....
Woah man, nice rubbermaid grow box.. Such an innovative ventilation system..Fuc$ing cool man..Nice grow..
 

bounty29

Custom User Title
Veteran
That's an awesome design and grow, I love the ingenuity. How many cubic feet of air are in that box? I've got a 2'x2'x4' that I'm gonna be growing in, and I'm wondering if I could set up a carbon filter like that, I really like that design. You say yours works fine with a normal computer fan? I'd get a high power computer fan because of the increased space, I just didn't know if it'd be enough to pull through the carbon. I was thinking I could get an 84cfm fan for that, and then use another one for an aircooled hood for a 250w HPS. Interesting... I love how each time somebody posts their grow, it adds to and changes my design, I can't wait until everything is finally together!
 

stonerpanda

New member
Kevvie from OG?? Glad to see you back, passing around that great design. I must have stared at those pictures for hours... the tissue-box light traps, the bathroom light fixture, rubbermaid carbon filter, this is a masterpiece of DIY. K+... er... i mean...
 

watermelon

Member
i like your design. me and a friend are planning to make somthing similar this weekend.

the plants look great, how far are the plants from the lights? yeild?
 
G

Guest

Hey guys, thanks for dropping in. It's nice to see some friendly faces like StonerPanda from the old OG micro crew. I'm pretty happy you guys like my rubbermaids.

Bounty29 - Here's the technical specs on the growbox.

Rubbermaid Roughnecjk 18 Gal, 68l 16h x 24l x 16h. When stacked together there is about 26" of height below the lights for growspace.

I have room for 2 plants using 8" pots or a single 10" pot. The SCROG technique is excellent to for control height and maximize yeild.

The lighting can be adjusted by changing bulbs. I usually run 6 x 26W @ 75 W/sqft for vegetation and 6 x 42W @100W/sqft for flowering.

To grow nice plants, about 30 w/sqft is needed for vegetation and 50w/sq ft for flowering.

Don't worry too much about the lighting if you're first starting out. Set up for around 50 w/sqft and work on your gardening skills, increase the lighting as you progress.

CFL lighting is very good for microgrowing because the heat output is low compared to HPS or MH. CFL's produce heat that is transferred to the surroundings by convection and conduction, mostly by heating the air around the lights. CFL's produce little radiant heat. If you can isolate the lights from the growchamber using a sheet of glass or plexiglass all of the heat can be easily be removed from the lighting chamber and the growbox stays cool.

To cool a CFL lighted area, about 0.3 CFM * lighting watts will keep the temperature within 10 degrees F of the ambient temperature.

HPS lighting requires about 1.0 CFM * lighting watts to get the same results. Also with HPS lighting, because the light is reddish, there is a lot of radiant heat. I don't recommend going the HPS route with this box due to it's small size and added difficulty to cool. I've looked at lot's of grows and this growbox using 252CFL watts is slightly better than a 150 HPS but not comparable to 250HPS.

With any lighting system, try to cool the lights separately from the growchamber. An air scrubber is a real big restriction on the air flow. I see a lot of single fan designs that put all the cooling air through the scrubber which is a big design flaw (imho). A scrubber works best when the air trickles through it. If you try to do the lights and scrubber with one fan, you end up with a huge noisy fan and an oversized scrubber.

The growspace takes up about 10 cubic feet with the air exchanged at 10-15 CFM which is exhaused through the scrubber. The air is changed out once per minute or better.

 
Last edited:
G

Guest

stonerpanda said:
Kevvie from OG?? Glad to see you back

I knew I'd seen those plants before.

amazing box man. refresh my memory as to what kind of yield your getting?
and what strain is that schromberry or something right?

edit: 1.5 oz not bad :chin: :bongsmi:
 
Last edited:

paulok2000

New member
the boxs look nice. what are the indvidual wattages of the lights, im guessing 42 (252 / 6)
The red green show is so funny, did you see the one where they make an air hockey table out of dryers?
 
awesome.. welcome 2 icmag. hope 2 see some grows in that rubbermaid soon.

ps. how much does it cost to put together this setup?
 
Last edited:
G

Guest

Hey Makavellian,

that's a good question. Just how much does it cost to put together this setup, honestly I couldn't tell you cause it's mostly make up of old junk.

Let's see...

3 Rubbermaid tubs - $6 each so that's $18 Total
A 3 fixture vanity light $12 from home depot
2 computer fans from scrapped computers. - $15 each from Radio Shak
2 plastic boxes with lids - $4 each
15 feet of 4" ducting - $11
Emergency Blanket - $3
A couple rolls of duct tape - $3
various bits and pieces $10

So how does $86 bucks sound? I actually built if for less because I scrounged up most of the junk.

I picked up two pack of 3x26W cfl for $15 and the 6X42W were $6 each so the lighting total is $15+$36 = $51

The grand total is $137 including lights for both veg and grow.


Hey guys how about a challenge? Try to make this box and grow more than 3oz of weed for under $100.

Who will take up the gauntlet?
 
Last edited:

bounty29

Custom User Title
Veteran
Wow that price list makes this look even nicer than I thought. Where do you get your CFLs? Everywhere I go they're either a lot more expensive than that, or they don't have anything above like 26w. I'd really like to get some 42w, and I can only find them online for like $12 each.
 
Last edited:

Latest posts

Latest posts

Top