What's new
  • As of today ICMag has his own Discord server. In this Discord server you can chat, talk with eachother, listen to music, share stories and pictures...and much more. Join now and let's grow together! Join ICMag Discord here! More details in this thread here: here.

Assistance with Cabinet Design

alt789

New member
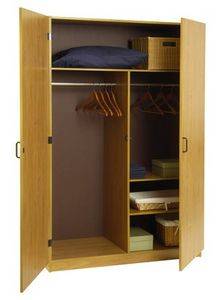
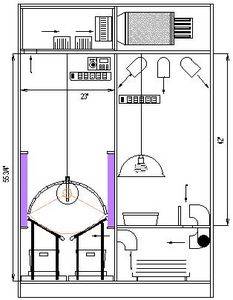
Ok,I'm considering building a cab from a Mill's Pride, or similar, cabinet. I want this cabinet to be all inclusive. Hopefully I can cram a Veg. chamber at the top, maybe by partitioning off part of the top of the cabinet and use the other partition for exhaust/scrubber and use the rest of the cabinet for flowering. Anyone have any advise for a setup like this? I am not entirely sure that I would have enough room to shove everything in the cabinet :confused:
I would like to use a 400watt cmh light for the flower. Some floros for the veg. and a 4in"/6in" fan for exhaust along with a carbon scrubber. The cabinet would be around 6' x 24" x 30" give or take a few inches.​
I'm drawing up some kinda plans now, I'll post them soon, but I would just like a heads up on some problems I may run into or any advice anyone might have. Thanks in advance!​
 

breeder

Member
BTW....
pay no attention to the mess. It's all tidy-up now.
i run a 250, but i'm sure a 400 could do the job as well. i have my blower on a speed control, and it's only set at 25% keep the temp about 72f. My house runs about 68f so thats pretty damn good if i say so myself. i can park that light 3 inches from the canopy. Hell i can even bleach my plants damn near white without causing any burns if i really wanted too....lol. been there...done that.
The blower is a 350cfm. sitting atop is my carbon scrubber. Direct fit...yea!
I always ened up building boxes with oak, or birch, but when i went to homedepot i seen this cab and thought....hmmmm.
Well this is pretty much what you'll get.
the white bar the runs across is nothing at all, it just came with it. ment for hangin clothes as such. i just couldn't bring myself to throw it out. So for right now i justify this telling myself it aids in support, as the middle shelf is ment to be there, but i use that on the floor. The bottom is drilled with a holesaw to allow air in. this middle shelf i cut just abit smaller, and lifted it about an inch or so.
hope you find it helpfull.
 

alt789

New member
Ahah, thats sweet! That is exactly what I was planning on doing! :jump: Heck, I'm not even going to post my "blueprints" anymore I'm just going to have to borrow your cabinet design now. :bow:

Your cabinet is great! From what I see it looks like everything is all boxed-up nicely. Nice job!

FreezerBoy thanks for the headup's. I looked over that thread but didn't see, or completely missed, anything exactly like I was planning to do.
 
Last edited:
alt what up!

WAIT! don't jump the gun just yet! i'm vertical in a cab and so far it's been easy!!!! why not save some space right?

if you were looking for something a little smaller....


day10 veg

no numbers as this is my first run but it's looking to be nice. gotta diary link in my sig.

i felt that it would be out of place to have a big ass cab sitting in a bedroom, my cab is intended for a computer. grow space is for the monitor, res is where the tower should be, and the veg chamber is for a printer. didn't use the keyboard stuff but still got the rollers for a future use.

BTW i have a full square yard of canopy! but if your set on the mills pride cab just imagine what 400w would do if it traveled on a mover up and down.... tubes/plants in the corners and about 3 square yards of canopy sound appealing? shoot.... i might just go get one to show how to make a "cash cab" lol. oh crap! how bout 2 flipped and flopped! now that's just getting retarded efficient. we should have a challenge to see what can be pulled with a single 400w ballast. with competition involved i wouldn't sleep for a month. i bet i can smoke(figuratively and literally) 1g/w with the right genetics. lol there only like $20 a month to run non-stop. room full of these and watch the fuck out! work wise and yield wise.

wow, half way through a bowl completely covered in oil i realized... i'm on like chapter 3 of the book on bullshit. :rant:

my bad, get @ me if you are interested in my input. i'd love to help.
 

breeder

Member
glad you like it bud.
Let me know if yea need any help.
I paid $100. for the cab. It's homedepot latest and greatest. So i'm sure you can walk in any of them and find one. Although it's not a mills pride. It seem that all the HD in my area have gotten rid of mills pride, or they changed the name. but either way it's still the same...6' tall, 2.5' wide, and 2' depth.
you have 2 options for the top shelf. one being higher then the other. I've went for the lower option to allow more head room for the mother/clone area. even with a 400hps i think this option would still be better suited as the head room in the flower area is perfect. more then enough room.
mother area i think is roughly 18"+in height. I got some beans in their now in 16oz solo cups i and still have to prop up the cups in order to reach the light so....plenty of room in this cab. Not to big, not to small :headbange
as you can see in the photo, i've duct taped my heating pad in place. not an option you have to take, but it works out nice.
yea, i have to say, i'm glad i went this route.
as i said before, i alway end up building boxes from raw materail..ergo birch, or oak 3/4". and it's a pain in the arse! the finished product is very nice though. however i'm gettin to old to keep bangin out new boxes. i just want to get growin :joint:
 

hoosierdaddy

Active member
ICMag Donor
Veteran
No matter what...airflow, airflow, airflow. It makes or breaks a good cab.
I am currently only using on 230cfm 6" inline duct fan ($27 Home De'pot), and it does a great job keeping temps workable when my garage goes no more than 65F. It needs more when the temps go higher. A thermostat from Lowes (+/- $19) can turn on the additional fan when needed.
When the scrubber is mounted, my cab is 100% silent. I have to put my ear to the side to hear it. Without the scrubber, my computer is louder and masks the sound of the cab.
 

alt789

New member
Lol, stke_fingas, I haven't even built the cabinet yet and I'm already being challenged! :biglaugh: I think, at least for my first cabinet grow/build, I have to stick w/the pre-built cabinet. But I will be looking more into vertical growing, 1square yard grow canopy in that small of a space is amazing! But I will be posting a grow log when I start this thing up and I'll make sure to post how much I pulled :joint:.

Breeder, yeah apparently many HomeDepots quit carrying the MillsPride line of cabinets. Though they did replace them with CabinetMaid, which looks almost the same at the MP's. But like I said your cabinet was exactly what I was planning, when I saw your cab it was like a sign telling me to build it haha. :headbange

hoosierdaddy, yeah, i've been wavering on what to get, a 4" or 6", not sure if a 4" would cool the cabinet enough with a 400watt in it :confused: I think there's a formula for calculating that, just gotta find it! :biglaugh:
 

hoosierdaddy

Active member
ICMag Donor
Veteran
If you do inline duct fans, the 6" is only a couple gilders more than the 4".
I would highly suggest looking into the Panasonic quiet fans thread that Bulenath has posted. http://www.icmag.com/ic/showthread.php?t=45196

I feel this is the way I will be going very soon when temps raise in my garage. I want to keep from using AC if I can.
 
Hope this isn't thread jacking but I noticed this thread and found that breeder is using the same cab I have from home depot. I was planning to do something similar, but mine is not put together perfectly. There are some areas for light leaks...and I'm also concerned about light leaks coming from a veg area in the top of the cabinet. How did you prevent this? I was thinking of totally separating the veg and flower areas off with panda plastic, but it looks like you're doing ok without the effort.

79
 
that aluminum duct tape will block all light leaks, put it on all the cracks that leak. put foam around all doors and you got it lightproof. very simple.
 

DiscoDuck

Member
seventynine said:
Hope this isn't thread jacking but I noticed this thread and found that breeder is using the same cab I have from home depot. I was planning to do something similar, but mine is not put together perfectly. There are some areas for light leaks...and I'm also concerned about light leaks coming from a veg area in the top of the cabinet. How did you prevent this? I was thinking of totally separating the veg and flower areas off with panda plastic, but it looks like you're doing ok without the effort.

79

panda plastic will work!

lots of folks use thin weather stripping on the edges of the boards before putting the cabinet together. every joint in the box has a strip to block light and seal air. this makes it convenient if you ever have to take the box apart because the joints aren't glued/caulked together.

if the box is already assembled, you can use caulk to seal the joints of the box. if you have to take it apart for any reason in the future, apply caulking sparingly or you'll have a big mess to clean up. don't use caulking guns, you'll get in a bind in the corners. buy a tube of caulk in the toothpaste looking tube and you'll be able to drive circles around a gun. much neater job too.

the fasteners and hinges for the doors are adjustable, allowing you to fine tune the fit of the doors over the openings. before you put the doors on, get weather stripping from the hardware store. the thickness of the weather stripping depends on how wide the gap is between the doors and the cab. get the foam type, this stuff will crush where necessary and allow the door to close parallel against the cab panel, blocking light and sealing air. if your stripping is too thick, this may cause the door to close other than parallel and lead to additional light leaks. if your stripping is too thin you can apply to the door and door face, doubling the thickness of the strip.

now, for the gap between the two doors, I've seen folks buy the thick 3/8" stripping to fill the gap between the doors. it sticks to one door and faces against the other. another option is to buy right angle aluminum trim from the hardware store. install the trim with the angle against the leaking light. the bad thing about this option is you may have to weather strip the aluminum trim. hope this helps.

about fans and temps, the recommendation for panasonic quiet fans is a good one. hope you don't mind me suggesting this but your intake works best on the bottom panel of the box. if you can't drill holes through the bottom panel, consider putting them as low as possible on the back panel. your exhaust air will be considerably hotter than the intake air. it's necessary to locate the two as far apart from each other as possible, otherwise you may need an intake duct that keeps the two from mixing.
 
Last edited:

breeder

Member
seventynine...
Hey bud, well to answer your ?....
I have no leaks anywhere! First off...not to step on anybody's toe's in here, but a caulk gun is perfectly fine to use. Companys don't make the guns because they don't work...know what i mean?
The trick is to lay out a small even bead. Then you can use a spreader, or in my case just use the tip of your finger to run down over the bead to smooth it out. However I have to say that with this cabinet I was surprized because I didn't have to use any. Not a single bead of caulk on this cabby!
For a $100. this cabinet is well worth the price.
As i've stated before...I use to build furniture, large/small sailboats, r/c aircraft, even bows...lol.
Neway....with these type's of cab's, all the wood is MDF grade, so always taking it apart and putting it back together over and over will start to wear out the joints. So if yours is already together, and it's not perfectly aligned or has shoty mill-work, then I'd just leave it as is and use the other suggestion that was givin to you, which was the use of duct tape. True duct tape. Not that cheap grey stuff. Actuall duct tape is completly light proof and extremly tacky, not to mention reflective. I use it for rubbermaids and the like. IMO it's WAY better then using the white paint that I see folks using for their rubbermaids. Problem is you only get one shot with it. Thats how tacky it is! Tough as nails though. You can't rip it, so you'll need a sharp blade.
As far as the clone area...(top shelf), i've put in 3 holes through the back of the cabinet. There 2" a piece, located at the top of the back. You know the cheapy card board. Well i've split the top area into 2. I did this and put in a small powerfull PC fan that blows into the utility area. Thats it. I run 2 26w daylight spectrum bulbs, and a 10w daylight. It all works out fine! No light leaks or anything of the sort.
I thought for sure though I would have problems with the doors not matching up. Low and behold...no problems there either. However it was VERY tricky to get them aligned right. But with enough fiddling around that to was set right. It really is a pain in the ass though to get it right.
Again there are a number of ways to go around this if ya need too. One of the best ways is to grab whats called Aluminum T channel. It's nothing more then a piece of 6061T6 Aluminum...(otherwise known as aircraft aluminum). Both homedepot, and Lowe's carry small amounts of it. Grab a 6' piece and drill some holes into it, and attach it to one of the doors.
If for some reason such as temp. and humidi. over time happen to change the alignment of my doors I'll prolly take care of it with that. But like I said there many alternative's for something like that. Thats just the one thats at the top of my head right now.
The flowering area is ventilated with the intake on the bottom. There again I used my hole-saw and put in some holes on the bottom floor. As you know the bottom of these cabs are hollow. Roughly 2" of clearance down there (underneth). In my photo you don't see the holes because I used what should have been the middle shelf as my floor. This piece sits atop of 2 1"x2", and is cut abit smaller so the airflow is capeable. Hope that makes sense to ya? I also have another PC fan that blows into into this area. It's set at canopy level. So with that fan running and my 250hps on, my inline is only running at 25%, and I keep things cool.
Hope that helps bud.
 

Latest posts

Latest posts

Top